Dennco2, realizing that we’re talking about a GR, not a GS, I have no Idea how much, if any of what I wrote is applicable.
-
Required reading for all forum users!!!
Welcome!
Register to access the full functionality of the GSResources forum. Until you register and activate your account you will not have full forum access, nor will you be able to post or reply to messages.A note to new registrants...
All new forum registrations must be activated via email before you have full access to the forum.A Special Note about Email accounts!
DO NOT SIGN UP USING hotmail, outlook, gmx, sbcglobal, att, bellsouth or email.com. They delete our forum signup emails.A note to old forum members...
I receive numerous requests from people who can no longer log in because their accounts were deleted. As mentioned in the forum FAQ, user accounts are deleted if you haven't logged in for the past 6 months. If you can't log in, then create a new forum account. If you don't get an error message, then check your email account for an activation message. If you get a message stating that the email address is already in use, then your account still exists so follow the instructions in the forum FAQ for resetting your password.Have you forgotten your password or have a new email address? Then read the forum FAQ for details on how to reset it.
Any email requests for "can't log in anymore" problems or "lost my password" problems will be deleted. Read the forum FAQ and follow the instructions there - that's what we have one for...
-
Returning Visitors
If you are a returning visitor who never received your confirmation email, then odds are your email provider is blockinig emails from our server. The only thing that can be done to get around this is you will have to try creating another forum account using an email address from another domain.
If you are a returning visitor to the forum and can't log in using your old forum name and password but used to be able to then chances are your account is deleted. Purges of the databases are done regularly. You will have to create a new forum account and you should be all set.
You are using an out of date browser. It may not display this or other websites correctly.
You should upgrade or use an alternative browser.
You should upgrade or use an alternative browser.
Suzuki GR (almost GS) 2 cyl Tempter is charging low .. and coil question
- Thread starter dennco2
- Start date
I am attempting to make progress changing out my R/R to the sh775. I pulled the old one off it's 5 pin stock connector and decided to grind off the plastic on ONE side .... to have something to solder 5 new strands of 16 gauge wires that will be going to the sh775 when I get that far. Looks like I should get those recommended matching plugs. The sh775 will be within 6 inches of the old one for the connectors. The stock old wires are NOT lined up in sequential order and the red and B/W ground wire are on opposite ends. I have read quite a bit on this GSR forum ... and learned a lot but when I look at my stock bike, I see variations of what I hoping to see. The picture is just a mock up of related parts ... not in final position.
View attachment 63032
I like how the Triumph reg/rect. plug pt.#T2500676 wire harness/connector which is available through a Triumph dealer is a direct plug-into the SH775 although the other two Triumph wire harness plugs(which come with the special harness)need to be trimmed-off for adapting to our Suzukis.I have also connected an Sh775 using 5) individual female spade connectors.
Last edited:
dennco2
Forum Mentor
I?m no expert, and I?ve been through what you?re going through exactly one time. The green wire looks heavy enough to me, and the connection to the frame looks like it?s probably OK. In order to be a single point ground, your other ground wires would all collect the that single point, hence the name. Another common mountain point is the starter solenoid mounting screw. Again, this is one common configuration. Like so:

As for the connections to the RR, the Triumph connector is great. I used a connector set from Amazon that I had to piece together myself, initially, which was about the same price as the Triumph connector. I recently swapped in the Much higher quality Triumph connector. I?ll find the item number if you need it, but if you?ve been digging around, you?ve surely come across it. I?m sure you?ve also seen Nessism?s SSH 775 connection diagram as well, and have read about how and why to eliminate the headlamp loop/connect all 3 legs of the stator directly to the RR.
Yes I have read those postings and also printed them out. There seemed to be some discussion of pros and cons of wiring up the old and new way .... and I was left confused as to the best way. I want to do it right ... the 1st time. I did not get very far trying to trace battery + wire back to the fuse box and back out into the wiring harness heading forward .... possibly to the handle bar? Wish my electron knowledge was at a higher level.
“My charging system sorted” link in my signature is a pretty thorough, if typical, story of just about everything you can expect to encounter. Again, assuming the GR charging system is similar to the GS.
dennco2
Forum Mentor
?My charging system sorted? link in my signature is a pretty thorough, if typical, story of just about everything you can expect to encounter. Again, assuming the GR charging system is similar to the GS.
Yes Rich, I just read all those postings in your Sorted thread ... and I seem to be having the same challenges. Very helpful and it cleared up a lot of questions. Not sure how to cut out the headlight loop? Do I sever the RED wire after it comes out of the fuse box and try to solder a return to the battery from there?
I don't know what your wiring diagram looks like, but, it really is simpler than it sounds. On the GS's (here's a good, typical, nice Color WD that's easy to follow) you see a White/green wire leave the stator, go all the way up to the left handlebar switch, do nothing, then return to the RR (5 on the WD) as a White/Red wire. Eliminating that loop is what it's all about. So when you wire the stator to the RR (the 3 prong left connector of the SH775) you wire all 3 legs from the stator directly to the RR, leaving out the headlamp loop. You can just tape up and tuck away those White/Red and White/Green ends, as they serve no purpose.
Last edited:
Glad you asked! That green ground wire was on the bike when I bought it and was extra long with a loop .... and bolted to the part shown on the picture which I assumed was the SPG grounding the engine and frame together and whatever else grounds desired. I shortened the green ground wire and put lugs on both ends ... crimping and soldering them on. I cut a groove on one side so I could see the solder flow. If you see any reason I should change that grounding point ... or improve it please let me know.
View attachment 63031
To see if that green ground strap going to the battery negative post is adequate for the starter load, which will put the heaviest load on the green ground wire, put your meter on the 20V DC scale. Put the positive meter lead on a bare spot on the starter CASE, and the negative meter lead on the negative battery POST. Put the circuit under load by cranking the engine. The meter will read voltage that can?t be handled by the circuit between your two meter leads, aka the circuit?s voltage drop. If while cranking the engine, the meter reading doesn?t exceed 0.2V, the green ground strap is good to go.
dennco2
Forum Mentor
I don't know what your wiring diagram looks like, but, it really is simpler than it sounds. On the GS's (here's a good, typical, nice Color WD that's easy to follow) you see a White/green wire leave the stator, go all the way up to the left handlebar switch, do nothing, then return to the RR (5 on the WD) as a White/Red wire. Eliminating that loop is what it's all about. So when you wire the stator to the RR (the 3 prong left connector of the SH775) you wire all 3 legs from the stator directly to the RR, leaving out the headlamp loop. You can just tape up and tuck away those White/Red and White/Green ends, as they serve no purpose.
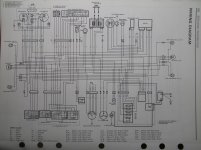
I found the GR wiring diagram in my newly acquired service manual. All black ... no color on service manual diagram. Looks like w/blue and yellow go straight to R/R but w/g to right handlebar switch .... and then returns white and red to R/R. I am having a hard time figuring out how which direction the battery and stator juice are flowing into and out of the R/R. Do I have to cut the white/green wire and if so ... where? Like you say, it is simpler than I am making it out to be. For further clarity, I will try to upload the wiring diagram in another post ... if I can figure out how to do it.
Attachments
I’m not sure how else to explain it so I’ll turn it over to the experts. Nessism has dumbed it down for us. https://www.thegsresources.com/_forum/showthread.php?254759-SH775-Install-Diagram

When you wire up the SH775, the 3 stator wires, color doesn’t matter, go to the left side of the SH775, you’ll likely have to cut all 3, but leave as much length of wire connected to the stator as possible. The White/Green and the White/red that go to/from the handlebar switch (apparently the right one on a GR) will be out of play, taped up and tucked away. The Red from the right side of the SH775 (brown on the Triumph connector) connects to the red wire that used to connect to the stock RR, so when you cut that one, again, cut as close to the stock RR as possible, or, if there’s a bullet connector, use it, and put a corresponding bullet on the red (or brown)wire from the SH775. The black wire on the right side of the RR goes to good ground, SPG, or to battery negative if you’d rather.
As for how you physically connect your stator wires to your new SH775 wires, there are some who like to solder them, some who use spade connectors, crimped. I prefer the OEM style bullet connectors from Vintage Connections, using their crimp tool. I suck at soldering. I’ve read about a lot of heat in these stator wires and these connections so some think soldering isn’t ok there. I don’t know. But I think my crimps are pretty good.

One other thing. Corrosion at any of these connections is cause for resistance/heat and early failure. Make sure all connections are clean. Deoxit is great for cleaning up light corrosion, it also protects and lubricates. For heavier Corrosion I clean with naval jelly, it’s messier to use, has to all be washed off in about 10-15 minutes, but really does a good job. I flush the jelly off with a water pic, dry with compressed air, make sure it’s dry with a spritz of electronics contact spray, then a spritz of deoxit. Everyone’s got their own methods. This works for me. I don’t typically use any dielectric grease on these connections, I do put a tiny bit on battery terminals, spark plug sockets, on top of my SPG. Again, lots of opinions on its use
When you wire up the SH775, the 3 stator wires, color doesn’t matter, go to the left side of the SH775, you’ll likely have to cut all 3, but leave as much length of wire connected to the stator as possible. The White/Green and the White/red that go to/from the handlebar switch (apparently the right one on a GR) will be out of play, taped up and tucked away. The Red from the right side of the SH775 (brown on the Triumph connector) connects to the red wire that used to connect to the stock RR, so when you cut that one, again, cut as close to the stock RR as possible, or, if there’s a bullet connector, use it, and put a corresponding bullet on the red (or brown)wire from the SH775. The black wire on the right side of the RR goes to good ground, SPG, or to battery negative if you’d rather.
As for how you physically connect your stator wires to your new SH775 wires, there are some who like to solder them, some who use spade connectors, crimped. I prefer the OEM style bullet connectors from Vintage Connections, using their crimp tool. I suck at soldering. I’ve read about a lot of heat in these stator wires and these connections so some think soldering isn’t ok there. I don’t know. But I think my crimps are pretty good.
One other thing. Corrosion at any of these connections is cause for resistance/heat and early failure. Make sure all connections are clean. Deoxit is great for cleaning up light corrosion, it also protects and lubricates. For heavier Corrosion I clean with naval jelly, it’s messier to use, has to all be washed off in about 10-15 minutes, but really does a good job. I flush the jelly off with a water pic, dry with compressed air, make sure it’s dry with a spritz of electronics contact spray, then a spritz of deoxit. Everyone’s got their own methods. This works for me. I don’t typically use any dielectric grease on these connections, I do put a tiny bit on battery terminals, spark plug sockets, on top of my SPG. Again, lots of opinions on its use
Last edited:
dennco2
Forum Mentor
Some progress today on wiring the SH775. I found the 3 wire bundle heading up to the frame tube right under the fuel tank and pulled the 3 bullet connectors apart. Then I rerouted the 3 wire bundle to head towards the battery area and cut off the 3 old connectors. I bared the ends of 3 new multistrand wires and crimped new doublecrimp connectors on one end .... and female spade connectors on the other. Lowes provided the parts which fit very snug. My crimping skills were put to the test but survived a mild pull apart effort.
Not done yet and I have to now tackle the 2 power wires and figure out how best to do that on my bike ... using the expert advice shared on this forum. I have some pics to show what I did today.
Not done yet and I have to now tackle the 2 power wires and figure out how best to do that on my bike ... using the expert advice shared on this forum. I have some pics to show what I did today.
Last edited:

The white/blue, white/green, and yellow wires should be the three stator legs, but I’d follow them back to the stator to be sure. They should be coming out of the engine case somewhere near the starter motor, probably. The bullets look very healthy with no signs of corrosion/heat melting the insulation. That is a promising sign that hopefully your stator is in good shape. But the best way I know to test the stator health is to measure AC voltage leg to leg at 5k RPM, and leg to ground test at 5k RPM. These tests show if the stator is bad, but not necessarily if it is good. I don’t think it’s necessary to remove the stator cover at this point, just be sure that those 3 wires do in fact go to the stator. Then connect them to the 3-pin left side connector of the SH 775.
edit.
well, looks like you got there. But I only see 2 of the 3 wires connected to the RR, maybe just the angle of the photo is hiding the 3rd?
edit.
well, looks like you got there. But I only see 2 of the 3 wires connected to the RR, maybe just the angle of the photo is hiding the 3rd?
Last edited:
dennco2
Forum Mentor
All 3 stator female plugs are cut and will fit into the R/R. One lead fell out because I currently have them just tacked in place. I tried fully installing one plug before the wires were attached .... and it takes a pair of pliers to remove it. I carefully determined those 3 wires were from the stator ... and finally ended in bullet connectors under the fuel tank. I cut some existing tie wraps to the frame tubing and rerouted those old stator wires for the most direct path to the battery box area. About 8" of new additional wires ... was all that was needed stator to RR.
By removing the old R/R, I see some openings in the mounting plate to route the red and black wires straight to the laid over SH775. I don't like the battery + terminal lug .... or the extra long routing around the mounting plate to the battery. Also I need some ground strap for the R/R ground wire.

By removing the old R/R, I see some openings in the mounting plate to route the red and black wires straight to the laid over SH775. I don't like the battery + terminal lug .... or the extra long routing around the mounting plate to the battery. Also I need some ground strap for the R/R ground wire.
Last edited:
“By removing the old stator…”. I think you meant RR.
dennco2
Forum Mentor
?“By removing the old stator?…?”. I think you meant RR.
Yes, I meant the old R/R.
So now my plan is to plug a new wire extension coming from the SH775 Ground and solder a ring connector to the other end and bolt to the old mounting plate .... using one of the attach screws to the OLD R/R. Also solder a ring connector to the end of the (cut off) harness ground wire ... so no crimping needed and add that to the screw mount. The bike has an old heavy duty ground wire bolted to the engine case which is currently NOT being used. I want to extend that wire to reach under the battery box and bolt up to the same R/R grounding screw on the mounting plate and cinch it all down. That SHOULD take care of proper grounding of the R/R, right?
BTW, the unused old ground wire/cable has a ring connector bolted to the engine transmission ... just a few inches from the green cable grounding bolt. Leave as is .... or is it better to bolt both grounds together to make a SPG?
For the + power lead coming out of the SH75, I will add the short extension wire to meet the cut off old red wire ... either by crimping or soldering the 2 together. That should wire it back up to the original harness power routing thru the factory fuse box and positive terminal on the battery ............ right??? I sure hope so.
Last edited:
dennco2
Forum Mentor
The stock Suzuki r/r case is mounted to a steel plate. Does that mean I should also have some kind of grounding wire to the SH775 case ... that is currently just tie wrapped to the back side of the battery box? I think I have read yes and no on that?
The battery box may or may not be grounded well thru those steel collars Suzuki uses along with rubber pads apparently to soften the vibration to the battery.
The battery box may or may not be grounded well thru those steel collars Suzuki uses along with rubber pads apparently to soften the vibration to the battery.
As long as the SH775 is secure with the zip ties, that’s fine. The RR is grounded with the black wire shown in Nessim’s diagram.
dennco2
Forum Mentor
I think I am done wiring in the sh775 R/R. Fuel tank still off so not ready to test anything yet. Kinda scared I will see some smoke when I do. ")
Anyway I took a couple more pics of what I have done. I wire brushed paint off for my R/R grounding point which has 3 Ring connectors connecting the new R/R wire to the old wire harness ground and a large grounding cable connected to the SPG on the other side frame/engine. The positive red lead from the SH775 is connected to the old red harness wire I cut via a matching set of spade connectors male and female .... which connects to the fuse box and to the + side battery. Later, I want to clean up the positive terminal connection to the battery.

Anyway I took a couple more pics of what I have done. I wire brushed paint off for my R/R grounding point which has 3 Ring connectors connecting the new R/R wire to the old wire harness ground and a large grounding cable connected to the SPG on the other side frame/engine. The positive red lead from the SH775 is connected to the old red harness wire I cut via a matching set of spade connectors male and female .... which connects to the fuse box and to the + side battery. Later, I want to clean up the positive terminal connection to the battery.
Last edited:
