• Required reading for all forum users!!!

    Welcome!
    Register to access the full functionality of the GSResources forum. Until you register and activate your account you will not have full forum access, nor will you be able to post or reply to messages.

    A note to new registrants...
    All new forum registrations must be activated via email before you have full access to the forum.

    A Special Note about Email accounts!
    DO NOT SIGN UP USING hotmail, outlook, gmx, sbcglobal, att, bellsouth or email.com. They delete our forum signup emails.

    A note to old forum members...
    I receive numerous requests from people who can no longer log in because their accounts were deleted. As mentioned in the forum FAQ, user accounts are deleted if you haven't logged in for the past 6 months. If you can't log in, then create a new forum account. If you don't get an error message, then check your email account for an activation message. If you get a message stating that the email address is already in use, then your account still exists so follow the instructions in the forum FAQ for resetting your password.

    Have you forgotten your password or have a new email address? Then read the forum FAQ for details on how to reset it.

    Any email requests for "can't log in anymore" problems or "lost my password" problems will be deleted. Read the forum FAQ and follow the instructions there - that's what we have one for...

  • Returning Visitors

    If you are a returning visitor who never received your confirmation email, then odds are your email provider is blockinig emails from our server. The only thing that can be done to get around this is you will have to try creating another forum account using an email address from another domain.

    If you are a returning visitor to the forum and can't log in using your old forum name and password but used to be able to then chances are your account is deleted. Purges of the databases are done regularly. You will have to create a new forum account and you should be all set.

Tappet depressor/valve shim tool video

  • Thread starter Thread starter Guest
  • Start date Start date
I have just replied to your e-mail and will also mention here: do not use a popsicle stick. It's not thick enough, it's not flexible enough.

It needs to be flexible enough to straighten out just a bit to slide down the spark plug hole, then resume its bend to end up under the valve.

It needs to be about 4-5 mm thick, so you can lift a shim that is about 2.5 mm thick out of the bucket, so you would need to double- or triple-up on the stick thicness, which would eliminate any flexibility.

Just in case you have difficulty picturing how it works, here is a basic drawing:
ziptieplacement.jpg


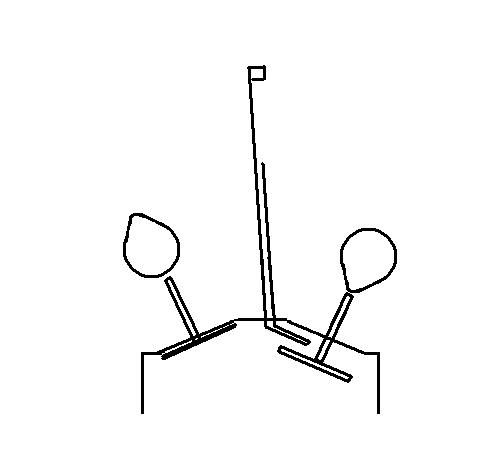
Rotate the cam to open the valve, slide the zip-tie in, rotate the cam so the lobe is away from the valve, remove the shim.

.
 
The zip ties are flexible, somewhat soft and easily formed to fit where you want. If you're going to use this method the zip ties are probably ideal. As far as the popsicle stick I'd avoid that because you would be surprised how much pressure the valve actually has and you're quite likely to chew part of the end off if not break it. An alternative I tried once was a piece of 6 or 8 gauge vinyl coated copper wire and was shocked that it chewed through the vinyl coating and actually left a divot in the copper. I'd say if you're going to use this method not to over think it and just use the zip ties. The larger the better I guess as that will give you a larger contact area on the valve to distribute the load.
 
You're quite the artist, aren't you Steve? Actually, that really simple line drawing shows the necessary elements really well - so thanks. Did you create the just for this response?

So it seems that ideally, the zip tie will already have the kink more-or-less permanently formed into it before it goes into the hole, right? We actually have a pretty good assortment of zip ties at work and I'll just "borrow" one of the longer ones for this.
 
Use the buckle side of the zip tie..kink it about 1/2 inch above the buckle and stick between the head and valve pans. Use a thick zip tie too..whittle the buckle down on a grinder if it just happens to be a tad too thick. Ive done the zip tie method and much prefer the toll myself.

Only thing is the tool can slip off the edge of the bucket, but this is easily solved with a small flat tip to keep side pressure on the tool as you cam it down to depress the bucket.
 
The zip ties are flexible, somewhat soft and easily formed to fit where you want. If you're going to use this method the zip ties are probably ideal. As far as the popsicle stick I'd avoid that because you would be surprised how much pressure the valve actually has and you're quite likely to chew part of the end off if not break it. An alternative I tried once was a piece of 6 or 8 gauge vinyl coated copper wire and was shocked that it chewed through the vinyl coating and actually left a divot in the copper. I'd say if you're going to use this method not to over think it and just use the zip ties. The larger the better I guess as that will give you a larger contact area on the valve to distribute the load.

Alrighty then. Zip ties it is. Thanks to you and Steve for all the advice. I'm going to ALSO have the tool on hand when I start, so I'll be able to try both and see which one "feels" better.

Sandy.... I looked at a few of your albums on Flickr, and it really made me wish I had been on those rides. Apparently you live somewhere in the Northwest, and as it happens, I plan to relocate to Portland, Oregon when I retire in five or six years. You have a really good eye for composition, and you weren't using your cell phone to take those pictures, were you?
 
You're quite the artist, aren't you Steve? Actually, that really simple line drawing shows the necessary elements really well - so thanks. Did you create the just for this response?
Not for this particular response, but definitely for one of the thousands before yours that asked the same questions. :-\\\


Use the buckle side of the zip tie..kink it about 1/2 inch above the buckle and stick between the head and valve pans.
I would not suggest doing it that way for at least two reasons. 1. Although the buckle is thicker, there is no way to double it up, which makes it safer. 2. You will have to position the buckle exactly correctly. If it slips off the edge of the valve or into the throat behind it, you have the same situation that you are trying to avoid: the valve will slam shut. If the buckle slides under the valve, there is a chance that it will get sheared off, because it is only single-thickness. Doubling the zip-tie and using tape or heat shrink to hold it folded ensures that all pieces will come out, in the rare event that something gets cut. I have only had one zip-tie get cut, and that was after intentionally using it for SIX full inventory sessions where I had to inspect every shim, then go through the process of changing a few. For most owners of a single, or maybe two bikes, one zip-tie will last a lifetime.


Only thing is the tool can slip off the edge of the bucket, but this is easily solved with a small flat tip to keep side pressure on the tool as you cam it down to depress the bucket.
My problem, when I have tried using the tool, is not in the process of inserting it, I usually manage to accidentally bump the tool while it is in place, which will knock it off the bucket, no matter who made the tool. :oops:

.
 
Although I offered to take a video a few days ago to show how this is done, other commitments prevented doing so until today. Charmayne and I took this video this afternoon so hopefully it will help you. I will caution to never turn the cams without shims in each location.

 
Although I offered to take a video a few days ago to show how this is done, other commitments prevented doing so until today. Charmayne and I took this video this afternoon so hopefully it will help you. I will caution to never turn the cams without shims in each location.


I'm the guy he offered to do the video for, and it is awesome. When I get everything together to actually do this procedure, I'll post my discoveries on this thread. Right now I have a new valve cover gasket, and I have an official Suzuki tool on the way.
 
Thanks for the video Scott! I'm in the process of re-assembling a 5 year long rebuild (several moves in between) and was just about ready to perform a valve adjustment. I have the suzuki tool but that looks far simpler and accident free. Good lookin' out!
 
Measured the clearance and checked the shim sizes tonight. I found a combination of the zip tie and tappet tool made everything much faster. If for some reason the zip tie wasn't holding the valve open enough the tappet tool helped with getting it down that little extra without risk of slamming the shim into the cam lobe due to the zip tie.

My recommendation is to get the tool, but really the zip tie method should be all that's necessary.
 
Back
Top