I'm probably being a little obsessive here, but I looked in my Clymer Manual and am having some doubts due to differing information from BassCliff's tutorial. I think, basically, the Clymer is pretty iffy. It only gives one example for cam position. It says measure when lobe is perpendicular (up). It doesn't say whether it is intake or exhaust but from Basscliff's info I would guess it has to be intake. It makes no mention of a position with the lobe horizontal (parallel). I have an 1100GL so is there any chance my measuring positions would be different from Cliff's 850. I'm understanding... #1 exhaust lobe parallel(forward) and I can measure #1 and #2 exhaust......#1 intake lobe perpendicular and I can measure #1 and #2 intake.........#4 exhaust lobe parallel and I can measure #4 and #3 exhaust....... and lastly...#4 intake perpendicular and I can measure #4 and #3 intake. Does that sound right for an 1100GL? I t seems odd measuring one exhaust with the lob parallel (forward) and the adjacent exhaust at the same time when it's lobe is not parallel. Thanks Jim M
-
Required reading for all forum users!!!
Welcome!
Register to access the full functionality of the GSResources forum. Until you register and activate your account you will not have full forum access, nor will you be able to post or reply to messages.A note to new registrants...
All new forum registrations must be activated via email before you have full access to the forum.A Special Note about Email accounts!
DO NOT SIGN UP USING hotmail, outlook, gmx, sbcglobal, att, bellsouth or email.com. They delete our forum signup emails.A note to old forum members...
I receive numerous requests from people who can no longer log in because their accounts were deleted. As mentioned in the forum FAQ, user accounts are deleted if you haven't logged in for the past 6 months. If you can't log in, then create a new forum account. If you don't get an error message, then check your email account for an activation message. If you get a message stating that the email address is already in use, then your account still exists so follow the instructions in the forum FAQ for resetting your password.Have you forgotten your password or have a new email address? Then read the forum FAQ for details on how to reset it.
Any email requests for "can't log in anymore" problems or "lost my password" problems will be deleted. Read the forum FAQ and follow the instructions there - that's what we have one for...
-
Returning Visitors
If you are a returning visitor who never received your confirmation email, then odds are your email provider is blockinig emails from our server. The only thing that can be done to get around this is you will have to try creating another forum account using an email address from another domain.
If you are a returning visitor to the forum and can't log in using your old forum name and password but used to be able to then chances are your account is deleted. Purges of the databases are done regularly. You will have to create a new forum account and you should be all set.
You are using an out of date browser. It may not display this or other websites correctly.
You should upgrade or use an alternative browser.
You should upgrade or use an alternative browser.
Valve measurements
- Thread starter 1948man
- Start date
F
Flyboy
Guest
I guess, it would not matter too much if you did it either way, practicaly as long as the lowest point of the lobe is over the shim, you can measure the clearence, I would think that would logicaly be 180 degrees opposite the lobe, in other words the "heel" of the lobe.
My guess is, that from 90 degrees down from the lobe, the arc is pretty much symmetrical and follows a circle, thus it would make no difference if you measured the clearence with the lobe at perpindicular (90 deg) or stright up from the shim and bucket, as the clearence would be the same.
I think that if you follow the sequence in the tutorial, it is just the way of doing it with the least amount of engine turning required..............anyone?
Hope it makes some sense.")
My guess is, that from 90 degrees down from the lobe, the arc is pretty much symmetrical and follows a circle, thus it would make no difference if you measured the clearence with the lobe at perpindicular (90 deg) or stright up from the shim and bucket, as the clearence would be the same.
I think that if you follow the sequence in the tutorial, it is just the way of doing it with the least amount of engine turning required..............anyone?
Hope it makes some sense.
The main concern is having two adjacent lobes unloaded, so that the lobe next to the one your measuring doesn't cause deflection and throw your readings off. It's hard to believe that the camshaft bends at all during normal operation, but I guess it does.
Not so much bending the cam as skewing it within the journal clearance. I recommend using the Suzuki factory method.
I don't have the Suzuki service manual but did look at the one for a GS1000 on Cliff's site. It had a section about valve shims and bucket so I guess it pertained to a G or a GL. It looked like Cliff's tutorial. So I guess I'm good. I measured 6 valves that would not accept a .04 mm guage (my smallest). In each case, I was able to spin the shim. I had 2 valves that would accept the .04 mm gauge but not an .05mm. Now my problem is I can't do squat with the tappet depressor tool. Do you hook it on the cam shaft and lever the bucket down or just push straight down. It seemed to want to creep off the bucket and get crooked when I tried to lever it. The side of my bucket has a bevel to it but now I see in pictures that that is normal. I was afraid the tool was gouging the metal on the wall away from the bucket. I don't have any suitable plastic ties but will get some tomorrow. I have Tuesday off work so maybe I can get after it then. I'd like to use the tappet tool if possible considering past problems I have had with sticking things in the cylinder of my Blvd. Any pointers on using the tappet tool? Or even the plastic tie tool for that matter. Thanks Jim M
R
raistian77
Guest
I use the ziptie method. Yesterday Steve showed me what happens if the tool pops off before you are ready. You get to spend 2 hours fishing tiny bits of shim out of the motor.
So, with the zip tie method, you just position the flaired (double-thickness) bent section of the plastic tie so that when the valve closes it will trap it and be held open a little? You don't try to loop it over the valve do you? You just get it so the valve pinches it against the seat?
That tool is easy to use, once you learn to use it correctly.
The trick is to get your eye in there where you can see what you are doing. Safety glasses are good, as a little oil may fly. Get it seated correctly, exactly in the right place, smoothly pull the lever down. Sometimes it helps to use a screwdriver to keep the tool from coming off the side of the bucket. Some engines seem to have more trouble with the tool popping off the buckets that others, I'm thinking the buckets were not all made to the same specs, some are more rounded on top?.
The trick is to get your eye in there where you can see what you are doing. Safety glasses are good, as a little oil may fly. Get it seated correctly, exactly in the right place, smoothly pull the lever down. Sometimes it helps to use a screwdriver to keep the tool from coming off the side of the bucket. Some engines seem to have more trouble with the tool popping off the buckets that others, I'm thinking the buckets were not all made to the same specs, some are more rounded on top?.
Would you position the screwdriver blade on the side of the tool away from the bucket so the tool can't creep toward the bevel edge of the bucket and slide off?
Also, do I understand correctly that once you push the bucket down a certain distance, springs will hold it down?
Oh yeah, 1 more. Do you use the tappet tool with the lobe in the same position as for measuring clearance?
Also, do I understand correctly that once you push the bucket down a certain distance, springs will hold it down?
Oh yeah, 1 more. Do you use the tappet tool with the lobe in the same position as for measuring clearance?
Last edited:
Would you position the screwdriver blade on the side of the tool away from the bucket so the tool can't creep toward the bevel edge of the bucket and slide off?
Yes, although it's almost never necessary.
Also, do I understand correctly that once you push the bucket down a certain distance, springs will hold it down?
Friction holds the tool down, just push it down until it stays. Usually down to where the lever is almost touching the head.
Oh yeah, 1 more. Do you use the tappet tool with the lobe in the same position as for measuring clearance?
Yes, just leave it where it sits, there is no need to turn the engine at all. Measure clearance in both adjacent valves, swap shims if needed, turn the crank 180 degrees and go on to the next pair.
Once I finish them all, I crank the starter several seconds, remeasure them all. Once in a while one of them is off a little bit.
Another thing I do sometimes is to not replace the gasket, ride it a few hours and recheck them all. Usually I only do this on a bike that has sat for years. Again, occasionally one of them is off a little. Then I replace the gasket.
Overkill, certainly.
B
BassCliff
Guest
Hi,
The valve check procedure (for 8-valve engines) I documented in my little "how to" guide is the Suzuki factory method, i.e. Position the outside cam lobe, measure two clearances. Point the #1 exhaust cam lobe forward, measure exhaust #1 and #2. Point the #4 exhaust cam lobe forward, measure exhaust #3 and #4. Point the #1 intake cam lobe up, measure intake #1 and #2. Point the #4 intake cam lobe up, measure intake #3 and #4.
Thank you for your indulgence,
BassCliff
Thanks for all the help Flyboy,Allie,Ed,Raistian, Tom and Cliff. I'm going to pick up some zipties today but try hard with the tappet tool first on Tuesday. Thanks to your answers, I think I understand things well now. Tom, I think this Vetter is making it hard to get my eye down there. I had to be Houdini to get the valve cover off. You were needing a Vetter weren't you?
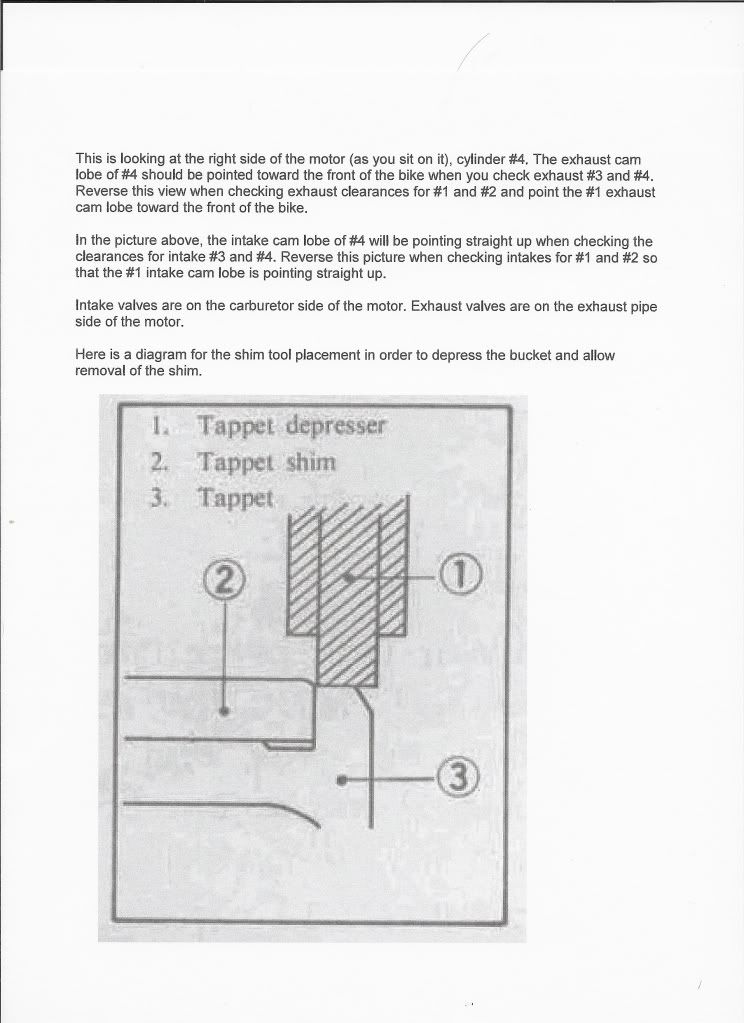
Looking at the illustration above, the width of my bucket edge (#3 in the pic) is maybe 5/32" with fully half of that as bevel. The pic shows shows more of a flat ledge. Maybe, as Tom says, some engines may have more rounded bevels. I just can't get the tool to work. I have an idea but want to get some expert opinions before I try it. Could I rotate the crank until the valve is open, insert the tool in the fully down position, and then rotate the crank until the valve is closed hoping the tool stays square and holds the bucket down? Any chance of damaging anything this way? One thing I have noticed is the bucket spins when I lever down on the tool which seems to help the tool slip off.
Steve
GS Whisperer
I have tried that, you still have to have incredible aim to land on the small ledge of the bucket. You also have to have the tool handle perfectly perpendicular to the cam, or it will walk sideways on you and either go off the bucket or over on top of the shim. I don't frustrate all that easily, but I keep my tool in the toolbox and use the zip-ties.Could I rotate the crank until the valve is open, insert the tool in the fully down position, and then rotate the crank until the valve is closed hoping the tool stays square and holds the bucket down? Any chance of damaging anything this way? One thing I have noticed is the bucket spins when I lever down on the tool which seems to help the tool slip off.
By the way, the zip-ties do wear out. I have found that the bend at the end will only last for about three valve inventory sessions (total of 24 valves), then it will break. Once your valves are inventoried, you will only need the zip-tie for one or two shims per valve adjustment session, so it will last a lot longer.
.
Thanks Steve. I may be headed the ziptie route although I did just get one out with the tool. I used a thin piece of aluminum between the tool and the wall to make it less likely to rotate. It was #1 exhaust so it was easy to get to. The one I'm trying now is back to being stubborn. Jim M
Remove the Vetter. it's much easier that way.Tom, I think this Vetter is making it hard to get my eye down there. I had to be Houdini to get the valve cover off.
Allie
Forum Sage
Remove the Vetter. it's much easier that way.
That sounds much vetter than leaving it on. Thank you! Thank you!
 Oh man I can't wait until I'm back working tomorrow (I bet the rest of you can't either)!
That sounds like Lawrence Welk talking about his music.This just keeps getting vetter and vetter