
The Stator Papers 2 - FAQ's
Questions and Suggestions
by Peter Huppertz
(with updates by the current editors
This page would never have been what it's now without the help of some people which I'd like to thank:
- Theo Ekelmans for support & electrical knowledge
- Ritzo Muntinga from ElectroSport Industries for knowledge about electrics, bikes in general, and good stuff.
- You, for usable feedback since I started spilling my guts.
Before reading on, you might want to take a look at The Stator Papers 1: A Primer on GS charging systems, which tries to explain the theory referred to in this Q&A.
- How do I find out whether my charging system is OK?
- How can I find out whether the stator has passed away, or if it's just a broken regulator/rectifier?
- My bike seems to charge OK on idle and slightly up, but when the revs rise up to, say, 4000 RPM, the voltage on the battery poles starts to drop down. What's wrong here?
- If, after starting the bike when the battery is on a charger, taking the charger off the battery causes the engine to run irregularly and then die after a few minutes, do I have a charging problem?
- The ac wires from the rectifier are so hot they melt and the rectifier will burn your fingers. I have replaced the rectifier and checked out the regulator (it's OK) and of course the battery has been replaced more than once. HELP!!!!! The dealer has no answers.
- What if my charging circuit seems OK, but the battery still drains?
How do I find out whether my charging system is OK?
The first indication is often a dead battery. So, the first thing you'd want to find out is whether your battery itself is OK, for if you conduct testing of the charging circuit with a perishing battery, your results will be way thrown off. To find out whether your battery is OK, first check whether the fluid level is within the range indicated on the outside. If it's way too low (more than, say, half an inch), you might refill it, but chances are that's it way too late already. If the plates inside the battery look crooked (not straight, or badly discolored), it's almost surely replacement time.
If the battery looks OK, but has drained from being left uncharged during the winter or something, charge it fully with an offline battery charger and check it with an acid tester. These are available at reasonable prices at auto accessories shops. If you don't have one, your local repair shop surely will.
Next, you would check ALL electrical connections in between the stator and the battery poles for excessive resistance. Clean or replace them if necessary... and check the wires for signs of a shortage. This is important! After all, a good deal of the life of your cycle is spent outside, which is a hostile environment for electrical connections, and it's easy for a connector to corrode, and thus mess up conductivity, your measurements and the charging process.
Also, we want our groundings to be PERFECTLY okay. Faulty or incomplete grounding is a surefire way of not only messing up our measurements, but ruining stators and rectifiers/regulator as well. Since we're dealing high currents here, our ground connections have to be near-perfect.
Step 0 - Testing the complete circuit
If the battery is known to be good AND fully charged, the testing may begin. The stuff hereunder assumes that you have a basic knowledge of electricity, up to the point that you know that electricity can be dangerous, and up to the point that you understand the difference between amperage and voltage, and AC and DC. If you don't, please, for the sake of your health and the health of your bike, back off and get some help.
What we need, apart from some general tools such as screwdrivers and spanners, is a general purpose multimeter, which is able to measure AC as well as DC.
We'll start with everything, including the engine, switched off. Select DC Volts on the multimeter, if it's not an auto-ranging meter be sure to select an appropriate range (up to 20 V on most devices), and determine the potential difference between the plus and minus poles of the battery. If the battery is OK and fully charged, this should be something in the proximity of 13 Volts.
Now we start the engine and have it idle. Be sure to leave lights and everything off. On idle, not too much will happen, since the stator simply isn't revolving fast enough to generate enough current. Depending on the bike, you may see it rise a little, to something like 13,5 V or so.
Now we rev it up to a reasonable speed, say, something like 4000 RPM. Now you should see full charge, somewhere in the range of 13,9 and 14,5 Volt.
Rev it up a little more, and check whether it stays at that level, or whether it starts to drop significantly at higher rev ranges -- it shouldn't.
If this is all OK, your charging circuit is in working order. If you've got a draining battery problem, it's somewhere else. If this is NOT OK, there's a problem somewhere in between (including) the stator and the battery. You may read this page to understand what's going on and proceed to step 1 (described below).
Please remember at this point: a battery that is not fully charged OR charged, but bad, will probably ruin your test. If you are not sure about the battery condition, get a battery that is KNOWN to be good, charge it fully and repeat the test.
How can I find out whether the stator has passed away, or if it's just a broken regulator/rectifier?
This is a toughie for me... I am not an electrical engineer, and I'm still finding that out, but I have some hints here.
First of all, I found out that something was wrong with the stator because current was draining away from my battery when everything was switched off and all fuses were nowhere near the fuse box. I then took off the leads from the stator and lo and behold! the power drain disappeared, indicating that some of the diodes in the stator had been fried to oblivion and there was a short somewhere in the circuit.
Step 1 - Preliminary test of the stator
Then I started testing the output of the generator itself. To do this, you need a measuring device that can measure AC Volts. Any decent universal multimeter will do this. You will also need someone who is capable of having the engine running at 5000 rpm in neutral.
Detach the three wires coming from the stator (in my case these are white/blue, white/green and yellow). Have the engine running at 5000 rpm and measure the potential difference between all possible pairs (white/blue against white/green, white/blue against yellow, white/green against yellow). In all cases the potential difference should be more than 75 V during a short test. If that's okay, go to step 3.
Step 2 - Further testing of the stator
If the previous test has shown that our beloved stator is suspect, we will measure resistance between all pairs of the stator and between each lead and the stator center (with the engine turned OFF). In all cases we should see a low resistance or continuity between the 3 legs, testing them in pairs. We should not have a resistance reading of infinity ('open') or zero (short). Instead you should see a resistance reading that is within 0.5 to 2.0 Ohms If there is a short or open, somewhere isolation has been damaged (probably melted) and we have a useless stator.
Repairing this is not a hard job. If you are interested, check out The Stator Papers 6 - How to rewind your own Stator.
Step 3 - Test the regulator/rectifier
If steps 2 and 3 are okay, you still have a working stator. Next, test your rectifier/regulator. There is no way to do this ab-so-lu-te-ly conclusively, since it's pretty much a sealed black box, and you cannot precisely test on the component level. But some things can be checked. Here goes:
There are a few diodes in the circuit, which should permit current to pass by in one direction, but not in the other (a little like Gore-Tex does with water). Usually in the case of a broken stator these diodes are fried, and turned into ordinary wires, permitting current flow in both directions.
Let's take a look at that. In the example below, I've used the color coding from my trusty GS850.
Hook up the test leads as in the scheme below. In all cases you should see continuity.
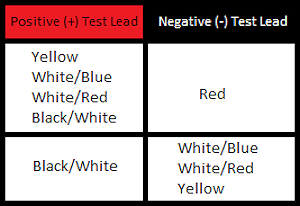
Now do the same tests, but with the test leads REVERSED. In all cases you should see discontinuity (infinitely high resistance). If you don't -- well... here goes another regulator/rectifier. Re-evaluate your relationship with the manager of your financial resources.
In the (unlikely?) event that the rectifier/regulator unit appears broken, but the stator still seems OK, dump the rectifier NOW! before it kills your stator as well.
The above procedure is not all you can do to test the complete charging circuit. We've thought of a better procedure since then, which is now officially published as The Stator Papers 4 - The Fault Finding Chart.
My bike seems to charge OK on idle and slightly up, but when the revs rise up to, say, 4000 RPM, the voltage on the battery poles starts to drop down. What's wrong here?
It seems at this point as if your stator doesn't have a complete shortage, but the insulation has deteriorated enough to cause a leak under load, as is the case when the revs rise, since the stator would then generate more power.
If the rectifier/regulator is still okay at this point, you will probably want to replace your stator right away, since when the stator blows, it'll probably fry the diodes in the rectifier. But on the other hand, this might, on a GS, well be caused by the phenomenon as described in the theory story, so this might be a very bad omen. Check your commonsense (and your bank account).
If, after starting the bike when the battery is on a charger, taking the charger off the battery causes the engine to run irregularly and then die after a few minutes, do I have a charging problem?
You may have, but it's impossible to tell at this point, since this is the sign of a dead battery. Dead, deceased, perished. As dead as a Norwegian Parrot, to speak with John Cleese. On a fully charged battery, a bike should be able to run for a few hours before the ignition has drained the battery. If the battery charger indicates that the battery is charged to capacity, and the capacity is used very quickly, this means that the battery doesn't have any usable capacity left and should be discarded.
Fix this before you do any further testing, since testing with a bad battery will mess up your results.
The ac wires from the rectifier are so hot they melt and the rectifier will burn your fingers. I have replaced the rectifier and checked out the regulator (it's OK) and of course the battery has been replaced more than once. HELP!!!!! The dealer has no answers.
We seem to have a terminology problem here... it would normally be very hard to replace the rectifier and leave the regulator untouched, as they are both the same! The regulator/rectifier is one sealed unit! So either we have a terminology error or you have got a VERY nonstandard kitchen sink charging unit.
Stop the presses! I learned from Holm Tiffe that this is in fact not true... early GS's DID have a separate regulator and rectifier. Afterwards, the regulator and the rectifier were put together in one sealed unit. Ritzo Muntinga comments that both configurations are similar in design, and both contain the same design flaw.
I made some assumptions, though... the STATOR (that's the thing with the coils residing under your left crank cover) has AC leads coming from it. These go to the regulator/rectifier (residing, in the case of the GS850, under the battery).
If these get VERY hot, that means there is a LOT of current flowing through it! If that's the case, my guess is that at this time you should absolutely check your stator (procedures to do this are outlined in the workshop manual), for it is probably the cause of your problem.
Next thing is that you should check your rectifier/regulator, for under the sustained heat it'll probably be fried by now. Procedures for testing the regulator/rectifier are usually not outlined in a workshop manual. Some even say that it's not possible. This is not entirely right. In practice, a fried regulator/rectifier will probably also have its diodes fried. You can easily test this by testing for continuity in one direction and discontinuity in the other. If the stator has passed the buck, you will almost certainly notice that there's continuity in both directions. If you do, you're out of luck.
A third, VERY IMPORTANT, thing to hunt for is whether you have good ground! If everything is okay, but the ground connections are rotten, you will heat things up in a bad way! Especially around the high current area associated with the battery/charging system area, a bad ground connection can mess things up and lead to havoc! So... check your ground leads! The Electrex rectifier/regulator that I use has a separate ground lead that will attach straight to the central ground point... these guys are really religious about it (and for good reason). Bad grounding is a problem that usually pops up on older bikes. Check and clean all and every electric connection, and test them for resistance.
I admit that this is a lengthy approach, but your problem seems to call for one.
What if my charging circuit seems OK, but the battery still drains?
If testing shows that the charging circuit is working fine, there's probably something using electrical power when -- or at a rate at which -- it's not supposed to. Surely you'll have an idea whether this happens when you're riding the bike or when it's in the shed.
The easiest way that I can think of to find that out is to measure current between the positive pole of the battery and the read lead that comes off it, and then see what happens. If you don't know how to do that, I'm sorry to tell you that, for reasons of safety, I won't explain you here. Be sure to use a good multimeter, good test leads and to regard safety precautions when you do this.
What I did was: I started testing with all fuses taken out, in order to plug them back in in a sensible order.
Anecdote: In my case, I didn't even have to put one back in, since even with all fuses out, there was a noticeable drain. This puzzled me for some time, until I took out the rectifier. The drain stopped, which led me to believe that the rectifier was at fault. The rest is history.
You should now have a good idea of how to conduct such a test. The trick to pull out the fuses prevents you from measuring a drain through faulty wiring... you would want to start from a zero drain situation and then work your way through the circuit step by step until you've got the drain. Once you know where it starts, you will usually be able to hunt it down.
Next article: The Stator Papers 3 - The Quick Test