Announcement

Collapse
No announcement yet.

Inlets - With Pics

Collapse
X
 
  • Filter
  • Time
  • Show
Clear All
new posts

    Inlets - With Pics

    Had some excellent info from site members so far which has been a tremendous help so far.. Starter problem (seperate thread) now sorted.

    Carbs, Getting better but not yet vacuum balanced (I'll come back to that) BUT !!

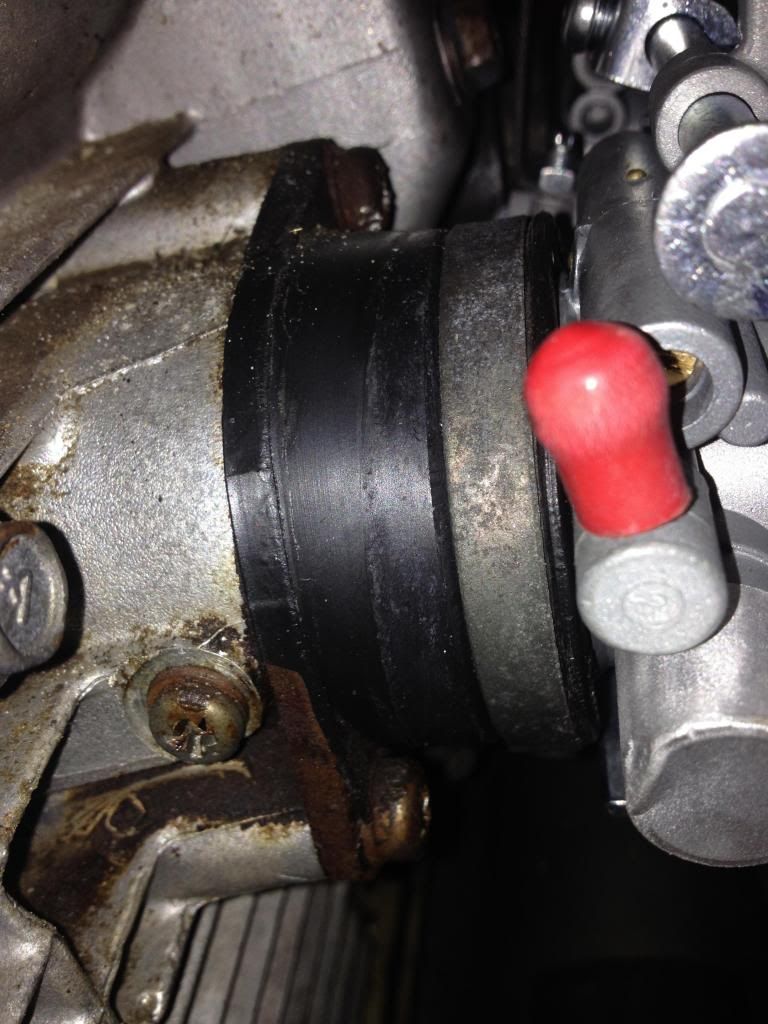
    I'm thinking that from reading previous threads on inlets and the so so sensitive nature of airbox being sealed, new filter etc etc.. that the ones on my bike are indeed toast ! .. and likely the 'O' Rings are also beyond serviceable... I did spray carb cleaner around them when the engine was running and it made no difference to the idle, just to see if they were leaking, but seemed ok

    However I cannot get them off in situ because the screws wont budge and I cannot get an impact screwdriver anywhere near. So only option is to remove the engine (unless you can tell me different )

    Valued opinion needed before I spend out on new ones..


    #2
    Well, you obviously have to remove the CARBS first, but the engine can stay.

    What bike?

    Once the carbs are out, you can use a hand impact driver. What? No room to swing a hammer? No problem. Remove the head of the driver, you will see a 3/8" square drive, just like the one in your socket set. Grab a few of the extensions, the driver can now be positioned where you can swing your hammer into it.

    .
    sigpic
    mine: 2000 Honda GoldWing GL1500SE and 1980 GS850G'K' "Junior"
    hers: 1982 GS850GL - "Angel" and 1969 Suzuki T250 Scrambler
    #1 son: 1986 Yamaha Venture Royale 1300 and 1982 GS650GL "Rat Bagger"
    #2 son: 1980 GS1000G
    Family Portrait
    Siblings and Spouses
    Mom's first ride
    Want a copy of my valve adjust spreadsheet for your 2-valve per cylinder engine? Send me an e-mail request (not a PM)
    (Click on my username in the upper-left corner for e-mail info.)

    Comment


      #3
      Usually you can get the hand impact driver onto the outer boots with no problems. The inner boot screws can be a little harder. You can do as Steve suggested and see if you can get a good whack at them. I've also found that, if you can get one screw out (top or bottom), you can tap/rotate the boot counter clockwise around the remaining screw and the other screw will turn with it. Once it breaks loose it's a piece of cake to get out. Replace the screws with cap screws and the next time will be much easier.

      Note: From the last picture I see that the metal cap end seal is cut. Not a bid deal but could be a source of an air leak if the seals weak.
      Last edited by JTGS850GL; 07-01-2014, 01:22 PM.

      1980 GS1000GT (Daily rider with a 1983 1100G engine)
      1998 Honda ST1100 (Daily long distance rider)
      1982 GS850GLZ (Daily rider when the weather is crap)

      Darn, with so many daily riders it's hard to decide which one to jump on next.

      JTGS850GL aka Julius

      GS Resource Greetings

      Comment


        #4
        Originally posted by Steve View Post
        Well, you obviously have to remove the CARBS first, but the engine can stay.

        What bike?

        GS450S .. ahem my mistake.. would have been useful


        Once the carbs are out, you can use a hand impact driver. What? No room to swing a hammer? No problem. Remove the head of the driver, you will see a 3/8" square drive, just like the one in your socket set. Grab a few of the extensions, the driver can now be positioned where you can swing your hammer into it.

        .
        Genius.. now I know why I ask first and act second.. Thanks Steve I'll give that a bash.. (did you see what I did there )

        But as to the original question.. inlets.. Toast ?

        Comment


          #5
          Get a can of PB Blaster and spray those stupid screws for a day or two....then, get a pair of needle-nose vice grips. Get a good grip on one of the screws and "worry" it loose...in other words, just slightly move it back and forth until it breaks loose. Once one is out then rotate the boot counterclockwise to loosen the other side.....proceed to next boot.

          Caution:: Be careful not to break the head off the screw. Good Luck !


          .........or do what Steve said......LOL !!!!
          Larry D
          1980 GS450S
          1981 GS450S
          2003 Heritage Softtail

          Comment


            #6
            Thanks all for the removal tips..

            But... Should I remove/replace them, do they look knackered to you.. ?

            Comment


              #7
              There is an o-ring that seats against the head behind that boot that should be replaced. So, yes, remove them, replace the o-ring and throw those stupid screws away and get some socket head screws.
              After you remove them, then they can be inspected properly to see if the boots themselves need replaced.
              Larry D
              1980 GS450S
              1981 GS450S
              2003 Heritage Softtail

              Comment


                #8
                Thanks all, much appreciate the input.. Old ones will be gone and replaced

                Comment


                  #9
                  Here ya go...

                  Larry D
                  1980 GS450S
                  1981 GS450S
                  2003 Heritage Softtail

                  Comment


                    #10
                    Learn from my mistake please ...

                    Be sure to look them over carefully...

                    One fella I know didn't do this prior to a reinstallation and the problem was found in the11th hour of a rejuvenation process...

                    It was almost enough to bring the project to a screeching halt and they were facing a very tight tie schedule to get it running.

                    Luckily the Lead Mechanic (Steve) had a few extras laying around which suited the project and saved the day (weekend).

                    Next time I will look at them much more closely...
                    Currently in the Stable :
                    2002 Honda Goldwing GL1800 Sunburst Pearl Orange
                    1983 Suzuki GS850 GL Blue & Black

                    " I am never lost until I run out of fuel...until that moment I am EXPLORING."
                    - Carl R. Munkwitz

                    Munk's Maxim: "There is no such thing as a cheap motorcycle"

                    Comment


                      #11
                      Originally posted by Larry D View Post
                      Get a can of PB Blaster and spray those stupid screws for a day or two....
                      Be careful with PB Blaster. It can eat through plastic/gaskets (as in, the cam chain tensioner right below there...). It's fine, just have some rags sitting underneath it.

                      Comment


                        #12
                        Originally posted by Wingsconsin View Post
                        Be sure to look them over carefully...

                        One fella I know didn't do this prior to a reinstallation and the problem was found in the11th hour of a rejuvenation process...

                        It was almost enough to bring the project to a screeching halt and they were facing a very tight tie schedule to get it running.

                        Luckily the Lead Mechanic (Steve) had a few extras laying around which suited the project and saved the day (weekend).

                        Next time I will look at them much more closely...
                        Thanks for the heads up on these things, clearly they are very sensitive, I'll just junk the originals and fit new ones along with replacement boots for the airbox.

                        Larry.. Thanks for the link.. I did get my 'O' Rings from Rob for the carbs and also ordered the ones fo the inlets..

                        Comment


                          #13
                          I did it with PB blaster, and a 1/4 driver bit, socket and rachet. one of the heads i really screwed up and had to cut a slot into it.

                          needle nose vice grips when all else fails as well..

                          also i personally say antiseize the bolts you put back in, and a +1 on the cycle o-rings kit.

                          Comment


                            #14
                            I would also replace those busted up screws in the balancing holes.

                            The only way to tell if they are done in is to get them off. This is what mine looked like:


                            I decided they were junk. You can get replacements here:

                            http://www.ebay.com/itm/New-Genuine-...ac8334&vxp=mtr

                            Be sure to add your self to the UK GS Owners Facebook page.

                            Greetings
                            Richard
                            sigpic
                            GS1150 EF bought Jun 2015
                            GS1150 ES bought Mar 2014: ES Makeover Thread AND blog: Go to the Blog
                            GS1100 G (2) bought Aug 2013: Road Runner Project Thread AND blog: Go to the Blog
                            GS1100 G (1) Dad bought new 1985 (in rebuild) see: Dad's GS1100 G Rebuild AND blog: Go to the Blog
                            Previously owned: Suzuki GS750 EF (Canada), Suzuki GS750 (UK)(Avatar circa 1977), Yamaha XT500, Suzuki T500, Honda XL125, Garelli 50
                            Join the United Kingdom (UK) Suzuki GS Facebook Group here

                            Comment

                            Working...
                            X