I removed all the parts from my 1978 GS1000 and striped down the top end of the engine, I had great plans. Now I have lost motivation to put it all back together. I am ready to re-grind the valve seats, replace the valves and continue from there. I purchased many new parts for the bike like a new motogpwerks exhaust, electronic ignition, modern brake system, stage III jet kit etc. Do you think I would be best to sell the parts vs trying to assemble the bike then sell. Although healthy now numerous illnesses prevented me making progress over the last few years. Sad story I know, and I hate giving up.
-
-
A running bike is always worth more than a non runner. I'd get it running first and then decide about adding the accessory parts.Ed
To measure is to know.
Mikuni O-ring Kits For Sale...https://www.thegsresources.com/_foru...ts#post1703182
Top Newbie Mistakes thread...http://www.thegsresources.com/_forum...d.php?t=171846
Carb rebuild tutorial...https://gsarchive.bwringer.com/mtsac...d_Tutorial.pdf
KZ750E Rebuild Thread...http://www.thegsresources.com/_forum...0-Resurrection -
If you sell the bike as a pile of parts, you will not get anything near what you will for it in running condition, or by selling each part one-by-one on eBay. Since motivation is your issue, I seriously doubt you want to go the eBay route.
If you just want to unload it and be done, and don't care about all the lost moniez, post it up on the parts wanted forum. For the right (low) price, someone will take it.
I have some problems with motivation myself, one thing that seems to work consistently is to start with something small. Polish or paint a piece. Bolt one thing to another. Mount a tire. Before you know it, you're halfway done and having fun again.Comment
-
Thanks EIL and Nessism, I appreciate the advice. I did buy the paste today to grind the valves. Perhaps I will start that and see where I get to.Comment
-
One step at a time my friend...
Look at my signature. Determination will see your project through. Tell yourself your going to finish it.Comment
-
Today I reground the valve seats, tomorrow I will replace valve guide seals.Comment
-
Well done - keep going. We all have days/weeks/months/sometimes years when we don't feel like it.
Keep us posted (give us some pics) and we'll support you.
GreetingsRichard
sigpic
GS1150 EF bought Jun 2015
GS1150 ES bought Mar 2014: ES Makeover Thread AND blog: Go to the Blog
GS1100 G (2) bought Aug 2013: Road Runner Project Thread AND blog: Go to the Blog
GS1100 G (1) Dad bought new 1985 (in rebuild) see: Dad's GS1100 G Rebuild AND blog: Go to the Blog
Previously owned: Suzuki GS750 EF (Canada), Suzuki GS750 (UK)(Avatar circa 1977), Yamaha XT500, Suzuki T500, Honda XL125, Garelli 50
Join the United Kingdom (UK) Suzuki GS Facebook Group hereComment
-
When I bought my GS1000 UTTER basket case, the first thing I did was buy two new tyres. That meant that money had been spent, and tyres if left for too long will go hard and lose their grip, etc. So that mean that my Inner Scrooge was now the one driving the project before the tyres got too old.
Comment
-
Today I spent 3 hours installing the 8 valves 2 hours for the 1st one and 1 hour for the other 7, phew. In that 2 hours I discovered that you need to expose the slot where the cotter half's seat and a bit more. Some Moly paste also helps the cotter half's stay in place. Finally the whole process would have been easier, removal and installation if I had purchased the right tool instead of making my own. Regardless its done, yeh. Cylinder installation next weekend and once again I do not have the right tool. When I was a motorcycle mechanic in the 70s all we used was our hands squeezing the rings and sliding the cylinders on. My recollection is that it was not easy and easy to break a ring but I will give it a try old school.Comment
-
Good work, keep at it, Jennifer is 4 years and counting already, had a few spells where the motivation just was not there.
Every little thing you do, no matter how small is one step closer.Comment
-
Thanks FlyboyComment
-
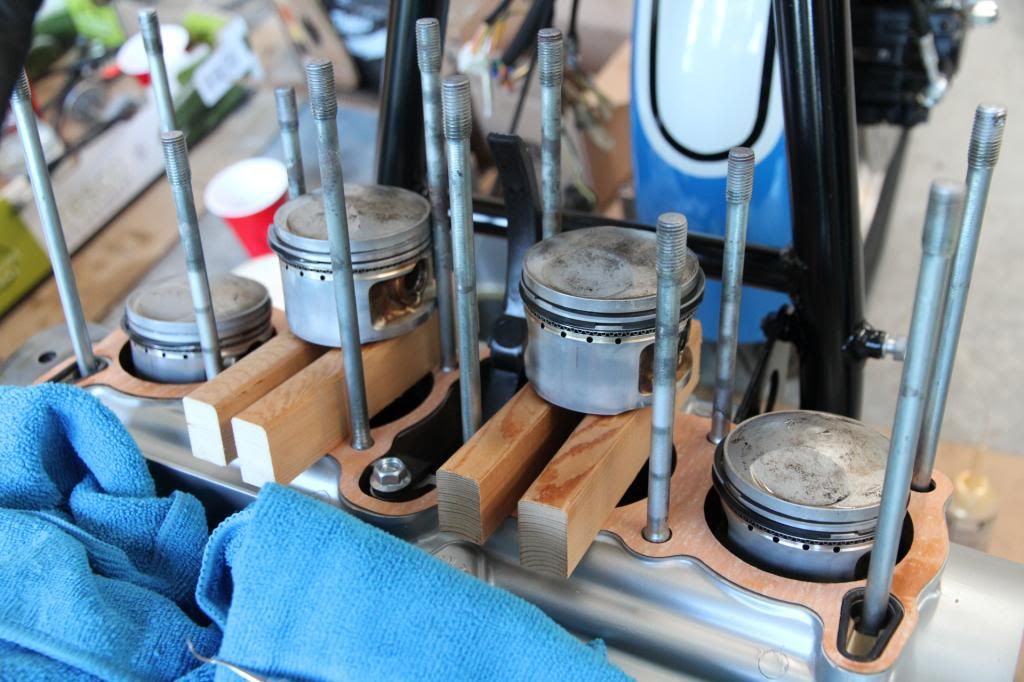
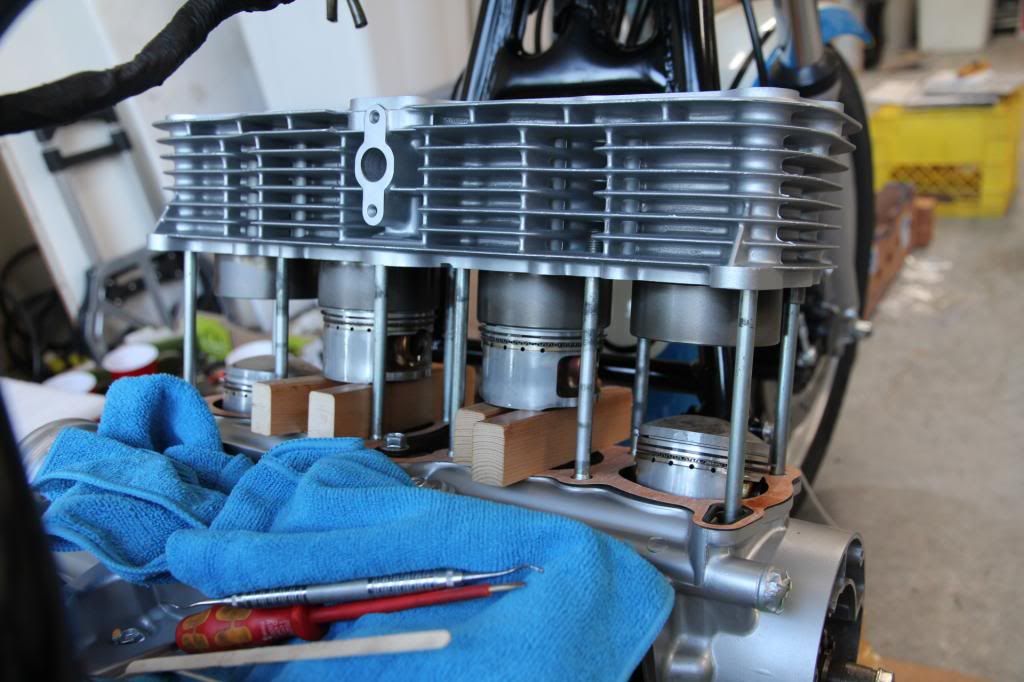
I used the wooden block method, and it worked well, I carefully used a small screw driver to compress the last piece of ring in so the cylinder would slide down as my fingers were not quite strong enough.
Here's a couple of pictures of the setup, the wooden blocks keep everything nice and straight.
 2018 Honda Africa Twin AS
2013 DR 650 Grey, sold 1981 GS 650E Silver,
1980 GS1000ST Blue & White, X2
2012 DL650 Vstrom Foxy Orange, in storage
1981 CT110 X2 "Postie Bikes" Gone to a New Home.
2002 BMW 1150 GS Blue & White - Sold
1975 BMW R90/6 Black - Sold 1984 GS1150EF Sold
1982 BMW R100 Africa trip, Stolen - Recovered- Sold
1977-1980 Suzuki GS550, GS1000E, GS1000S GSX750, GSX1100,s
Hondas ST90, CR125 CB175 , CB350 CB750, NSU Quickly, Yamaha RD's 350/400,Comment
-
Make yourself a pair of piston ring compressors out of strips of thin aluminium sheet, about 1" in width, which can be clamped up using 1" long self-tapping screws. They work a treat, and the soft aluminium means nothing gets scored or scratched.When I was a motorcycle mechanic in the 70s all we used was our hands squeezing the rings and sliding the cylinders on. My recollection is that it was not easy and easy to break a ring but I will give it a try old school.Comment
-
Push those rings in with popsicle sticks. Eat the popsicles 1st.Comment
-
Ok cool those are good suggestions. Currently the 2 to end pistons are up do you see any problem doing it in that configuration?Comment


Comment