• Required reading for all forum users!!!

    Welcome!
    Register to access the full functionality of the GSResources forum. Until you register and activate your account you will not have full forum access, nor will you be able to post or reply to messages.

    A note to new registrants...
    All new forum registrations must be activated via email before you have full access to the forum.

    A Special Note about Email accounts!
    DO NOT SIGN UP USING hotmail, outlook, gmx, sbcglobal, att, bellsouth or email.com. They delete our forum signup emails.

    A note to old forum members...
    I receive numerous requests from people who can no longer log in because their accounts were deleted. As mentioned in the forum FAQ, user accounts are deleted if you haven't logged in for the past 6 months. If you can't log in, then create a new forum account. If you don't get an error message, then check your email account for an activation message. If you get a message stating that the email address is already in use, then your account still exists so follow the instructions in the forum FAQ for resetting your password.

    Have you forgotten your password or have a new email address? Then read the forum FAQ for details on how to reset it.

    Any email requests for "can't log in anymore" problems or "lost my password" problems will be deleted. Read the forum FAQ and follow the instructions there - that's what we have one for...

  • Returning Visitors

    If you are a returning visitor who never received your confirmation email, then odds are your email provider is blockinig emails from our server. The only thing that can be done to get around this is you will have to try creating another forum account using an email address from another domain.

    If you are a returning visitor to the forum and can't log in using your old forum name and password but used to be able to then chances are your account is deleted. Purges of the databases are done regularly. You will have to create a new forum account and you should be all set.

1982 GS650GL. 2nd gear is busted. Time to take apart the engine

  • Thread starter Thread starter William Groebe
  • Start date Start date
Took apart the transmission shafts and found that on the mainshaft the 2nd gear teeth are worn down a little on the driven edge of every other tooth. (Every other tooth contacts the 5th gear inner teeth)


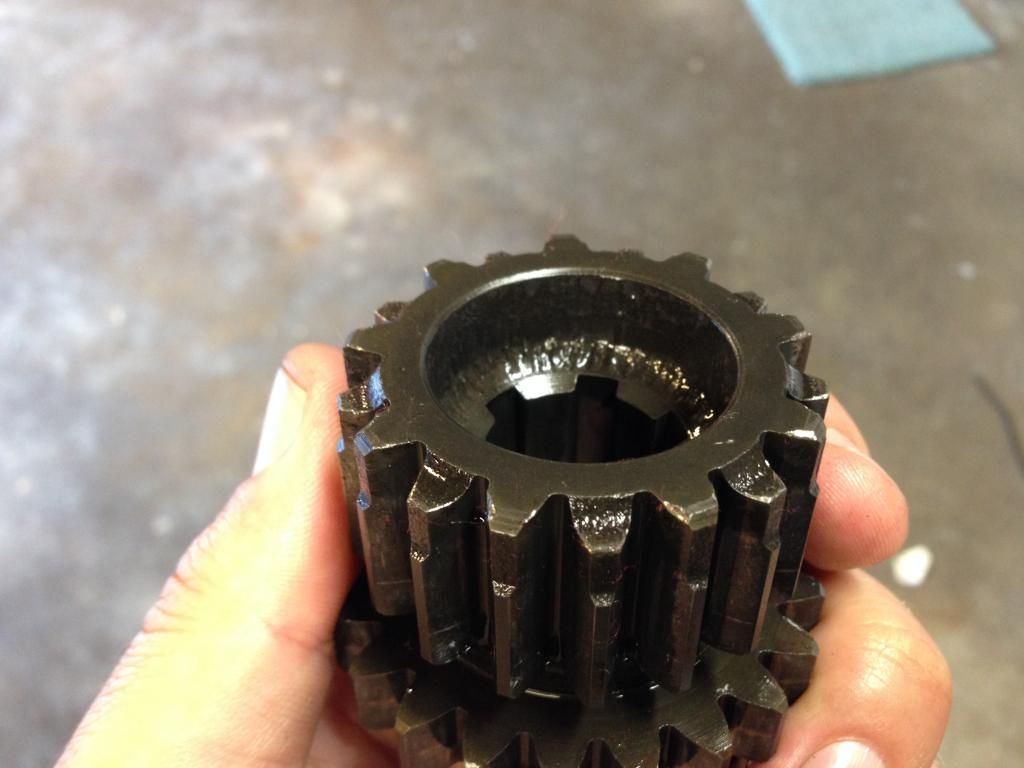
And the adjoining 5th gear inner teeth are a little worn down on the corners


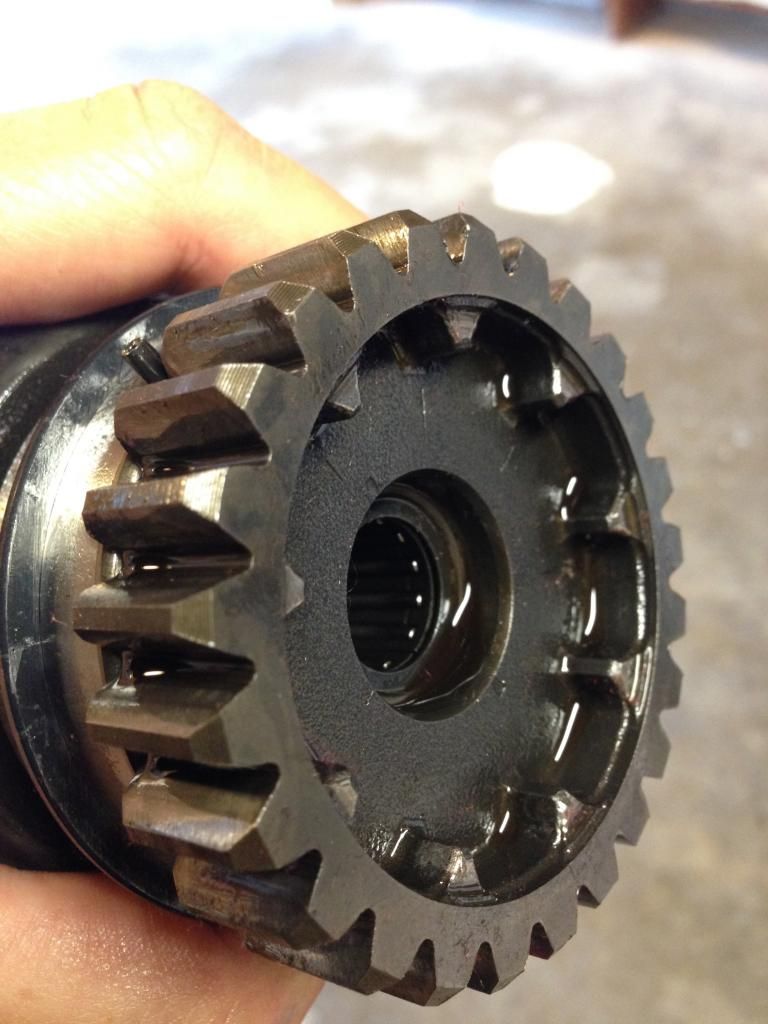
On the layshaft there is very minimal wear on the inner teeth of the 5th gear which is adjacent to the 2nd gear.


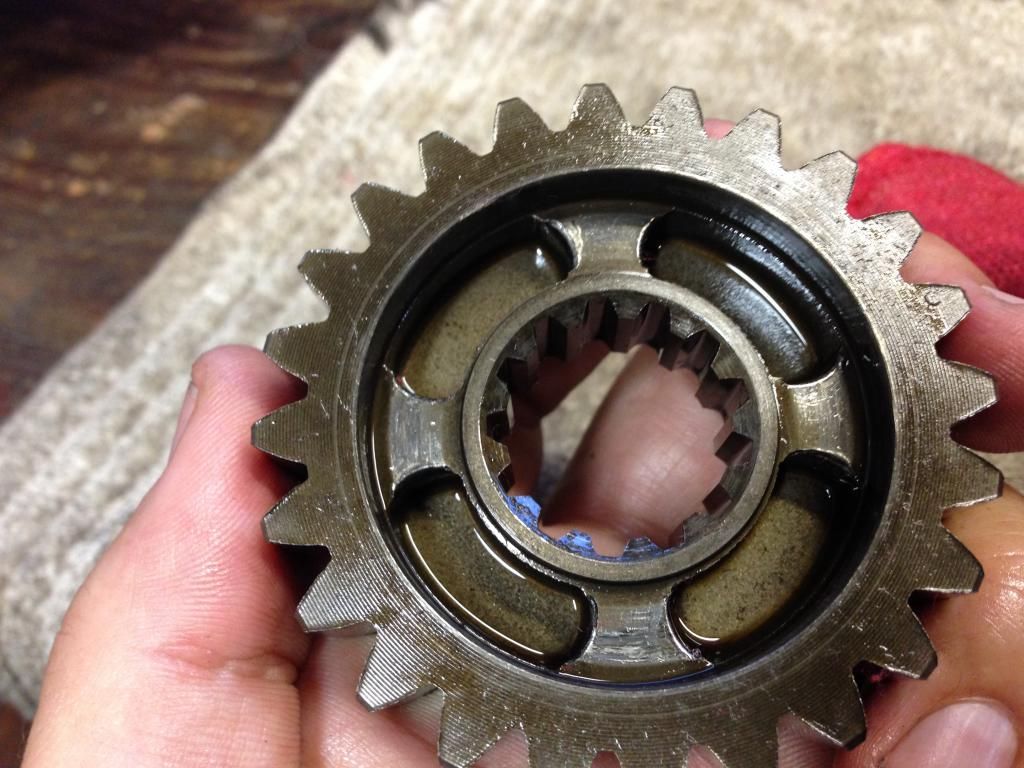
Also on the layshaft I can't see any real wear on the 2nd gear dogs, but maybe the edge should be even more sharp. I guess it's slightly rounded.


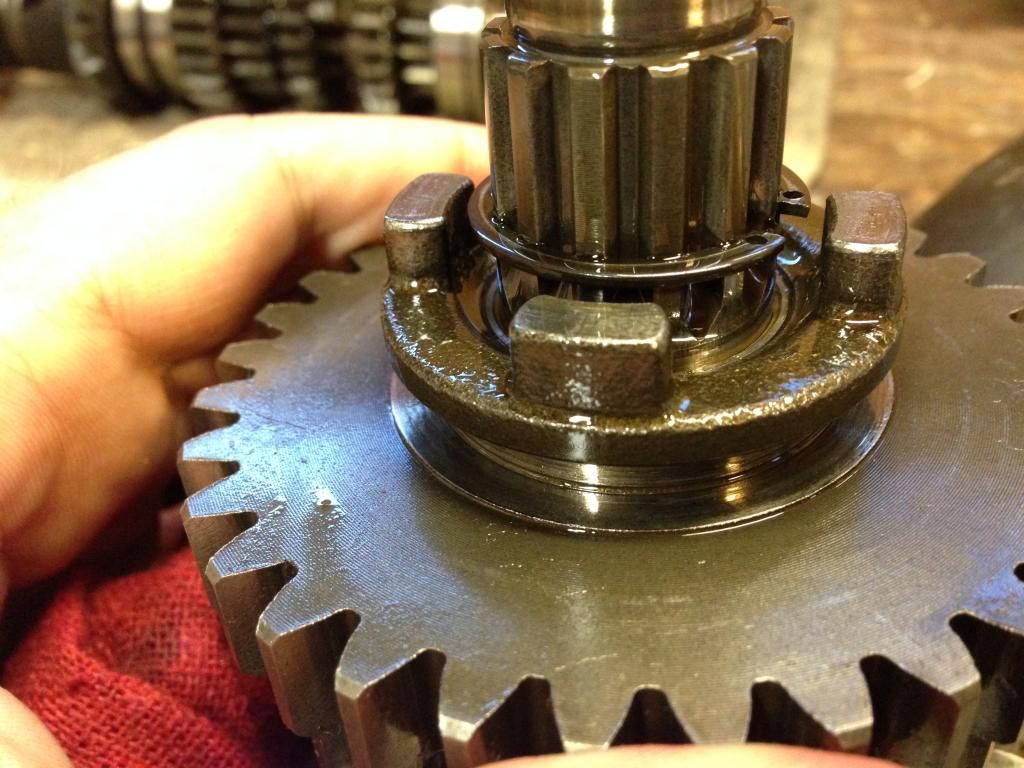
All the other gears look perfectly fine. And these ones don't look that bad to me, but like I said, I don't know anything about transmissions. I guess the one that looks the worst is the 2nd gear on the main shaft.

Should I replace all four of these gears? What says the GS forum?
 
Something I figured out while taking everything apart is that the gouge in the groove of the gear shift shaft is where the messed up fork sits while in 2nd gear. Aha!
 
Oh yeah.

I was also able to figure out how to put the end parts of the gear shift shaft back together. Turns out I had taken a picture of it before disassembly. I put the pins back in to the holes with the springs round side down, and then put the shims in place over the pins and put it back onto the shaft. Here it is now all put back together and sitting in the crankcase for good keeping until I buy a new shift shaft.
 
"Took apart the transmission shafts and found that on the mainshaft the 2nd gear teeth are worn down a little on the driven edge of every other tooth. (Every other tooth contacts the 5th gear inner teeth)"

On your first pic..... The one showing gears
those "lower"teeth are designed like that (every other tooth)- this apparently aids the transition into fifth gear "lockup"- second gear teeth are really the bigger diameter ones on that "double" gear set.

edit. Here's a pic of shifting stuff

image.jpg
 
Last edited:
Yesterday's mail brought me a new (used) transmission, along with a bunch of engine gaskets. I'm waiting on a few more necessities, and then I'll be ready to put this machine back together.

Hopefully I'll be enjoying a nice long Saturday in the garage.
 
first off, photos of the score man! also, did you need to tear the motor this far apart to split the cases? i'm getting ready to do the exact same thing to my 81 650g. it'd be awesome if i don't have to
 
60ratrod. I'm not sure if you'll need to pull apart as much as I did, but my engine was leaking from the head, head cover, and cylinder , and I had no 2nd gear, so I needed to pretty much pull everything apart. But this is my first time doing this, so I can't really go about giving advice yet. Especially not until I put this bike back together and get it running again. *fingers crossed*

Here's where I am with my loot so far.


New tranny. New gaskets for the head, cylinder block, and clutch cover. And Threebond 1194 for the crankcase halves. The shift drum looks to be in great shape. No gouges anywhere along any of the grooves. And the shift forks look good too. The gears look about the same as the ones I have, but I think I'm going to go ahead and put the whole new transmission in there anyways just in case.

I'm still waiting for the new intake boots and o-rings, and the cam chain tensioner gasket. My intake boots were probably the originals, and it looks like someone caked on some kind of epoxy to keep them from falling apart. And check out these o-rings. Yeah right.


In the meantime I've been doing some cleaning of engine parts and bolts. Man, was my bike dirty and rusty, and covered in caked on and burned on oil and other gunk. I dropped the exhaust bolts in a bucket of vinegar for a couple of days, and then scrubbed them good with some green scotch brite pads. Here's a before and after.


I haven't taken any after photos of the cylinder but check out the before. Oil had been leaking all over the whole thing for decades.


Believe it or not, this is the after photo of the cleaned up oil pan cover. It started off completely black. I decided I'm not going to make this bike museum quality, but just give it a decent wash, so that in the future I'll be able to tell where leaks are coming from.


I'm hoping I get everything by this Friday so I can get to work this weekend.
I can't wait.
 
I gave my motor a good soak in power purple and gave it a blast from my pressure washer. Such a huge difference. I think my motor was painted silver. If I tear it down as far as you have then I might look into having it powder coated either black like the frame or blue like what I'm gonna paint the tank, covers, and rear fairing. The cover screws and bolts will be replaced by black oxide allen button head screws. JIS fasteners suck to take out when they've been in there a while. I had to drill the heads off the right side shift cover to get it off
 
Snapped a bolt!! ARGH! I feel sick to my stomach

Snapped a bolt!! ARGH! I feel sick to my stomach

I spent the whole weekend cleaning and prepping the engine for reassembly. I put some threebond on the crankcase and put the two halves together. It's starting to get late, but I just wanted to tighten down the lower crankcase bolts to let the two halves set together overnight.

And then.. on the third to last bolt I was turning the torque wrench and I didn't feel a click and so I kept turning until SNAP.

NOOOOOOOOOOOO!


Now I've got to take all the bolts back out, separate the halves, drill out the lower part of this screw, or if I'm lucky I will be able to use my vise grips on the busted end and pull it out. We'll see. Then I've got to remove all the shafts, forks and drum and clean off the mating surfaces from the threebond. Then reapply the threebond and start putting it all back together again.

What a let down.
 
apply some anti-sieze before out put the bolts back in. steel and aluminum don't get along too well, and the anti-sieze will make the install easier and prevent corrosion on the threads
 
eil - It's a new torque wrench, so I'd like to say it's a dodgy bolt, but maybe the wrench is too new. I haven't gotten the feel for it yet.

60ratrod - The manual doesn't say anything about putting anti-seize on the bolts, so I was not planning on using any, but I'm open to suggestions. I just want to stay as close to the "standard operating procedure" as possible. I'm new to this, so I don't want to stray too far or I'm liable to get lost.
 
anti-sieze is just a good measure to make sure that you don't have this problem in the future. it's worse with stainless steel fasteners. the corrosion reaction is so intense that it happens quickly when moisture is introduced and it's bad. we had a jet on deployment that had a stainless steel patch put in way before we got it and it corroded a huge hole. antiseize is just a good precautionary measure to minimize the dissimilar metals corrosion. i'm guessing that was part of what happened with that bolt
 
60ratrod. Thanks, man. I'll go ahead and pick up some anti-seize.

On another note, on inspection last night I noticed these little damaged areas (brinelling?) in the upper case where the driven shaft sits.
Is there anything I can do about this? Should I be worried about this?

 
Ok, so I went ahead and attempted to put the cases together again tonight. I'd bought a replacement 6mm bolt for the one that had snapped. I put a little anti-seize on each bolt to help fight future corrosion. Threebond on the mating surfaces. Everything is going as planned. I'm being extra careful torquing down the bolts when CRACK! Another one of the 6mm bolts snapped. This time I was very careful and had not only rotated the wrench slowly and carefully, but had set the initial torque value to 3ft-lb instead of 4.5. It's the damn bolts! Apparently the 6mm bolts have just corroded over time. I'm lucky I was able to get them off in one piece in the first place. Tomorrow I'm going to the autoparts store and I'm going to buy all new 6mm bolts for the case. This is getting ridiculous.

Oh well. Taking it apart again for cleaning and prepping for another go tomorrow... again.

 
I would really try another torque wrench...Ideally you need a 1/4" with 0-50 inchpounds. or zero-100 inchpounds. simply convert the 3 ( or whatever the correct torque) is by multiplying by 12..... 3 ft./lbs. = 36 inchpounds !!!
If you are using a 3/8" or worse yet, a 1/2" torque wrench..you will never get it correct because the reading is so negligible it may be WAAY OFF. if you are using a large torque wrench and trying to use it on the LOWER part of the scale, thats where it will be most incorrect. and I suspect thats why you are snapping bolts, rather than them being bad.
always, on any measuring device, the mid to 3/4 range of the device is the most accurate, not the lowest portion.
at least I would check that wrench against another good one for future knowledge!!!!
forgive me if you are already using a small wrench, i just wanna make sure!!!!
 
Last edited:
barnbiketom - I'll go get an inchpound wrench today. I am using a large footpound wrench, and I didn't know about the readings being way off at the lower end.

But on a better note. I did get the cases together this morning before heading off to work. Went to the autoparts store first thing in the morning, got the new 6mm bolts, went home, torqued everything down slowly and it all worked great. Can't wait to get back home tonight and see how far I can get putting everything back together.

Of course with all the trouble I've been going through I bet that after I get the bike all together I'll take it out for its first ride and there will be a Bellagio fountain of oil leaks spraying out of my engine. Well, that will be for another day. For now, it's reconstruction time.

 
Glad you finally got it back together. For torque wrenches, I really like the GearWrench series. They run about $100 each but they'll be the last torque wrenches you'll ever need.
 
Alright.

Thanks to barnbiketom for explaining torque wrenches for me. Nowhere on the 5-80ft-lb wrench packaging does it say 'this doesn't actually accurately work for 5ft-lbs. I bought myself an in-lb wrench today after work.

I'm making some good progress. If all goes well I may be riding to work on Monday.


Back
Top