• Required reading for all forum users!!!

    Welcome!
    Register to access the full functionality of the GSResources forum. Until you register and activate your account you will not have full forum access, nor will you be able to post or reply to messages.

    A note to new registrants...
    All new forum registrations must be activated via email before you have full access to the forum.

    A Special Note about Email accounts!
    DO NOT SIGN UP USING hotmail, outlook, gmx, sbcglobal, att, bellsouth or email.com. They delete our forum signup emails.

    A note to old forum members...
    I receive numerous requests from people who can no longer log in because their accounts were deleted. As mentioned in the forum FAQ, user accounts are deleted if you haven't logged in for the past 6 months. If you can't log in, then create a new forum account. If you don't get an error message, then check your email account for an activation message. If you get a message stating that the email address is already in use, then your account still exists so follow the instructions in the forum FAQ for resetting your password.

    Have you forgotten your password or have a new email address? Then read the forum FAQ for details on how to reset it.

    Any email requests for "can't log in anymore" problems or "lost my password" problems will be deleted. Read the forum FAQ and follow the instructions there - that's what we have one for...

  • Returning Visitors

    If you are a returning visitor who never received your confirmation email, then odds are your email provider is blockinig emails from our server. The only thing that can be done to get around this is you will have to try creating another forum account using an email address from another domain.

    If you are a returning visitor to the forum and can't log in using your old forum name and password but used to be able to then chances are your account is deleted. Purges of the databases are done regularly. You will have to create a new forum account and you should be all set.

1983_GS750E - Rebuild

  • Thread starter Thread starter GateKeeper
  • Start date Start date
Great job on those wheels! they look better than mines! :)

Thanks.......spent close to 12 hours on those rims, about 6 hours each, between, sanding, polishing, taping, painting, then sanding again, then paint again, then clean up and give em a nice wipe with a microfiber cloth...

but they came out as I say,,,,minty.......now they are in the basement, curing until they are ready to go back, I did try to put the rotors back on, but they would not go, when I painted the rotors middle parts, paint is now on the hub portion, and it will not go on to the rim, so I will have to sand off that little bit of paint on the rotor, and all will be good, talk about a tight tolerance......

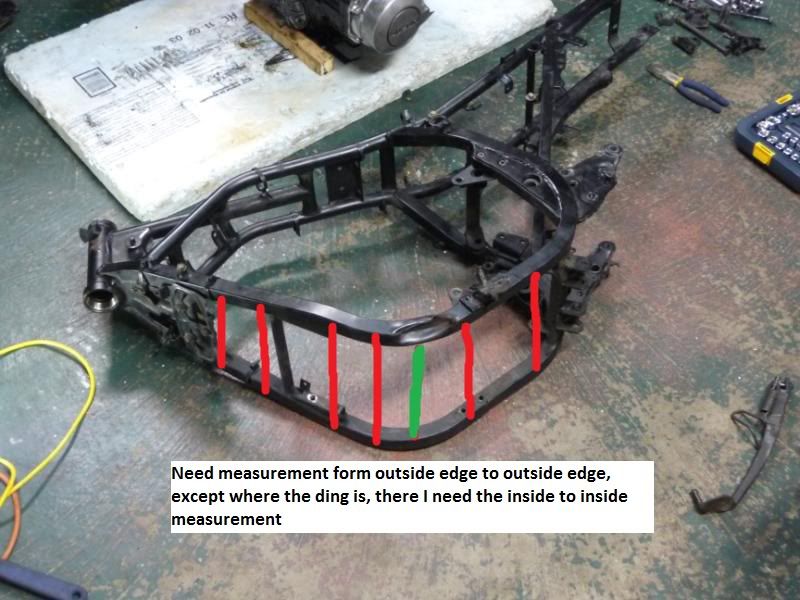
Will check measurements tonight for you.

Spyug

Thanks for checking on this for me....and appreciate the link to the home brew aluminum welding, it just might work, unless I can get the guy who is welding up my frame to do the holes as well......


Long story short, it's my dad who will do the frame work, but at my brothers shop, me and bro don't talk, but I asked the old man, and he said he will do it for me......me happy.....:D:D:D
I just don't know how good he will be in trying to weld up the aluminum holes, I will ask, cause the motor is way to heavy to take over there and just hope he will or can do it.

but those measurements will be great....

I hope the bumper paint will work, and not flake off quickly, it should have some give to it so it should not crack, and if it can be put on a bumper that takes a bit more abuse than an air box that is well protected, plus the chain guard, I should be OK, we used to use plastic trim paint to spray the inside of our snowmobile windshields to blacken them out, it was sprayed on the inside, this stuff has held up for over 10 years, but I couldn't find the same product we used back then, so I figured lets try this....

Cheers

DAn
 
Last edited:
yeah, i think i ll have the exact same issue later on!

I did not polished mine, because i am usually not a fan of polished pieces, but hell! yours look so pretty!
 
I will try to take some pictures of them outside, indoor pictures always look like crap, but then again this time of year we don't have a whole lot of sun either....lol

and nothing a little bit of sandpaper will not take care of, should get that extra bit a paint off with no issues
 
Dan, I'm sorry but I'm not going to be too much help. With the pipes on there is little to no room to get accurate measurements. I was able to take 2.

The first at the front of the frame just under the cross brace (below where the oil cooler would sit) I make it 26mm to the outside edges.

Lower down and just above your booboo I make it approximately 29.5mm to the outside edges.This was actually a best guess as I couldn't clearly see the tape measure. I was not able to get an inside measurement as the pipes run very close and the engine is also in the way.

Same with the bottom of the frame, the engine drops lower than the lowest point of the frame and the stock exhausts are also in the way.

I wish I could have gotten more for you but without a bare frame I don't see how.

Sorry my friend.

Spyug
 
No worries, and thanks for the offer and some of the measurements.....

Hopefully someone else will be able to get these measurements, that does have just the frame

It's not a rush, as the welding won't be for a couple of days

Cheers
 
OK, getting the frame welded, but want to ensure it is still in spec, and it has not bent in or out. I know a couple of you guys have the same bike and frame, could you please take a few measurements for me please and post, so I can take em to the welder to make sure it all stays within spec.....

Thanks

The red lines are outside edge to outside edge, and the green is inside to inside edge.....please try to take measurements in these areas, as this is what I will use to see if my frame is the same.

Please try to be as exact as possible, metric will be great, but imperial measurements will work as well

frame.jpg


Cheers

DAn


shameless bump
 
I can't be any help to you GK but maybe try posting in the general GS threads.
There has to be people here with bare frames that could do a quick measure for you.

Bruce.
 
#1 is 8 1/2"
#2 is 10 1/2"
The rest are 11 1/2" as near as I can tell with the sump and exhaust interfering with measuring.
 
Thanks Billy_Ricks, this will help

Hopefully someone with just the frame can chime in as well, measuring will be easy if it's just frame, etcheberri I think has just frame, I hope he sees this and can do some measuring as well, if hasn't already started assembly

@spyug, I don't think you meant mm, perhaps cm, but I got what you meant

Thanks guys...
 
@spyug, I don't think you meant mm, perhaps cm, but I got what you meant

I should stick with inches. I was finished school before everything went metric and I still have issues with it. I find myself always converting everything back to feet and inches, pounds and ounces, gallons and pints etc. I figure if God had wanted me to think metric, He/She would have made me French :)

I read on the GTA that you had checked the measurements and everything was still in spec. .That's good news, now get the old man to fire up the stick and "glue" on some re-enforcement.

I'm looking forward to seeing the fix.

Cheers,
Spyug

I kinda posted prematurely on the GTA forum, I was really only guessing at the time of that post, but it seems I am OK on the frame, there is only a slight difference right where the ding is, but we will be able to spread it back out and into speck. nothing seemed weird, as I did ride the bike in the condition it was in, ding and all, engine came out fine, and so did all nuts and bolts, it seemed to be spot on, but a check was to ease my mind...

I will try to get pics, probably only after the fix is done, I don't go to the shop much, unless I really have to, this was one of those times.

Forgot the inside measurement. It looks to be about 9 7/16".

Thanks, this is where I thought I was going to be out, and is, but not by much, it will get pushed back in place and all should good once again...


Overall, it will be OK, slightly off should not be a huge concern, new plates will be welded, this will strengthen the frame, and a set of plates will be put on the other side, just to make it look the same, as though Suzuki made it that way...LOL

If anyone still has measurements by all means post them, it will be good to have a good amount to go by, this little weld job should be done by next week....


Ohhh,,,Spyug, I think I will be ordering those Alumiweld rods as well, sent a pm to the place and seems it will do exactly what I need to do to fix up the holes, I can then drill and tap new ones, of the correct size and angle
 
Thanks for the offer....I will keep it in mind

I just checked out your build

http://www.thegsresources.com/_forum/showthread.php?t=165430

very nice, love the conversion

nice handle bars as well, wouldn't mind trying something like that on mine, and that green chain is awesome, was it expensive, or can I ask where you got it

Thanks

Don't remember where I got it. I took it of actually because I put a gsxr750 engine in the bike and had to switch to a 520 chain. Think I paid 90 for it though. Might have gotten it off of eBay.
 
Glad to hear the frame turned out to be good. That would have been a ****er. I just started rereading your thread and was looking at the wheels, airbox and chain guard those came out very very nice. I was thinking about painting mine and now it is a definite. Did you use the spray paint for plastic or something else? Anyway looking good.

Paul
 
The airbox, chain guard, was with a rattle can, on the can it says it's for Bumpers, as in car bumper.....it was a matte black, I guess it has some flex in it, so it don't crack once it dries.

I sanded down the box with a very fine paper, and cleaned it up, used some rubbing alcohol to wipe it down, and gave it a spray, let it dry and it came out really good, not that it's seen or anything , but it looks much better than it was....the chain guard was a shiny black, but I wanted to dull it down as well, so it got a spray......

we used to use this to spray the inside of our snowmobile windshields to make them look black, we never looked through them, and by spraying on the inside it got protection, and from the other side, it came out nice and shiny, a cheap way to black out the shield....
 
I think I will be ordering those Alumiweld rods as well, sent a pm to the place and seems it will do exactly what I need to do to fix up the holes, I can then drill and tap new ones, of the correct size and angle

I am pretty certain it will work for you. I haven't done much with mine although I'm planning on making a luggage rack for the 750 from aluminum strap and rod. I have practiced with it and as mentioned you need a bit of a hotter flame than propane can provide. Oxy/acet would be best but failing that I found Mapp gas to work. One thing that is crucial for it to work right is that the part you are welding needs to get to temperature. On thinking about it, I wonder if the head being so big will leach away a lot of the heat. You might have a bit of an issue with that and may need to use 2 heat sources perhaps. Maybe not. Just an observation.

I'm looking forward to seeing how the frame turns out. It shouldn't be too hard and putting stiffeners on the other side for visual balance is a good idea, that I wouldn't have thought of.

Good luck with it.

Cheers,
Spyug.
 
I might have found a local guy that does tig/mig welding, and knows his way around aluminum welding as well, it's through a friend, but right now we/I don't know if the guy is still around, he had a small shop in Oakville. Going to see if this pans out, as he can fill in the holes, I can the drill and tap new ones, and be certain the fill will hold.

I spoke to a guy at Miller Welding, he said the Alumiweld, might not have the tensile strength to put up with the pressure made by the bolt, as it might be a softer compound than the original aluminum, and the bolt might just strip out. It's unfortunate, that we cannot weld aluminum at the shop, otherwise it would get done there.... :-(


I will take pictures as soon as the frame has been fixed up....and ya I still wanted to keep it symmetrical, so I told my dad to do up the gussets/stiffeners (?) on both sides
 
I spoke to a guy at Miller Welding, he said the Alumiweld, might not have the tensile strength to put up with the pressure made by the bolt, as it might be a softer compound than the original aluminum, and the bolt might just strip out.
I'm not sure about that as they do say that it can be drilled and tapped. However he's likely got more knowledge than you or I so I guess I'd defer to his recommendation.

A pro welder with an aluminum Tig rig would be my first choice really anyway, I just mentioned the Alumiweld as a possible alternative for someone unable to find a welder.

It does sound like its coming together so that's the main thing.

Cheers,
spyug
 
Getting there slowly......and the Alumiweld will be my last resort if I cannot find another means....

Well buddy has gone out of business, so that takes care of that, so the search continues, I have a lead on one other place, will try to see them tomorrow.....for the aluminum welding, good thing this is during the winter, and no riding is expected at this time.....LOL

Keeping busy on polishing bits and pieces and painting other bits and pieces, so it keeps my mind off of the parts that are not going so well, but there is still at least 3 1/2 months left to work on this thing.....

no need to rush.....
 
hi, i have used the aluminum rods, you have to weld fast or it globs up bad, i think it would be ok , maybe even if you drill and use helicoils for final threads
 
Back
Top