• Required reading for all forum users!!!

    Welcome!
    Register to access the full functionality of the GSResources forum. Until you register and activate your account you will not have full forum access, nor will you be able to post or reply to messages.

    A note to new registrants...
    All new forum registrations must be activated via email before you have full access to the forum.

    A Special Note about Email accounts!
    DO NOT SIGN UP USING hotmail, outlook, gmx, sbcglobal, att, bellsouth or email.com. They delete our forum signup emails.

    A note to old forum members...
    I receive numerous requests from people who can no longer log in because their accounts were deleted. As mentioned in the forum FAQ, user accounts are deleted if you haven't logged in for the past 6 months. If you can't log in, then create a new forum account. If you don't get an error message, then check your email account for an activation message. If you get a message stating that the email address is already in use, then your account still exists so follow the instructions in the forum FAQ for resetting your password.

    Have you forgotten your password or have a new email address? Then read the forum FAQ for details on how to reset it.

    Any email requests for "can't log in anymore" problems or "lost my password" problems will be deleted. Read the forum FAQ and follow the instructions there - that's what we have one for...

  • Returning Visitors

    If you are a returning visitor who never received your confirmation email, then odds are your email provider is blockinig emails from our server. The only thing that can be done to get around this is you will have to try creating another forum account using an email address from another domain.

    If you are a returning visitor to the forum and can't log in using your old forum name and password but used to be able to then chances are your account is deleted. Purges of the databases are done regularly. You will have to create a new forum account and you should be all set.

1984 Katana 7/11

  • Thread starter Thread starter Guest
  • Start date Start date
Cheers Sam, I was pretty sure I'd got those right but being the first time I've assembled this gearbox there's no guarantees.

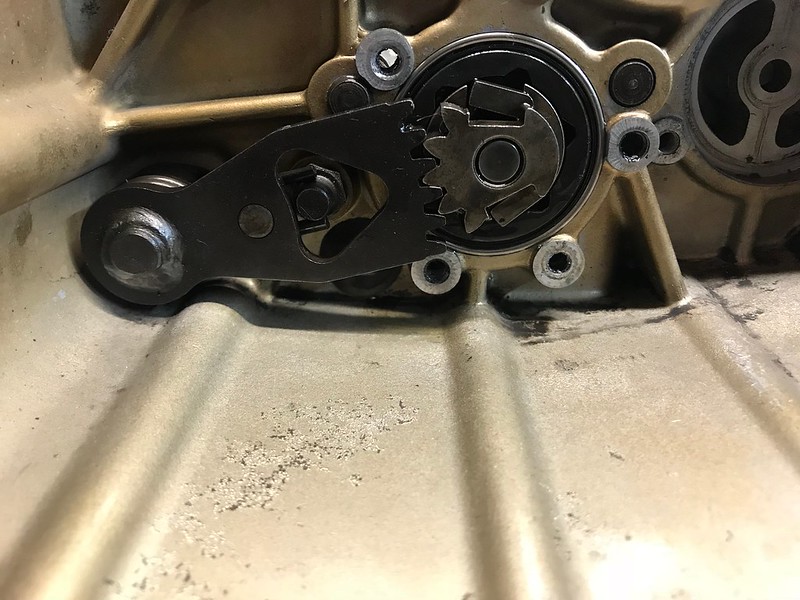
I saw that the pawls are designed to go in one way only by the recess for the spring, but I'll revisit for sure.

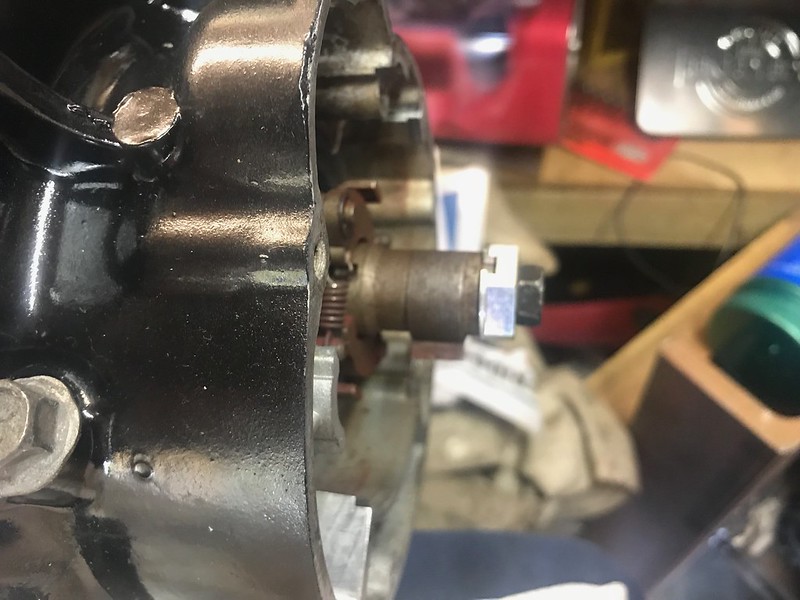
You're right on the shift lever shaft, but I'd removed it before taking that pic so it didn't obscure any pertinent details of the cam end on the shift drum.
 
Man I'm so confused with this gear shifting...

I'm definitely going exactly by the book, and the pawls on the cam end are definitely in correctly.

The shift drum is definitely in neutral with the neutral stopper sitting in the indent.

The cam end is set so the pawls are engaging in two of the recesses.

Untitled by starpoint73, on Flickr

If I slide the shift shaft in, no way is everything in a neat centre line, the cam end is definitely offset, and rotating the shift shaft runs out of shifting room real quick, and I know that's not right.

I know however this goes together it should be a short movement up or down, with the cam end being spring loaded and all basically selecting the next set of recesses to rotate the shift drum around.

I'm just not getting it...

Untitled by starpoint73, on Flickr

And of course if I set the shift shaft and cam end with the right alignment, the pawls are between recesses so all the shift shaft does is move it to a recess and it doesn't spring back again.

Untitled by starpoint73, on Flickr

I'm just so damn confused... can anyone enlighten me?
 
Ok, no idea what I did wrong the first time, but I put the retainers on, slipped the shifting shaft in, and good as gold.

Did the test fit to the upper case and gearbox again, and shifts fine from 1st to 5th and sits in neutral happily as well.

Looks like I'm good to put the cases together this week, so I ran a tap through all the crankcase threads as well last night to give them a clean up and they all feel good too.
 
An older, wiser mechanic that I used to work with at a Honda dealership used to watch me at times (more then I want to admit) struggle with something that he could do with his eyes closed and one hand tied behind his back. He would patiently watch me get to the point of literally throwing a wrench. Instead of doing it for me he would tell me, these are precision machines, they only go together (correctly) one way. His advise was always to walk away when you get frustrated, think about it a bit, and 99% of the time that worked. He was one of the best mechanics I've ever known.
 
I was going to suggest installing the retainer.
The retainer probably restricts any end play in the drum.
I imagine the either drum, or the shaft was trying to move outward ever so slightly, and causing a bind.
 
That's excellent advice Larry! Walking away from things has helped me many times over the years... much better than getting a bigger hammer :D

Greg, definitely a good possibility there, and I think adding more oil definitely helped too. Something I forget sometimes while test fitting these bits together is that the engine has lots of oil on all the bits, and typically the gearboxes don't shift too well without the motor spinning also.

I gave myself a night off last night but hopefully tonight I can get the bolts and gasket surface cleaned up ready to put the cases together.
 
I had an exciting night last night... cleaned the crankcase gasket surfaces up then cleaned and sorted the crankcase bolts.

That does mean the cases should be ready to go together tonight though!

Untitled by starpoint73, on Flickr
 
I'd go ahead and install APE main bearing studs, and cylinder studs & nuts. More peace of mind.
Although to do all that would probably run a couple hundred bucks. Not including shipping. And do you guys pay a VAT down there?
 
I'd love to Greg but that would set me back a couple of months at this stage. I've pretty much hit the end of the available $$ for now and I can only put a certain amount away each month towards the build. I can't see finishing this year as it is factoring in the things I have to do already unfortunately. I think I'm going to hit a point where I have a running Kat waiting for the last items like tyres and chain and sprockets.

I did get the cases together last night though.

Untitled by starpoint73, on Flickr

I had to stop short of putting the sump cover on because I discovered I hadn't ordered the O ring that sits between the cover and the lower case.

I'll get that as well as the O rings for the oil pump and pressure switch ordered today, hopefully they're in stock and not back ordered again.
 
Yep Sam, although the waiting ended up being for the best... started looking at putting more stuff together on Sunday and realised I was missing more bits so I had to order more stuff... then thought I need to replace the footrest and rear master cylinder bolts where the generic black ones I put on had already started to rust (yep, rust, not moved an inch and rusting, not happy!)... so I ordered those as well... I think our much preferred dealer over here is really happy with me at the moment somehow... :) (they're not a stealer either, they're a real fair dinkum dealer)

Anyway, everything not in stock arrived yesterday and all got posted so I should have a bunch of stuff I can get started on tonight. Yay!
 
True, some of my best progress has come from waiting for parts... I usually tackle something tedious I've been avoiding, thinking I'll just get started on it until my parts come. usually it's done by the time my package arrives. I'm just about done sorting out my wiring because I've been waiting for parts...

That sucks about the bolts rusting already... I've actually been rubbing some wizards power seal on some bolt heads... not new ones, but the ones I've either replated or just polished...
 
Yep I know what you mean, I definitely have stuff I've procrastinated on but I also know there's fast approaching a time where I'll be either waiting or out of $$ so those bits can get done.

Haven't heard of wizards power seal but I might have to look into it... it's annoying for sure! I think in future for non-genuine bolts I'll stick with zinc plated rather than black, as the zinc plated ones seem to be fine.

All my outstanding bits arrived from the dealer yesterday, so I grabbed my gaskets and set to it.

Untitled by starpoint73, on Flickr

Sump cover is on at last.

Untitled by starpoint73, on Flickr

All the retainers under the clutch are in as well as the oil pump and mechanical advance.

Untitled by starpoint73, on Flickr

The starter clutch/rotor is on and all torqued up as well as the shifting shaft oil seal and neutral switch, although I still need to sort out the wire for the neutral switch and get it protected and terminated yet.

Untitled by starpoint73, on Flickr

I've yet to get the oil pressure switch and starter motor in but I have all the bits to do so now.

Aside from the clutch and case covers that pretty much wraps up the bottom end, but I'm not sure if I'll put the clutch in just yet or leave it until the head and barrels are on and it's all in the frame to save a bit of weight during the install. I don't think it will make much difference though.

Next up I can look at getting the cylinders honed and check the valves and seats out to see if they need any attention.

I also have some proper bolts to replace the annoyingly rusted footpeg and rear master cylinder bolts as well.
 
Cheers Larry, fun putting it together too :D I wish the pace was a bit quicker but I must be patient, good things take time right? :rolleyes:

I got the oil pressure switch and starter motor in last night, no pic's though as it's a bit tricky with the bottom end still inverted.

However those ugly rusted footpeg and rear master cylinder bolts have been replaced and are much prettier.

Untitled by starpoint73, on Flickr

Untitled by starpoint73, on Flickr

Now on to the top end...
 
I've been a bit under the weather so no real progress but I did get some top end inspection done on Sunday and I reckon things are looking good.

All cam caps and bolts are accounted for so I just need to get head nuts. I'll have to get them in from the US though as four of those are listed at $103.40 each from my preferred local dealer here but only $US6.40 from Partzilla... big difference!

Untitled by starpoint73, on Flickr

I had a close look at the valves and seats, and they look in much better shape than the ones on the 450 did when I rebuilt it, so I'm happy enough to just finish cleaning the bottom of the valves up with a wire wheel and then lap them in.

To me the valves don't need facing and the seats don't need cutting.

Untitled by starpoint73, on Flickr

Untitled by starpoint73, on Flickr

The pistons look all good too, again just need a bit more cleaning up.

Untitled by starpoint73, on Flickr

The valve spring free lengths all measure good but I've yet to measure them with weight on to check tension.

The guy who did the crankshaft truing did say he may be able to rustle up a lightly used set of racing springs which will help reduce valve seat wear, so I'll check that when I contact him about the top end gaskets next pay and see if that's an option or not. Depending on price that could be a nice little upgrade.

Untitled by starpoint73, on Flickr

The valves feel like they all sit in nicely and appeared to have a nice bit of suction removing them with my finger placed over the valve stem seal, so I've just picked a spot for them all and located them in an egg container ready for cleaning up and lapping in.

Untitled by starpoint73, on Flickr

Untitled by starpoint73, on Flickr
 
I'm beginning to think the only reason this top end was pulled apart was to do the porting job, and a porting job has definitely been done. I've not looked at another GSX1100 or Kat head before to see how they look stock, but it's obvious to me it's been done. No idea if it's a good job or not of course.

Not so easy to photograph for me either...

Untitled by starpoint73, on Flickr

Untitled by starpoint73, on Flickr

Untitled by starpoint73, on Flickr

Untitled by starpoint73, on Flickr

The only other catch I've discovered is the ignition cover, and either I've got the wrong mechanical advance unit on or the cover's not quite right... I'm leaning towards the wrong cover though as the advance bolts on with the correct bolt, and the fiche calls for 30mm long screws which look like they'd be the correct length also.

Basically the cover seems too shallow, hitting the advance before sitting on the gasket surface. Can anyone confirm for me and maybe have a pic of how it should be?

Untitled by starpoint73, on Flickr

Untitled by starpoint73, on Flickr

I think next up is honing the cylinders and lapping the valves in ready for a leak down test.

Then the cylinders and head need painting ready to assemble, so I'll need to get rings, top end gaskets and valve stem seals, and some paint real soon.
 
That really looks like an 1150 cover.
Much to shallow to be an 1100 cover.
And the 1100 covers have a shallow recess for the emblem. The 1150 covers have the raised boss visible in your photo.
 
1100 cover.
(One of these days I'll figure out how to orient photos)
 

Attachments

  • image.jpg
    image.jpg
    15.1 KB · Views: 0
Last edited:
1150 cover.
Disregard the hole where the dyna ignition pokes through.
 

Attachments

  • image.jpg
    image.jpg
    15.7 KB · Views: 0
Back
Top