• Required reading for all forum users!!!

    Welcome!
    Register to access the full functionality of the GSResources forum. Until you register and activate your account you will not have full forum access, nor will you be able to post or reply to messages.

    A note to new registrants...
    All new forum registrations must be activated via email before you have full access to the forum.

    A Special Note about Email accounts!
    DO NOT SIGN UP USING hotmail, outlook, gmx, sbcglobal, att, bellsouth or email.com. They delete our forum signup emails.

    A note to old forum members...
    I receive numerous requests from people who can no longer log in because their accounts were deleted. As mentioned in the forum FAQ, user accounts are deleted if you haven't logged in for the past 6 months. If you can't log in, then create a new forum account. If you don't get an error message, then check your email account for an activation message. If you get a message stating that the email address is already in use, then your account still exists so follow the instructions in the forum FAQ for resetting your password.

    Have you forgotten your password or have a new email address? Then read the forum FAQ for details on how to reset it.

    Any email requests for "can't log in anymore" problems or "lost my password" problems will be deleted. Read the forum FAQ and follow the instructions there - that's what we have one for...

  • Returning Visitors

    If you are a returning visitor who never received your confirmation email, then odds are your email provider is blockinig emails from our server. The only thing that can be done to get around this is you will have to try creating another forum account using an email address from another domain.

    If you are a returning visitor to the forum and can't log in using your old forum name and password but used to be able to then chances are your account is deleted. Purges of the databases are done regularly. You will have to create a new forum account and you should be all set.

77 GS400 to Cafe Project

  • Thread starter Thread starter Englishman
  • Start date Start date
E

Englishman

Guest
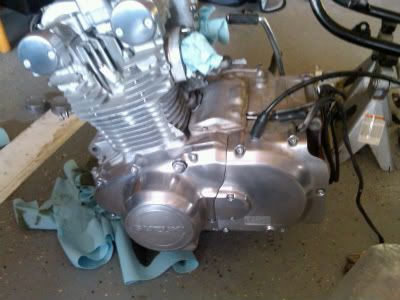
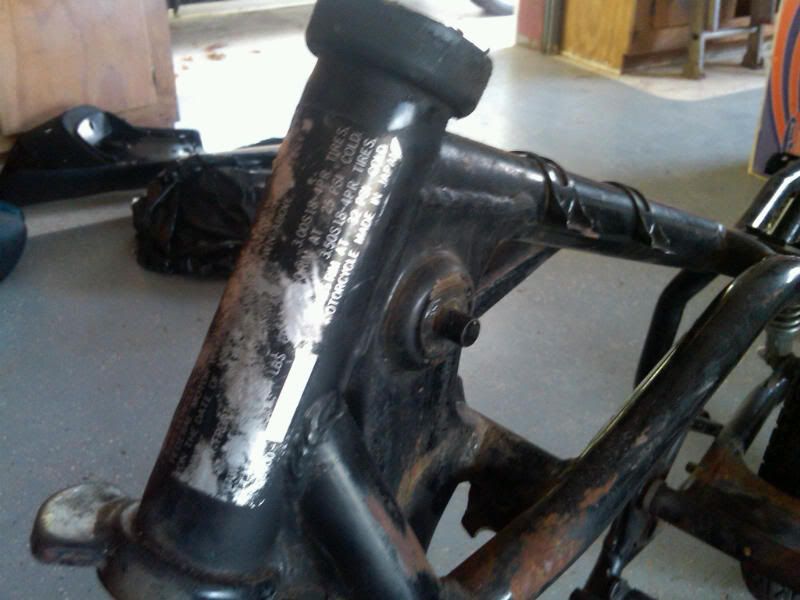
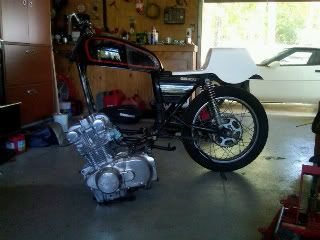
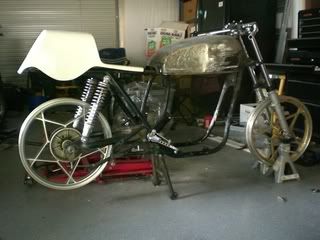
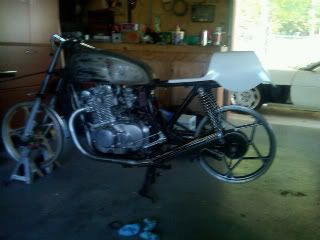
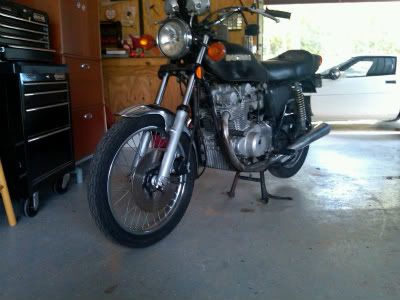
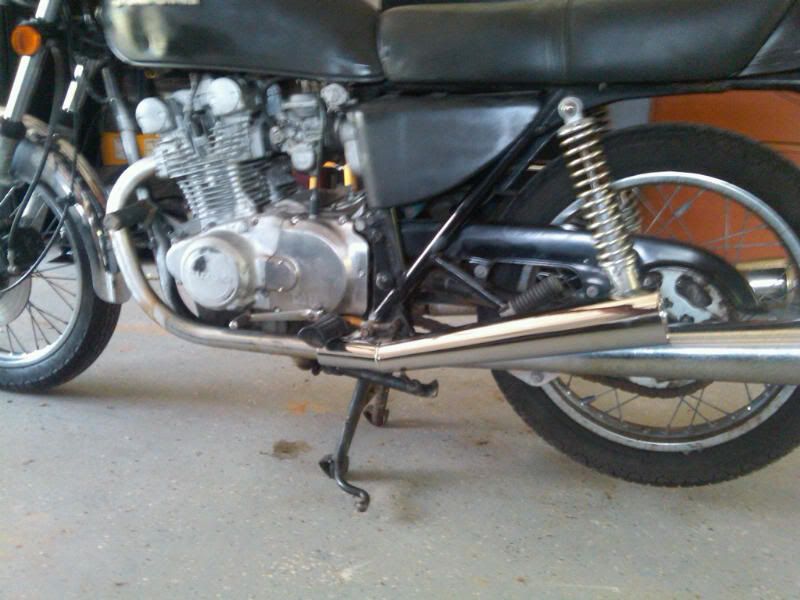
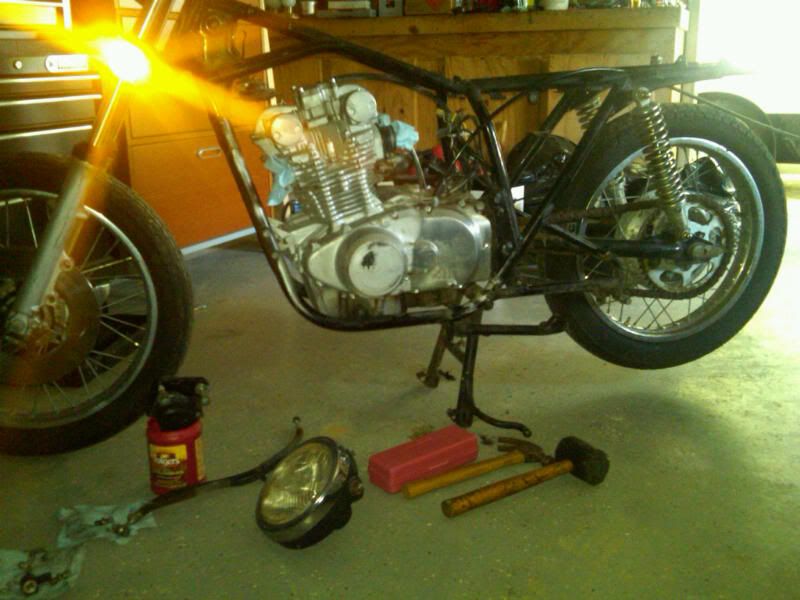
I acquired my 1978 GS400 about a month ago with the idea of doing a cafe racer to keep me busy for a few months. Bike rides and runs OK. Motor appears sound, but the rest of the little GS has had a hard life. After trolling the net and this board for a while for ideas and after many changes of mind, I have decided to do somethinmg a little different to the mainstram Cafe thing

IMG00083-20110701-1615.jpg


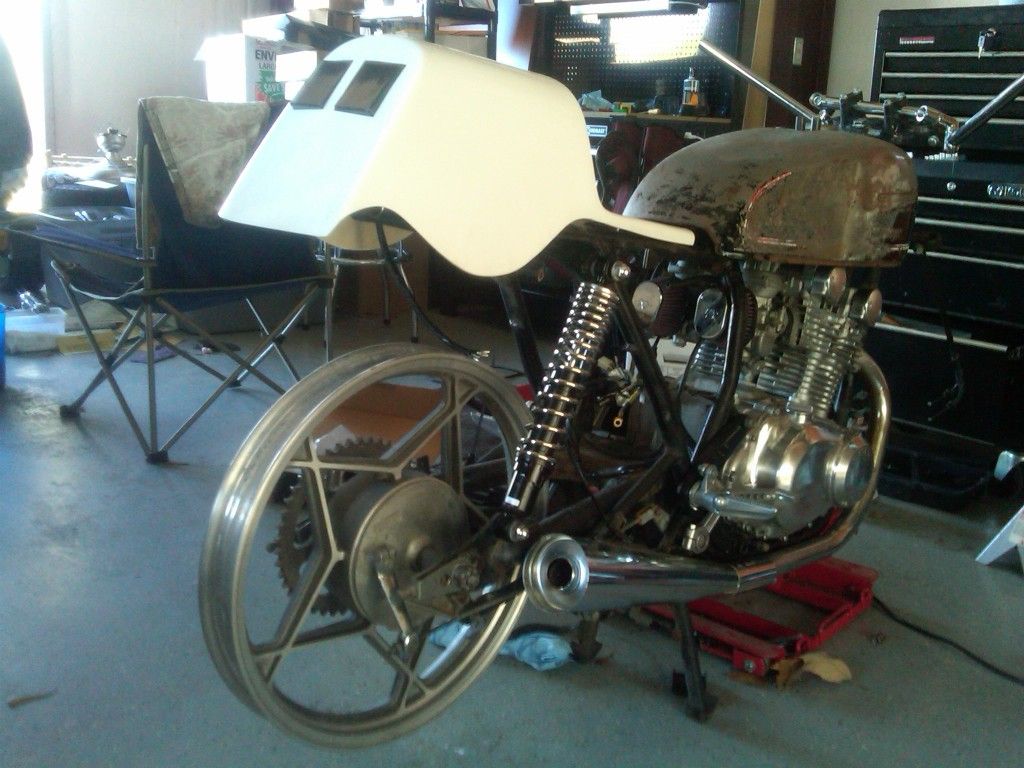
So the idea is to take this basically stock GS400 and using the styling of my favorite bike that got away, make it look something like this

image.jpg


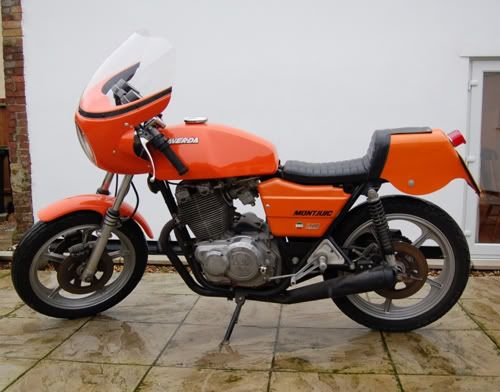
Some of you may not of seen or heard of the Laverda Montjuic 500. It was perhaps one of the original factory cafe/Hooligan bikes and something I would dearly love to own but beyond my reach since my move to the USA. In the late 70's back in the UK, this was fairly exotic and expensive compaired to its Jap rivals, but for me one that I now regret missing. I appreciate this project may not be to all tastes, but this is the plan.
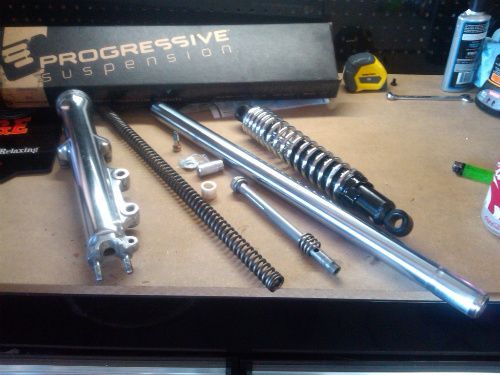
  • Overhaul/Replace; brakes, bearings, carbs, add Pods and paint or polish all metal surfaces, hex bolt almost everything........all normal resto stuff
  • Shocks and Forks upgrade
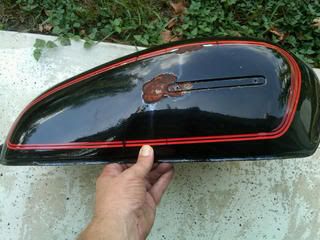
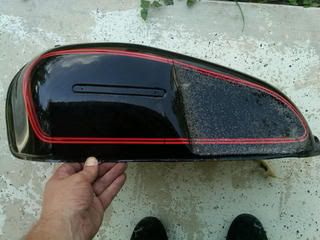
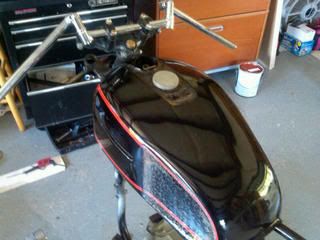
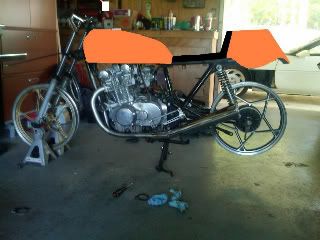
  • GS550 Gas tank to be beaten into a shap resembling the Lav tank
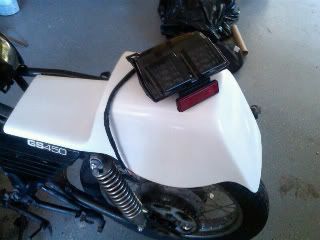
  • GS450ET side covers
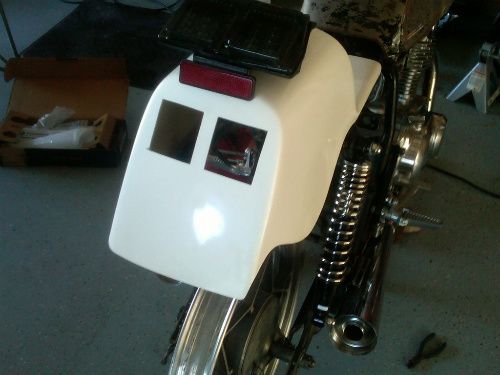
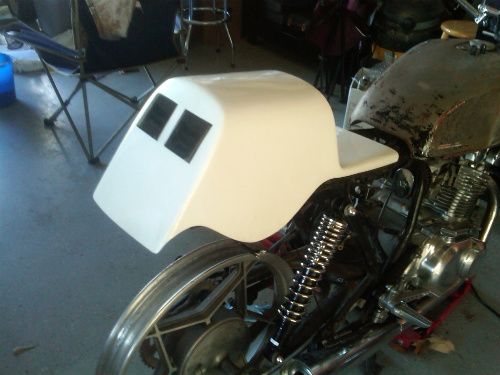
  • Airtech Laverda Seat (I admire the guys here doing their own glass work, but not for me)
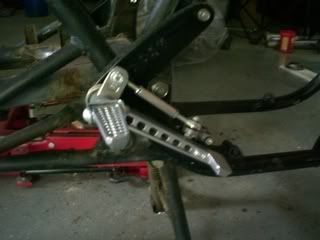
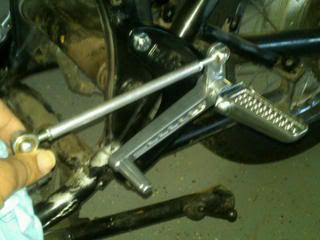
  • Custom Rearsets + 2into2 exhaust - stock headers aftermarket mufflers mods to frame to accomodate all this.
  • Acewell digital all in one spedo/tach (Mine are beaten up)
  • Laverda or Jota Bars (Adjustable any which way)
  • ....and Im sure lots more as I get into the restoration.
Progress expected to be very slow but will post progress and hang-ups here.

Mark.
 
Last edited:
Mark, I'm in! When I initially wanted to cafe my 450E before my wrist buggered up, a Laverda 750SFC was my inspiration when I watched one race at Queensland Raceway, that was a sweet lookin' machine! Looked identical to this minus headlight etc.:


Anyways, try a 450E/S tank for style, doesn't look too far from the Laverda and you shouldn't have to bash it, but you may need to adjust the mounting for your frame.


Ignore the masking tape stripes and stuck on paper, I was just playing with some paint ideas, but you can see the general shape of the tank there, just thinking it may be more straight forward than bashing a 550 tank instead.
 
Pete

I already had the GS550 tank on the way. Reasonable condition and price GS450E tanks appear a rare as rocking horse pooh. I do have 450E side covers already that will need a little modification to fit the 400 to make the squared off look im looking for.

I also have picked up some cans for the shorter, kicked up look to put on the headers.
IMG00078-20110701-1602.jpg

Only the motor to go on the dismantle. Right now the impact driver is my best friend!

IMG00091-20110710-1338.jpg


Mark
 
Last edited:
As I said in Raids thread looking at my 79 frame going Hmmmmm what to do.I will be interested to see how this goes!
 
As I said in Raids thread looking at my 79 frame going Hmmmmm what to do.I will be interested to see how this goes!

Dont hold your breath.......this is a longer term project;)

Mark
 
Last edited:
Cool, just thought I'd throw the 450E/S tank in there :)

Those cans should look good and yeah, glad to hear you're using an impact driver, beats the hell out of chewed out philips head screws!
 
Nice project!

These old twins are a great platform for modification (cafe!)
 
OK its time for a small update. Progress is slow but I only get one day per week to work on it.

I have cleaned up the engine side covers taking two layers of silver paint off, then the anodizing layer, then corrosion and finally down to aluminum. All by hand using wet and dry sandpaper but the result before any polishing is good.
IMG00095-20110820-1354.jpg


To get the shape of the Laverda tank, I found a GS550 tank on ebay that was dent free and have begun the reshaping process with a body hammer. Its been a long while since I have done anything like this but happy so far
Before?..

IMG00096-20110820-1457.jpg

After?.
IMG00097-20110820-1457.jpg


Now a question. When you have done a restoration, what did you do with the original VIN label ? Peel it off, paint around it or find another way to put a VIN number visible?
IMG00094-20110820-1353.jpg


Mark
 
Engine and tank are looking good! I wouldn't be game to do anything like that on a tank because I'd ruin it for sure... was hard enough for me just to bend my fork brace reasonably straight...

I just masked off my compliance plate when I painted mine, but I just roughed the existing paint up, sprayed some metal ready over it to give the POR 15 Blackcote some purchase and brushed it on... didn't get it acid dipped or sand blasted or anything like that...
 
So over the weekend I did a little daydreaming and laid a few parts on the frame and took a break from sanding and polishing engine cases. The tank is half done for the leg indents of both sides. Next is building out the front to make it more square and Laverda looking.
IMG00101-20110905-1213.jpg


One thing that I liked about styling based on a Laverda, was finding somewhere to put the tail light and license plate was obvious. With the bubble or rounded tails, lights and number plates can be an after-thought and can spoil the looks. For mine while its not true Caf?, I decided to use a Ducati 916 light to be ?frenched? into the back of the tail. Its LED with integrated turn signals which at $30 shipped from a man in China was too good to pass on.
IMG00103-20110905-1214.jpg


The adjustable Laverda or Jota bars were not a bargain, but look good and will help with riding position and steering stop....keep telling yourself that Mark!
IMG00106-20110905-1215.jpg


Ahh well, back to rubbing cast aluminum with wet and dry?.

Mark
 
Definitely starting to take shape, and I'm definitely seeing the Laverda influence there too...
 
So far I have been concentrating on the motor, but for a break I trial fitted a few of the larger pieces I have been accumulating for the project. Thanks to Pete for a heads up on his GS450 wheel sizes I was able to find some very modestly priced 450 cast wheels in great shape from ebay. Also I wanted to fit the Raask rearsets as they looked wrong in the box, but fitted just fine. The controls are great but the brackets are a far cry from the lightweight items on todays sports bike?..very 1970?s looking !

Anyway for those that like picture see below
photo.jpg


..and the Raask pieces
photo-1.jpg


IMG00118-20111002-0918.jpg


Mark

That should be a nice shape once you're done. How's the quality of the Raask sets? I've heard mixed reports...
 
How's the quality of the Raask sets? I've heard mixed reports...

Pete, you have hit the nail on the head with that question. Quite frankly, they are a little disappointing. The pegs and levers are OK but the linkages seam sloppy and poor quality fasteners supplied to hold things together. A little booklet supplied with them by the US importer implied that I would need to do the final adjustments, filing holes to fit and buy some bolts myself ! As I said the large boomerang shaped brackets to hang the things onto the frame are ugly but very 70's looking and have saved me many hours and $ to fabricate them myself. However, I can see myself fitting some generic Tarozzi pegs to the Raask brackets later on:-k

Mark
 
Last edited:
Pete, you have hit the nail on the head with that question. Quite frankly, they are a little disappointing. The pegs and levers are OK but the linkages seam sloppy and poor quality fasteners supplied to hold things together. A little booklet supplied with them by the US importer implied that I would need to do the final adjustments, filing holes to fit and buy some bolts myself ! As I said the large boomerang shaped brackets to hang the things onto the frame are ugly but very 70's looking and have saved me many hours and $ to fabricate them myself. However, I can see myself fitting some generic Tarozzi pegs to the Raask brackets later on:-k

Mark

Aah ok, yeah that's similar to other feedback I've heard along the way which is quite disappointing really.

When I was initially going to cafe mine I looked into them and while the price was good, the feedback was making me wonder if it was worth it or not.

Hopefully they'll do what you need them to and you can just neaten them up a little with the pegs etc. :)
 
This weekend I put the motor back in the frame and fitted the Raask's and the exhaust arrangement to determine what cutting and grinding was needed to hang the pipes. Overall Im happy with the look thats emerging.

IMG00136-20111030-1222.jpg


..and a view care of MS Paint, if I was to go Laverda Orange on the project

SuzLav1.jpg


If anyone is at the stage in their project where it does not feel like you are making any progress, putting a few things together like this gives a little inspiration to get rolling again.

mark
 
Mate that should look good!

And yeah, the minute I had a rolling frame I could wheel around the garage it felt a whole lot better than just a pile of parts...
 
Unfortunately, between work, Christmas and life, its been 6 weeks since I have been able to do some work on the project. Recent deals on ebay on Progressive fork springs and a rather nice pair of shocks were waiting installation. Thanks to a tool looking like a miniature pick-axe in my father in laws too box, removing the old seals was only a 5 minute thing. Rubbing the paint and anodizing of the fork legs took somewhat longer (4 hours each) but the results look great. New seal and wipers and smoothing a few pits off the fork tubes and progress was made.


IMG00158-20120102-1324.jpg


Next up, empowered by the Dremmel that Santa brought me was cutting the seat/tail unit to accept the Ducat 916 lookalike LED tail/break/turn lights...... I know this is not the purest cafe rear Lucas type light, but I wanted to keep the race tail look without hanging a big red lump off the end.

IMG00152-20120102-1315.jpg


IMG00154-20120102-1319.jpg


With one of the rear Progressive's in place and 5mm taller eye-to-eye than the stock units, Im startinbg to feel like Im getting somewhere again.

IMG00153-20120102-1319.jpg


Next thing will be to fabricate a new battery tray to hold a gell cell battery. Bet you cant guess where it will get installed !

Mark
 
Last edited:
Back
Top