Pulling the dent it is not really hard but at the same time is almost an art. I am taking a local shop course and have an intructor who showing me and another student how to use this. He is the one that did the dent in which it looks like none was there. The dent I worked on had a crease and is harder to work then one without the crease.
Here is what the tool looks like.
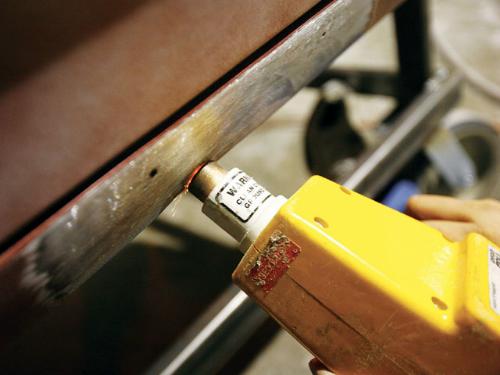
What I was shown was: you take your stud and weld it to the 'high point' of the dent around the outside which is just inside the bend of the metal. You hold the welding switch for a quick 1/4 second or less and it should be welded on.
Here is a picture of it done on a car.
Place your slide hammer over the stud and tighten. Then slide it up with a little force. To much force can pull the stud off , tear a hole in the tank or you can cause a high point which you will have to fix.
Next you take another stud and pick a spot near the first stud but far enough away. I was about 1/2 an inch away and repent the process. Do this as your are working your way around the dent. I did not make my way all around but about 1/2 around the dent.
Then start welding in between the previous studs at the low point and repeat the process with the slide hammer. You just keep doing this until the dent is gone or swallow enough for a little filler.
Once you are happy with it. Then you can get a die grinder and grind it down a little as there will left overs from the studs.
If you do put a small hole in the tank, you can use the stud and welded it with the gun and grinder it down. Also, avoid place a stud over same spot as before if you are working the dent up. The metal is weaker at that point and you can rip a hole. I did it but my instructor mig welded the hole.
Now you can get high points if you start at the low spot of the dent or use to much force. I was lucky not to get any high point. However, my class mate did. The fix was weld a stud beside the high point place the slide hammer over it and pull up on the handle it self. Then take a body hammer (with the pick) and lightly tap the high point back down while keep tension on the slide hammer in the opposite direction.
I wish I had taken pictures of the process on my tank but I kept forgetting my camera.
I had a few small dent about the size of a dime or nickle and they came out with one stud in the center. Can't even tell they were there.
I am by no means and expert as this was my first time with this tool so if anyone else knows better chime in. I do get insulted easily

")


 , but not sure if you are spot welding something to the outside or going through the tank. I would have thought that using a slide hammer on a single attachment point would cause a volcano type high spot or worse just a rip in the tank with the bulk of the deformity remaining.