• Required reading for all forum users!!!

    Welcome!
    Register to access the full functionality of the GSResources forum. Until you register and activate your account you will not have full forum access, nor will you be able to post or reply to messages.

    A note to new registrants...
    All new forum registrations must be activated via email before you have full access to the forum.

    A Special Note about Email accounts!
    DO NOT SIGN UP USING hotmail, outlook, gmx, sbcglobal, att, bellsouth or email.com. They delete our forum signup emails.

    A note to old forum members...
    I receive numerous requests from people who can no longer log in because their accounts were deleted. As mentioned in the forum FAQ, user accounts are deleted if you haven't logged in for the past 6 months. If you can't log in, then create a new forum account. If you don't get an error message, then check your email account for an activation message. If you get a message stating that the email address is already in use, then your account still exists so follow the instructions in the forum FAQ for resetting your password.

    Have you forgotten your password or have a new email address? Then read the forum FAQ for details on how to reset it.

    Any email requests for "can't log in anymore" problems or "lost my password" problems will be deleted. Read the forum FAQ and follow the instructions there - that's what we have one for...

  • Returning Visitors

    If you are a returning visitor who never received your confirmation email, then odds are your email provider is blockinig emails from our server. The only thing that can be done to get around this is you will have to try creating another forum account using an email address from another domain.

    If you are a returning visitor to the forum and can't log in using your old forum name and password but used to be able to then chances are your account is deleted. Purges of the databases are done regularly. You will have to create a new forum account and you should be all set.

Aaargh, 1980 GS850L front fork.

  • Thread starter Thread starter kinch
  • Start date Start date
K

kinch

Guest
.......................................
 
Last edited:
Well, what I was posting about was getting the left fork taken apart because of a fluid leak. The diagram in my Clymer manual is of a different fork and doesn't really help. I was trying to take the thing apart but can't see how. I took the rubber cover off
sealcoveriu4.jpg

and can see the seal that I have the replacement for (I think) but I can't get the seal out. There's a hex bolt at the bottom of the fork that I've been trying to loosen in hopes that it would do something magical but it just spins without loosening. I had to use a manual impact driver just to loosen it in the first place.
frontforkje5.jpg


That's pretty much where I am at this point, I'm very green at all this and I can't see where to go from here. I'm sure I'll find a way to get the seal out eventually but I'd appreciate any advice. Thanks.
 
Last edited:
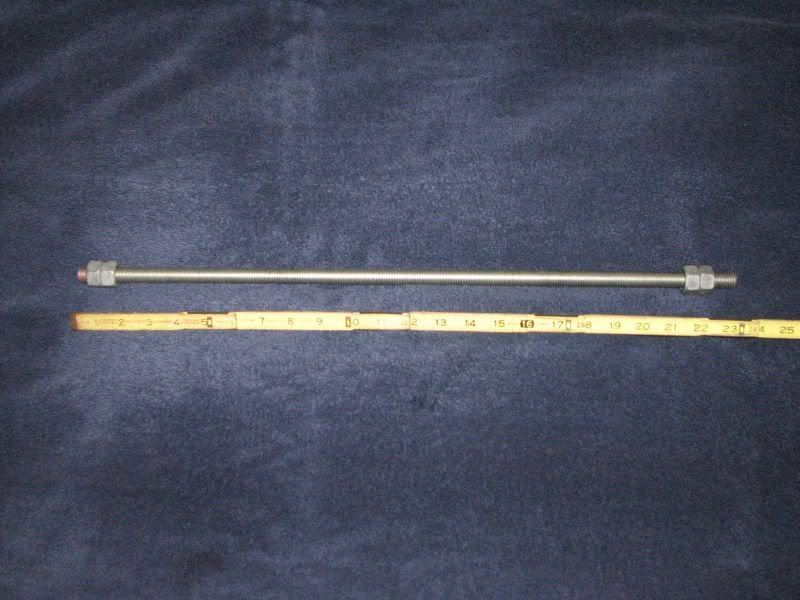
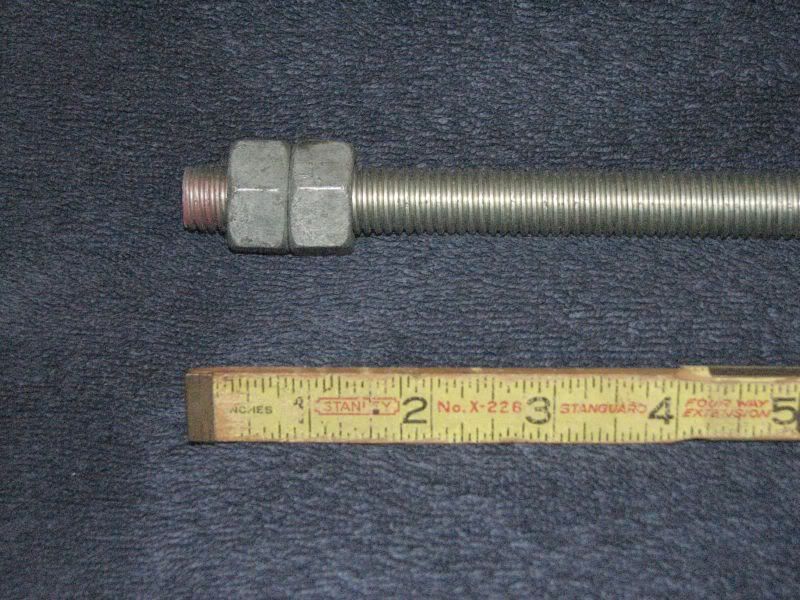
What you need to do is make a tool. I used 5/8" threaded rod, 2 feet long and 4 nuts to fit. Jam two nuts together about 1 inch from one end of the all-thead. Jam the other two nuts on the other end, they can be up to about 4 inches from the end with no problem, but if you put them 1 inch from the end, it won't matter which end you stick into the fork tube. 8-[

Now you can hold that socket-head bolt on the inside of the tube and use the smaller allen wrench on the outside.

Here are a couple pictures of the tool:
IMG_2027.jpg


IMG_2032.jpg


.
 
Last edited:
Thanks for the reply Steve. What I'm confused about is that there's nowhere to stick anything because there aren't any openings in the fork at the moment. That rubber cover is the only thing I've been able to remove besides the part that screws inside the cap at the top. Unless the cap itself is supposed to come off?
ehwx4.jpg


Keep in mind you have to talk to me like a child. I'm completely new to all this. Thanks again.
 
Yes, the top piece screws off. The easiest way to do that is to clamp it in the triple tree on the bike, then use an open-end or crescent wrench to turn the top cap off. While the fork tube is still attached to the bike, remove the drain plug (#9) and let all the oil out. After you have used your new tool and removed the circlip (#6) that holds in the seal (#5), parts will still be stuck together. You will try to slide the tubes apart, but they will hit a stop. The only method I know of is to slide the tubes together, then slide hard against the stop a couple of times until they come apart.

Now, when you get them apart, watch the parts carefully to see what parts go where and which way they are turned. Some of the parts work or fit better when turned in a particular direction, and the diagram in the book is not a whole lot of help.

By the way, I believe it is the top of part #16 that your new tool will engage. The part you have labeled "hex bolt", #7 threads into the bottom of #16, which is inside the inner fork tube, #20. Hopefully I am remembering this stuff correctly, it has been a couple of years since I had to to it. :oops:


.
 
Good advice, thanks. It'll take me a while to get this completed due to work and all but I'll post results once I'm done.
 
I made the tool as you said but is it supposed to thread into part #16 or is it just supposed to hold the sides? It doesn't seem to be gripping either way.
 
Part #16 is the damper rod. The bolt at the bottom goes through the lower fork leg and threads into the bottom of the damper rod. It's held in with a thread locking compound, so it takes a bit of oomph to spin it out.

This bolt is a special thread, so don't lose it or its copper sealing washer or you'll need to order new ones from Suzuki. Might not be a bad idea anyway.

The damper rod has a female hex (like a shallow socket wrench) in the top, so the nuts locked onto the threaded rod need to engage this hex. You put a wrench on the other end of the threaded rod to keep the whole thing from spinning, and now you can spin the bolt out.

On a GS, this hex is 19mm, which happens to be almost exactly 3/4 inch. Happily, the most common nut for a 1/2" threaded rod has a 3/4" hex on the outside.

Once you get the first one apart, you'll understand completely.
 
I understand now, thanks. I think the problem is that I have the 5/8 rod and the hex nuts that I put on it are too big to drop in. I'll drop down to 1/2 and try that tomorrow.
 
I understand now, thanks. I think the problem is that I have the 5/8 rod and the hex nuts that I put on it are too big to drop in. I'll drop down to 1/2 and try that tomorrow.
Sorry about that, I was going off of memory, and it's just ... er... what were we talking about?

And who are you anyway? :oops:


](*,).....](*,).....](*,)


Yeah, it probably is 1/2". All I know is it was bigger than anything I had sitting around and I had to go fetch some parts.


The damper rod has a female hex (like a shallow socket wrench) in the top, so the nuts locked onto the threaded rod need to engage this hex.
Yeah, it's a hex on top. Actually you can pretty much think of it as the spark plug wrench in your tool kit sitting upside down at the bottom of the fork tube. Size and shape are about the same. The extended tip on the threaded rod will help center the tool in the damper rod, but you don't want it so long that the nuts will not engage the damper.


.
 
Last edited:
Hah no worries Steve, thanks for the tip. The explanation of your contraption and the other 2 replies got me to understand what was going on enough in there to get the job done. I eventually ended up whittling down the hanger bar from my closet (the wife will not be pleased) into a semi-hex shape and cramming it into a spark-plug socket which worked. The fork is now in pieces and ready to be re-assembled after I clean everything and replace the seal. Take that Suzuki.


A hefty motorcycle wave to all who helped.
 
Hey howdy hey!

Hey howdy hey!

Mr. knich,

Wow, I am really falling down on the job. Here you are, eight posts into your membership here and you haven't gotten the "unofficial" official welcome. Stand back while I get to work...

Let it be known that on this day you are cordially and formally welcomed to the GSR Forum as a Junior Member in good standing with all the rights and privileges thereof. Further let it be known that your good standing can be improved with pictures (not you, your bike)! :-D

You may have seen some of this already, but I like to remind all the new members. In addition to the carb rebuild series, I recommend visiting the garage section via the GSR Hompage and check out the Stator Papers. There's also a lot of great information in the Old Q&A section. I have some documentation on my little BikeCliff website to help you get familiar with doing routine maintenance tasks (note that it is 850G-specific but many tasks are common to all GS bikes). Other "user contributed" informational sites include those of Mr. bwringer, Mr. tfb and Mr. robertbarr.

I think you have acquired one of the finest all-around classic motorcycles in the world (but I may be a little biased). Thanks for joining us. Keep us informed of your progress. There's lots of good folk with good experience here.

Speaking of folks with good experience, here is a list of online vendors compiled by our beloved Mr. bwringer, along with his comments. I've used most of these resources and trust his opinions.

***********Quoted from Mr. bwringer***************
http://denniskirk.com
Put in your bike model and see what they have.

I would definitely double and triple the recommendations to use Cycle Recycle II and Z1 Enterprises as much as possible. These guys are priceless resources. Z1 tends to have slightly better prices, CRC2 has a wider range of goodies available. If you're near Indy and can bring in an old part to match, CRC2 has a vast inventory of used parts.

http://oldbikebarn.com seems to be slowly regaining a decent reputation, but it's still caveat emptor. They don't have anything you can't get elsewhere at a better price anyway.

OEM Parts/Online Fiches:

http://www.babbittsonline.com/
Decent parts prices. Spendy shipping. Don't give you part numbers at all. Useful cross-reference if you obtain a part number elsewhere. Efficient service.

http://bikebandit.com
Fastest. Middlin' prices. Uses their own parts numbering system to obfuscate price comparisons -- can be very confusing for large orders. Cheapest shipping, so total cost usually isn't too bad.

http://flatoutmotorcycles.com
Slow. Cheapest parts prices, crazy shipping costs. Don't expect progress updates or much communication. Real Suzuki part numbers.

http://alpha-sports.com
Exorbitant parts prices. Different type of fiche interface that's quite useful at times, especially with superceded part numbers. Real parts numbers. Shipping cost and speed unknown due to insane, unholy pricing.


Stainless Bolts, Viton o-rings, metric taps, dies, assorted hard-to-find supplies and materials, etc.:
http://mcmaster.com
Fast, cheap shipping, good prices. No order minimum, but many items like bolts come in packs of 25 or 50. Excellent resource.


http://motorcycleseatcovers.com
Great quality, perfect fit (on original seat foam), and available for pretty much every bike ever made. Avoid the textured vinyl -- it's perforated.


http://newenough.com
You DO have riding gear, don't you? Great clearances, always outstanding prices and impeccable service.
***************End Quote**********************

Here's the links for a couple of the sources mentioned above:

Cycle-Re-Cycle Part 2
http://crc2onlinecatalog.com/

The ever popular Z1 Enterprises
http://www.z1enterprises.com

Also from Mr. bwringer is his excellent "GS850 Basics" list. I'll quote again.

**********<quote Mr. bwringer>**********
Every GS850 has (or had) a set of well-known issues that MUST be addressed before you have a solid baseline for further troubleshooting.

It's a vintage bike, and it's quite common (as in, every single GS850 I have had contact with) that there are multiple problems that have crept up and slowly gotten worse over the years.

It's not like a newer vehicle, where there's generally one problem at a time.

These common issues are:

Intake O-rings (install NEW OEM or Viton only - common nitrile o-rings will quickly deteriorate from heat)

Intake Boots (install NEW -- these cannot be repaired)

Valve clearances (more important than most people think)

Carb/airbox boots

Airbox sealing

Air filter sealing

Petcock (install a NEW one)

On '79 models, install new points or Dyna electronic ignition (or at least verify that the old points are working correctly)

On all models, it's fairly common to have problems with the spark plug caps. These are $3 or $4 each, and often worth replacing if you're keeping the stock coils/wires.

Stock exhaust with NO leaks or holes -- good seals at the head and at the junctions underneath.
**********<end quote>**********

That ought to keep you busy for a while. :-D

Thank you for your indulgence,

BassCliff
(The unofficial GSR greeter)
walmart_greeter2.jpg
 
Last edited:
Thanks for the welcome and all of the good information BassCliff. I've been lurking around these sites for a while picking up bits of info here and there. There are plenty of improvements that I need to make on my bike and I am a novice so I'm sure I'll be asking plenty of questions in the future.
 
thanks steve for the tool tip

thanks steve for the tool tip

dismantled my forks today
made this exact tool as per steve's instruction - it worked a charm (1/2" rod, 3/4" nuts)
thanks


What you need to do is make a tool. I used 5/8" threaded rod, 2 feet long and 4 nuts to fit. Jam two nuts together about 1 inch from one end of the all-thead. Jam the other two nuts on the other end, they can be up to about 4 inches from the end with no problem, but if you put them 1 inch from the end, it won't matter which end you stick into the fork tube. 8-[

Now you can hold that socket-head bolt on the inside of the tube and use the smaller allen wrench on the outside.

Here are a couple pictures of the tool:
IMG_2027.jpg


IMG_2032.jpg


.
 
Last edited:
Back
Top