E
ekabil
Guest
alright guys! Finally got those damn covers off the cams, vice grips what a blessing, and got the cams off.
Then I went through and removed the buckets one at a time, and now its spotless under the valve cover. I used a magnet too. The cams were also in pretty good shape but I filed them with a very small gauge file and made them even smoother.
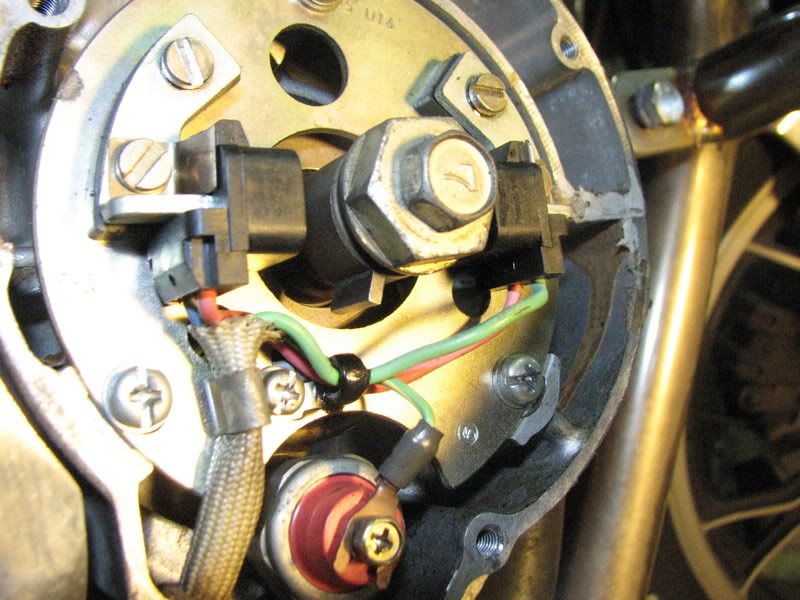
But I may have put the cams back on wrong. You see, in my clymer manual, the instructions are very vague for getting the timing back to TDC before reinstalling the cams. It just says to line up the "T" with "the marking" Luckily I had my good friend chuck to explain that it must be at TDC AND on the compression stroke. So I used my thumb to tell when air was blowing out of the spark plug hole (this means its on compression) and then used a rod down in the same hole to tell when the piston was at its highest. This point corresponded to the T mark under the ignition cover being lined up with a point to the LEFT of the T, not ABOVE the T as it says in the manual. But since the picture of the ignition timing panel in the manual is not like mine I figure its just a different model.
Now here is where I may have gone wrong...the spark plug I was using for all this was the one closest to me. Chuck said that its 1 and 4 that need to be TDC (and the manual) in order to line the cams up right. I thought that the cylinders were labeled 1 to 4 from the bike's left to bike's right. From port to starboard. But the valve's are labeled differenly, they go 1 2 3 4 in a clockwise direction, with 1 and 4 being on the left side of the bike. If I used the right-most spark plug hole to tell TDC and which stroke it is on, will my timing be right? Or will it be 180 degrees off
And the other thing is that the first valve bucket I took out, the back rightmost valve, did not go nback into the valve as easily as the other ones. As a result, I couldn't turn it or get it back out without needlenose pliers. I tried to reseat it and it turns more easily now but still nowhere near as easily as the rest. It is difficult to rotate the bucket by hand. What does this mean? And what should I do?
Otherwise, everything has gone smoothly. Big thanks to everyone, especially Steve and Chuck, for their help!!
Then I went through and removed the buckets one at a time, and now its spotless under the valve cover. I used a magnet too. The cams were also in pretty good shape but I filed them with a very small gauge file and made them even smoother.
But I may have put the cams back on wrong. You see, in my clymer manual, the instructions are very vague for getting the timing back to TDC before reinstalling the cams. It just says to line up the "T" with "the marking" Luckily I had my good friend chuck to explain that it must be at TDC AND on the compression stroke. So I used my thumb to tell when air was blowing out of the spark plug hole (this means its on compression) and then used a rod down in the same hole to tell when the piston was at its highest. This point corresponded to the T mark under the ignition cover being lined up with a point to the LEFT of the T, not ABOVE the T as it says in the manual. But since the picture of the ignition timing panel in the manual is not like mine I figure its just a different model.
Now here is where I may have gone wrong...the spark plug I was using for all this was the one closest to me. Chuck said that its 1 and 4 that need to be TDC (and the manual) in order to line the cams up right. I thought that the cylinders were labeled 1 to 4 from the bike's left to bike's right. From port to starboard. But the valve's are labeled differenly, they go 1 2 3 4 in a clockwise direction, with 1 and 4 being on the left side of the bike. If I used the right-most spark plug hole to tell TDC and which stroke it is on, will my timing be right? Or will it be 180 degrees off
And the other thing is that the first valve bucket I took out, the back rightmost valve, did not go nback into the valve as easily as the other ones. As a result, I couldn't turn it or get it back out without needlenose pliers. I tried to reseat it and it turns more easily now but still nowhere near as easily as the rest. It is difficult to rotate the bucket by hand. What does this mean? And what should I do?
Otherwise, everything has gone smoothly. Big thanks to everyone, especially Steve and Chuck, for their help!!
")