B
Billyboy
Guest
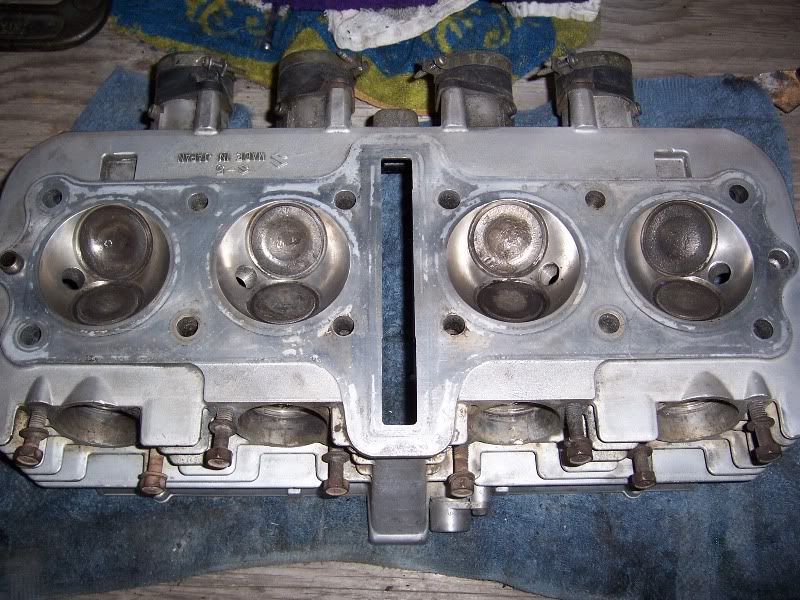
Cleaned up the combustion chambers yesterday. Not perfect, but pretty good, I think.
Required reading for all forum users!!!
Welcome!
Register to access the full functionality of the GSResources forum. Until you register and activate your account you will not have full forum access, nor will you be able to post or reply to messages.
A note to new registrants...
All new forum registrations must be activated via email before you have full access to the forum.
A Special Note about Email accounts!
DO NOT SIGN UP USING hotmail, outlook, gmx, sbcglobal, att, bellsouth or email.com. They delete our forum signup emails.
A note to old forum members...
I receive numerous requests from people who can no longer log in because their accounts were deleted. As mentioned in the forum FAQ, user accounts are deleted if you haven't logged in for the past 6 months. If you can't log in, then create a new forum account. If you don't get an error message, then check your email account for an activation message. If you get a message stating that the email address is already in use, then your account still exists so follow the instructions in the forum FAQ for resetting your password.
Have you forgotten your password or have a new email address? Then read the forum FAQ for details on how to reset it.
Any email requests for "can't log in anymore" problems or "lost my password" problems will be deleted. Read the forum FAQ and follow the instructions there - that's what we have one for...
If you are a returning visitor who never received your confirmation email, then odds are your email provider is blockinig emails from our server. The only thing that can be done to get around this is you will have to try creating another forum account using an email address from another domain.
If you are a returning visitor to the forum and can't log in using your old forum name and password but used to be able to then chances are your account is deleted. Purges of the databases are done regularly. You will have to create a new forum account and you should be all set.
What'd you use to decarbonize?
*AHEM*!!
Hi there. I'm Canadian.:-D
See, even Ozzies and Kiwis dis the Canadians.
Looking good so far. Are you about ready to start reassembly?
BTW, I used the 4 hose clamp method on my pistons to reinstall the cylinder block. Easy for a solo operation.

Combustion chamber looks great. Good job.
How long ago since the intake boot O-rings were changed? If more than 5 years or so, now is a good time.

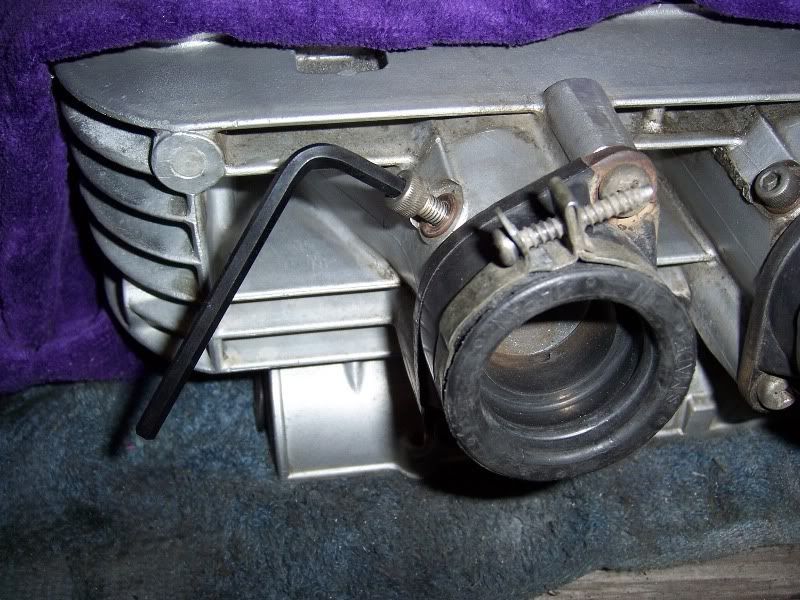
i'd use a little high-temp grease, for longevity and easier removal down the lineFound my o-rings. Little grease to install, or dry?
huh, not really an expert on that... the one i use just says "withstands extremely high temperatures" LOL!How high is high temp?
I've got some continous 205C grease. Will that do?
Ya know, I just used white lithium grease on my exhaust header bolts and after a year they came right out when I pulled it to get it recoated. Still seemed a bit "wet" too. I would think some copper anti sieze would work okay, too but don't quote me on that.
An English anti-seize, Rocol J-166 works great on those exhaust studs/bolts. It contains copper, molibdenum disulphide and graphite. I have used it on all my past engines. Any similar US product will work.
Billyboy, I have only just checked out this thread. Your early pics show the piston in #2 pot with dark marks on the rear skirt. This indicates that that piston is short on clearance with the bore under certain conditions. The colour of that piston crown is a very light brown with not much carbon on it compared to #1. I think that #2 has been running fairly lean and to a lesser extent, also #3. This is reducing the running clearance of the piston to bore. You need to address this leanness before putting any hard miles on your rebuild.
Fit your base gasket dry. If you oil/grease it you risk dust and grit particles sticking to it while you wrestle with fitting up the pistons to the jugs. When they are dry, you can give the base area a light blow with compressed air before dropping the pots onto the gasket. Just don't put the air gun too close to the gasket as the air velocity may tear the new gasket.
If you've still got the head off, put a straight edge across the chambers to check for a bow. If you have more than 0.003 inch gap under the middle chambers, you should bump straighten and then re-surface the head.
Thanks for all the advice! The bike used to have stock exhaust with a few of the baffles missing. I think Theat is the leanness that it evident. The bike was running very rich when I got a stage 3 kist from DJ. I think I've finally got the needles in the right spot. I'm thinking of getting a colourtune and carbtune from morgan's.
What's a "Bumb straighten"?
 /
/