• Required reading for all forum users!!!

    Welcome!
    Register to access the full functionality of the GSResources forum. Until you register and activate your account you will not have full forum access, nor will you be able to post or reply to messages.

    A note to new registrants...
    All new forum registrations must be activated via email before you have full access to the forum.

    A Special Note about Email accounts!
    DO NOT SIGN UP USING hotmail, outlook, gmx, sbcglobal, att, bellsouth or email.com. They delete our forum signup emails.

    A note to old forum members...
    I receive numerous requests from people who can no longer log in because their accounts were deleted. As mentioned in the forum FAQ, user accounts are deleted if you haven't logged in for the past 6 months. If you can't log in, then create a new forum account. If you don't get an error message, then check your email account for an activation message. If you get a message stating that the email address is already in use, then your account still exists so follow the instructions in the forum FAQ for resetting your password.

    Have you forgotten your password or have a new email address? Then read the forum FAQ for details on how to reset it.

    Any email requests for "can't log in anymore" problems or "lost my password" problems will be deleted. Read the forum FAQ and follow the instructions there - that's what we have one for...

  • Returning Visitors

    If you are a returning visitor who never received your confirmation email, then odds are your email provider is blockinig emails from our server. The only thing that can be done to get around this is you will have to try creating another forum account using an email address from another domain.

    If you are a returning visitor to the forum and can't log in using your old forum name and password but used to be able to then chances are your account is deleted. Purges of the databases are done regularly. You will have to create a new forum account and you should be all set.

GS1100E Cafe fairing installation

GS1100E Cafe fairing installation


  • Total voters
    1
  • Poll closed .
Because of the contour lines on the fairing (Wes Cooley replica) I don't think it would be possible, I may be mistaken.

You should contact posplayr, he has a Maier fairing that was cut to fit the 8 inch headlight from one that was made for a 7 inch headlight.

David


thank you for the heads up will do
 
Thanks for the thread. I'll be fabbing some brackets for my "Dude"-made cooley fairing as soon as I'm finished painting it, which leads me to my quick, non-hijacking question, can I leave the inside black mat? -should it be painted?
 
Thanks for the thread. I'll be fabbing some brackets for my "Dude"-made cooley fairing as soon as I'm finished painting it, which leads me to my quick, non-hijacking question, can I leave the inside black mat? -should it be painted?


Me personally, I think it looks much better with the inside black because it blends in with the guage console and it's not distracting.
Something else to think about, if it's painted a light color or painted any gloss color it has the potential to reflect when the sun hits it at the right angle, or wrong angle, depending how you view it.
What color are you going to paint it? I'm still trying to decide if I want to keep with the original color or just totally change the paint scheme.
 
I'm going to do the inside of my "S" fairing in wrinkle-black this winter. The existing white finish does reflect, and is distracting at nite.
 
Let me know how it comes out, I might decide to paint the inside of mine in wrinkle black too, that ought to look good.

David
 
Because of the contour lines on the fairing (Wes Cooley replica) I don't think it would be possible, I may be mistaken.

I actually don't know who made my WC fairing, because I got it in the salvage barn of a local speed shop. It was hanging on the wall for years, never installed. I gave him $20 then bought the windscreen from Gustaffsen. The fairing was made for a 7" light, but the "tunnel" for the light tapers to 7". I just cut an inch or so off the inside to make it fit an 8" headlight. It mounts slightly (and inch) further back, but I think that actually looks better. (my hardware and paint look like sh!t, but the shapes look good....and it works incredibly well)
 
Gs 1100 Fairing

Gs 1100 Fairing

Nice looking GS Im up in Canada and I just received a Wes Cooley fairing from National Fiberglass Dude fabricated it for me right away and shipped it up a great fellow to deal with Im going to install mine right away as my bike is back from the shop ( 82 GS 1100 EZ) If you have time could you post some pictures of the front face as im not sure of depth for headlight I have some fairing mounts from a GS 1150 im going to try to mod THX (for anybody interested Dude makes these in 7 1/2 and 8 1/2 headlight openings for GS 1100,s and GS 1000,s)
 
Last edited:
Nice looking GS Im up in Canada and I just received a Wes Cooley fairing from National Fiberglass Dude fabricated it for me right away and shipped it up a great fellow to deal with Im going to install mine right away as my bike is back from the shop ( 82 GS 1100 EZ) If you have time could you post some pictures of the front face as im not sure of depth for headlight I have some fairing mounts from a GS 1150 im going to try to mod THX (for anybody interested Dude makes these in 7 1/2 and 8 1/2 headlight openings for GS 1100,s and GS 1000,s)


I bought mine from Dude and in my opinion it is very high quality stuff, I love the way it turned out.

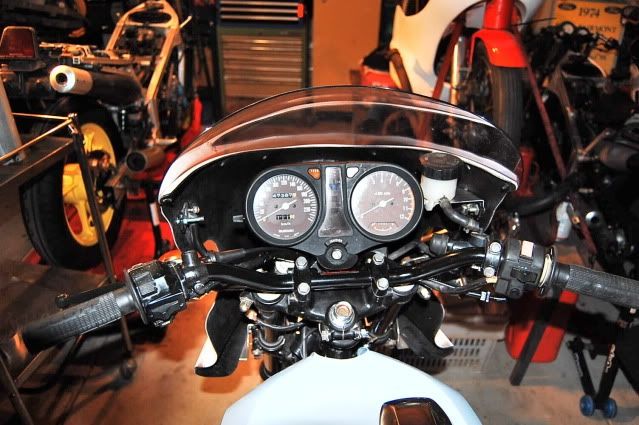
It's funny you asked about the depth for the headlight, I had the exact same question and unfortunately I never received an answer so I came up with an idea of how to do it and this is what I decided on
picture.php


I cut a spacer out of sheet aluminum, off the top of my head I think I used 1/8" thick, this is also the one thing that I would change, instead of making this spacer the thickness I did I would make it 1/4" instead. It seems like 1/8" is a bit of spacing but in reality it's not that much when you consider that you will still need room for adjustment of the headlight.

Here is a link to my photo albums in it I've got one labeled Fairing Installation, it's got all kinds of pictures that you might find helpful. http://www.thegsresources.com/_forum/album.php?u=14086

As for the spacer I measured the actual diameter of the headlight bulb itself and then made a border around it like 1/2" then cut it out which you can see above.

I ordered the actual Wes Cooley brackets that are still available from any of the parts distributors that fit the '79-'80 GS1000S. What I noticed was that the lower brackets had all the correct angles but they dropped down too far so I had to figure out a way to shorten them, the ones in the photo above are the ones I made, they're pretty much exactly like the originals except shorter. The top brackets are the ones that I ordered but of course the yaw angle was wrong so I cut the weld, repositioned the cross bracket and clamped with a pair of vise grips then had them welded in place.

The windscreen is another story.

These are the original brackets:
picture.php


These are the new brackets after the lowers were remanufactured and uppers were reworked:
picture.php


Original lower tracing to make shorter, I placed a thick book on the floor and used a blank piece of printer paper, both sides were traced individually:
picture.php


New aluminum angle brackets to be made into lowers aligned on my pattern:
picture.php


Old and new together:
picture.php


Upper with mount pad removed:
picture.php


This is how I clamped it for the correct angle for welding:
picture.php


Fit check before painting:
picture.php


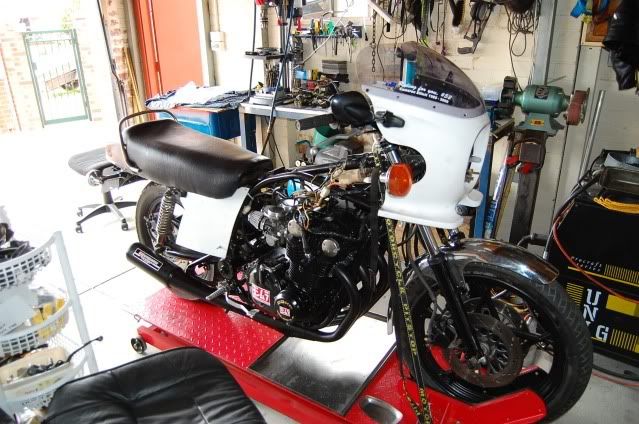
The end result, there was a lot more that got it to this point and changes that were made to the upper mount brackets:
picture.php


I know this is quite a bit of an explanation but I have a habit of getting wordy sometimes, besides I love pictures.

By the way post a picture of your bike so we know what you're working with.
 
I made the bottom brackets out off 1.2mm S/S scrapp bit and just bend them up after cutting them out from a cardboard patern.
Also used the double nut block originally used to clamp the fork legs.
You can easily spot weld them to the Stainless Steel bracket if so desired.
I used balustrade brackets as they were already correctly bend and size.
Modified them to suit.
CSC_5176.jpg

On a Shaft drive, what this is, the fairing does fit snug with the front light.

Hopefully this helps a bit , otherwise please do remove!
 
Last edited:
After I went through all of that I had decided to change my bars yet again, I ordered some Clubman bars but now the problem was that in order to mount them the turn signals had to move, basicly had to be upgraded because the front brake master cylinder would end up where the turn signals were originally mounted.
picture.php

picture.php


The next problem I ran into was that because of the front brake master cylinder the "J" shaped fairing mounts needed to be remanufactured again. Again using the GS1000S upper fairing brackets as a pattern I used some aluminum tubing, smashed one end with a vise, measured the length and adjusted for the proper angle then smashed to other end, made a couple of mount pads, then bolted the pads to the fairing and installed the bracket to get proper alignment.
picture.php

picture.php


These show the new brackets mounted and painted, as you can see in the pictures I riveted the mount pad to the bracket because as was said early on in this posting I don't weld and I have everything at my fingertips for riveting.
picture.php

picture.php

In the above picture of the R/H mount bracket you can get an idea of the problem with the brake master cylinder, how it would have impacted the first bracket and also how it fits perfectly into the cutout for the turn signal.
picture.php


Just in case you're wondering, the plugs for the mirrors are rubber feet for a piece of furniture that is available at hardware stores.

The end result:
picture.php


I just had to throw this in, My family crest, painted freehand by the same friend that painted the fairing and side covers for me.
The shield I bought on ebay that had some basic design on it and the rapiers bought on line from a sword shop. It came out excellent.
picture.php
 
I made the bottom brackets out off 1.2mm S/S scrapp bit and just bend them up after cutting them out from a cardboard patern.
Also used the double nut block originally used to clamp the fork legs.
You can easily spot weld them to the Stainless Steel bracket if so desired.
I used balustrade brackets as they were already correctly bend and size.
Modified them to suit.
CSC_5176.jpg

On a Shaft drive, what this is, the fairing does fit snug with the front light.

Hopefully this helps a bit , otherwise please do remove!

I like what you did with the brake master cylinder, mine is an integral part of the R/H lever assembly. That would probably be an easier/better solution to the problem I had with my master cylinder.
 
DSC_5181.jpg

Got some mirrors from evilbay (cheap) to get it over the pits (licensed)
 
I have the same fairing on my ?82. I found mine in a salvage barn for $20. It was an aftermarket that had never been mounted. Bought the screen from Gustaffsen. My mounting hardware was (and still is) sloppy barstock. Bottom is mounted to the screwholes for the reflector on the side of the forks. Top is mounted to the mirror holes (I use bar-ends).

Nothing?s pretty on my bike, but the fairing sure works great.


Good morning, Bert! Just giving you a hard time... :p

Don't the fairing brackets tweak the mirror threads? Quite small and fine for a fairing support, I would think...
 
Cool family crest, nice work

Cool family crest, nice work

I just had to throw this in, My family crest, painted freehand by the same friend that painted the fairing and side covers for me.
The shield I bought on ebay that had some basic design on it and the rapiers bought on line from a sword shop. It came out excellent.
picture.php
 
The end result:
picture.php


I just had to throw this in, My family crest, painted freehand by the same friend that painted the fairing and side covers for me.
The shield I bought on ebay that had some basic design on it and the rapiers bought on line from a sword shop. It came out excellent.
picture.php


Bike looks very nice; the black accents on the fairing and the Corbin pull the look together nicely.

The crest looks very nice as well
 
Bike looks very nice; the black accents on the fairing and the Corbin pull the look together nicely.

The crest looks very nice as well

Cool family crest, nice work
(wacky941) I just had to throw this in, My family crest, painted freehand by the same friend that painted the fairing and side covers for me.
The shield I bought on ebay that had some basic design on it and the rapiers bought on line from a sword shop. It came out excellent.
picture.php


Thanks, I love the way the shield turned out, I've got it proudly displayed at the top of the stairs so that you cannot miss it when you walk through the doors. The motorcycle turned out great too, I've got an old toolbox it's a Lista mobile cabinet having two cabinets with five drawers each, I already redid the butcher block top on it in a dark walnut, the same friend who painted the bike parts and the shield is going to paint the box for me to match the motorcycle.
 
I received an email with questions about this thread so I decided to resurrect it and update it a little. :)

In my last post I mentioned the toolbox and wanting it painted to match the bike, here it is:

25oct10049.jpg


25oct10051.jpg


25oct10039.jpg


25oct10038.jpg


25oct10052.jpg


Hopefully sometime soon I'll be adding some graphics to the box.
 
Back
Top