I follow most build threads, sometimes silently, sometimes not. There's always something to learn regardless of the model or build style.
-
Required reading for all forum users!!!
Welcome!
Register to access the full functionality of the GSResources forum. Until you register and activate your account you will not have full forum access, nor will you be able to post or reply to messages.A note to new registrants...
All new forum registrations must be activated via email before you have full access to the forum.A Special Note about Email accounts!
DO NOT SIGN UP USING hotmail, outlook, gmx, sbcglobal, att, bellsouth or email.com. They delete our forum signup emails.A note to old forum members...
I receive numerous requests from people who can no longer log in because their accounts were deleted. As mentioned in the forum FAQ, user accounts are deleted if you haven't logged in for the past 6 months. If you can't log in, then create a new forum account. If you don't get an error message, then check your email account for an activation message. If you get a message stating that the email address is already in use, then your account still exists so follow the instructions in the forum FAQ for resetting your password.Have you forgotten your password or have a new email address? Then read the forum FAQ for details on how to reset it.
Any email requests for "can't log in anymore" problems or "lost my password" problems will be deleted. Read the forum FAQ and follow the instructions there - that's what we have one for...
-
Returning Visitors
If you are a returning visitor who never received your confirmation email, then odds are your email provider is blockinig emails from our server. The only thing that can be done to get around this is you will have to try creating another forum account using an email address from another domain.
If you are a returning visitor to the forum and can't log in using your old forum name and password but used to be able to then chances are your account is deleted. Purges of the databases are done regularly. You will have to create a new forum account and you should be all set.
You are using an out of date browser. It may not display this or other websites correctly.
You should upgrade or use an alternative browser.
You should upgrade or use an alternative browser.
Kiwi Canuck tries his Luck with a Six Fiddy
- Thread starter Kiwi Canuck
- Start date
I follow most build threads, sometimes silently, sometimes not. There's always something to learn regardless of the model or build style.
Thanks for your input on this thread Glen, always nice to see you following along, too bad about your frame, I know the pain.
I've been mocking up the rear end to see if the sub frame straightening I did is OK.
But I'm having some issues with putting the rubber grommets back together on the rear fender and cowling.
I started opening the packages of new rubber cushions (grommets) and installing them as I went, but seems I may have put the wrong ones in the wrong place and now what I have left doesn't fit the remaining holes.
It's possible that the new superceeded parts are different than the originals and now that I've opened all the packages I'm a bit stumped, and maybe I missed ordering a set, I've left it for now and will need to get back at it before I forget any more.
These bikes sure have a lot of rubber grommets, maybe 25+ in total and a lot of them are similar but not interchangeable apparently.
I'm always nervous installing and removing them on the plastic parts as I'm afraid I'll damage something, the plastic, the grommet or myself.
More to come.
David
Last edited:
The plastics are one of the more maddening items I deal with on my bike. Being that the bike has hit the ground a few times, the fairing brackets are subtly tweaked, making alignment a pain. The mid panels are the worst, and a test of patience when dealing with them, especially since I now have a decent set I care about. I put dabs of grease on all tabs to ease installing.
If the es wasn't so damn cool, I'd ditch the fairing..... but it is.
If the es wasn't so damn cool, I'd ditch the fairing..... but it is.
Last edited:
My first bike I restored when I first joined this forum was a 1984 GS1150EF, and it had been tossed a few times, everything on it was bent from the fairing brackets to the sub frame, even the seat grab rail was seriously tweaked.
I tried to straighten the fairing brackets but just made them worse and finally found some newer less bent brackets from a member here.
Everything else was so bent the new parts I got had to be modified so they would fit.
I fixed so much stuff on that bike and it was a good inexpensive learning experience.
After all that work I couldn't ride it more than a few KM's without my legs cramping, I remember the riding position was not very adjustable and it was too cramped for my body type, 6'2" and 35" inseam.
Your bike sure looks sharp, so hopefully you can get the issues with the frame and fairing sorted and have a mostly straight bike.
Cheers Glen,
David
Not my actual bike but this was the colour scheme.
I finally got some free time in the garage again last night, so got to work on the last carb and finish up the jets and bits and pieces.
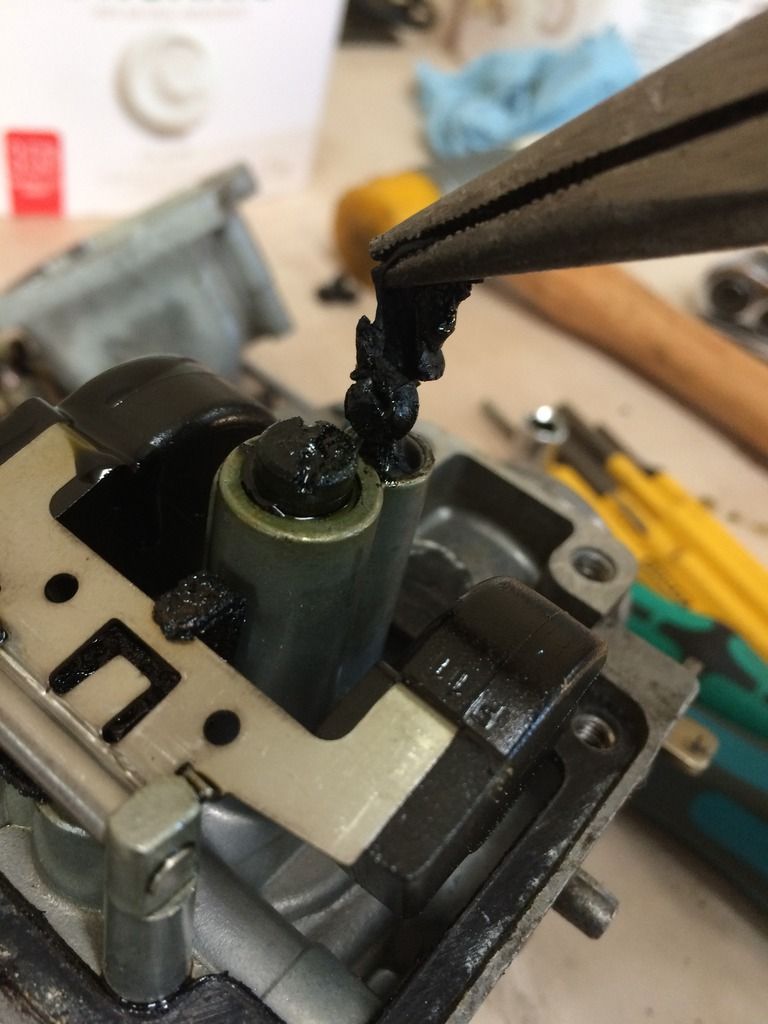
Here's a picture of the condition of the rubber pilot jet plug, fun stuff.
I am really impressed with the new solution I'm using in the Ultra Sonic cleaner, it works really well. (distilled water and Franks Special Cleaner, approx. 40:1)
After changing the water, here is what it looks like just after turning it on, right away the crud starts coming off.
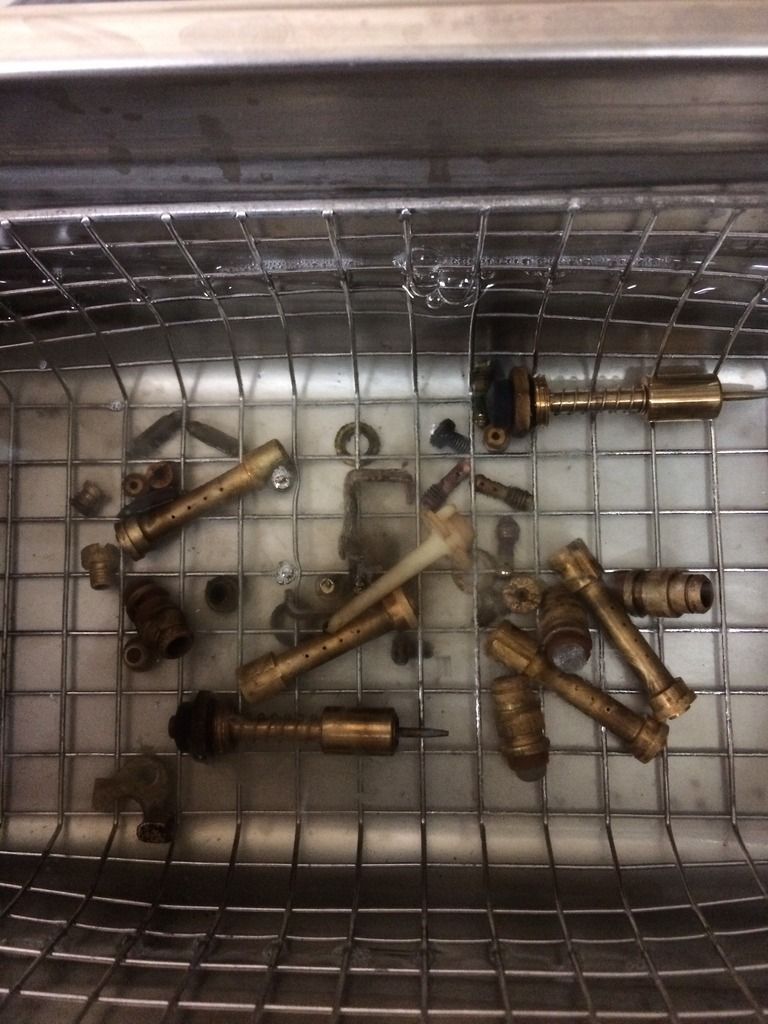
After about 20 mins @ 50 degrees celcius.
Here's a picture of the condition of the rubber pilot jet plug, fun stuff.
I am really impressed with the new solution I'm using in the Ultra Sonic cleaner, it works really well. (distilled water and Franks Special Cleaner, approx. 40:1)
After changing the water, here is what it looks like just after turning it on, right away the crud starts coming off.
After about 20 mins @ 50 degrees celcius.
Last edited:
Fjbj40
Forum Mentor
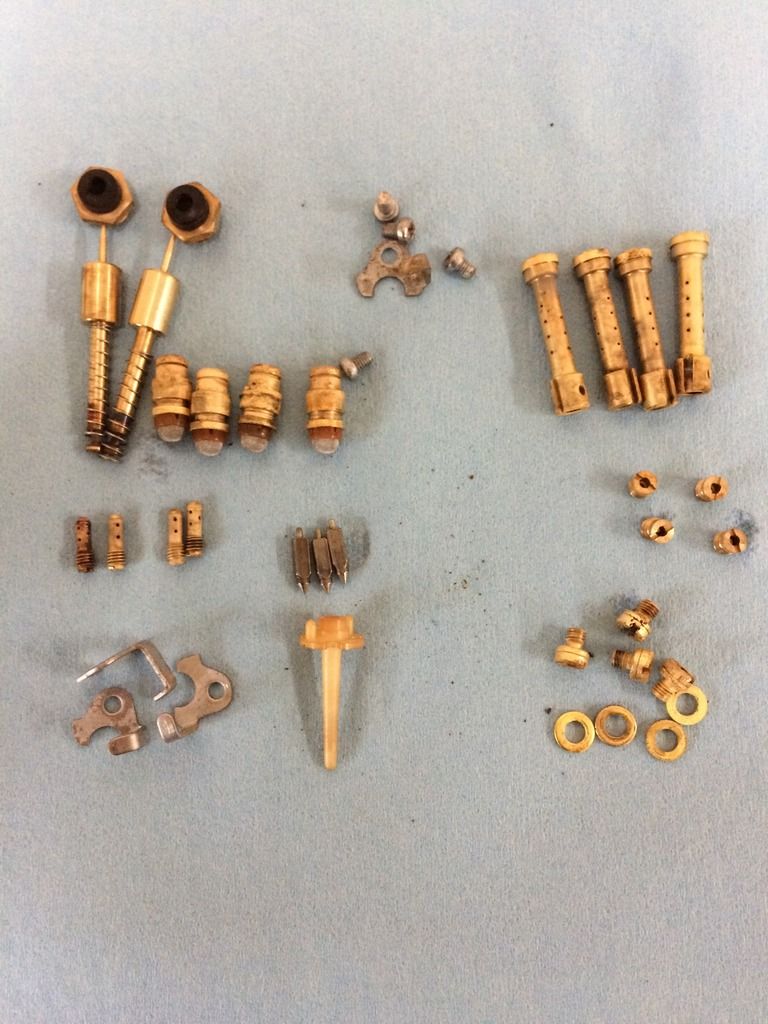
They look really good, but you could go to Canadian Tire or any gun shop and get yourself some Hoppes#9 gun cleaner. Throw all your brass in there for a couple of hours and after removal and some IPA rinse they will be like new with no contaminants or staining remaining.
Cheers and she is coming along very nicely!
Cheers and she is coming along very nicely!
They look really good, but you could go to Canadian Tire or any gun shop and get yourself some Hoppes#9 gun cleaner. Throw all your brass in there for a couple of hours and after removal and some IPA rinse they will be like new with no contaminants or staining remaining.
Cheers and she is coming along very nicely!
Thanks for your kind comments FJBJ40.
I've seen that product mentioned before, is it the solvent or oil, seems they have several different products and how much would I need to clean a few sets of carbs?
I'll probably be passing by the Cabelas store in Abbotsford this weekend so I'll pick some up once I know what to get.
Cheers.
David.
Last edited:
Fjbj40
Forum Mentor
https://www.midwayusa.com/product/1240462963/hoppes-9-bore-cleaning-solvent-liquid
5 oz bottle will do MANY jets and carb brass parts, it will also clean non brass parts! It's re-usable so just pour it back in the bottle when done.
cheers,
Daryl
5 oz bottle will do MANY jets and carb brass parts, it will also clean non brass parts! It's re-usable so just pour it back in the bottle when done.
cheers,
Daryl
https://www.midwayusa.com/product/1240462963/hoppes-9-bore-cleaning-solvent-liquid
5 oz bottle will do MANY jets and carb brass parts, it will also clean non brass parts! It's re-usable so just pour it back in the bottle when done.
cheers,
Daryl
Thanks Daryl.
I spent the day cleaning out my garage and sorting stuff out as it was starting to get crowded in there, I found myself having to step over stuff and squeeze between the bikes to get at stuff on the shelves, it was time and the weather was nice so it was perfect time to get a good start on it.
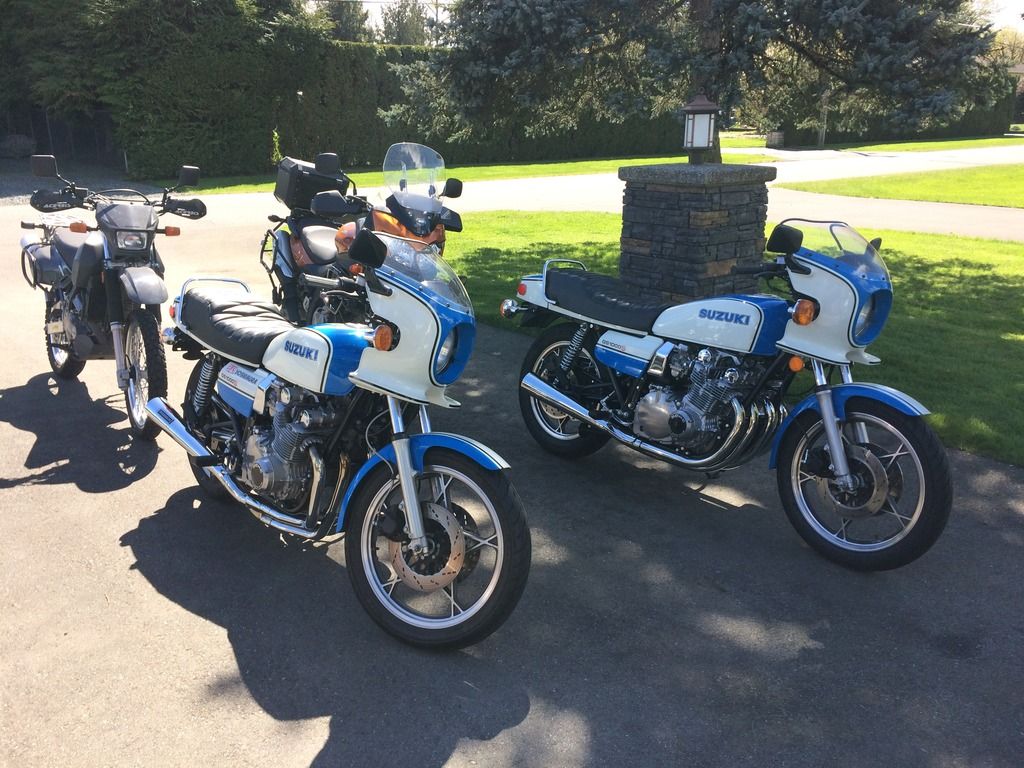
I also took the opportunatey to start all my bikes, I took each one for a quick run to get the cobwebs out, the Canadian Cooley was a bit reluctant to fire up so I pulled the air filter to get at the battery so I could charge it.
After getting a full charge on the battery she finally spluttered into life, after she warmed up she ran fine.
Here they are hanging out waiting to go back inside for the night.
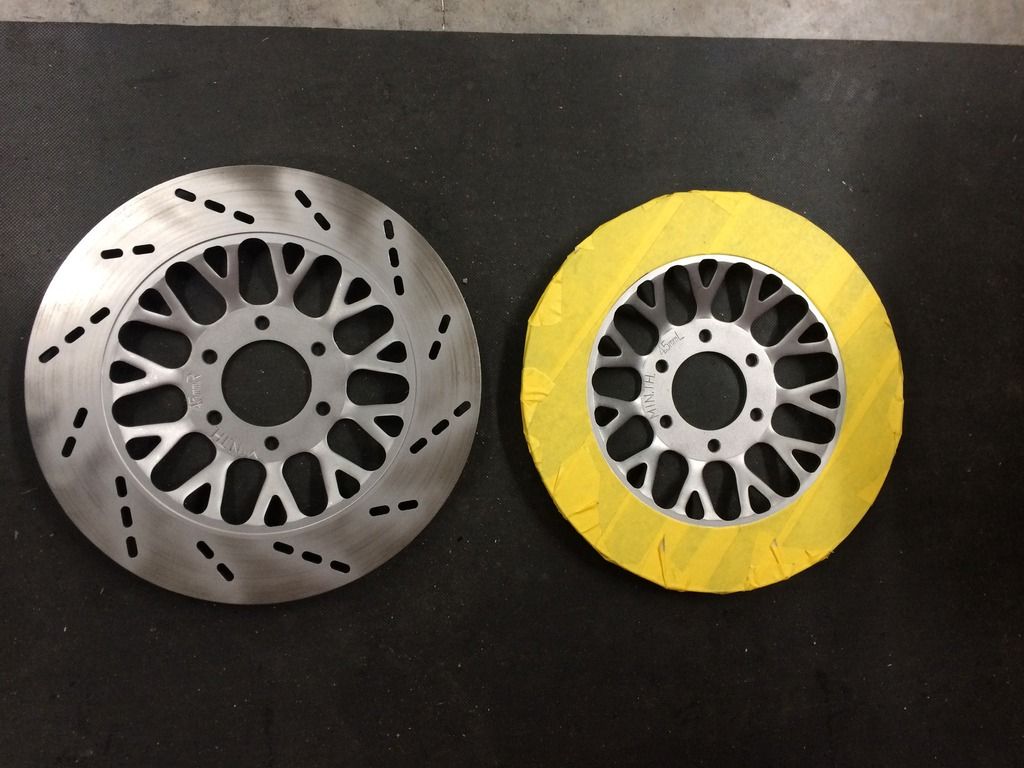
I was talking with the guy who does my powder coating and engine work yesterday, he suggested using a cutter to remove the excess tape when doing rotors.
I tried it and it worked like a charm.
Also got back a bunch of parts blasted ready for paint.
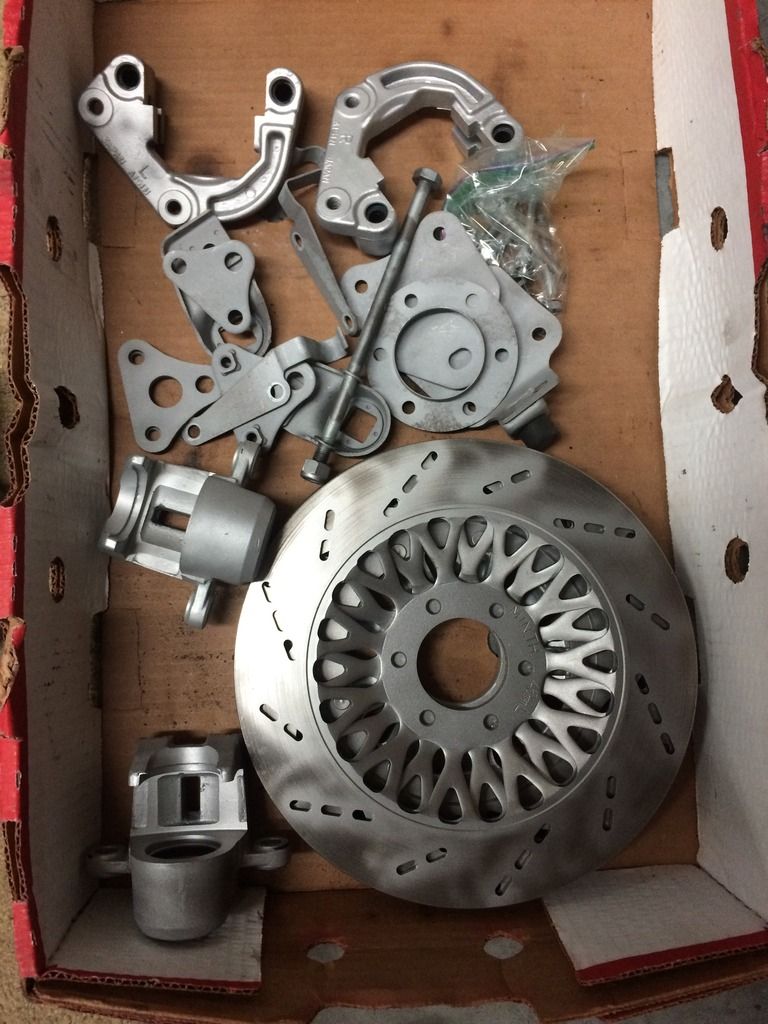
One down 2 to go, tape it up run a blade around the inside of the groove, peel out the inside piece in one go and done in 5 minutes each.
I tried it and it worked like a charm.
Also got back a bunch of parts blasted ready for paint.
One down 2 to go, tape it up run a blade around the inside of the groove, peel out the inside piece in one go and done in 5 minutes each.
Nice trick on the tape. My 1150 has floating rotors and the corresponding bobins. Made taping tedious-er....
Man, those Cooleys look cool parked side by side.
Man, those Cooleys look cool parked side by side.
I got most of the parts painted on Saturday, the rest of the weekend was a write off for bike work, with yard work and I took a few hours out to go to the motorcycle races at Mission Raceway.
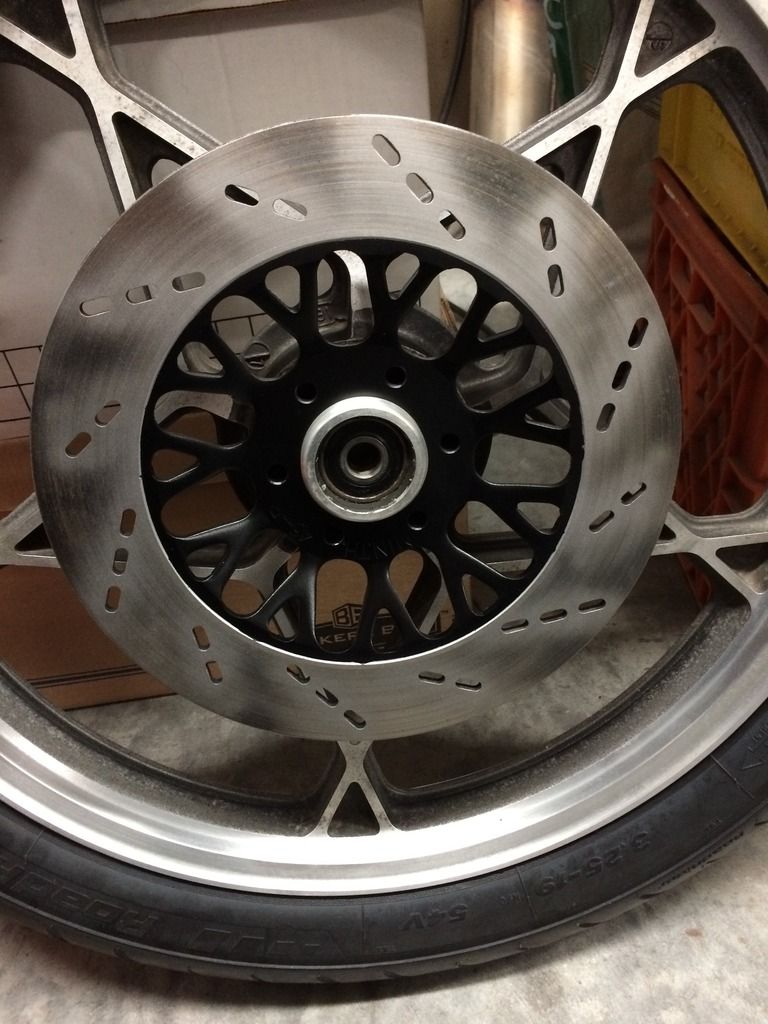
The rotors worked out well, I used VHT Caliper paint in satin black.
here's the process, Mask,
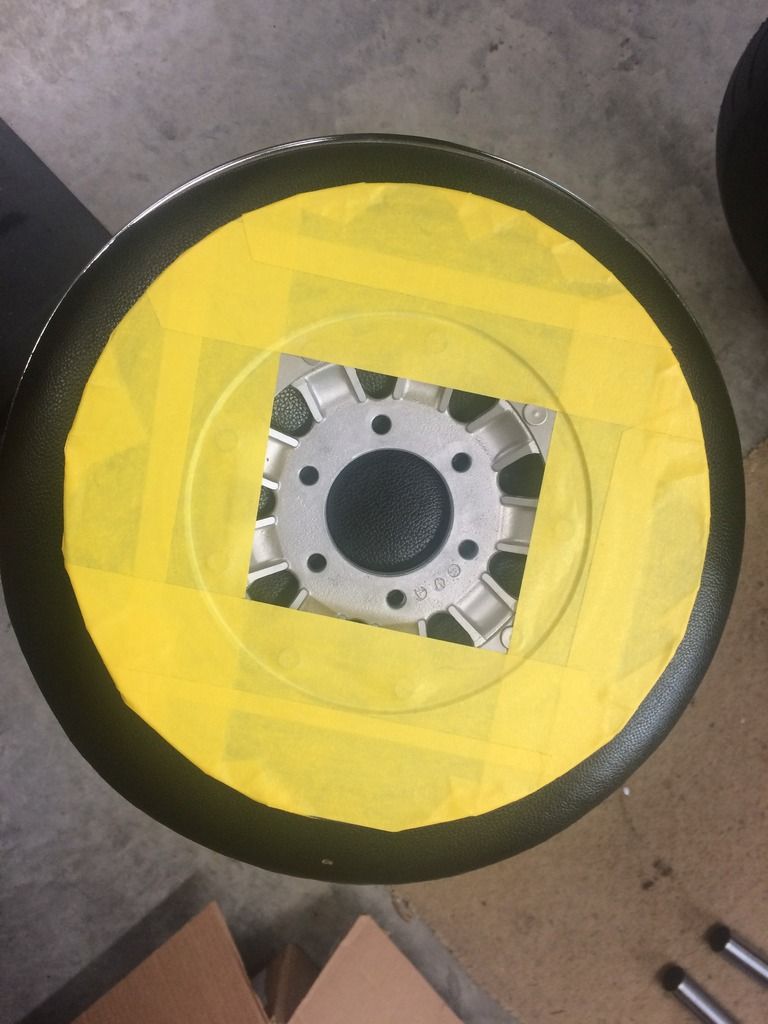
Run a razor blade around the lip and peel out the inside part.
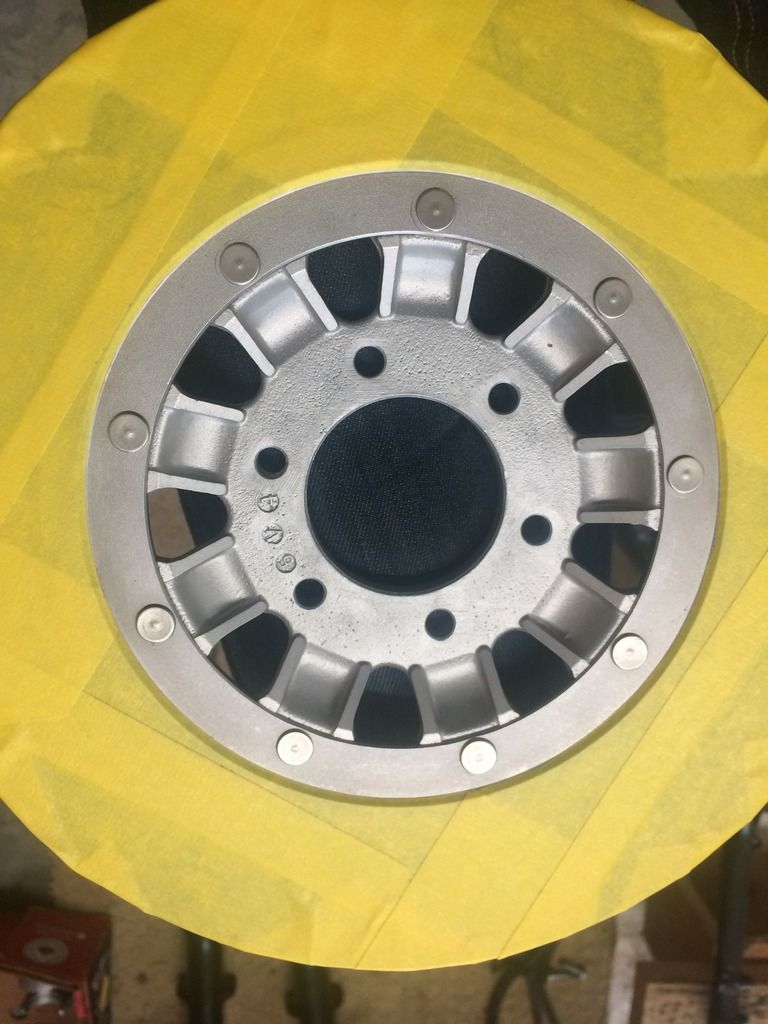
Paint and peel, finished.
I used VHT Rollbar & Chassis Satin on most of the other parts and used the gloss on the frame to touch up a few spots that had worn through and gone rusty.
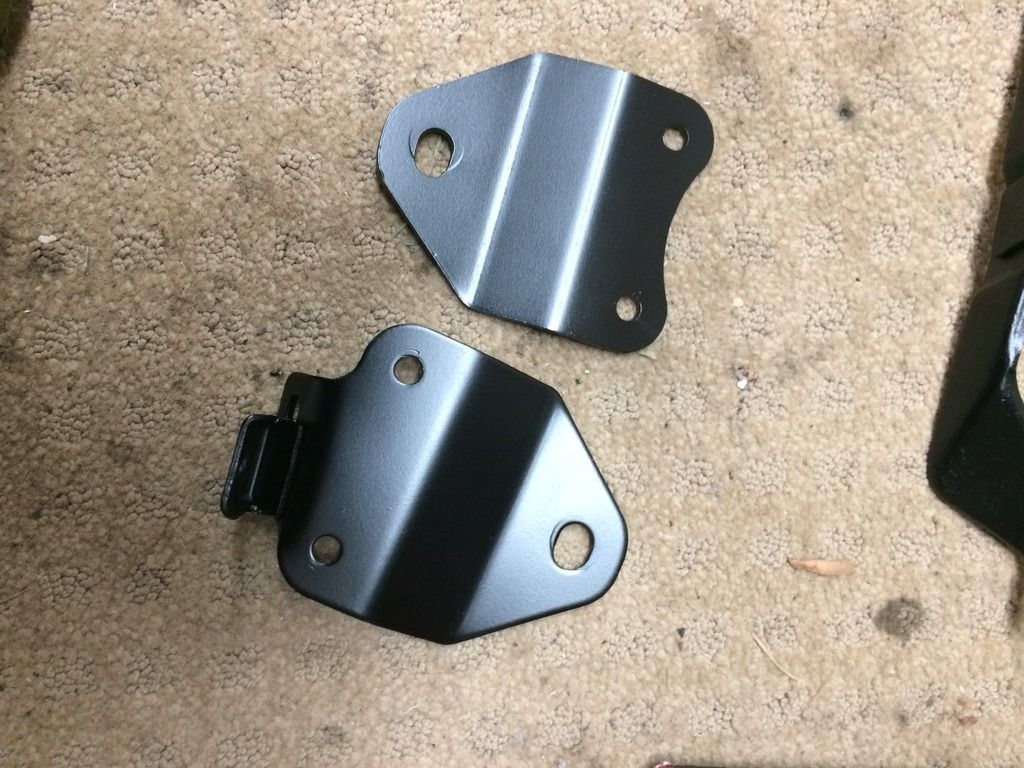
Here's the exhaust mounting tabs, they came out very nicely using the Satin Finish. (IMHO)
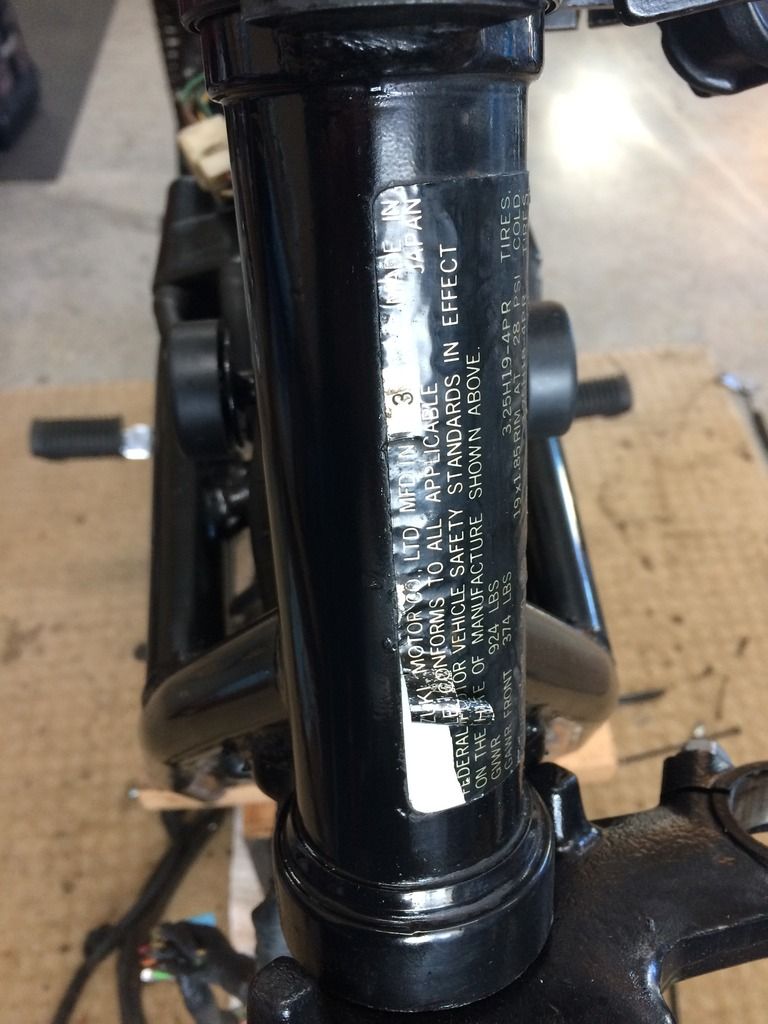
I was a little concerned about masking the VIN label as it's in pretty delicate shape, so I very lightly applied the tape and painted the frame, once I pulled the tape it took some of the label, so I peeled from the other side and managed to only lift a small amount.
Rather than panic and try and fix it right away, I just let it be for the night, I'll glue it back down now that the paint has dried, I think I'll try regular white glue or I do have some Gorilla super glue which may work.
Here's the damage, I'll post some pictures later tonight when I come in from the garage.
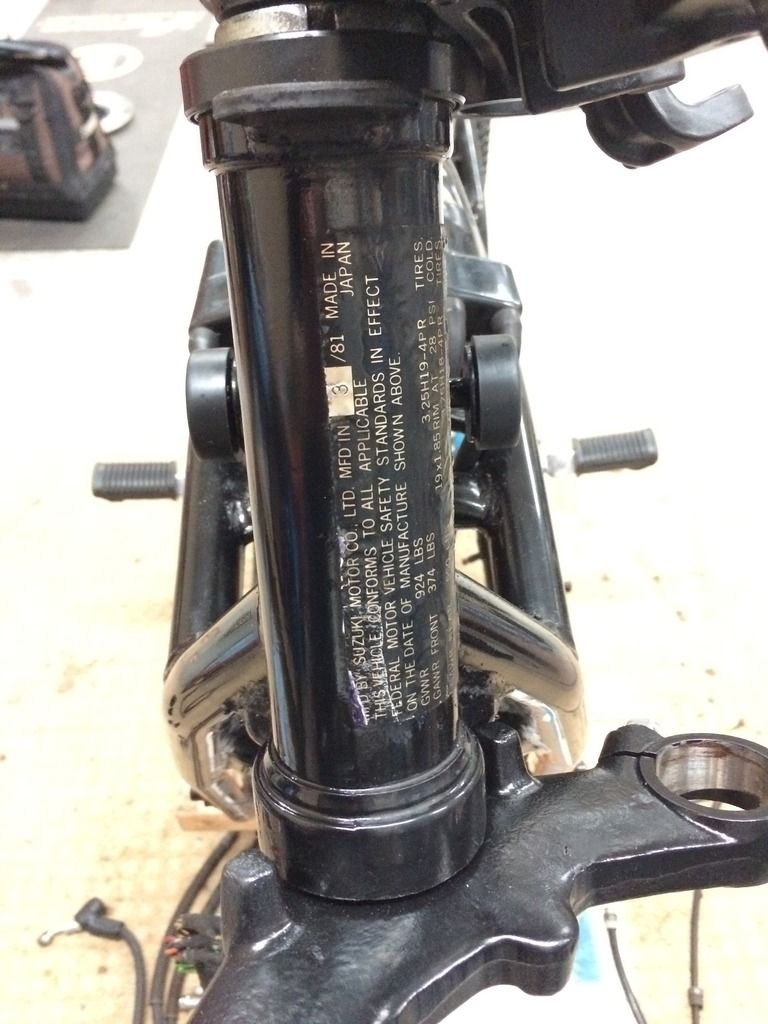
I used the white glue as the super glued had dried out.
Not perfect but best I could do.
The rotors worked out well, I used VHT Caliper paint in satin black.
here's the process, Mask,
Run a razor blade around the lip and peel out the inside part.
Paint and peel, finished.
I used VHT Rollbar & Chassis Satin on most of the other parts and used the gloss on the frame to touch up a few spots that had worn through and gone rusty.
Here's the exhaust mounting tabs, they came out very nicely using the Satin Finish. (IMHO)
I was a little concerned about masking the VIN label as it's in pretty delicate shape, so I very lightly applied the tape and painted the frame, once I pulled the tape it took some of the label, so I peeled from the other side and managed to only lift a small amount.
Rather than panic and try and fix it right away, I just let it be for the night, I'll glue it back down now that the paint has dried, I think I'll try regular white glue or I do have some Gorilla super glue which may work.
Here's the damage, I'll post some pictures later tonight when I come in from the garage.
I used the white glue as the super glued had dried out.
Not perfect but best I could do.
Last edited:
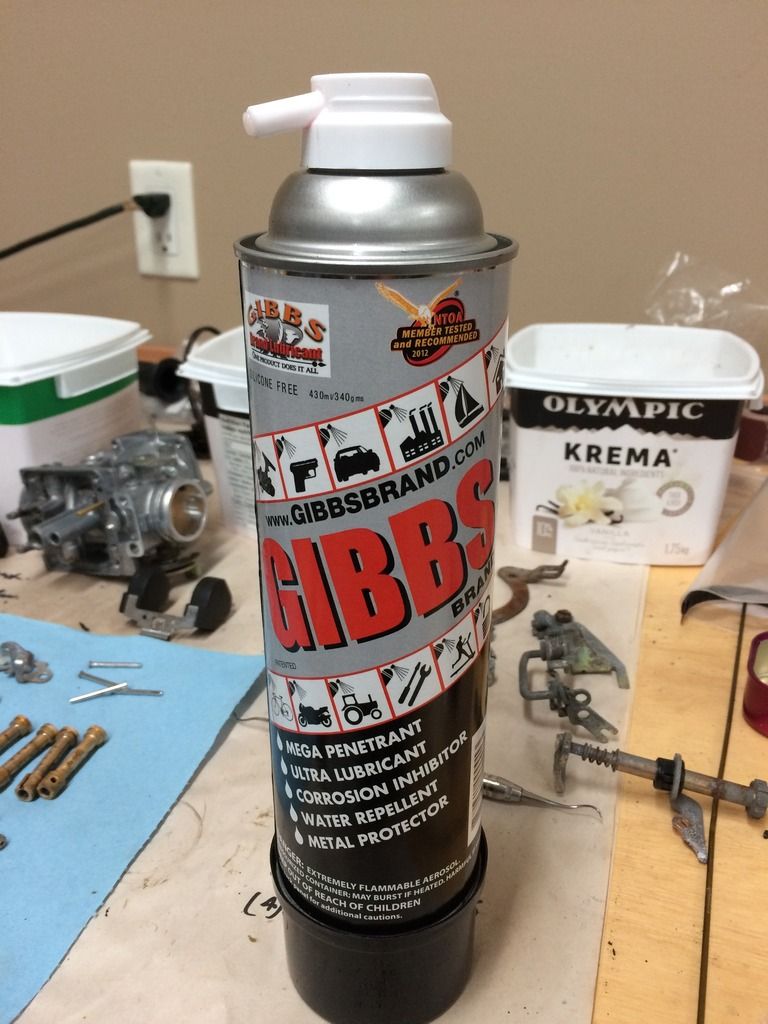
When I was at the bike swap meet earlier this year I saw a penetrating oil product for sale that was $25.00 a can, at that price I passed but did some research.
It was made by Gibbs.
I was intrigued as it's possible to spray metal to protect it and then paint over the lube without needing to remove it, I thought it may work for stopping flash rusting when treating fuel tanks and I had a few other uses in mind.
Anyways I ordered a case of 12 from ebay.ca last week and it came in today, I've been trying it on a few items so I'll see if it works as well as the claims suggest.
This is going to be gorgeous.
Small nitpick re. ultrasonic:
1. You can use an old tea sieve or similar to hold parts too small for the basket.
2. When using heating, always fill to the mark. The heating element on many of these cleaners is mounted on the side of the tub; if there's no water next to it, there's a risk of overheating it (Details of course depend on the construction of your particular model).
Small nitpick re. ultrasonic:
(...)
(...)
1. You can use an old tea sieve or similar to hold parts too small for the basket.
2. When using heating, always fill to the mark. The heating element on many of these cleaners is mounted on the side of the tub; if there's no water next to it, there's a risk of overheating it (Details of course depend on the construction of your particular model).
The Gibbs product certainly has great reviews on amazon.
https://www.amazon.com/Gibbs-Brand-Lubricant-2-12oz-cans/dp/B00AFJXIJQ
I don't see how paint would adhere after the surface has been treated.
Looking forward to your follow-up.
https://www.amazon.com/Gibbs-Brand-Lubricant-2-12oz-cans/dp/B00AFJXIJQ
I don't see how paint would adhere after the surface has been treated.
Looking forward to your follow-up.
This is going to be gorgeous.
Small nitpick re. ultrasonic:
1. You can use an old tea sieve or similar to hold parts too small for the basket.
2. When using heating, always fill to the mark. The heating element on many of these cleaners is mounted on the side of the tub; if there's no water next to it, there's a risk of overheating it (Details of course depend on the construction of your particular model).
Thanks for the tips, not sure about the heater element(s) re; water level, but I ran out of distilled water for this batch, I have since filled it to the top.
A mechanic friend suggested that I can put all the small parts in a ziploc baggie filled with solution and toss it in the tank as well, but I'm probably going to make or buy a small stainless mesh basket for the small parts.
Cheers.
David
I have used tea leaf holders like this for small bits.
http://www.ebay.com/itm/Lot-of-2-St...175698?hash=item489cac30d2:g:OYoAAOSwR29ZEBC~
http://www.ebay.com/itm/Lot-of-2-St...175698?hash=item489cac30d2:g:OYoAAOSwR29ZEBC~
I have used tea leaf holders like this for small bits.
http://www.ebay.com/itm/Lot-of-2-St...175698?hash=item489cac30d2:g:OYoAAOSwR29ZEBC~
Same here.
I love before and after shots, so here's one of each.
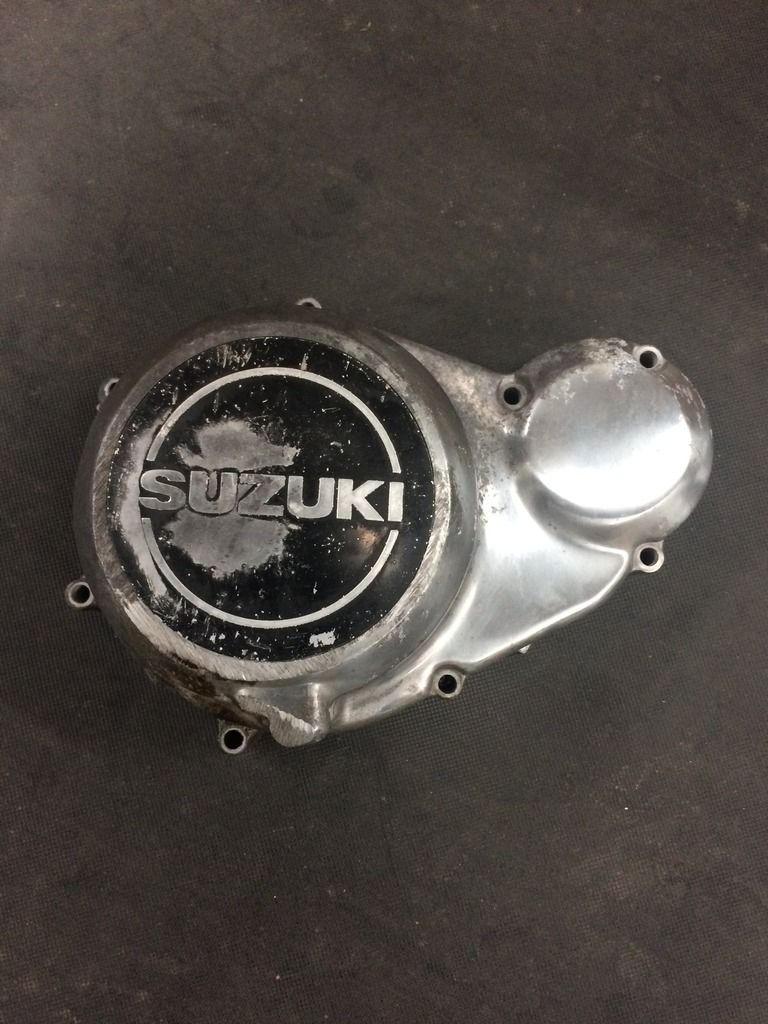
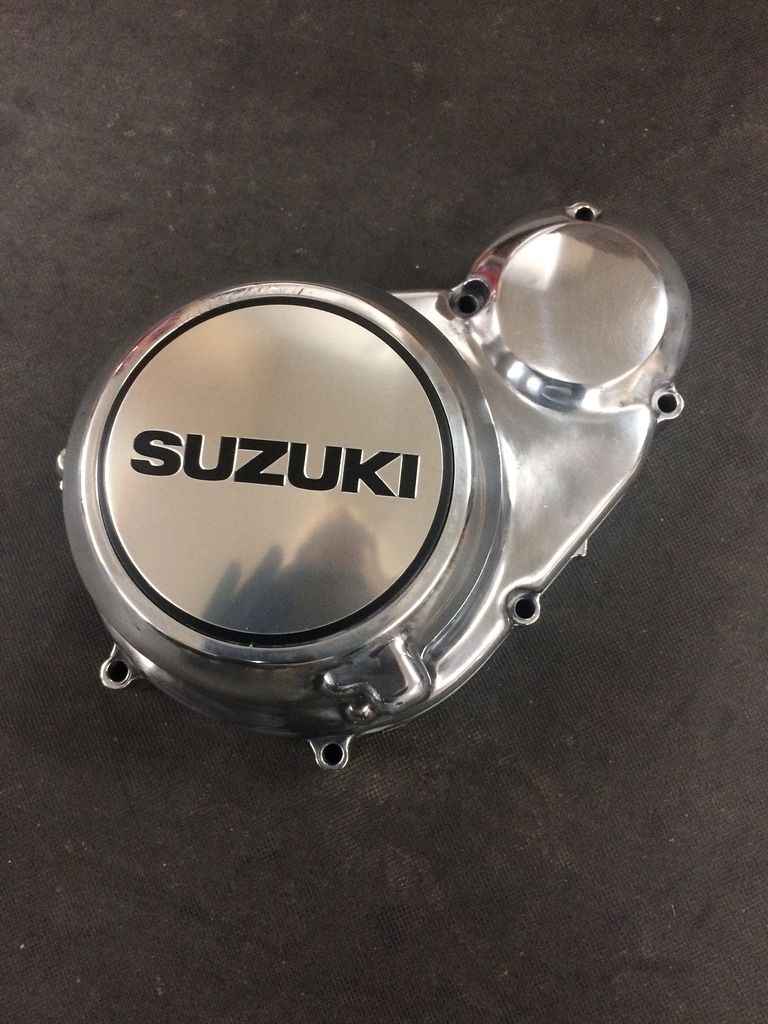
Actually those are not the same covers, the polished one is my new ebay purchase as the original one had a little too much road rash to repair.
Actually those are not the same covers, the polished one is my new ebay purchase as the original one had a little too much road rash to repair.
Last edited: