• Required reading for all forum users!!!

    Welcome!
    Register to access the full functionality of the GSResources forum. Until you register and activate your account you will not have full forum access, nor will you be able to post or reply to messages.

    A note to new registrants...
    All new forum registrations must be activated via email before you have full access to the forum.

    A Special Note about Email accounts!
    DO NOT SIGN UP USING hotmail, outlook, gmx, sbcglobal, att, bellsouth or email.com. They delete our forum signup emails.

    A note to old forum members...
    I receive numerous requests from people who can no longer log in because their accounts were deleted. As mentioned in the forum FAQ, user accounts are deleted if you haven't logged in for the past 6 months. If you can't log in, then create a new forum account. If you don't get an error message, then check your email account for an activation message. If you get a message stating that the email address is already in use, then your account still exists so follow the instructions in the forum FAQ for resetting your password.

    Have you forgotten your password or have a new email address? Then read the forum FAQ for details on how to reset it.

    Any email requests for "can't log in anymore" problems or "lost my password" problems will be deleted. Read the forum FAQ and follow the instructions there - that's what we have one for...

  • Returning Visitors

    If you are a returning visitor who never received your confirmation email, then odds are your email provider is blockinig emails from our server. The only thing that can be done to get around this is you will have to try creating another forum account using an email address from another domain.

    If you are a returning visitor to the forum and can't log in using your old forum name and password but used to be able to then chances are your account is deleted. Purges of the databases are done regularly. You will have to create a new forum account and you should be all set.

OK, now for the run-down

  • Thread starter Thread starter KRISTI'SGS550
  • Start date Start date
I am confused

I am confused

if I have to take the carbs off to get the airbox out, how would that help me in removing and reinstalling the carbs? Looking at my bike and the Clymer manual all I can do is loosen the box and move it back about an inch giving me a little more room to wiggle the carbs in and out. What about taking off the intake boots and installing them after the carbs are mounted to the air box? Then connect the throttle lines last?
 
The intake boots (airbox side of the carbs) need to fit in a particular place, and are hard to get there unless you have free access. That means no carbs in the way. Usually, the easiest way is to get all the boots into place, place the airbox in the general area, then slide it back as far as you can. On some bikes, it helps to also loosen the battery box so you can slide the airbox back just a bit. Even if it only allows another half an inch, that might be what it takes.

On the 650 and 850s that I have worked on, the throttle cables were easier to work with when the carbs were loose from the intake boots, so the order would be: loosen airbox (and battery box, if needed), slide it back. Loosen clamps on intake boots (engine side), slide the carbs out of the boots, remove the cables, slide the carbs out the side. Installation is, of course, just the reverse.

.
 
Steve,
thank you for the semi-visual illustration (you know what I mean). It does help out alot to visualize first. I think the steps you mentioned are for me the easiest and fastest way to get the carbs out. It is getting them back in what I fear. I just have to remember to take my time and be patient and I will be able to do it. I haven't tried to attached the cables while the carbs were loose yet. I will try that this time. Thanks for the suggestions.

Cory
 
Take the screws out on both sides of the airbox and slide it back as much as possible - about an inch or so. This will give you a little room to take the carbs off. The airbox can be removed but it's a pain - you have to split into two pieces.

Regarding the rebuild process, GSR wisdom is to order an O-ring kit from Robert and intake boot O-rings from the dealer since cycleorings.com does not sell them for 550's (or at least they didn't last time I checked). Floatbowl gaskets are a good idea and you should be able to reuse the stock jets unless they are damaged in some way.

Good luck.

[SIZE=+2]09280-32006 (32mm) for '79 and older 750 & larger[/SIZE]
[SIZE=+2]09280-38004 (38mm) for most '80 and later bikes.[/SIZE]
[SIZE=+2]Usually available at your[/SIZE] dealership, as well as here.
77-79 750's, 850's and 1000's use 32mm o-rings and 16mm screws.
79 425's use 40mm O-rings and oddball 6x35 screws, which I don't carry. **
77-79 550's use 28mm O-rings (which I don't carry) and 16mm screws.
80 & 81 1100E and 750's don't use intake O-rings or screws (so you're off the hook!)
80 & 81 1000's use 40mm O-rings and 16mm screws. **
80 and later 850's use 38mm O-rings and 20mm screws.
81-83 650's use 38mm O-rings and 16mm screws.
80-82 550's " "
80-82 450E's use 40mm O-rings and 20mm screws.
82 & 83 1100's (2-valve) use 38mm O-rings and 16mm screws.
83-86 550's use a siamesed setup; they take 30mm O-rings, five 20mm screws and one 16mm screw. (Email me).
85 700 uses 38mm O-rings and 20mm screws.

This is from Robert's site doesn't it say the 80-82 550's are the same screws and O-ring as the 81-83 650's, or am I reading this wrong?​
 
I think you have that right. It's the early 550 intake O-rings that he does not carry.
 
That is what I thought. I figured he quotation marks meant it was the same as the line above, just saving himself some typing time. But I wanted to make sure others saw it as that.

Cory
 
One other comment. Unless it's really warm, a properly tuned GS will need the choke to start. Restated, if it starts without the choke, it is either already warmed up, or it needs tuning. Badly.
 
themess,
when my bike was running it needed the choke to start up everytime, warm or not. Now it isn't running at all, even with the choke. That is why I am tearing it apart and fixing, cleaning and adjusting to my hearts content.

Thanks for the info.

Cory
 
Berrymans was suggested to soak the carb parts in, any other suggestions for cleaning carb parts. What about Seafoam would that do anything if parts were soaked in it for a while?
 
Ive run Seafoam in my tank to run thru the carbs, but i dunno bout its parts soaking properties. Im sure it wouldnt hurt them, but im not sure that its as effective as Berrymans or similar products. This may have been mentioned, possibly even by me, but a word of caution with Berrymans. Its some heavy duty stuff, and kinda stinky. So obviously using it in a ventilated area would be wise. Also, it will destroy rubber, and isnt real nice to plastic either, so DO remove the carb parts that arent metal before soaking them. This includes the orings (which you should likely replace anyway) and the choke clips ( i dunno if your carbs have those or not, but mine did, and i didnt, and they became brittle and broke. Live and learn.) Also, be sure to flush the Berrymans out of the carbs with water and air, as after it evaporates or whatever, it turns into a sticky film that will likely leave your jets clogged worse than before. Some have said the dip will turn thier carb boddies black, and they cant get it off. It did indeed turn mine black, but a lil washing with water and scruby scruby with an old toothbrush took care of that.
 
Ive run Seafoam in my tank to run thru the carbs, but i dunno bout its parts soaking properties. Im sure it wouldnt hurt them, but im not sure that its as effective as Berrymans or similar products. This may have been mentioned, possibly even by me, but a word of caution with Berrymans. Its some heavy duty stuff, and kinda stinky. So obviously using it in a ventilated area would be wise. Also, it will destroy rubber, and isnt real nice to plastic either, so DO remove the carb parts that arent metal before soaking them. This includes the orings (which you should likely replace anyway) and the choke clips ( i dunno if your carbs have those or not, but mine did, and i didnt, and they became brittle and broke. Live and learn.) Also, be sure to flush the Berrymans out of the carbs with water and air, as after it evaporates or whatever, it turns into a sticky film that will likely leave your jets clogged worse than before. Some have said the dip will turn thier carb boddies black, and they cant get it off. It did indeed turn mine black, but a lil washing with water and scruby scruby with an old toothbrush took care of that.

thecafekid,
would you suggest I take the carbs completely apart to soak them. I know you mentioned taking rubber and plastic parts off, but should I soak the jets and needles off of the carbs as well (off the carbs but still soaking in the solution).
 
Yes thats the only way you're assured to get them completely clean. There are alot of little passageways besides the jets themselves built into the carb bodies, mainly for the pilot or idle circuit of the system. You can get the jets clean, but if those passageways still have crap in em, they'll still run like crap. I would suggest getting an egg carton and numbering them to keep the parts from each carb together, as Keith pointed out, they all wear differently, and putting parts from one carb in another could lead to premature failure, or simply not running right in general. After soaking them, i would use some spray carb cleaner with the red spray straw on it, and stick it in those passageways to blow them out and assure that they are flowing freely. BE CAREFULL however, as some of the passageways you cant tell where they come out at, some goin in one way and come right around back at you. I caught some carb cleaner right in the eyeball doing mine. Lemme tell you, the pain was magnificent. I thought i was going to be blind. lol
 
Also, keep track of which carb went where on the rack as you take them apart. One of them is usually the master carb, and doesnt have the same ports as the rest. It usually has one blocked off to create vaccum for the petcock. As long as you keep track of what went where, you should have no problem. Take pictures if you need to. They really arent as complicated as you'd think. Also, when unscrewing the air and/or fuel screws to soak them, screw them in untill they softly bottom out (no gorilla torque or you could damage them) and count how many full and half turns you made to get it there, so you can set them the same way when you put them back in, ie the air screw took 1 and a half turns to bottom out. When you put it back in after cleaning, you'll turn it till it bottoms out, and then back off one and a half turns.
 
thecafekid,
thanks again for the info! I will be tearing my carbs apart hopefully today and setting them in some Barryman's over night. I have some plastic containers that will work great to soak the parts in while still keeping them separate.
I haven't found anywhere yet how to seperate the carbs on a 1981 GS550, my manual doesn't explain it very well. Is it very easy? How can I find out how to do this? I have a clyemer, but it really doesn't expand on taking them apart, it just says seperate the carbs. There seems to be some springs holding them together, do they get "tapped" with a hammer to "break" them apart? Thanks again for the all the help. It willl be because of you and everyone else on this forum that my wife's bike will once again run.

Cory
 
The carbs are different accross the rack so it might save you some time if you scribe a 1 - 4 into the body to keep track. Take some photos as well before you tear them apart so you can refer back in case you forget where all the hoses go. And don't forget the carb rebuild series in the GSR homepage. Lots of good info there.
 
Kristi's hubby (Cory),

Have you seen the Carb Series in the garage section? It is a nice pictorial on how to work on the carbs. Print it out if you have the paper and ink, it's 53 pages, but well worth printing and placing in your service manual supplement.

It's all detailed in the guide mentioned above, but the basic idea of separating the carbs is to remove the choke activation rod, remove the screws from both mounting rails, then sliding the carbs apart. There are fuel pipes between all the carbs, and vent tubes between 1&2 and 3&4. These are just tubes with o-rings that slide into machined bores in the carb bodies. Don't worry about the throttle linkage, but DO note how they fit together. There is a tab on the adjacent carb that slides between the adjuster screw and a spring. You will understand that when you see it.

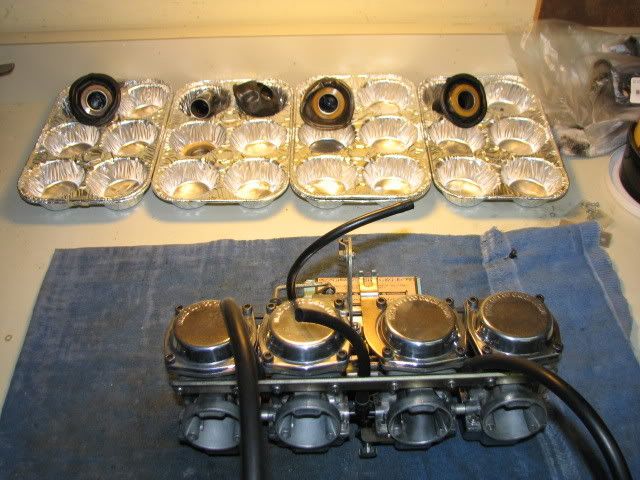
I second the idea for a compartmentalized parts bin for all the screws and jets, but my wife presented me with a better idea than egg cartons. Most of the egg cartons we get are styrofoam, and dissolve upon contact with gas or carb cleaner. She handed me a stack of disposable muffin tins from Big Lots, but they can be found anywhere. Mine have 6 muffin cups each, which is plenty for a carb. Four of these tins lined up side by side keep stuff separated quite nicely. At under a buck for a pair of tins, they won't break the bank, either. I have also found it very useful to have a towel covering the work space. It keeps parts from bouncing off the work area.

IMG_3640.jpg
 
Last edited:
You guys are awesome!

Thank you all for so many great details. I am off this week Wed through Saturday so I will be tearing these guys apart and cleaning them, in the mean time I will order my 0-Rings from Robert. Great ideas and thank you for the link for the carb page. I hope I have enough ink to print the sucker!

Thanks again for all the help guys. I really appreciate it.

Cory
 
I got the carbs off the bike!

I got the carbs off the bike!

Before work tonight I worked on the bike for about an hour and got the carbs off and out. I am sure it is because of the information on this forum and the handy carb maual that I got this accomplished, http://www.thegsresources.com/gs_carbrebuild.htm . I pulled the rod out and got one of the brackets off, by doing the hammer and screw driver approach. But I am having trouble with one of the bracket type rails that holds the carbs together so it will be soaking in some "solution" over night. Hopefully this will loosen the screws up enough to get them off. If not I will be seeking help on this. Tomorrow I am going to buy some Barryman's and start tearing down the carbs for cleaning and soaking.

After I clean my carbs will it be okay to keep them apart a week or so while I wait for my O-rings?

While the carbs are off I am going to hook the bike to my truck battery and do some electrical tests. I want to test the plugs, wires and coils. Also while I am in the area I should do a compression test and later follow it all up with a valve adjustment.

Thanks,

Cory
 
In my opinion, PB Blaster is the best rusteater/penetrating oil ive used. Helped me out a billion times. SHould be fine to leave the carbs apart, just keep them covered up, or put them someplace where they wouldnt collect dust or whatnot.
 
thecafekid,
I believe it is PB Blaster that I am using. I really like the stuff too, it seems to work pretty fast.

Would putting the carbs sealed in a plastic bag when I am done with them be OK?

Cory
 
Back
Top