• Required reading for all forum users!!!

    Welcome!
    Register to access the full functionality of the GSResources forum. Until you register and activate your account you will not have full forum access, nor will you be able to post or reply to messages.

    A note to new registrants...
    All new forum registrations must be activated via email before you have full access to the forum.

    A Special Note about Email accounts!
    DO NOT SIGN UP USING hotmail, outlook, gmx, sbcglobal, att, bellsouth or email.com. They delete our forum signup emails.

    A note to old forum members...
    I receive numerous requests from people who can no longer log in because their accounts were deleted. As mentioned in the forum FAQ, user accounts are deleted if you haven't logged in for the past 6 months. If you can't log in, then create a new forum account. If you don't get an error message, then check your email account for an activation message. If you get a message stating that the email address is already in use, then your account still exists so follow the instructions in the forum FAQ for resetting your password.

    Have you forgotten your password or have a new email address? Then read the forum FAQ for details on how to reset it.

    Any email requests for "can't log in anymore" problems or "lost my password" problems will be deleted. Read the forum FAQ and follow the instructions there - that's what we have one for...

  • Returning Visitors

    If you are a returning visitor who never received your confirmation email, then odds are your email provider is blockinig emails from our server. The only thing that can be done to get around this is you will have to try creating another forum account using an email address from another domain.

    If you are a returning visitor to the forum and can't log in using your old forum name and password but used to be able to then chances are your account is deleted. Purges of the databases are done regularly. You will have to create a new forum account and you should be all set.

Rear Set Mounting Plate Design

  • Thread starter Thread starter Guest
  • Start date Start date
G

Guest

Guest
Well as most/many know my 82 GS1100 was rear ended Memorial Day Weekend and the frame was bent enough to warrant replacement.

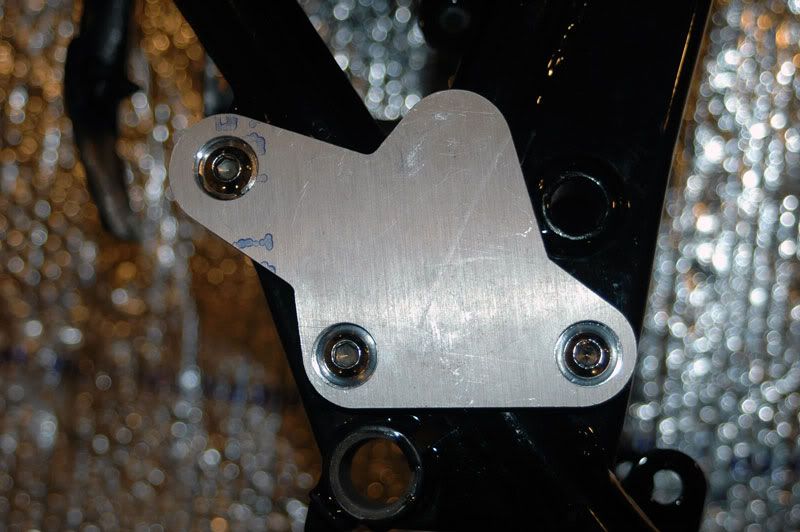
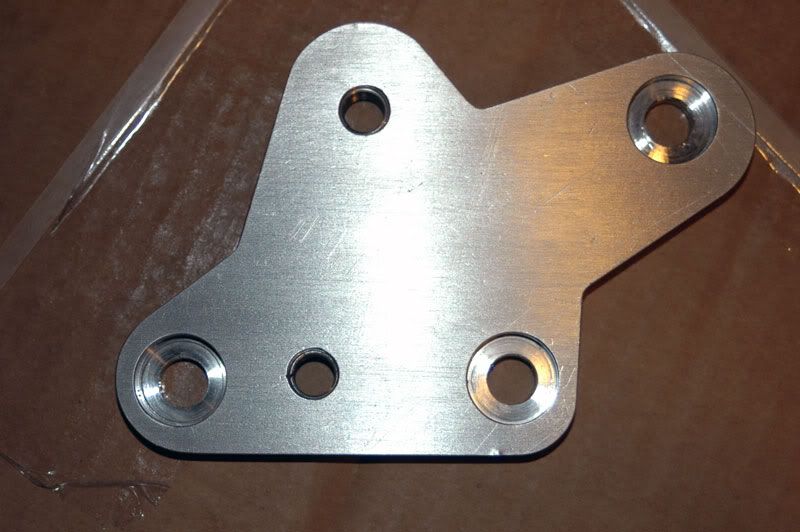
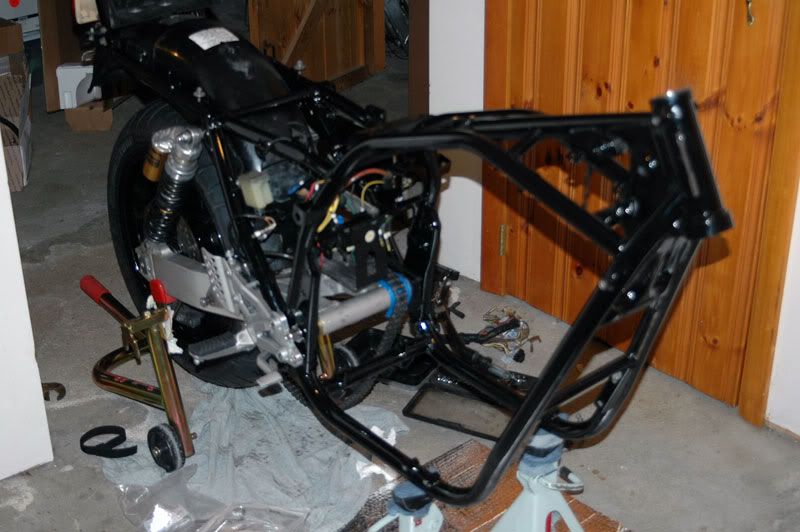
Found a nice 83 frame locally and had it powder coated. One thing I knew going into this was that the 83 frame's mounting points for the stock driver pegs are in different locations than the 82 for the two rear mounting points on each side of the bike. So I knew my current rear set mounting plates would have to be revised to continue using ZX12R running gear. I chose the ZX12R brackets at the time because I liked the way they looked and I found a pretty cheap set.

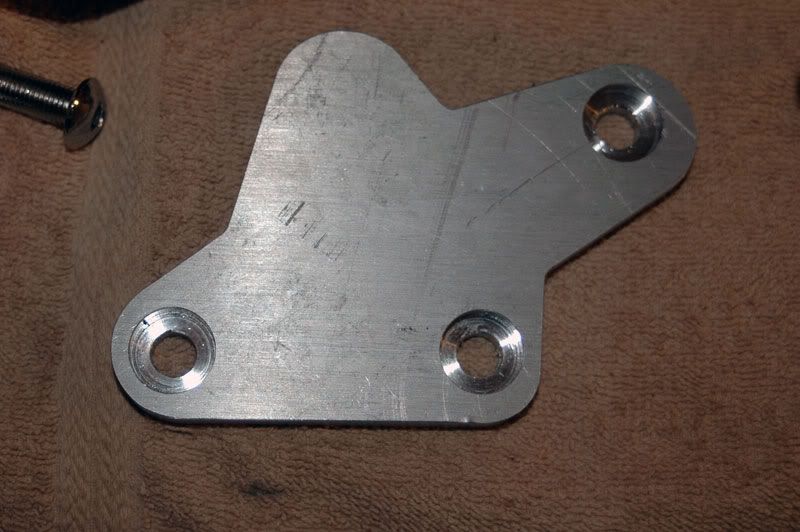
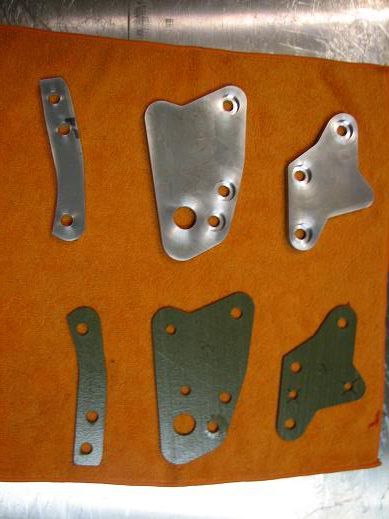
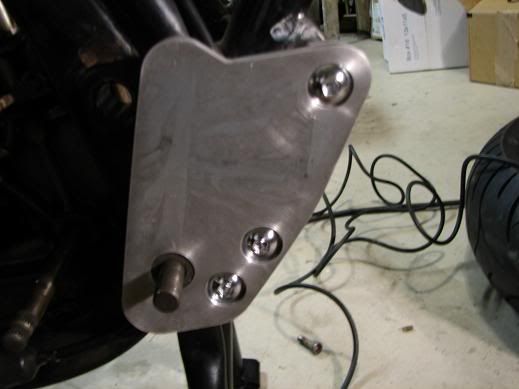
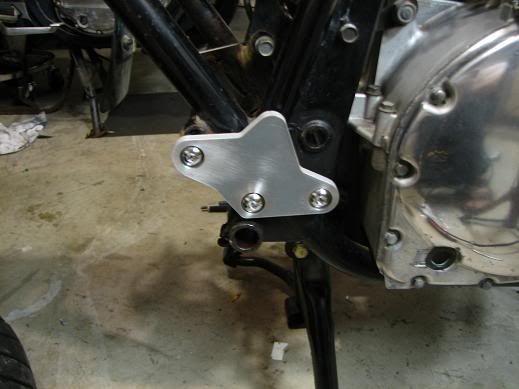
So here's the 82 mounting plates that need to be replaced. Note that shift side and brake side plates are quite different in shape. Note also that on the shift side the plate is low enough so that it also caught the shift pivot shaft. In the picture below the shaft is obscured by the shifter arm.

rear-set-shifter-side.jpg


Girls-Day-036a.jpg


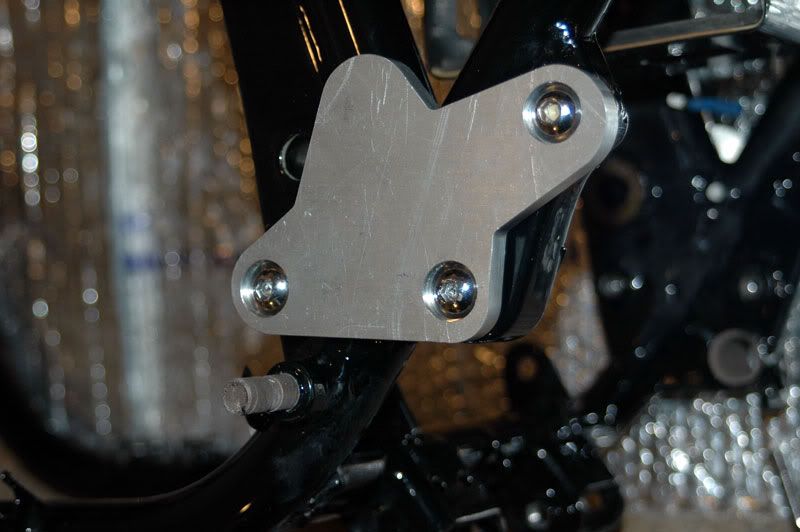
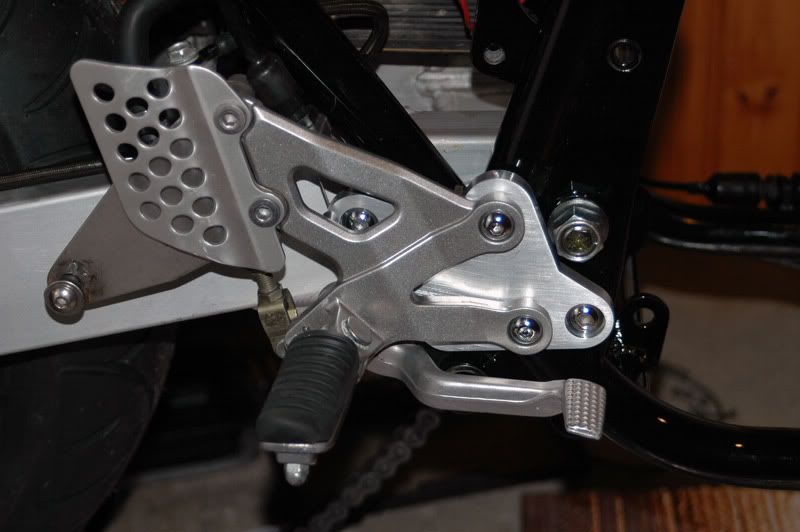
For purists on the usage of the term "Rear Set" since these plates do raise the stock peg position one inch up and 1 inch back I think its safe to use the term. I didn't want to go too far up/back with them and make the position uncomfortable.
 
Tom,
Those are very nice "rear sets". Judging by the length of the shifter extension bolt you are much further back than 1" from stock.

Looking at my bike, the stock position is just offset back (1 peddle width) of the swingarm bolt. Looks pretty racey to me.

Jim
 
Last edited:
So back to the future.......

Both times I've done this drill I've mocked up the plate on pattern paper first so that I can cut things out quickly with scissors till I'm happy with shape and design. I probably went through 7 to 8 designs/shapes over several days till I felt I was getting close. Last night I had a "Doh" moment as I stood over the frame while it was laying on its side when I realized that on the 83 frame I would be able to use the same shape plate and hole locations on both the brake and shift sides. Woo Hoo!! We love standardization.

The next step was to trace the pattern onto a piece of 3/8" thick clear lexan plastic and cut out with a band saw. Again the point to this step is check the design and interference fit with the other mounting points and moving parts. The lexan is also easy and fast to cut and drill. The holes in the lexan are 1/2" dia. for the three plate mounting bolts I haven't cut the recesses for the bolt heads yet. The two shift bracket mounting point holes are 3/8" dia. (just tight enough to hold the bolts loosely in place with the bracket mounted. The final plates will be made from 3/8" thick 6061 billet aluminum plate and the threaded holes for mounting the ZX12R running gear will be heli-coiled to take the stresses.

The frame is laying on its side in these photos on a piece of foil covered bubble wrap I had laying around. The bubble wrap is just to protect the new powder coat finish. I know for a minute you thought I was writing this from the Twilight Zone.

The blue color on the lexan is the protective release paper they put on the face side. If I pulled it off it would be transparent, harder to mark on, and tougher to take pictures of.

rear-sets-reduced-07.jpg


rear-sets-reduced-16.jpg


rear-sets-reduced-33.jpg


This time around I plan to cut the shifter pivot shaft off flush with the boss. See second pic.
 
Tom,
Those are very nice "rear sets". Judging by the length of the shifter extension bolt you are much further back than 1" from stock.

Looking at my bike, the stock position is just offset back (1 peddle width) of the swingarm bolt. Looks pretty racey to me.

Jim

Jim, you could be right. It does look like your shift side peg is in line with the forward down tube (tube that accepts the rear of the engine).

Call me "Racey" then. I did put 7K on the 82 frame with that set up and found it pretty comfortable. The further you push back the harder it will be to find a viable place for passenger pegs. Lately if the wife wants to go we take the FZ1 which is a better two up platform. If she doesn't I take the GS.
 
Some shots of the same mounting plate moved over to the brake side. Using same monting hole locations on both sides will hopefully provide "Racy" symmetry.

Mounting plate Blue release paper is on top when the plate get used on brake side

Rear-Set-reduced-012.jpg


Rear view of plate, Also note new Katana swingarm pivot bolt. Thank you Joe for that tip.

Rear-Set-reduced-09.jpg
 
Last edited:
Couple more from the brake side. Again remember that final plate will be polished aluminum. The tab at the bottom accepts the master cylinder (not mounted at this time.

Rear view
Rear-Set-brake-reduced-33.jpg


Return spring mounting tab on brake lever forced removal of some of the plate so the lower rear mounting bolt is a smidge closer to the outside edge of the plate than I would prefer. Now just need to figure way to mount spring between that tab and the brake light switch and I'll be done. My machinst buddy has agreed to make up new set.

Rear-Set--reduced-38.jpg
 
Looking great! If you decide to let go of the '82 plates, please let me know.;)
Tony.
 
Looking great! If you decide to let go of the '82 plates, please let me know.;)
Tony.

Tony,

I have a spare set for my 82 that I had made from Isleoman's original set. I also have them on file at a local machine shop. They are blank you would need to have them drilled for whatever rear set you use.

Plates3.jpg


Plates2.jpg


Plates1.jpg
 
Last edited:
Looking fantastic Isleoman! Again I cannot wait to see this thing, its motivated me to get mine back on track.
 
Excellent workmanship..Nice Job!..Sweet lookin Bike..


DDM
 
Rear Pegs?

Rear Pegs?

Very Very,nice work just went threw the same thing,My CBR Friend wrecked my 1982 lost control in a turn and flipped it end over end about 3 times through a graveyard and bent the frame(Pictures in my profile i think),gsxr front end was fine ....no clue how,I found an 1983 frame at Baltimore Cycle Salvage with title so i bought it,everything went together fine until i went to mount the pegs and rear pegs,I used an old set of PMFR pegs from a dragbike i used to have for a simple solution.But no rear pegs for the lady freind.I was thinking of using an old set of zx7 rear pegs and weld small tabs to the rear part of the frame for easy removal.Any thoughts.?
 
I appreciate Joe's kind offer, but am also rethinking the mod due to lack of pillion pegs, which I seem to need several times a year. The '83 pegs and carriers are different (lighter, and more attractive) but I do not think they are significantly different in position, in reference to fixed datum points on both bikes.
Tony.
 
Isleoman,
Great thread! Subscribed. Thanks for posting the link over on the doctor's thread.
-KR
 
Friend wrecked my 1982 lost control in a turn and flipped it end over end about 3 times through a graveyard and bent the frame

Ouch ! Thats a painful picture. Glad he didnt take up residence at the crash site. :eek:

Great work guys. Keep it coming.......:)
 
Oh, and on the subject of 'passenger pegs' here is a solution that I came up with on one of my ... er ... "green" bikes ;) . Not meaning to thread jack but here is what I did. Cut a piece of metal plate for passenger-peg bracket mounting, drilled and threaded the holes, welded it in place, painted, mounted the pegs and *poof*! :o
 
Last edited:
And all painted and bolted up it turned out like this.
-KR
...end of thread-jack, with appologies. :o

PS> Sorry I don't know how to make multiple photo posts! :)
 
Made some progress on the mounting plates. Everything is done except the two threaded holes in each plate that will except the helicoils for the rear sets. Should have those done next week. Only get a few minutes every few days at lunch to work on them.

Once the helicoils are installed just need to mount the rear sets and work on the return spring for the brake light switch. The 83 frame is going to allow for the rear sets to be tighter to the frame than I was able to do on the 82 frame. Don't mind those surface scratches they will polish right out. Still need to cut off the old shift shaft post (bottom pic).

Metal-RS-7-reduced.jpg


Metal-RS-1-reduced.jpg


Metal-RS-13-reduced.jpg
 
Well my buddies done with my rear set mounting plates.

Here's the shift side with the 3/8"-24 heli-coil inserts installed. He applies a quick brushed finish in his shop which makes it easier and faster for me to polish up.

RS23-reduced.jpg


Somewhat fuzzy pic of pieces starting to be re-mounted to the 83 frame. Pit bull has been coming in handy. Some blue painters tape on the swingarm to protect it from the loose chain. New wiring harness laying in the background. That's the next big step.

RS20-reduced.jpg


Close up of dry fit of brake side rear set. All that left to do is find a shorter bolt for brake switch activator spring to attach to on the brake pedal. You can see the spring in the opening. The stainless plate facing to the rear with the bolt hanging off it holds the yosh header.

RS19-Reduced.jpg


Cafe Kid, I'll post up the drawings for the mounting plates soon, trying to find a format like .pdf to have them print at actual size. I have them in autocad now.
 
Last edited:
picture.php


picture.php


picture.php


picture.php


picture.php


Copy Right protected drawings. Free for anyone's personal use. Not free for commercial use, contact me if your going into business with these.
Applicable to 1983 GS1100 only. I think they are right, but no guarantee offered or implied.
The depth of the .75" recess for the three mounting bolts is .20". Those bolts are available from the company www.helmethead.com. The two rear set mounting holes are for ZX12r 01-05. You may be able to mount Rear Sets from some other bike, again no guarantees. Brake side shown, Shift side is a mirror image. Mine are made from 3/8" thick billet 6061 aluminum. Steel or titanium or another grade of aluminum might work as well.

Two Helicoils in each plate are 3/8"-24

I don't have the capability to make anymore of these so don't ask, Your machinist should be able to replicate. Mine were made on a Proto-track three access machine but a water jet might be able to cut the shape and most of the holes except the bolt recesses. Might also be able to make them with a hack saw, grinding wheel and hand drill if your serving a long prison sentence and need something to do. Good luck.
 
Last edited:
Back
Top