• Required reading for all forum users!!!

    Welcome!
    Register to access the full functionality of the GSResources forum. Until you register and activate your account you will not have full forum access, nor will you be able to post or reply to messages.

    A note to new registrants...
    All new forum registrations must be activated via email before you have full access to the forum.

    A Special Note about Email accounts!
    DO NOT SIGN UP USING hotmail, outlook, gmx, sbcglobal, att, bellsouth or email.com. They delete our forum signup emails.

    A note to old forum members...
    I receive numerous requests from people who can no longer log in because their accounts were deleted. As mentioned in the forum FAQ, user accounts are deleted if you haven't logged in for the past 6 months. If you can't log in, then create a new forum account. If you don't get an error message, then check your email account for an activation message. If you get a message stating that the email address is already in use, then your account still exists so follow the instructions in the forum FAQ for resetting your password.

    Have you forgotten your password or have a new email address? Then read the forum FAQ for details on how to reset it.

    Any email requests for "can't log in anymore" problems or "lost my password" problems will be deleted. Read the forum FAQ and follow the instructions there - that's what we have one for...

  • Returning Visitors

    If you are a returning visitor who never received your confirmation email, then odds are your email provider is blockinig emails from our server. The only thing that can be done to get around this is you will have to try creating another forum account using an email address from another domain.

    If you are a returning visitor to the forum and can't log in using your old forum name and password but used to be able to then chances are your account is deleted. Purges of the databases are done regularly. You will have to create a new forum account and you should be all set.

suitability of Furakawa RFW and Sumitomo HM-090 connectors for switchgear

  • Thread starter Thread starter garagepunkfan
  • Start date Start date
G

garagepunkfan

Guest
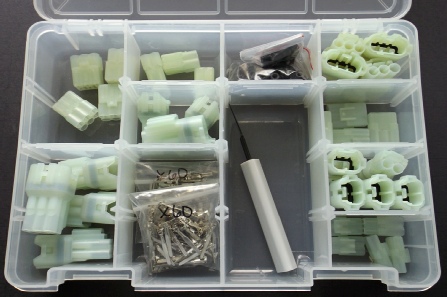
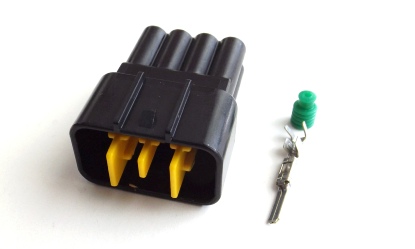
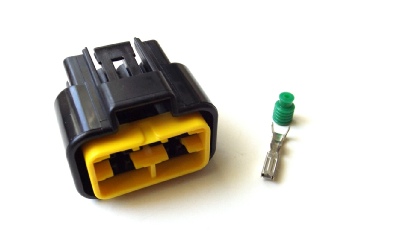
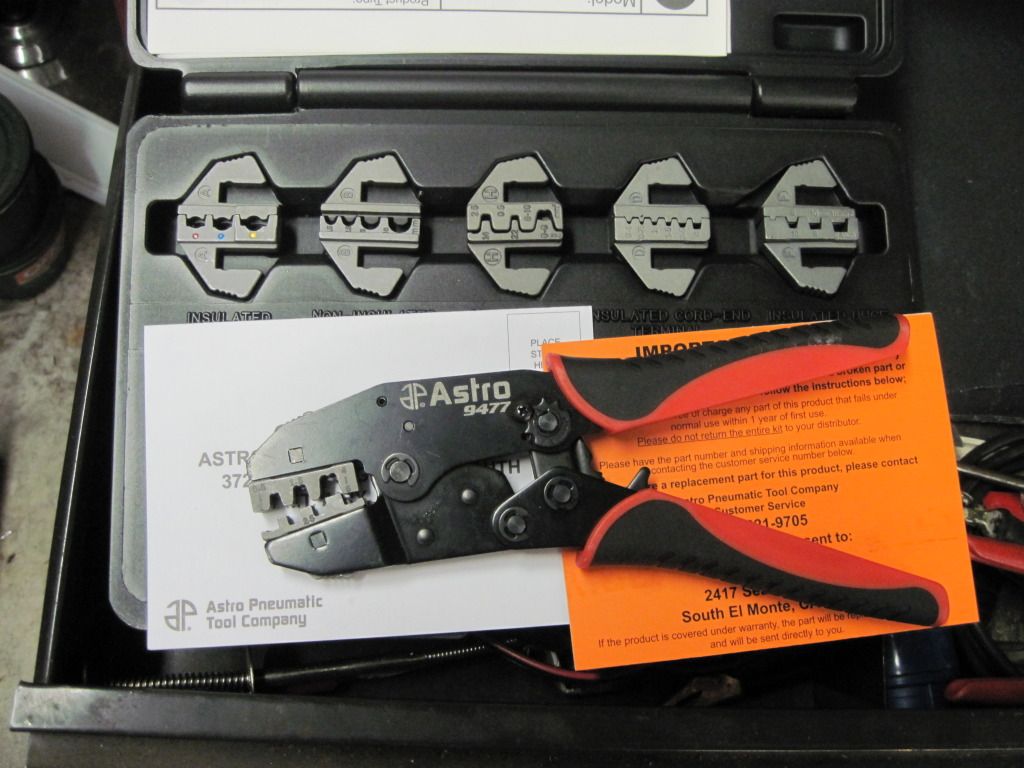
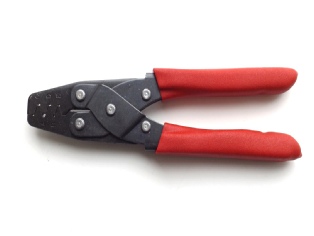
i'm back on rewiring my 83 GS1100ED after some time away from it. i was unhappy with some of the work that i'd already done; too much patching, splicing and soldering of connections, as well as having started out replacing the melted OEM unsealed Sumitomo 110 connectors in the headlight bucket with identical replacements. all this and i still had a harness that depended on an antiquated Controlled Relay Module for Check Panel and headlamp functions......to make a long story short, i'm beginning again with a very nice 17,000 mile harness removed from my 1982 GS750EZ. i combined my tach and speedo from the 1100E with the cluster from the 750EZ which has no check panel. i am using an Eastern Beaver Headlamp Relay Kit and their Horn Relay Kit as well as their R/R Lead Kit for the SH-775 R/R. i'm also doing the Coil Relay Mod and have followed Pos' advice on running only the orange/white wires thru the kill switch. i really want to put as many of the connections on the bike into sealed connectors as i can and avoid soldering most of those, preferring the floating connection at the crimp, and the seal providing strain relief. i have salvaged a bunch of the Furakawas, and ordered what i might need, as well as having ordered a Sumitomo HM-090 connector assortment from CycleTerminal (great folks to deal with). since all of the heavy loads were being taken out of the switchgear and the circuits in question simply providing "trigger" function for the relays, can anyone comment on the ability of an .090 connector to pass the current vs. the original .110 connectors?
 
I used the Furukawa RFW single connectors for the stator leads on my bike over 10,000 miles ago and they look like they did the day I installed them, so I know they will handle the job. I'm not familiar with the other connectors.
 
thanks for the reponse OldVet66. the connectors we know and love for the SH-775 type R/R's are also Furakawas in the QLW series but have a hefty .250 wide spade to handle the current.

both the Sumitomo HM i think i read somewhere that a typical .090 is rated at somewhat less than 10 amps each, although i have personally taken apart a late-model Suzuki harness that passed a horn circuit with 14 ga wire thru an unsealed Sumitomo HM style connector. Eastern Beaver and CycleTermial both sell the 14-16 ga seals for the Furakawas but terminals seem to be made for the 16 to 20 gage range only.


a pic of the Sumitomo HM 090's, courtesy of CycleTerminal....

HM-090-6-Sumitomo-M(6187-6801)-F(6180-6181).jpg


and the terminals for them

090-HM-MT-HW-sumitomo-sealed-male-terminal-M(1500-0105).jpg
090-HM-MT-sumitomo-sealed-female-terminal-(1500-0110)-F(1500-0106).jpg


they sell a nice starter kit too for about $63..

HM-090-Connector-Kit.jpg


and the Furakawa RFW 090....

FW-C-8M-B-Furukawa-8pin-male-connector.jpg
RFW-C-8F-B-cdi-module-connector.jpg


here's the link to their site

http://www.cycleterminal.com/index.html

both have their advantages. the Sumitomos are cheap, comparitively; but only go up to 6 stations. the Furakawas, meanwhile, are a more solidly-built connector with a higher-density plastic shell and are available in more ranges including 8, 9, and 12 station versions with male and female halves; but are pretty spendy. terminals and seals are cheap in either case and make looking at 10 or 12-dollar used late-model bike harnesses worthwhile (found on that auction site)
 
Last edited:
I've used the Furakawa terminals under some fairly harsh conditions (-30C to +60C @90% humidity) for years in an industrial application and have never had one fail. I see no reason why they wouldn't work out great.

Sorry, no experience with the Sumitomo connector.
 
I don't think you could tell the difference in the metal connectors, both companies may buy them from the same source. I like the Furukawa connector shells better than the one you showed and to tell the truth I fudged the connectors a bit for the 10 gauge wire for my Compu-Fire R/R (removed some strands for the first crimp and removed the insulation for the second crimp and sealed the end of the barrels with silicon. I opted for the single connectors for the R/R so they wouldn't heat each other. My next quest is to replace all the rest of the plugs on the bike with the Furukawa multiple connectors.
 
Last edited:
In the absence of any locally available Furukawa connectors, or anything that remotely resembled them, I ordered some Chinese knock-off single connectors from aliexpress. I'll try them out on the headlight and heated grips circuits first before trusting them elsewhere.
 
if you guys would not mind i'd like to turn this into a tech thread about my electrical upgrades. i'm making good progress and a thread would help keep me motivated....

10449892_1424481144494398_1842197614439844567_n.jpg


here is my 82 GS750EZ harness tagged and laid out


10308737_1424481004494412_1654681277110932718_n.jpg


10382776_1424480727827773_5247258083870151871_n.jpg


as you can see its not too bad for a 32 year old harness. nothing burnt, cut or melted
 
10401916_1424481167827729_9120749225969941484_n.jpg


i drew a "dead body outline" on cardboard to ensure that i would remake it to the same "footprint" and labeled the areas of the branching. starting to unwrap
 
10421629_1424481201161059_2162786964441032934_n.jpg


removing the charge loop from the harness and relocating the orange/red wire to be grouped with the left switchgear wires. it eventually ends up going to the yellow/white wire over on the other side, and the right switchgear does not need it. all that is needed are the 2 orange/white wires
 
10300174_1424481587827687_5945669462746997791_n.jpg


this stuff is small...


10338255_1424481611161018_1026327438710339183_n.jpg


luckily, with the seals in place, normally the terminal will hold itself in place while preparing to crimp

10464263_1424481614494351_815398462597535126_n.jpg


IMG_0534.jpg


the 090 sealed terminals need (in my case) to be crimped in two different pliers. i have an Astro-Pneumatic model 9477 which has the stepped dies for crimping both sets of wings at once. unfortunately, none of the dies are sized appropriately for the 090's. killing 6 terminals in a row on my first crimp convinced me to seek another pliers.....

Sumitomo-090-040-terminal-crimp-tool.jpg


so i purchased a Rostra ECT47 from Cycle Terminal, which handles the wire crimp well, but seems too small to crimp the seals. so i use an appropriate die to do the seals only with the 9477 pliers
 
10462650_1424481661161013_7462825264941370441_n.jpg


notice the dark color of the wire strands? that's oxidation and it needs to be cleaned before crimping. the old terminal ends looked ok but this was lurking when i clipped and stripped. keep in mind that this harness came from a 17,000 mile garage-kept bike with known history of always being kept indoors. think about that when you are thinking of running an old harness as-is.....

10354997_1424481697827676_5109279532302126981_n.jpg


so a little bath is in order. generic brand CLR.

10313629_1424481761161003_2795348766186792070_n.jpg


that's a little better
 
Last edited:
10446453_1424481791161000_3136346692877007436_n.jpg


10449191_1424481801160999_3374096562478613329_n.jpg


10336717_1424481821160997_2488714047903509908_n.jpg


10446637_1424481834494329_1760141113322896485_n.jpg


just about done with this one...note that this is for the left switchgear, the orange/red wire is now re-routed thru this connector to feed the dimmer switch (yellow/white).

10274325_1424481851160994_617152247006304781_n.jpg


the empty hole gets a cavity plug

10300174_1424481864494326_593698087148452362_n.jpg


10457845_1424481881160991_5209968898237314503_n.jpg


10409485_1424481884494324_8311540923045438199_n.jpg


1969342_1424481934494319_3546153328163532742_n.jpg


the guide block.....


10437793_1424481977827648_4455983734249779586_n.jpg


and done!
 
Last edited:
BTW, i should note here that the Furakawa connector shown in the last sequence and its future mate were both salvaged from cheapo cut-up late-model bike harnesses. get familiar with the different connector types and go shopping on that auction site. plan what you need and buy trying to maximize the number of useable-to-you connectors. you will even score some useable primary wire and maybe get some ideas how to set up different circuits.....
 
10347634_1424482004494312_8277763485829204884_n.jpg


all that goes into the right switchgear anymore is the yellow/green wire for the starter button and these two orange/white wires. i'm going to put a 2-station
Sumitomo MT sealed connector on these 2...


10402390_1424482051160974_9043000615935214397_n.jpg


10334339_1424482091160970_88199933705563348_n.jpg


1907348_1424482111160968_4368555997548468678_n.jpg


getting better at this....


10325532_1424482134494299_90296436626261430_n.jpg


good strippers are essential...
 
10291117_1424482151160964_4682451064441736319_n.jpg


this is the original GS750EZ side-stand switch diode. it was still serviceable so the contacts were cleaned with CLR. it goes inside the headlight bucket in a clear vinyl tube....


10363946_1424482184494294_528594272025341256_n.jpg


this is the running/tail/instrument illumination lamp circuit branch clipped apart at the factory splice and stripped. note the corrosion, and also bear in mind that this connection is utterly, completely buried in the heart of the harness seemingly away from moisture, yet here is clear evidence of something going on. you have been warned!
 
10441413_1424482334494279_2081743478671090197_n.jpg


running wires for the horn relay...two 12 gauge wires, green is fused hot from terminal block near battery, red splits into 2 - 14 gauge feed wires for horns. 18 gauge trigger wires, one direct to horn fuse in fusebox (Kawasaki ZX6 fusebox), the other is the stock horn wire to the switch (switch is a ground-side switch)

10410531_1424482341160945_5498237508117733069_n.jpg


relay bases for Panasonic NAIS 20 relays

1901787_1424482367827609_4890234640632285267_n.jpg


Panasonic NAIS 20 relay. tiny, lightweight and well built. perfect for inside the headlight bucket

1521236_1424482414494271_3955497029640102730_n.jpg


10446709_1424482471160932_5374800925726009959_n.jpg


pin-out diagram for Panasonic relay

10372147_1424482454494267_2316404651498326783_n.jpg


horn leads finished....
 
135959bb-7ecf-4c09-84b6-49bbe1ff6ca7_zpscdce5aed.jpg


here's my Kawasaki fusebox set up in my previous effort to utilize the GS1100ED harness. i modified the original electrical mounting plate to bolt it in place, however, i will probably make a new aluminum plate altogether, as well as a new battery tray. the fusebox will be re-used though.


10386857_1424482511160928_2085164236884379156_n.jpg


Hayabusa switchgear


10347406_1424482524494260_2405471305539014497_n.jpg


starting to prepare switchgear for Furakawa RFW connector


1959477_1424482554494257_6356270048590580630_n.jpg


clutch safety switch leads for Kawasaki ZX6 clutch lever/switch all wired up with connector and run thru main conduit and back out of switchgear to clutch switch.

10441179_1424482574494255_4142802446268181392_n.jpg


female terminals...

10363532_1424482601160919_2131435927080982366_n.jpg


10464326_1424482607827585_991947195333511161_n.jpg
 
Back
Top