• Required reading for all forum users!!!

    Welcome!
    Register to access the full functionality of the GSResources forum. Until you register and activate your account you will not have full forum access, nor will you be able to post or reply to messages.

    A note to new registrants...
    All new forum registrations must be activated via email before you have full access to the forum.

    A Special Note about Email accounts!
    DO NOT SIGN UP USING hotmail, outlook, gmx, sbcglobal, att, bellsouth or email.com. They delete our forum signup emails.

    A note to old forum members...
    I receive numerous requests from people who can no longer log in because their accounts were deleted. As mentioned in the forum FAQ, user accounts are deleted if you haven't logged in for the past 6 months. If you can't log in, then create a new forum account. If you don't get an error message, then check your email account for an activation message. If you get a message stating that the email address is already in use, then your account still exists so follow the instructions in the forum FAQ for resetting your password.

    Have you forgotten your password or have a new email address? Then read the forum FAQ for details on how to reset it.

    Any email requests for "can't log in anymore" problems or "lost my password" problems will be deleted. Read the forum FAQ and follow the instructions there - that's what we have one for...

  • Returning Visitors

    If you are a returning visitor who never received your confirmation email, then odds are your email provider is blockinig emails from our server. The only thing that can be done to get around this is you will have to try creating another forum account using an email address from another domain.

    If you are a returning visitor to the forum and can't log in using your old forum name and password but used to be able to then chances are your account is deleted. Purges of the databases are done regularly. You will have to create a new forum account and you should be all set.

Suzuki GR (almost GS) 2 cyl Tempter is charging low .. and coil question

dennco2

Forum Mentor
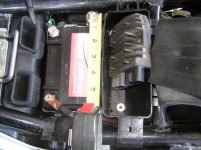
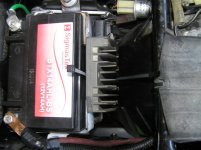
I am trying to clean up my 38 year old twin cylinder Tempter 650. It has serious charging issues and I have started to address the problem by pulling parts off to inspect and clean anything and everything having to do with the electrical. Stuck bolts is a major problem but after removal I wire brush them on the bench grinder wire wheel. All mount plates and grounding points have been cleaned. I pulled the coils one at a time to clean all contact points. All is good till this evening in my progress .... I am not 100% positive the 2 small coil wires on both coils (with spade connectors( are connected correctly as they were. Hate to think if I accidentally reversed these wire to the coils .... something bad will happen. Any sage advice from someone here!??

In the next few days I want to complete the job of pulling all bullet and spade connectors apart ... to clean them up and reattach. If that doesn't solve my charging problem, I will know it comes down to the Stator and/or the R&R. I did the recommended battery check and maybe getting a half volt of charging currently at 3,000 rpm. My fully charged battery shows 13.2 volt and drops about 1/2 to 3/4 volt with key on.
 
13.2v after shutting the bike off is a well charged battery, and 0.5v higher than that (13.7v) at 3k rpm isn't a bad deal. I'm not seeing a "low charging" complaint here.
 
13.2v after shutting the bike off is a well charged battery, and 0.5v higher than that (13.7v) at 3k rpm isn't a bad deal. I'm not seeing a "low charging" complaint here.

I should have stated my battery was charged up by my Schumacher battery charger/maintainer. That got my battery to 13.2 but after a 10 minute ride .... the system voltage goes down to 11.9 or so. The bike charging system is doing almost nothing currently ... but I am working on improvements. I am trying to buy a Suzuki manual for this bike so I can look up technical info.

Still wondering about the 2 small leads to the 2 coils. Left side coil leads are colored orange/white on the outside of coil ... and solid white wire on the inside spade connection closest to the frame tubing. On the right side coil, I currently have the Black/Yellow wire to the outside spade ..... and the orange/white wire to the inside spade connector closest to the frame tubing.
 
dennco,Have a good look at your regulator/rectifier plug which plugs into the harness.I would also suggest testing your OEM(?) original(?) regulator/rectifier as it may have got burned-out.
 
dennco,Have a good look at your regulator/rectifier plug which plugs into the harness.I would also suggest testing your OEM(?) original(?) regulator/rectifier as it may have got burned-out.

I bought a used Polaris SH775 R&R but I see no room to install. It seems twice as big. After I finish cleaning the bullet connectors in the headlight bucket and some on the rear fender, I'll get to the old R&R. Previously I had pulled that part off the bike to check and clean the mounting plate. This bike has suffered from poor maintenance. This evening, I mounted the fuel tank and it actually started when I pressed the starter button! No charging numbers yet, but I did put the battery on a trickle charger so it will be full by morning.

I have ridden lots of bikes over the years, but this on is the smoothest softest riding bike I have ever rode. This 1983 Suzuki model was the first production motorcycle to have a monoshock adjustable rear suspension. I barely feel anything in the seat when I accidentally hit a pot hole or ride on rough pavement. That is why I really want to get this running well .... and charging the battery! More progress tomorrow.
 
I found 8 bullet wiring harness connections inside the headlight bucket ... in addition to the multi-pin connectors. One bullet connector pinned a green coded wire to a black coded wire. Does that sound correct? I looked for other mating wires inside and found nothing.

Still cleaning old connectors trying to lower ohm resistance in the harness and find out why my R&R is not charging the battery.
 
I bought a used Polaris SH775 R&R but I see no room to install. It seems twice as big.

Keep in mind that it doesn't nessessarily need to mount where the old one did. On my 450 I mounted my SH775 to the plate where the toolbox used to be under the right cover, you'll need to extend the wires but there's no reason it won't work, plus you might be able to directly ground it to the battery.
 
I found 8 bullet wiring harness connections inside the headlight bucket ... in addition to the multi-pin connectors. One bullet connector pinned a green coded wire to a black coded wire. Does that sound correct? I looked for other mating wires inside and found nothing.

Still cleaning old connectors trying to lower ohm resistance in the harness and find out why my R&R is not charging the battery.

I don’t have a wiring diagram in front of me but the green to black wire sounds like a right turn signal connection if it is similar to the GS
 
Keep in mind that it doesn't nessessarily need to mount where the old one did. On my 450 I mounted my SH775 to the plate where the toolbox used to be under the right cover, you'll need to extend the wires but there's no reason it won't work, plus you might be able to directly ground it to the battery.


That's excellent advice.I had the same GS450TXZ as you and I mounted the SH775 onto the top of the rear fender(I used a small hammer to lightly bend the top of the rear fender down enough to clear where the seat sits over it,also for cooling) just under where the rear of the seat bolts to the frame and it was protected plus had plenty of air cooling.
 
Last edited:
That's excellent advice.I had the same GS450TXZ as you and I mounted the SH775 onto the top of the rear fender just under where the rear of the seat bolts to the frame and it was protected plus had plenty of air cooling.

I tried to locate the larger SH775 R&R under the seat ... to the top of the fender, but not enuf clearance there under the seat. My next idea was in the plastic tool holder shown in the attached picture ... which clears the bottom of seat when the seat clicks in riding position. The R&R would be right behind the battery. How to secure it in that spot? Gravity only? There is already a thin rubber flap behind it ..... that could be used to cover over it and hold it down in the plastic box.

Originally, I thought the R&R needed to be mounted to metal ... so as to have a ground to the frame? I am guessing I will have to run new added wire to the R&R 5 leads and other mods to make it work at that location.
 

Attachments

  • SH775location.jpg
    SH775location.jpg
    92.4 KB · Views: 0
Last edited:
I tried to locate the larger SH775 R&R under the seat ... to the top of the fender, but not enuf clearance there under the seat. My next idea was in the plastic tool holder shown in the attached picture ... which clears the bottom of seat when the seat clicks in riding position. The R&R would be right behind the battery. How to secure it in that spot? Gravity only? There is already a thin rubber flap behind it ..... that could be used to cover over it and hold it down in the plastic box.

Originally, I thought the R&R needed to be mounted to metal ... so as to have a ground to the frame? I am guessing I will have to run new added wire to the R&R 5 leads and other mods to make it work at that location.


Would it fit somewhere underneath the battery where air could get to it ?
 
You don’t want to put it inside the plastic tool box where it will get no cooling air. I’d remove that tool box and mount the SH 775 in its place. Secure it however you can through its two holes. The black wire on the right side of the RR (the other is red or brown (triumph connector)). The three left connectors all go to the Stator.
 
You don?t want to put it inside the plastic tool box where it will get no cooling air. I?d remove that tool box and mount the SH 775 in its place. Secure it however you can through its two holes. The black wire on the right side of the RR (the other is red or brown (triumph connector)). The three left connectors all go to the Stator.

Good advice there. I pulled the plastic box out and set the reg sideways in the narrowing gap between the battery box and the rear fender. I think the easiest way to secure it is with the tie wrap shown in picture ... unless there is a good reason not to. Not sure if it is best to route the connector pins to the right or left side of bike ... but straight up wont clear. I am thinking left side due to the stator wires are on that side anyway.

I don't remember where the ground wire on the old R&R went to ... but it seems like it was headed to the fuse block? Best to go directly to the battery ground .... or to both?
 

Attachments

  • SHtiewrap.jpg
    SHtiewrap.jpg
    92.6 KB · Views: 0
Point the connectors from the sH775 toward the left/stator side of the bike to make it easier on yourself. Ground from RR COULD go directly to bat-, some folks do that. I prefer all of my grounds come to one point, the starter solenoid mounting screw (SPG-single point ground), then one wire from the SPG to bat-. tomāto-tom?to.
 
dennco2,
Just wondering if that green battery ground cable is heavy enough to handle the starting load.
I don’t know, just asking?
What gauge is it?
 
If you’re referring to the green wire with the lug connected to your bat-, I have no idea, AFAIK there are no bright green wires like that in the factory wiring. :-k
 
Glad you asked! That green ground wire was on the bike when I bought it and was extra long with a loop .... and bolted to the part shown on the picture which I assumed was the SPG grounding the engine and frame together and whatever else grounds desired. I shortened the green ground wire and put lugs on both ends ... crimping and soldering them on. I cut a groove on one side so I could see the solder flow. If you see any reason I should change that grounding point ... or improve it please let me know.

groundwire2.jpg
 
Glad you asked! That green ground wire was on the bike when I bought it and was extra long with a loop .... and bolted to the part shown on the picture which I assumed was the SPG grounding the engine and frame together and whatever else grounds desired. I shortened the green ground wire and put lugs on both ends ... crimping and soldering them on. I cut a groove on one side so I could see the solder flow. If you see any reason I should change that grounding point ... or improve it please let me know.

View attachment 63031


That green ground strap is an excellent idea dennco2 :cool:
 
I am attempting to make progress changing out my R/R to the sh775. I pulled the old one off it's 5 pin stock connector and decided to grind off the plastic on ONE side .... to have something to solder 5 new strands of 16 gauge wires that will be going to the sh775 when I get that far. Looks like I should get those recommended matching plugs. The sh775 will be within 6 inches of the old one for the connectors. The stock old wires are NOT lined up in sequential order and the red and B/W ground wire are on opposite ends. I have read quite a bit on this GSR forum ... and learned a lot but when I look at my stock bike, I see variations of what I hoping to see. The picture is just a mock up of related parts ... not in final position.

mockup2.jpg
 
I’m no expert, and I’ve been through what you’re going through exactly one time. The green wire looks heavy enough to me, and the connection to the frame looks like it’s probably OK. In order to be a single point ground, your other ground wires would all collect the that single point, hence the name. Another common mounting point is the starter solenoid mounting screw. Again, this is one common configuration. Like so:
qP59TbLl.jpg


As for the connections to the RR, the Triumph connector is great. I used a connector set from Amazon that I had to piece together myself, initially, which was about the same price as the Triumph connector. I recently swapped in the Much higher quality Triumph connector. I’ll find the item number if you need it, but if you’ve been digging around, you’ve surely come across it. I’m sure you’ve also seen Nessism’s SSH 775 connection diagram as well, and have read about how and why to eliminate the headlamp loop/connect all 3 legs of the stator directly to the RR.
 
Last edited:
Back
Top