• Required reading for all forum users!!!

    Welcome!
    Register to access the full functionality of the GSResources forum. Until you register and activate your account you will not have full forum access, nor will you be able to post or reply to messages.

    A note to new registrants...
    All new forum registrations must be activated via email before you have full access to the forum.

    A Special Note about Email accounts!
    DO NOT SIGN UP USING hotmail, outlook, gmx, sbcglobal, att, bellsouth or email.com. They delete our forum signup emails.

    A note to old forum members...
    I receive numerous requests from people who can no longer log in because their accounts were deleted. As mentioned in the forum FAQ, user accounts are deleted if you haven't logged in for the past 6 months. If you can't log in, then create a new forum account. If you don't get an error message, then check your email account for an activation message. If you get a message stating that the email address is already in use, then your account still exists so follow the instructions in the forum FAQ for resetting your password.

    Have you forgotten your password or have a new email address? Then read the forum FAQ for details on how to reset it.

    Any email requests for "can't log in anymore" problems or "lost my password" problems will be deleted. Read the forum FAQ and follow the instructions there - that's what we have one for...

  • Returning Visitors

    If you are a returning visitor who never received your confirmation email, then odds are your email provider is blockinig emails from our server. The only thing that can be done to get around this is you will have to try creating another forum account using an email address from another domain.

    If you are a returning visitor to the forum and can't log in using your old forum name and password but used to be able to then chances are your account is deleted. Purges of the databases are done regularly. You will have to create a new forum account and you should be all set.

The Chronicles of Suzy- 82 GS850GL

  • Thread starter Thread starter ratdude
  • Start date Start date
R

ratdude

Guest
Hello all,

My name is Rat and I have a problem . I am a magnet for derelict vehicles .
Somehow they find me , I can't seem to help it .

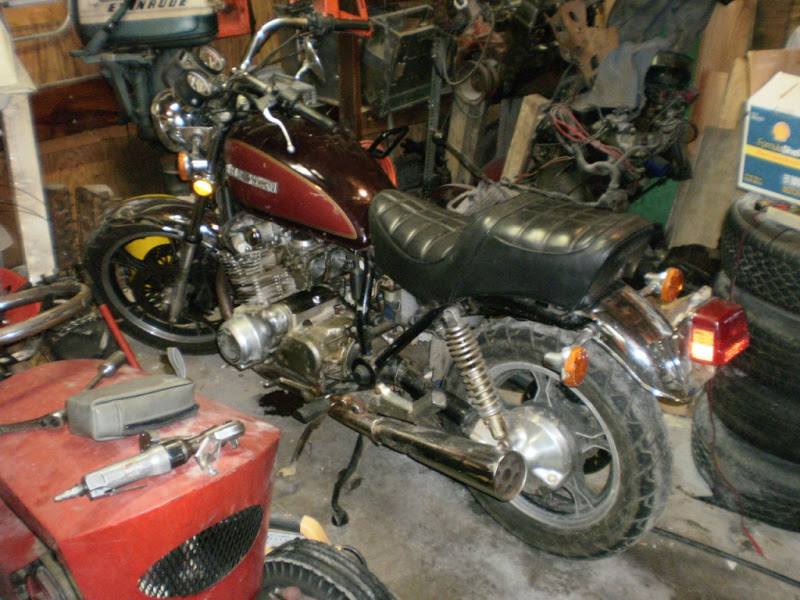
With that said , this is going to be a worklog of sorts on " Suzy " ( ya I know, novel name ), A almost beat to death , 82 GS850GLZ .

My neighbor had it , BARELY ran ( only at about the redline ) and I got to feeling sorry listening to this guy kill the thing and terrorizing the neighborhood with it ( " see if it clears out " lol ) .

A C note later , I took my prize home to see what I had done

suzy_intro.jpg
 
Preliminary tests

Preliminary tests

Suzy had a bad case of not hitting on all four cylinders , verified by the highly scientific touch the ( should be ) hot exhaust pipe method . In addition starting was extremely difficult if not impossible .

I pulled the carbs ( previous owner's brother "had just gone through them" ) and discovered

I had 3 of 4 pilot jets clogged solid
I was missing the pilot jet plugs
all four carbs were just assembled wrong ( discovered later )
all four intake boots were shot ( butchered actually )

So I cleared the jets reassembled the bike and low and behold we had a FOUR cylinder motorcycle again .

from " Barely running " to " Runs like crap "

So at least I knew I had a viable platform to work with , let the parts hunting begin ...

Rat
 
Intake Boot Carnage

Intake Boot Carnage

Previous Owner managed to tear the rubber off all four Intake boots ! My best guess is they did it when they wrestled the carbs off " to go through them " . They then tried to epoxy the rubber back on to the baseplates , Nooooo it don't work .

Some pics

Looks just wonderful , doesn't it ?

suzy_intake_boot_1.jpg


Me thinks perhaps epoxy might not work so well

suzy_intake_boot_2.jpg


Nahhhh , no air leaks here ( all four were like this ! )

suzy_intake_boot_3.jpg


Proof positive Mr Robert Barr ( and god knows how many others ) know EXACTLY what they are talkin about ( only one blown O ring though )

suzy_intake_boot_4.jpg


In case you were curious what lives inside a carb boot ( the metal part )

suzy_intake_boot_5.jpg


All in all , amazed I even got it to fire .

Rat
 
Last edited:
Man!! why didn't I think of that! those photo's should win a prize for something....
 
Even more tests

Even more tests

Before I got in too deep with the Suzuki parts people I decided to run a compression test to make sure I didn't have any other surprises in store .

Ran with carbs removed , ice cold motor cheap old compression tester

Cyl 1 125 psi
Cyl 2 112 psi
Cyl 3 112 psi
Cyl 4 125 psi

Kind of an anomaly on the center cylinders , not sure what is up with that , but good enough to make me keep going .

Rat
 
My " gone through " carbs

My " gone through " carbs

Well even though my carbs were all good according to previous owner I tore em down any way .

As stated previously

3 of 4 pilot jets were clogged
All 4 pilot jet plugs were long gone
3 of 4 passageways in the float bowls were clogged up
2 of 4 main jet washers were the wrong kind
all 4 CV boots and slides were " clocked " wrong

And thats probably enough , I wont be going into huge detail on the rebuild process , John Bloemer's guide says it better than I ever could
( FANTASTIC guide ! )

Some early pics

Just a reference shot I took of the linkages , notice how squeaky clean it is .

P6130027.jpg


And another

suzy_carb_ref.jpg


Early stages of disassembly notice my super trick parts organizer

suzy_carb_ref3.jpg


Why you need to take them COMPLETELY apart ( looks good , huh ? )

suzy_carb_ref2.jpg


Later
Rat
 
Before I got in too deep with the Suzuki parts people I decided to run a compression test to make sure I didn't have any other surprises in store .

Ran with carbs removed , ice cold motor cheap old compression tester

Cyl 1 125 psi
Cyl 2 112 psi
Cyl 3 112 psi
Cyl 4 125 psi

Kind of an anomaly on the center cylinders , not sure what is up with that , but good enough to make me keep going .

Rat

That reminds me... I saw no mention of checking valve clearances. 2 and 3 might have some tight ones.

This is a nice rescue you have goin' on. That's going to clean up very nicely for a $100 buy.
 
Not yet but its on the to-do list

Not yet but its on the to-do list

That reminds me... I saw no mention of checking valve clearances. 2 and 3 might have some tight ones.

This is a nice rescue you have goin' on. That's going to clean up very nicely for a $100 buy.

My plan was to get it complete enough to put about 100 miles on it then run the valves .

Suzy sat for an unknown period of time ( probably years ) before the neighbor proceeded to kill it .

I also have some substantial blowby when it has run . so I may also have some less than ideal ring sealing .

Just curious the center cylinders are the exact same readings ( ran the test twice to verify )

Rat
 
Hey Rat,
Looks like you will have a nice bike when done there.
Most of the guys here will inform you that less than ideal sealing rings are a direct result of sitting too long, and will usually work themselves back in with a little extra twisting of the wrist. That is, give it the 'ol Italian tune-up treatment.

I would pour a litle seafoam into each cylinder through the spark plug hole, and let it sit for a few days while finishing up the carbs and other necessary maintenance issues like checking the valve clearances, changing the spark plugs, change the brake fluid and ensure the pads are good with proper braking action, then pour a half of a can of seafoam into the oil, the rest in the tank, and ride the snot out of it!

The seafoam won't hurt anything if it is left to sit in the cylinders for a long time either, so no big rush on that part of it.

Once you have given her a good workout, change the oil and filter. Try not to hurl when you see all of the gunk that comes out of the engine.:-&

Oh, and make sure the tires are good, old tires are not condusive to good health for either you, or your bike.

From there, you should be able to have a decent benchmark to go from, and make sure to clean up your wiring and connectors so you can effectively check your charging system.

Best of luck, and I hope this helps.
 
Hey Rat,

Interesting thread. I'll be watching... Love to see them pulled back from the brink of certain destruction.

Nice documentation; we all appreciate photos.

Wonder if your equal compression on 2&3 might be blamed on a blown head gasket?

In the photos it doesn't look too bad, in spite of it being an "L".

Edit: Never mind. In a fit of blind stupidity (these happen to me quite often) I thought your head gasket might be leaking between cylinders. But since theres a big ol' cam chain tunnel between 'em its not too likely...
 
Last edited:
Dont feel bad

Dont feel bad

Hey Rat,

In the photos it doesn't look too bad, in spite of it being an "L".

Edit: Never mind. In a fit of blind stupidity (these happen to me quite often) I thought your head gasket might be leaking between cylinders. But since theres a big ol' cam chain tunnel between 'em its not too likely...

Can't say I am huge fan of the cruiser style on these myself , but its what I got to work with . I really think the epitome of the Japanese Motorcycle is the four cylinder standard style bike.

And I decided it couldn't be the head gasket cause the numbers were too high , And I too didn't even think about that cam chain . :rolleyes:
 
Dang , the mega deluxe one !
I shoulda saved up .

Giving me workbench envy :)
Rat
Saved up? :confused:

No, you would have saved by getting some like those. :o

My wife got me those on one of her many trips to the Dollar store.
If you look carefully at the first and third sets, you will see that they are doubled up.
The pair of two tins that hold six muffins each are a whopping 99 cents. :-\\\

That's right, for just under $2 (plus tax), you can get your own set of "mega deluxe" carb parts organizers. :D

.
 
Carb Work

Carb Work

As I stated before I am not gonna go into too much detail , just the highlights.

Question:

Dear Uncle Rat,
Some ham fisted cretin smushed my fuel screens , and I am afraid to un smush them with a sharp pointy stick , what should I do ?

screen.jpg


Answer:

You need the super fuel screen un-smusher tool ! ( ok its a bent welding rod )

screenamatic.jpg


Dingy fuel bowls ? Buff those puppies !

buff.jpg


Only needed a couple parts to straighten these things out .

few_parts.jpg


Re-assembly time !

cleaned.jpg


Just to show they went back together

together.jpg


Bottom side

together_2.jpg


Later

Rat
 
Assembly and the test start

Assembly and the test start

Well now that the carbs are cleaned up I put them on back on the motor .

New intake boots from Suzuki
Stainless fasteners and new O-rings from http://www.cycleorings.com/

A couple pics

Lookin' Sad ( waiting for re-assembly )

assemble_1.jpg


Ahhh the beauty of new boots and stainless fasteners

assemble_2.jpg


home again

assemble_3.jpg


The result ,
Hooked up the gas , no leaks , starts fine , even idles pretty good considering there is no airbox yet . Sounds ready to go but I have a few things to address before I can road test the bike .

Rat
 
The Oil Leak

The Oil Leak

One of Suzy's problems was a oil leak from the front of the motor , the tach drive to be exact .

Forum member terrylee suggested it was a easy fix ( it was , cheap too )

Sure enough BikeCliff's Website had a guide made up to walk me through it .

A few pics

Unacceptable ( 15 minutes of run time )

P6260027.jpg


The Culprit ( been leaking a while by the looks of it )

P6260030.jpg


Inner tach drive seal might have a tiny bit of wear ( new seal is on the left )

P6260037.jpg


New inner and outer tach drive seal solved the problem :)

Later
Rat
 
The Sweatsock Air filter ( and the fix )

The Sweatsock Air filter ( and the fix )

Now that Suzy starts and runs I had to get some sort of Air Fliter on there .

She came with the stock airbox , which is missing the end caps and was removed by the previous owner .

The air filter that was in there has to be seen to be believed .

The sweatsock air filter !

P6260048.jpg


Yet Another shot of this fine piece of engineering

P6260049.jpg


Pretty sure there is supposed to be a gasket here

P6260050.jpg


The result of all this air filtration

P6220021.jpg


Fixing the air filter ( my version of the Mr. Roostabunny Airbox sealing repair )

My weapon choice , foam tape used to seal truck caps to pickup beds ( its solvent resistant , and I had some )

P6260053.jpg


All trimmed up

P6260055.jpg


Probably not as good as the sweat socks but it will have to do :rolleyes:

P6260057.jpg


After scubbing all the gook out of that airbox , I reassembled , reinstalled on Suzy and another piece of the puzzle is done ! :clap:

Rat
 
Nice work on those carbs. Thanks for sharing.:)

I'd go after the valves now since it's a pretty fair bet some will be overly tight. Sadly, many people neglect this critical bit of maintenance which is a real shame since the valve train on these GS bikes is so stable and reliable.
 
Back
Top