• Required reading for all forum users!!!

    Welcome!
    Register to access the full functionality of the GSResources forum. Until you register and activate your account you will not have full forum access, nor will you be able to post or reply to messages.

    A note to new registrants...
    All new forum registrations must be activated via email before you have full access to the forum.

    A Special Note about Email accounts!
    DO NOT SIGN UP USING hotmail, outlook, gmx, sbcglobal, att, bellsouth or email.com. They delete our forum signup emails.

    A note to old forum members...
    I receive numerous requests from people who can no longer log in because their accounts were deleted. As mentioned in the forum FAQ, user accounts are deleted if you haven't logged in for the past 6 months. If you can't log in, then create a new forum account. If you don't get an error message, then check your email account for an activation message. If you get a message stating that the email address is already in use, then your account still exists so follow the instructions in the forum FAQ for resetting your password.

    Have you forgotten your password or have a new email address? Then read the forum FAQ for details on how to reset it.

    Any email requests for "can't log in anymore" problems or "lost my password" problems will be deleted. Read the forum FAQ and follow the instructions there - that's what we have one for...

  • Returning Visitors

    If you are a returning visitor who never received your confirmation email, then odds are your email provider is blockinig emails from our server. The only thing that can be done to get around this is you will have to try creating another forum account using an email address from another domain.

    If you are a returning visitor to the forum and can't log in using your old forum name and password but used to be able to then chances are your account is deleted. Purges of the databases are done regularly. You will have to create a new forum account and you should be all set.

Valve shim adjustment

  • Thread starter Thread starter Dizzixx
  • Start date Start date
D

Dizzixx

Guest
78 GS 750

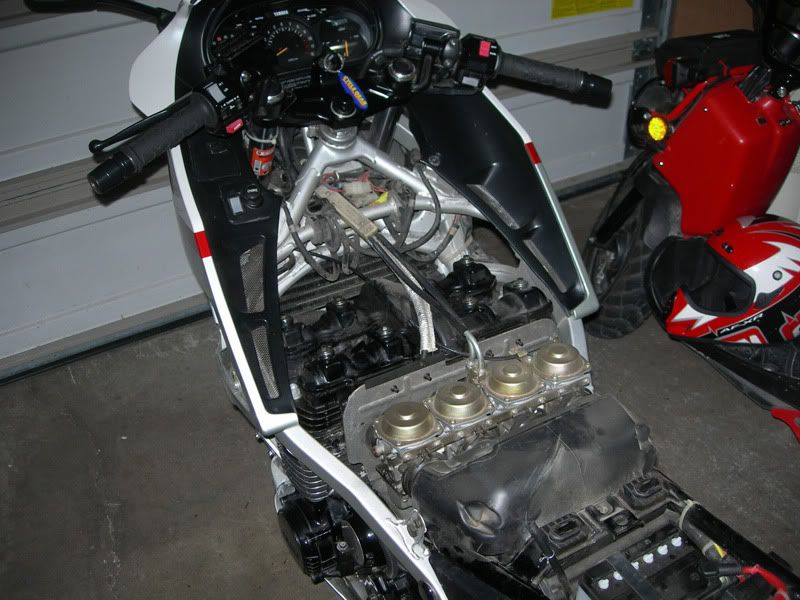
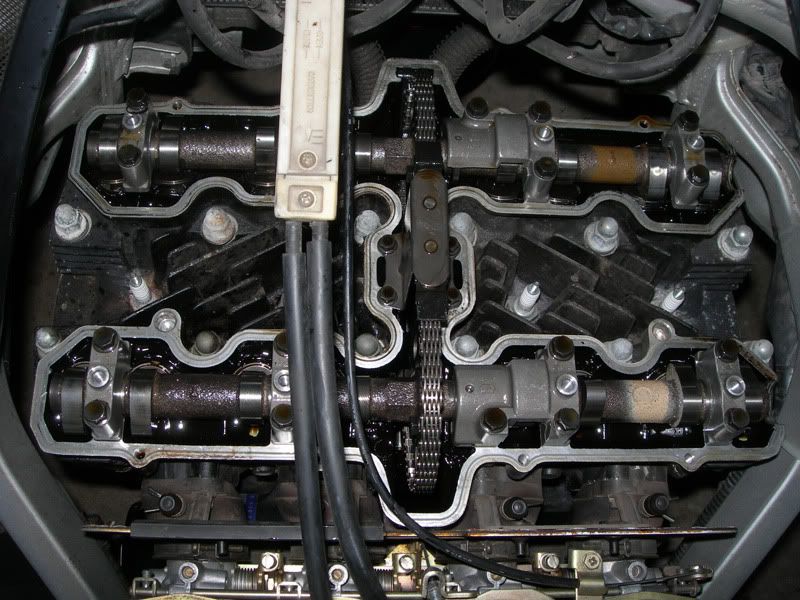
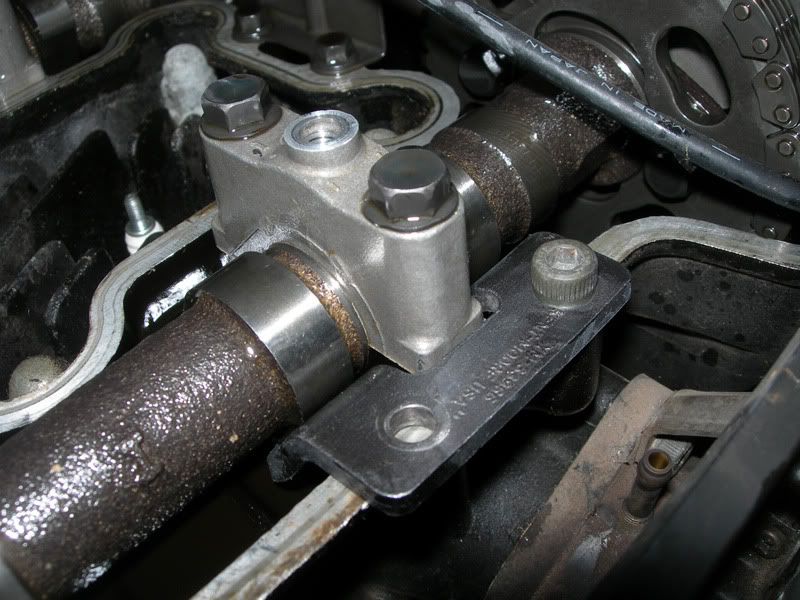
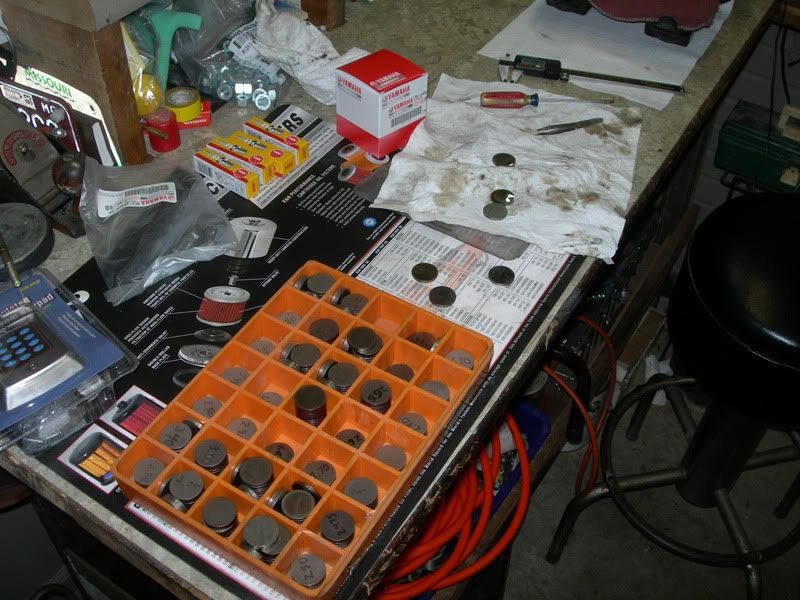
I am doing the valve adjustment. I found one intake valve is too tight. I have the motion pro 08-0017 tool to depress the bucket so that I can pull the shim out and check what size it is. I have never actually done this before but cannot seem to get the tool to press the bucket down. I am rotating it under on the inside side of the lobe from the spark plug side and right as it is about to depress the bucket it kicks out and gets crooked (ie - leans towards the lobe and slips off the edge of the bucket).

Can anyone share advice on this process? I looked on you tube and was able to find a video but it cuts out right as the guy is inserting the tool.

Any help is appreciated.
 
They can kick out easy, you could try using a screwdriver as a pry bar to hold it tight on the bucket
 
You can also use a folded zip-tie through the spark plug hole to hold the valve open.

I also have that tool, can not seem to find the knack of using it successfully.

Link to the "zip-tie method" are at BassCliff's site. Scroll down the left column, it is near the bottom of the picture of his blue 850.

While you are doing your valves, consider looking up member "Steve", send him an e-mail request for his spreadsheet. It's a handy tool to help you figure out your shim sizes and it helps keep track of your adjustment intervals, too.
 
What I do is to rotate the cam where the lobe is depressing the shim you want to remove. Put the tool in place, then rotate the cam again to move the lobe away. The bucket will stay down. Just make sure the tool is only on the bucket, not on the shim.
 
They can kick out easy, you could try using a screwdriver as a pry bar to hold it tight on the bucket

I use a screwdriver too. Once you get the technique figured out it's pretty easy.

BTW, Basscliff has a tutorial on how to adjust the valves so guys that are unfamiliar with the process may want to check it out.
 
When I get home from work I will have to try the screw driver and/or rotation method and see if I can get that to work. If I cant then I will resort to trying the zip tie method. Thanks everyone I will let you know how it goes. I will more than likely have more questions when it comes to ordering the appropriate size shims.

Another tangential question. What does everyone use for feeler gauges? It is very difficult to find a set that goes below .03 mm (and with good reason given that is .001'' or significantly thinner than a piece of paper) but to establish the needed shim, don't I want to find the go/no-go gauge size? I did just buy a set on amazon that is supposed to be .02mm and I am hoping that will work. Assuming I have different size shims in my head I alternatively was thinking I can just swap shims around until I find a measurable combination, but I am worried that having only one valve beyond the .03mm tight limit I wont be able to make that work. Any thoughts?

You can also use a folded zip-tie through the spark plug hole to hold the valve open.

I also have that tool, can not seem to find the knack of using it successfully.

Link to the "zip-tie method" are at BassCliff's site. Scroll down the left column, it is near the bottom of the picture of his blue 850.

While you are doing your valves, consider looking up member "Steve", send him an e-mail request for his spreadsheet. It's a handy tool to help you figure out your shim sizes and it helps keep track of your adjustment intervals, too.

The BassCliff site is a wealth of information, thanks for the link.
 
You don't really need any feelers less than 0.04mm. Yes, the specs call for a minimum of 0.03mm, but by the time it gets that close, you will be changing shims anyway, so it doesn't matter if it's 0.03 or 0.02 or less. Unlike other bikes, the minimum clearance on a GS is VERY close to ZERO, and it's less than the increment in shim size, so just get a thinner shim. The problem is that if the valve adjustment has been neglected for a LONG time, you might need to drop two or three sizes, but there is no way to tell without putting in a thinner shim to see if it has clearance. For that reason, many of us will have a "checking" shim that is REALLY thin, say 2.30 or 2.40. Put that one in, there will be plenty of extra clearance that can be measured, then it's an easy job to figure out how many sizes thicker than your 'checking' shim you will need to get proper clearance.

Note that this will only need to happen the first time you go through your adjustment check, and only if you bother to inventory your shims. Even if a valve has the proper clearance, it is good to know what size shim is in there. That way, as the clearance gets less as the miles go on, you will know what size shim you will need.
 
If you have zero clearance and don't have an extra thin shim (which I am sure you don't if this is your first time) measure all the shims then take the thinnest one you have and put it where the thickest one was. Hopefully you still won't have zero on that valve and you can get an idea of how much thinner you need to go when you order "new" ones from the shim club.
 
That is a good idea for a starter, but please remember this: if you remove a shim to put it in another location, put SOMETHING there as a 'placeholder'.

DO NOT ROTATE THE ENGINE UNLESS THERE IS A SHIM (or a placeholder) IN EVERY POSITION.

A quarter will work as a placeholder, but be prepared to see a slightly-damaged coin come out.

Should go without saying, but do NOT start the engine with a coin in place of a shim.


Hmmm..... wish I had seen this warning sooner....

I was a bit hesitant but didnt think to use a quarter. Cam does not appear to have suffered unduly except it looks like it may have worn on the edge a bit so I am kicking myself over that.

Anyways I found the following

INTAKE
Cyl - SHIM/GO/NO-GO
1 - 2.70/.038/.051
2 - 2.80/NA/.030
3 - 2.75/.051/.063
4 - 2.80/.076/.102

EXHAUST
Cyl - SHIM/GO/NO-GO
1 - 2.66/.076/.102
2 - 2.65/.063/.076
3 - 2.60/.063/.076
4 - 2.58/.076/.102

I took the 2.58 from the exhaust of 4 (actually stamped 2.60 but that was crossed out and scribed on the back was 2.575, I checked with calipers, actually all of them, but I only have two digits, and I confirm 2.58) and swapped it with the 2.80 on the intake of cylinder 2, a change of 0.22mm. After that I read .23 GO and .24 NO-GO.

Which I believe should mean that with the 2.80 shim I actually have .10 clearance and to achieve .08 I would want to drop .07 requiring a 2.73 shim, but since they do not come in this size I would want a 2.75 which should produce clearance of .06. Is this right?

Should I also worry about the #1 intake? and possibly #3 intake? I am planning to check again with the feelers tomorrow using different combinations to get as close a reading as I can before ordering shims. Tonight took longer than I expected to get the rhythm down using the "turn to set the basket depressor" and "screw driver/tweezers to extract" method, I was initially using needle nose pliers and it was a huge PITA.
 
Last edited:
Since you have a 2.75 and 2.70 just try them in intake 4 and remeasure. You will find that you will be able to swap quite a few to get the right clearance and just need to replace 2 or 3 of the thicker ones
 
Shims are available in just about any thickness imaginable. 2.72 or 2.73mm shims are very common. If you want to be this exact, send me a pm after you read the shim club thread, we have them all. Ray
 
Options

Options

So I played around with the measurements I have

and I got three options:
Option 1 -
The simplest option only requires buying/trading a single shim. The exhaust is left as is while the intake is loosened up by shifting shims around. Two valves slightly out of spec, one more than the other. The tight valve stays the tightest but moves to nominal.


Option 2 -
Very nearly .080 on all valves. Requires buying/trading 4 valves which are each an X size, meaning it is likely only possible if in stock with the shim club.


Option 3 -
This option opens everything up as I noticed a number of people in other posts saying you should aim for as high as .10mm, in particular on the exhaust. This involves buying/trading 4 shims but they are all standard sizes. Cylinders 2 and 3 end up more open than the outside cylinders not sure that it matters but I could see this being beneficial from a heat flow perspective though I really doubt it makes a difference if everything else is balanced like it should be.


I already bought the 4 shims from Z1 for option 3 because it covers both options 1 and 3 and was cheap enough that I thought I would try it. Worst case I end up with shims to trade more easily with the shim club. They should be here Friday. I am just wondering what everyone's thoughts are.

Also I am unsure if this makes much difference but the engine was rebuilt 6k miles ago and was bored to 850cc using a wiseco kit. At the time a number of valves seats were lapped and some valves were replaced etc. This was done by a professional mechanic. This is the second clearance check since the rebuild and the first one I am doing instead of a professional.
 

Attachments

  • Measurements.png
    Measurements.png
    9 KB · Views: 0
Numbers look good, your conclusions are sound, but you are using the metric approximations that are printed on the INCH feelers. That makes figuring a bit difficult.

Having the clearances on the looser side is good, but don't fret about them not all being the same.

.
 
How loose is too loose? I know the spec says .08 but most people talk about going to .10 instead, or say .011 as in option 3, if that is even really what they are. There is also the issue of actually determining accurately the clearance based gauge drag. I have only ever done valves on my own and never had someone show me the correct amount of drag. But I imagine I err on the interference side of things, the idea being I should be closer to true clearance. This of course also means that inflating my clearances to .11 is potentially much different from someone who measures with very light drag on the gauge.

I noticed you made the same comment about inch to metric in another thread. I get that there is some rounding error (.038 is really .0381, .051 is really .0508, .063 is really .0635, etc.) but I imagine it is within their manufacturing tolerances anyways (cheap gauges), having said that I just bought a metric set of feeler gauges that go from .02 up to 1mm in increments of .01, I am going to use those next time after I check them with my caliper first. They were also cheap Chinese ones from Amazon.
 
There are two tricks to know with the valve tool that everyone seems to miss. We need to sticky these or something... next time I do a valve check maybe I should get someone over here and make a video.

1) Make sure the "rib" that pushes on the valve bucket is clean and square. Many of these tools have a casting line on this rib, or are slightly uneven (thanks, Motion Pro...). Take two minutes with a vise and a file to dress the working surface of the tool.

2) As you insert the tool and push down, apply a little sideways pressure on the handle toward the bucket. DON'T just push straight down -- basically, push at a 45 degree angle. Once you understand this technique, it'll stay on the bucket and work correctly first time, every time.

Using the tool is a lot faster once you get the technique right. As Steve will note, there's a small risk of shattering a shim if the tool slips off, so if you're not confident in this then there's always the zip-tie method, which is pretty foolproof.
 
God I love my FJ!

TankRemoved.jpg


TopOpenHead.jpg


Tool in place -

ShimTool.jpg


Shims.jpg


Great bike to work on, I've kept it around longer than anything else, so far.

I thought for a little while a Honda XX would be it's replacement - but it's long gone and the FJ is still in the garage.....

That Blackbird was quick and fast!

CAM01467VI_zpskbnggh6r.jpg
 
Back
Top