• Required reading for all forum users!!!

    Welcome!
    Register to access the full functionality of the GSResources forum. Until you register and activate your account you will not have full forum access, nor will you be able to post or reply to messages.

    A note to new registrants...
    All new forum registrations must be activated via email before you have full access to the forum.

    A Special Note about Email accounts!
    DO NOT SIGN UP USING hotmail, outlook, gmx, sbcglobal, att, bellsouth or email.com. They delete our forum signup emails.

    A note to old forum members...
    I receive numerous requests from people who can no longer log in because their accounts were deleted. As mentioned in the forum FAQ, user accounts are deleted if you haven't logged in for the past 6 months. If you can't log in, then create a new forum account. If you don't get an error message, then check your email account for an activation message. If you get a message stating that the email address is already in use, then your account still exists so follow the instructions in the forum FAQ for resetting your password.

    Have you forgotten your password or have a new email address? Then read the forum FAQ for details on how to reset it.

    Any email requests for "can't log in anymore" problems or "lost my password" problems will be deleted. Read the forum FAQ and follow the instructions there - that's what we have one for...

  • Returning Visitors

    If you are a returning visitor who never received your confirmation email, then odds are your email provider is blockinig emails from our server. The only thing that can be done to get around this is you will have to try creating another forum account using an email address from another domain.

    If you are a returning visitor to the forum and can't log in using your old forum name and password but used to be able to then chances are your account is deleted. Purges of the databases are done regularly. You will have to create a new forum account and you should be all set.
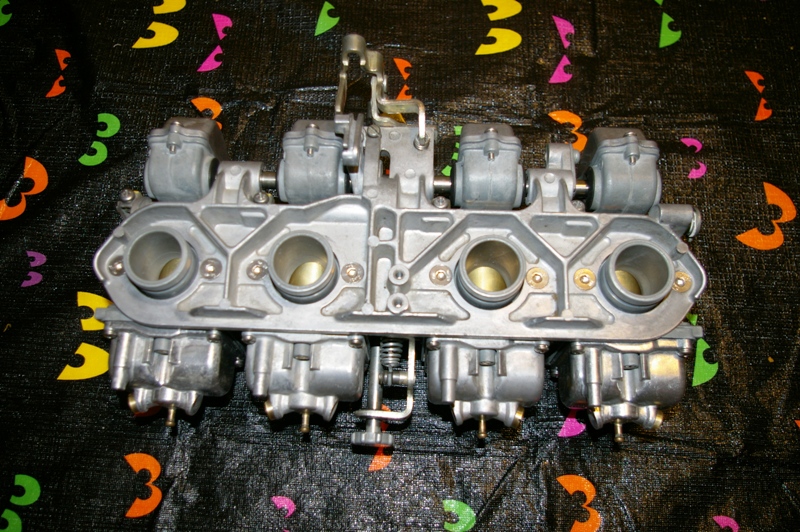
VM26SS Carbs

  • Thread starter Thread starter mike1414
  • Start date Start date
that is your ca chain tensioner. Look for you idle adjuster on the filter side of the carbs.
This is what your adjuster should look like. These are Kawasaki carbs so it is pointing up at and angle. Suzuki carbs point down.
$_3.JPG

Here is a set from a GS1000
IMGP0688.JPG
 
Rick, this is where it was located on my 550 and GL500 - pointing upwards towards the back, making it easy to reach under there to adjust while riding. I guess then, by default, this would be the idle adjuster?


I just haven't encountered an idle adjuster that looked like this; as I said my other two were positioned on top and with a bit more clear of a "knob." I'm going to feel really stupid if I've been overlooking this the whole time and this is actually it...

Ignore the machine screw used as a drain plug. The PO apparently didn't want to invest in new plugs and I have been weary of pulling that out for fear that it messed up the threads.
 
Yes , that is it, your knob has taken a vacation somewhere else. My 78 1000 is the same way. It was there for a long time then poof, gone. Not really, but I have no idea when it decided to leave home. I was riding it a few months ago and my idle seemed a little on the low side at a traffic stop and when I reached under for it I couldn't feel it. I knew it was there the last time I adjusted it, but like I said, gone. I almost fell over trying to bend down far enough to see where it was.

You may need to use some plyers to turn it. You'll want to turn it counterclockwise to lower the rpms.
 
Last edited:
That tube sticking down at the top of the photo, is that connected to carb sync port? If it is it should be blocked - it's letting air into the circuit.
That's where my 1000 fuel tank petcock vacuum hose is hooked to. Not sure if it is the proper location, but it has done the job for 6 years now.
 
Good heavens me, I feel dumb haha. I mean, I don't even know how I overlooked that thing so many times. What a fool. I will give it a few twists tomorrow to see what I can figure out.

John that is the tube to which I alluded earlier on in this post - I have been playing around with blocking it and not blocking it, and honestly I haven't been able to come up with a clear way to block it. Any ideas? I haven't found a cap or anything that may be suitable on any auto parts stores, home improvement, etc; Rick I tried connecting my vacuum petcock to that (though the one connected to carb 3 to where my petcock is currently connected) but it was making horrendous popping noises and sputtering. So the way to go is block that it seems and let the other one be my main vacuum petcock line?

BTW, Rick, I absolutely love the signature and couldn't be more in the Gary Johnson boat!
Your the second member tonight to say something to that effect, maybe we have a movement going here. Spread the word.:encouragement:

That port should unscrew like the other ones. Just get a allen head screw that is the correct size and thread pitch. Whatever one you choose make sure the other one is blocked. You could just cut off a piece of excess vacuum line and put on the spare tube and plug it with a screw or an old golf tee that may be lying around at the side of a golf course.
 
Side question here....Rick, are your 1000 carbs VM26SS' and not have pilots fuel screws?
 
Spread the word, indeed! Rick, John asks that because (I don't know if you really read through the thread), but mine does not appear to have a pilot screw on my VM26SS's.

On the brighter side, I messed with my air screw and my idle mixture and it's running significantly better! Another kind of "negative" note though, (not that I necessarily expected it to fix this) it still overflow's quite a bit. I have my air screw at 3/4 out and I think that with some fine tuning, I can get the response perfect. Now I just need to worry about the overflow. Typically the overflow is better about 1.5 turns out - but the response wasn't good at 1.5 out after having plugged the downward pointing vacuum tube; 3/4 turn out seems to work the best. Do we have a final verdict on what I should do with my overflow issue, or should I just start over from the bottom and tear apart the carbs/rebuild them?
 
That's good news Mike, glad it's getting better for you.
On the leaking....I can't believe that silly arse screw the PO put in the bowl drain is holding gas - that has to be leaking.....
 
Haha surprisingly enough it holds. I feel like it would likely have messed up the threads so I don't want to pull it out, but I guess that I'll have to eventually. The majority of the gas coming out is still through the 4th carb overflow drain hose unfortunately
 
take them apart and rebuild the according to the tutorial
as for the pilot mixture screws they are there
turn the carbs upside down on the engine side of the carbs right in the center and deeply recessed in the hole is the pilot mix screw it may have a little metal cap covering it (most don't but you never know)
 
Last edited:
I did in fact take the carbs off multiple times and as I was rebuilding them according to the tutorial the first time, repetitively shining a light into the slot, sticking a screwdriver in there to try and get them out, and trying to install the new ones that I bought I was never able to have any success in getting any out that may have been there or getting the new ones in. I know it never hurts to rebuild them again, but unfortunately my schedule allows me minimal free time. I'll see if some tinkering may lead me in the right direction
 
What you've got looks like a set of VM's I have here which does not use the pilot fuel screws - at all. The holes are just left blank.
The VM26's on GS1000's sold here in NZ didn't have the pilot fuel screws either.

as for the pilot mixture screws they are there
turn the carbs upside down on the engine side of the carbs right in the center and deeply recessed in the hole is the pilot mix screw it may have a little metal cap covering it (most don't but you never know)

GregT says carbs without fuel pilot screws are real, at the very least in NZ.....
 
Hey guys, so it's been a bit, but I finished up with finals and had the day off from work so I went out to tinker. I tried my best to measure the float heights (first try), but I honestly don't know how well it went because they all seem quite off. I believe that the float heights are supposed to be set somewhere around 21mm correct? or is it 24mm? I don't have the correct tool to measure, so I used a typical ruler with inches/centimeters. I took my measurements in inches (mostly down to the /32 mark) but converted them to metric. Just in looking at them, some of the float heights differed via inspection. I took the measurements with the carbs straight upwards as if they were on the bike. The measurements are as follows:

Carb #1: float at 1 3/16" (30.16mm); tang just before compressing the tip of the needle: 15/16" (23.8125mm)
Carb #2: float at 1 3/32" (27.78125mm); tang just before compressing the tip of the needle: 7/8" (22.225mm)
Carb #3: float at 1 3/32" (27.78125mm); tang just before compressing the tip of the needle: 7/8" (22.225mm)
Carb #4: float at 1 1/8" (28.575mm); tang just before compressing the tip of the needle: 1" (24.5mm) --> I adjusted the tang towards the needle because of the overflow issue, but it still overflows now just as much as before. It appears to me that the little 90 degree tab on the float clip seems to be turned outward more than the others though the float height itself is still around the same range as the others.

I don't honestly know if these could help, but here are just some random pictures of the floats. I figured maybe someone could identify something of which they are skeptical or something that looks inappropriate.


I went for about a 10 mile ride last night and noticed that there was slight leaking from the drain screw in carb #1, no apparent draining from the overflow or drain from carb #2, draining from carb #3 overflow drain, and draining from carb #4 overflow drain.


Just for kicks, I also further validated that there is no pilot screw. I scraped and cleaned and blew and tried my best to figure it out, but there really is no pilot screw. Alright, any thoughts?
 
On regular VM266SS's the float height is 24mm, measured upside down (with the valve effectively closed) from the flat area inside the lip to the top of the float. Give me a bit - I'll post a photo....
Incorrect float heights makes a massive difference.

Edit: Post #3 has a perfect photo courtesy Rob (AZR)
 
Last edited:
Ah, I see. I did not measure from inside the lip nor from upside down. I'll knock that out and be back with an update soon

Ok just got the measurements:

Carb 1: 25mm
Carb 2: 25mm
Carb 3: 24mm
Carb 4: 26mm

I left the float bowl gasket on, though, so these measurements do not take this into account. I figure add (+1) to each number for the true number, making it respectively 26, 26, 25, and 27. So they are clearly off, but would this make such the difference? If so, does anyone have a link to a tutorial on here as to how to measure? I haven't found a great one or anything of great help.
 
Last edited:
Back
Top