Announcement

Collapse
No announcement yet.

Exhaust Bolt Holes Dilemma

Collapse
X
 
  • Filter
  • Time
  • Show
Clear All
new posts

    Exhaust Bolt Holes Dilemma

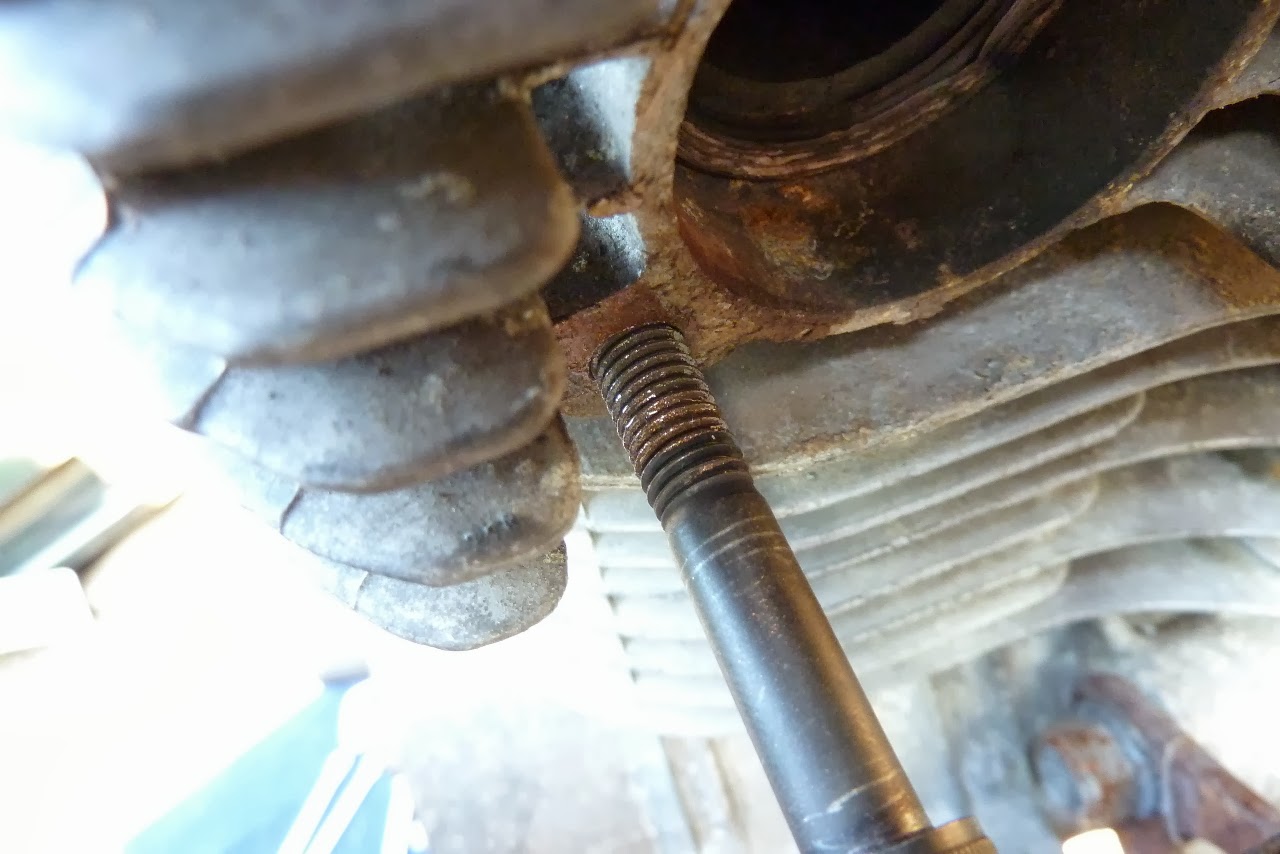
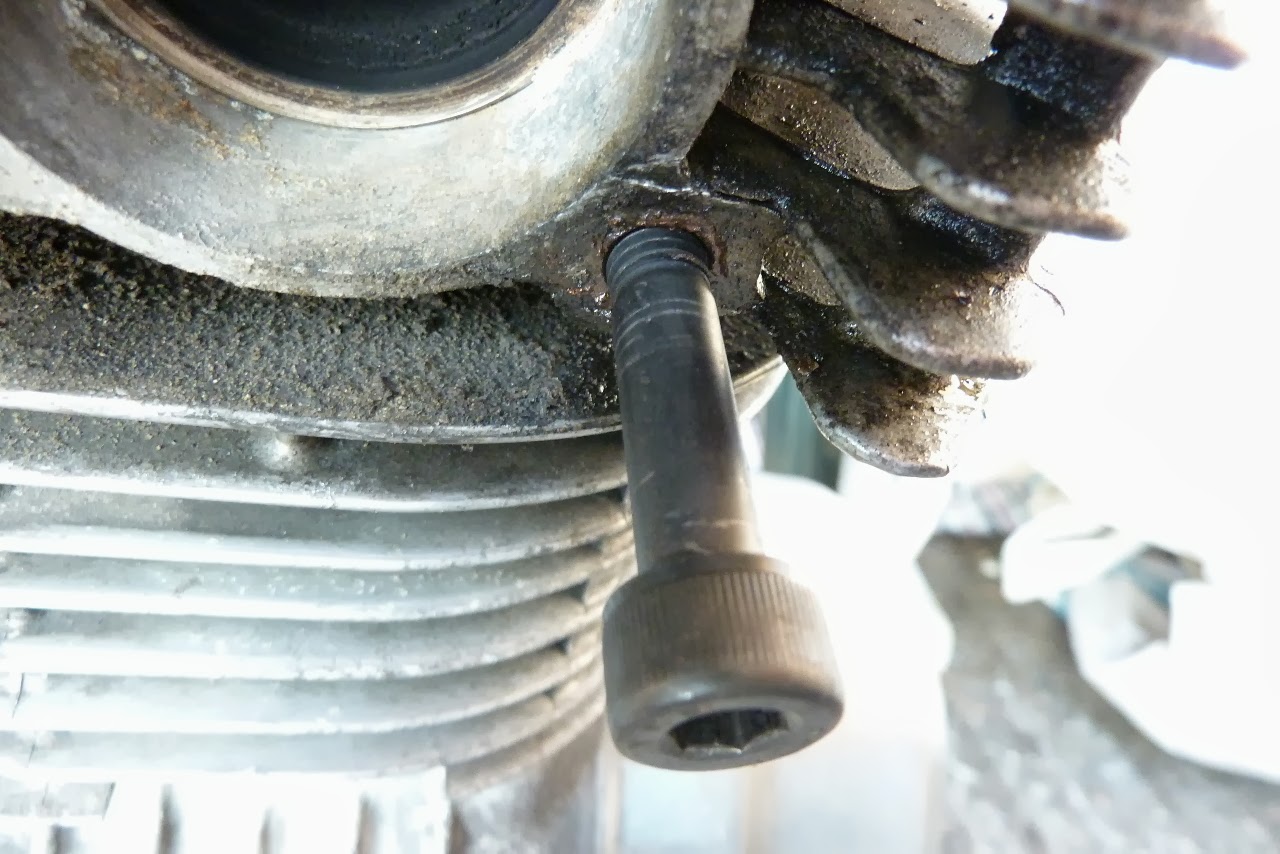
    I'm working on my GS1100 Road Runner Project and I now have a dilemma with my exhaust bolt holes. They (when measured with a caliper spike) are all the same depth but on some I can turn a bolt in 6 times only and on others 14 times.


    or


    So I thought I should try a little tapping and all this stuff came out after about 4 or 5 turns:


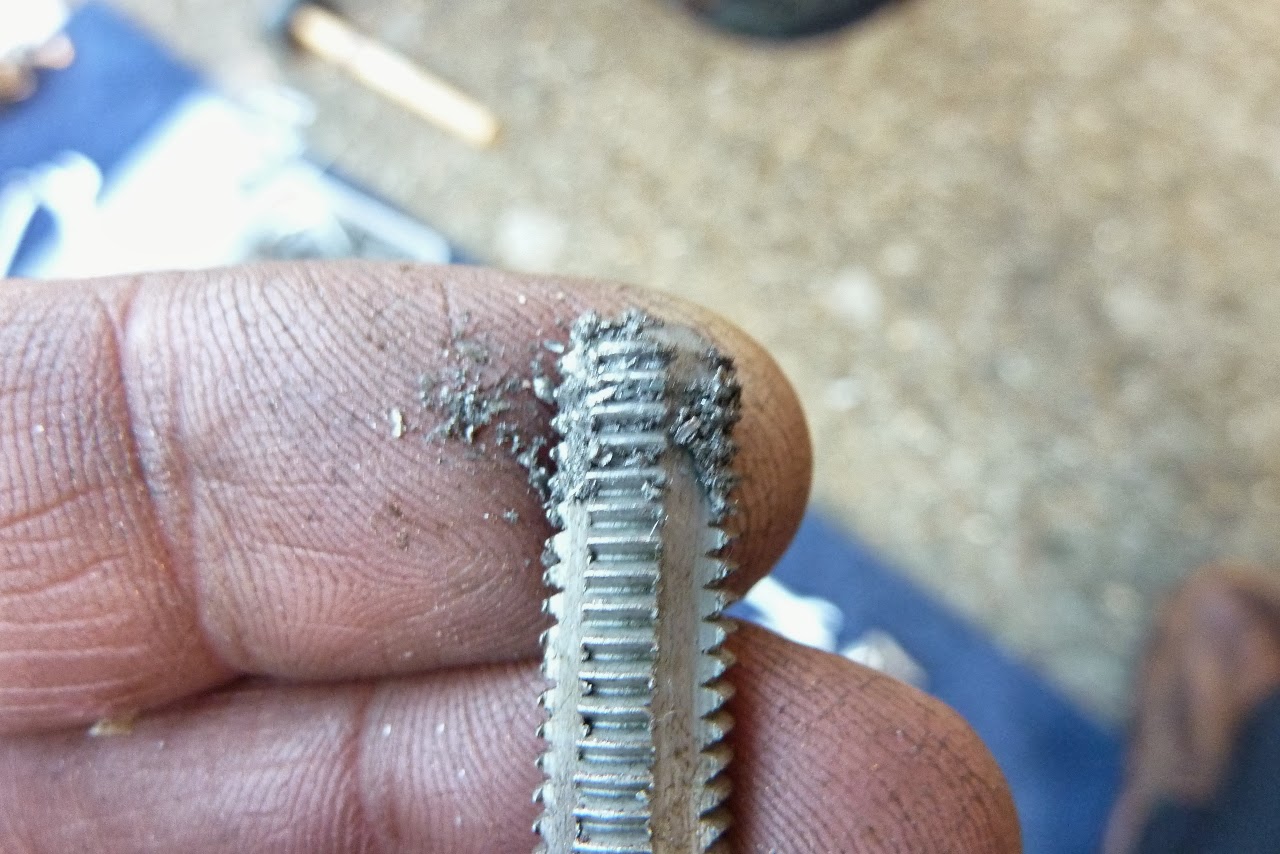
    The bolt does fit in the tapped hole nicely now (up to the 4 or 5 turns) but should I continue tapping down? I am afraid I might be doing irreparable damage. Seems like there is a lot of metal coming out.

    Or is there a tap that is different from the M8 x 1.25 that I am using that should be used just to clean up the hole?

    Greetings
    Last edited by londonboards; 09-24-2013, 11:35 AM. Reason: Bolt hole size changed (typo)
    Richard
    sigpic
    GS1150 EF bought Jun 2015
    GS1150 ES bought Mar 2014: ES Makeover Thread AND blog: Go to the Blog
    GS1100 G (2) bought Aug 2013: Road Runner Project Thread AND blog: Go to the Blog
    GS1100 G (1) Dad bought new 1985 (in rebuild) see: Dad's GS1100 G Rebuild AND blog: Go to the Blog
    Previously owned: Suzuki GS750 EF (Canada), Suzuki GS750 (UK)(Avatar circa 1977), Yamaha XT500, Suzuki T500, Honda XL125, Garelli 50
    Join the United Kingdom (UK) Suzuki GS Facebook Group here

    #2
    M8 x 1.0? (OK, it's been corrected.)

    I thought they were 1.25 or 1.50 pitch.

    Have you tried spraying carb cleaner, brake cleaner, WD-40, anything in there to try to flush out the crud?

    .
    Last edited by Steve; 09-24-2013, 12:43 PM.
    sigpic
    mine: 2000 Honda GoldWing GL1500SE and 1980 GS850G'K' "Junior"
    hers: 1982 GS850GL - "Angel" and 1969 Suzuki T250 Scrambler
    #1 son: 1986 Yamaha Venture Royale 1300 and 1982 GS650GL "Rat Bagger"
    #2 son: 1980 GS1000G
    Family Portrait
    Siblings and Spouses
    Mom's first ride
    Want a copy of my valve adjust spreadsheet for your 2-valve per cylinder engine? Send me an e-mail request (not a PM)
    (Click on my username in the upper-left corner for e-mail info.)

    Comment


      #3
      Pretty sure that into aluminum it will be a 1.50 pitch. I would start looking for a helicoil kit for the ones that are in bad shape.

      Comment


        #4
        Steve - absolutely correct: they are 1.25 and it was my typo. I used 1.25 tap.

        I have corrected the original post.

        I will try spraying out. But where is all the crud coming from?

        Greetings
        Richard
        sigpic
        GS1150 EF bought Jun 2015
        GS1150 ES bought Mar 2014: ES Makeover Thread AND blog: Go to the Blog
        GS1100 G (2) bought Aug 2013: Road Runner Project Thread AND blog: Go to the Blog
        GS1100 G (1) Dad bought new 1985 (in rebuild) see: Dad's GS1100 G Rebuild AND blog: Go to the Blog
        Previously owned: Suzuki GS750 EF (Canada), Suzuki GS750 (UK)(Avatar circa 1977), Yamaha XT500, Suzuki T500, Honda XL125, Garelli 50
        Join the United Kingdom (UK) Suzuki GS Facebook Group here

        Comment


          #5
          The threads are deep into those holes, but the bolt doesn't go full depth. Cleaning them with a tap is the right approach, just make sure you have the proper tap. I believe you need 8mm x 1.25, but please measure to be sure.

          EDIT: post above showed up while typing.

          The crud is corrosion deep into the hole. The bolt only uses the first few threads, not full length, so crud build up at the bottom. Make sure you use anti-seize on the bolts and go easy when tightening the bolts to avoid stripping.
          Last edited by Nessism; 09-24-2013, 11:39 AM.
          Ed

          To measure is to know.

          Mikuni O-ring Kits For Sale...https://www.thegsresources.com/_foru...ts#post1703182

          Top Newbie Mistakes thread...http://www.thegsresources.com/_forum...d.php?t=171846

          Carb rebuild tutorial...https://gsarchive.bwringer.com/mtsac...d_Tutorial.pdf

          KZ750E Rebuild Thread...http://www.thegsresources.com/_forum...0-Resurrection

          Comment


            #6
            You can see in this pic of the bolts used by the PO (all different sizes and with various numbers of washers) that some of the bolts were only biting by a couple of threads (see 2nd bolt from left). I have bought longer bolts. Originals were 45 mm long and I have some 50s and 55s. I would like to get a bit more bite.

            Richard
            sigpic
            GS1150 EF bought Jun 2015
            GS1150 ES bought Mar 2014: ES Makeover Thread AND blog: Go to the Blog
            GS1100 G (2) bought Aug 2013: Road Runner Project Thread AND blog: Go to the Blog
            GS1100 G (1) Dad bought new 1985 (in rebuild) see: Dad's GS1100 G Rebuild AND blog: Go to the Blog
            Previously owned: Suzuki GS750 EF (Canada), Suzuki GS750 (UK)(Avatar circa 1977), Yamaha XT500, Suzuki T500, Honda XL125, Garelli 50
            Join the United Kingdom (UK) Suzuki GS Facebook Group here

            Comment


              #7
              Arent stock ones something like 35MM from shoulder to the end? To keep them from bottoming and punching into the head itself??? And yes on flooding the hole with a spray bottle full of water or something to rinse the chips and crud out and lots and lots of air to blow as much out as you can get out.
              Last edited by chuck hahn; 09-24-2013, 12:15 PM.
              MY BIKES..1977 GS 750 B, 1978 GS 1000 C (X2)
              1978 GS 1000 E, 1979 GS 1000 S, 1973 Yamaha TX 750, 1977 Kawasaki KZ 650B1, 1975 Honda GL1000 Goldwing, 1983 CB 650SC Nighthawk, 1972 Honda CB 350K4, 74 Honda CB550

              NEVER SNEAK UP ON A SLEEPING DOG..NOT EVEN YOUR OWN.


              I would rather trust my bike to a "QUACK" that KNOWS how to fix it rather than a book worm that THINKS HE KNOWS how to fix it.

              Comment


                #8
                You also don't want to drill any deeper than what the holes are now.

                Some of those holes are just a couple of millimeters away from oil passages.

                Don't forget your safety glasses when spraying fluids in the hole and blowing air.

                .
                sigpic
                mine: 2000 Honda GoldWing GL1500SE and 1980 GS850G'K' "Junior"
                hers: 1982 GS850GL - "Angel" and 1969 Suzuki T250 Scrambler
                #1 son: 1986 Yamaha Venture Royale 1300 and 1982 GS650GL "Rat Bagger"
                #2 son: 1980 GS1000G
                Family Portrait
                Siblings and Spouses
                Mom's first ride
                Want a copy of my valve adjust spreadsheet for your 2-valve per cylinder engine? Send me an e-mail request (not a PM)
                (Click on my username in the upper-left corner for e-mail info.)

                Comment


                  #9
                  Which was the reason I posted about what the stock bolt length was. Remember some time ago someone posted they drilled and then had oil running out one or two of the bolts holes.

                  Had a 750 with a bad crank so it became a parts bike. When I took the pipes off oil came out of the bolt hole on cylinder 4 I believe it was. Anyhow, when I measured the bolt it was 40MM from shoulder to the tip and it was an allen head like he shows in his pictures. So I assume the head has been punched and its no good.

                  Would you agree Steve?
                  MY BIKES..1977 GS 750 B, 1978 GS 1000 C (X2)
                  1978 GS 1000 E, 1979 GS 1000 S, 1973 Yamaha TX 750, 1977 Kawasaki KZ 650B1, 1975 Honda GL1000 Goldwing, 1983 CB 650SC Nighthawk, 1972 Honda CB 350K4, 74 Honda CB550

                  NEVER SNEAK UP ON A SLEEPING DOG..NOT EVEN YOUR OWN.


                  I would rather trust my bike to a "QUACK" that KNOWS how to fix it rather than a book worm that THINKS HE KNOWS how to fix it.

                  Comment


                    #10
                    Not real sure, Chuck. I have no personal experience with those engines, just what I have read here.

                    The existing holes should not be any problem, only if he does any drilling to install Heli-Coils.

                    Another thing to watch for is to make SURE there is no fluid left in the hole when inserting a bolt.
                    If the thread seal well, it could build up some incredible pressure behind it and possibly force a crack.

                    .
                    Last edited by Steve; 09-24-2013, 01:12 PM.
                    sigpic
                    mine: 2000 Honda GoldWing GL1500SE and 1980 GS850G'K' "Junior"
                    hers: 1982 GS850GL - "Angel" and 1969 Suzuki T250 Scrambler
                    #1 son: 1986 Yamaha Venture Royale 1300 and 1982 GS650GL "Rat Bagger"
                    #2 son: 1980 GS1000G
                    Family Portrait
                    Siblings and Spouses
                    Mom's first ride
                    Want a copy of my valve adjust spreadsheet for your 2-valve per cylinder engine? Send me an e-mail request (not a PM)
                    (Click on my username in the upper-left corner for e-mail info.)

                    Comment


                      #11
                      Installing a Helicoil or Timesert isnt an issue as long as he does NOT go deeper than what the depth measures with the probe. In fact, I would stay 3 MM minimum short of the stock depth just to insure I didn't punch thru anything.
                      MY BIKES..1977 GS 750 B, 1978 GS 1000 C (X2)
                      1978 GS 1000 E, 1979 GS 1000 S, 1973 Yamaha TX 750, 1977 Kawasaki KZ 650B1, 1975 Honda GL1000 Goldwing, 1983 CB 650SC Nighthawk, 1972 Honda CB 350K4, 74 Honda CB550

                      NEVER SNEAK UP ON A SLEEPING DOG..NOT EVEN YOUR OWN.


                      I would rather trust my bike to a "QUACK" that KNOWS how to fix it rather than a book worm that THINKS HE KNOWS how to fix it.

                      Comment


                        #12
                        best bet with all suzukis that use bolts to hold the headers is change them to studs & use spring washers & brass nuts instead, i,ve changed them on all 3 of my engines, after problems like yours. you need to clean up & make good the threads you've got left, tap them a bit deeper if required, then thread lock some good hi-tensile stud material in, or a cut down full thread set screw to required length.don't use cheap general threaded bar ! brass nuts can undo themselves so leave enough length for 2 nuts locked together.

                        Comment


                          #13
                          Suzuki lists the correct length bolt as 35mm but if you have the newer aluminum collars they are thicker than the older steel ones.

                          I ordered Suzuki OEM bolts and they didn't even reach the threads.

                          My finned collars are 26mm thick plus the 3-4 mm space as they do not tighten flush against the head, plus the washers, that leaves only a few thread in the head if that.
                          I needed to use minimum 45mm bolts to get a decent bite, can't remember if I used 45's or 50's but 55 is too long.
                          Check the thickness of your finned collars, then measure the depth of your holes and use a bolt that fits but doesn't bottom out.

                          Re-taping the hole is fine, your taps look like they are taking out a little material, because you're using a but as long as the bolt is still firm and not loose in there then no worries.

                          Just found this, the article recommends that when tapping into aluminum you should have threads 1.5-2 times the depth of the bolt diameter, so that would be 12-16mm of threads.

                          Nut and tapped hole strength - How much thread engagement is needed?

                          If a screw / bolt fails because the threads strip, it can be hard to detect both during installation and later because the threads will still have some grip on the screw. If the bolt breaks, however, it will be completely loose, be easy to detect and remove, and usually fail during installation when additional torsional loads are present (torsional loads usually dissipate within minutes after tightening if you're wondering why we didn't take them into account before). Because of this, fasteners are designed to fail in the bolt, not the threads, so most nuts are more than adequate--just make sure you use a similar grade of nut compared to the screw.
                          How much thread engagement is needed in a tapped hole, then? According to "Fundamentals of Machine Component Design", 3rd addition, by Juvinall and Marshek, p. 413, if the bolt and nut are of similar material the thread stripping stength will equal the bolt tensile strength when the nut is .47 * diameter. Standard nuts are 7/8 of a diameter, for comparison.
                          Interestingly, more than a third of the load is held by the first thread in a nut according to this. As the bolt tightens, its threads stretch and the nut's threads compress, which reduces force on the far threads.
                          The .47*dia calculation above takes this imbalance into account, but it will certainly be different for other material combinations. This offers some formula (also found in machinery's handbook) for calculating the shear area of threads, but it's uncertain how one would apply that formula given the imbalanced thread load. The Machinery's handbook suggests at least 3 threads of engagement. We recommend 1 diameter depth for steel and 1.5-2 diameters for aluminum. The referenced formulas may at least provide a rough estimate for sheet metal, where thread engagement is limited. Unbrako's Engineering guide has several charts showing experimental testing of various sized holes. According to their guide, formulas have performed poorly at predicting thread strength.
                          Last edited by Kiwi Canuck; 11-30-2013, 04:27 PM.
                          2018 Honda Africa Twin AS
                          2013 DR 650 Grey, sold 1981 GS 650E Silver,

                          1980 GS1000ST Blue & White, X2

                          2012 DL650 Vstrom Foxy Orange, in storage
                          1981 CT110 X2 "Postie Bikes" Gone to a New Home.
                          2002 BMW 1150 GS Blue & White - Sold
                          1975 BMW R90/6 Black - Sold 1984 GS1150EF Sold
                          1982 BMW R100 Africa trip, Stolen - Recovered- Sold
                          1977-1980 Suzuki GS550, GS1000E, GS1000S GSX750, GSX1100,s
                          Hondas ST90, CR125 CB175 , CB350 CB750, NSU Quickly, Yamaha RD's 350/400,

                          Comment


                            #14
                            Originally posted by hugo151 View Post
                            best bet with all suzukis that use bolts to hold the headers is change them to studs & use spring washers & brass nuts instead, i,ve changed them on all 3 of my engines, after problems like yours. you need to clean up & make good the threads you've got left, tap them a bit deeper if required, then thread lock some good hi-tensile stud material in, or a cut down full thread set screw to required length.don't use cheap general threaded bar ! brass nuts can undo themselves so leave enough length for 2 nuts locked together.
                            What he said. Save what's left of the threads.


                            Life is too short to ride an L.

                            Comment

                            Working...
                            X