• Required reading for all forum users!!!

    Welcome!
    Register to access the full functionality of the GSResources forum. Until you register and activate your account you will not have full forum access, nor will you be able to post or reply to messages.

    A note to new registrants...
    All new forum registrations must be activated via email before you have full access to the forum.

    A Special Note about Email accounts!
    DO NOT SIGN UP USING hotmail, outlook, gmx, sbcglobal, att, bellsouth or email.com. They delete our forum signup emails.

    A note to old forum members...
    I receive numerous requests from people who can no longer log in because their accounts were deleted. As mentioned in the forum FAQ, user accounts are deleted if you haven't logged in for the past 6 months. If you can't log in, then create a new forum account. If you don't get an error message, then check your email account for an activation message. If you get a message stating that the email address is already in use, then your account still exists so follow the instructions in the forum FAQ for resetting your password.

    Have you forgotten your password or have a new email address? Then read the forum FAQ for details on how to reset it.

    Any email requests for "can't log in anymore" problems or "lost my password" problems will be deleted. Read the forum FAQ and follow the instructions there - that's what we have one for...

  • Returning Visitors

    If you are a returning visitor who never received your confirmation email, then odds are your email provider is blockinig emails from our server. The only thing that can be done to get around this is you will have to try creating another forum account using an email address from another domain.

    If you are a returning visitor to the forum and can't log in using your old forum name and password but used to be able to then chances are your account is deleted. Purges of the databases are done regularly. You will have to create a new forum account and you should be all set.

My 1982 GS 450 - journal thread

bren

Forum Apprentice
Howdy folks. I finally started tearing into my GS today trying to get it running. This is my first motorcycle project. Unless you wanna count the 2 stroke bicycle in the background there ...

bike001.jpg

The bike had been sitting in the last feller's garage for several years. He said he got the carbs worked on by someone but it hadn't been running right after that.

The tank was full of questionable gas. I popped the battery in, checked spark, thumb-over-the-hole tested compression, put plugs back in, turned it over. nothing happened whatsoever, not even a sputter. I just wanted to hear some sign of life, but no such luck.

I pulled the fuel line out of the tank and turned it over to check the petcock, sure enough gas spurted out of the tank. So the vacuum stuff works.

I drained the tank, intending to put in some sea foam and run it thru, say what you will about that. But, when I pulled the bowl drain plugs, it was bone dry in there. I squirted carb cleaner down the fuel intake line, and it just stayed in the fuel line and didn't drip into the bowls :( So, I pulled the carbs out and started disassembling them. I found this, what appears to be definitely the wrong needle:
filedata/fetch?filedataid=63251

the tip is rubber on there. It was definitely getting stuck in the seat. plus it appears to be too long. Now my first problem is I'm having a little trouble finding the right needle.

So I found this part, it looks right, I guess I'll find out next week. It looks like someone in taiwan is making these.
https://www.ebay.com/itm/186119107646

Apart from that, and I've only pulled open one of the carbs, but the inside looks quite clean. The pilot jet is even clear. I'll save the second carb disassembly until my parts come in. Or I guess I could dip them in the meanwhile, i just really don't want to mess with the adjuster screw which apparently has an o ring on it. They look clean enough that I'm hoping I can go with my original plan of seafoaming it through the gas tank.

Fingers crossed, it'll run once it actually gets gas into the carb bowls ...

the boots look half decent too as far as I can tell, still soft and not cracked or anything.

I also found out that the tank and plastics used to be blue and have been repainted red. So I feel less bad about the little scratch i put in the tank paint... lol

the inside of the tank is very clean, though it does have some ever so slight rust beginning to form. it's really minimal, i'm not sure that it's even worth worrying about, it's basically surface rust. maybe i'll look into evaporusting it.

Anyhow. that's my progress as of today. comments or suggestions welcome, thanks for reading.
 
The rubber tip on the needle of the float valve was definitely there on my 82 450 for what that's worth. Did you try putting the petcock in the "prime" position to bypass the need for vacuum?

I've never dealt with a rusty tank before and the reviews of different coatings is so-so at best, some swear by them and others swear at them. Saw someone use POR-15 on theirs in another repair forum and it looked quite good when it was done so that might be an option. Filling the tank with vinegar and following that up with a baking soda flush and a light coating of WD40 to stop further flash rusting is also a popular choice.
 
As someone that has used RedKote liner for decades, I will recommend it. Find a radiator shop that uses it. I still send my stuff to Missouri because the shop is trustworthy.
 
The rubber tip on the needle of the float valve was definitely there on my 82 450 for what that's worth. Did you try putting the petcock in the "prime" position to bypass the need for vacuum?

hm interesting, all the pictures i've seen show a solid metal tip on the needle. my petcock is stuck in the run position, i'm slightly afraid to force it because i've heard that some ppl have torn their petcock diaphragm this way ... but regardless, the tank did release fuel when i turned the engine over, it should have filled the bowls at least a little bit yea? i cranked for maybe 30 seconds total before removing the drain plugs and finding them bone dry.
 
hm interesting, all the pictures i've seen show a solid metal tip on the needle. my petcock is stuck in the run position, i'm slightly afraid to force it because i've heard that some ppl have torn their petcock diaphragm this way ... but regardless, the tank did release fuel when i turned the engine over, it should have filled the bowls at least a little bit yea? i cranked for maybe 30 seconds total before removing the drain plugs and finding them bone dry.

Put a piece of tube on the vacuum connection at the back of the petcock and suck it. Fuel should flow.
 
hm interesting, all the pictures i've seen show a solid metal tip on the needle. my petcock is stuck in the run position, i'm slightly afraid to force it because i've heard that some ppl have torn their petcock diaphragm this way ...

Better it fail now than when you find you NEED to turn it, usually 4am in a pouring rain. Can't say I know this for sure but my best guess is you'll need a new petcock either way. Just get some gas flowing for now, Grimly gave some sound advice.
 
Mikuni makes both rubber tip needle float valves, and steel tip. All GS's I've seen up to this point have been steel tip. Not saying I've seen everything, though. Either way, if they seal, they seal. Go with what works.

That bike looks pretty clean. A nice platform to build off. You might want to check out the Newbie Mistakes thread linked in my signature, so you can know some thing too look out for. For example, the rubber carb boots attached to the head in your photo, need to come off, so the rubber O-ring can be replaced. Otherwise you are 95% sure to have an air leak.
 
Better it fail now than when you find you NEED to turn it, usually 4am in a pouring rain. Can't say I know this for sure but my best guess is you'll need a new petcock either way. Just get some gas flowing for now, Grimly gave some sound advice.

i'll add it to the list
 
Mikuni makes both rubber tip needle float valves, and steel tip. All GS's I've seen up to this point have been steel tip. Not saying I've seen everything, though. Either way, if they seal, they seal. Go with what works.

That bike looks pretty clean. A nice platform to build off. You might want to check out the Newbie Mistakes thread linked in my signature, so you can know some thing too look out for. For example, the rubber carb boots attached to the head in your photo, need to come off, so the rubber O-ring can be replaced. Otherwise you are 95% sure to have an air leak.

yea, it's been well kept and apparently has been refreshed at least once in the past, sometime around 2000 i'm guessing. the tank and covers have been painted and maybe the frame too.

hm yea good point on the boots, i've heard of that, any chance you know off hand what size o ring i need to get for those boots? i know you're the new o ring guy, lol. but i read your post that you don't know what goes on the 450s. are the carb boots the same o ring on all the different engines?

edit: nevermind i checked the cycle orings site on the wayback machine, it says "the intake O-rings (40mm)"
 
Last edited:
Buy the Suzuki intake boot O-rings. They are the only ones that fit properly. O RING PN 09280-40010

​Less than $3/each. Go visit your local dealer.
 
Mikuni makes both rubber tip needle float valves, and steel tip. All GS's I've seen up to this point have been steel tip. Not saying I've seen everything, though. Either way, if they seal, they seal. Go with what works.

After 40 years and three owners it's hard to say who's been in there and what they've been up to but as you say "Use what works"
 
today's journal - took the wheels off. There's only one brand of road tires that fits this bike's specs now, unfortunately. at least that I could find. 90 90 19 & 110 90 17. I could get some adv tires that are close... 120 rears. There's some knobbies too but that's it. Guess I'm getting some of these :


IRC Durotour RS-310

If they stop making these, I'm gonna be boned I guess. I wonder how hard it would be to swap in a 2.5 rim. If I did, I'm pretty sure I could run 130's.

I was going to try to get the tires and the valve cover both off tonight. But had a little mishap and decided to throw in the towel for the night ... Yea the center stand collapsed while i was wrangling the rear tire (: 
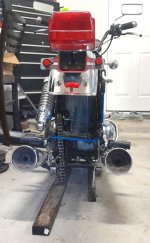
Glad I shoved those boards under there. I had a scissor jack on the front of the engine case but the bike shifted and it got crossways and fell over (the jack not the bike!). then the center stand went. Lesson learnt ... I think i panicked a little and pushed the bike the wrong way, then, thunk... I've got a plan to get it back up. I've got some 7 foot tall wood tripods from a hammock stand. I'll get some pulleys and hoist it once I have the front wheel back on. It would be nice having another strong dude around .. ah well. next time i'll secure it better.

add to the list : throttle cable, brake shoes

I grabbed a SH775 box off ebay last night while I was at it. I'm gonna do the headlight mod, the dremel one where you slide a led bulb into the housing of the old sealed lamp.

also found a drip of fork oil on the ground. The bike came with some new forks so it looks like those are going on sooner than later. at least i don't have to worry about getting the seals out of the old ones.


Whoops (:
Click image for larger version  Name:	whoops.jpg Views:	0 Size:	66.6 KB ID:	1744952
 

Attachments

  • photo63258.jpg
    photo63258.jpg
    66.6 KB · Views: 0
Last edited:
The largest tire I tried was a 120/90-17. The Shinko 705 front/rear gave me about 8k miles of use and I was able to easily navigate Forest service roads above the treeline up in the Rockies. Also ran a Shinko 777 front on the rear which gave me about the same distance. Continental was also making a dual sport tire at that time which was on it when I sold it

I'd go with the Shinko 705 again without hesitation. You can run a 100/90-19 up front just fine. Avoid the Kenda dual sport tires, they're absolutely useless in the wet both on and off road!

IMG_20190602_121358976.jpg
 
Put a strap between the centre stand and the front wheel and pull it tight before wrestling with the rear wheel.
<edit>
I see you had both wheels off. Best not to, just inviting trouble.
 
Last edited:
project journal - valve day

Tonight I cracked open the valve cover. Unfortunately i have a bolt that is rusted into the head and broken off, fortunately it's sticking a few mm out of the head, enough to grab hold of it with vice grips. I'm leaving it alone for now. it's very stuck. Tomorrow I'll get a torch from the auto parts store. right now the stub is soaking in pb blaster. Don't have a welder unfortunately. so i can't weld a nut on it. I do work with someone who maybe could do that for me if it comes down to that.

The rest of the bolts were torqued properly. One other bolt was rusty but i was able to get it out and clean out the hole.

it looks nice and clean on the inside. the oil is light amber, like the oil was changed and never ran after that.

here are my measurements of valve clearance. My smallest feeler gauge is .02mm and i have them in .01mm increments. does this look right?

"driver" side:
intake:
clearance: less than .02mm
shim: 2.50mm
shim needed: 2.45mm

exhaust:
clearance less than .02mm
shim: 2.65
shim needed: 2.6mm

"passenger" side:
intake LT .05mm, exhaust LT .05mm
no adjustment required

I may be the first person to crack into the valves on this bike. Is it normal for valves to have different shims from the factory?

also it's my understanding that valve clearances usually tend to tighten over time, is that right? I don't really understand that. is it from the camshafts wearing into the bearings?

---

everything else is on order that i've discovered so far. needle & seat, intake boot o-rings, and sh775 box should be here in the next couple days, hopefully tomorrow. also in the mail still: tires, brake shoes, throttle cable, valve cover gasket (oem at that!), some new bolts for the valve cover.

just need to obtain a couple of shims and a new turn signal relay. probably also need some o-rings for the float bowl drain plugs. i'll find out if it leaks i guess.

i also checked out the chain. the adjuster was all the way in when i took the wheel off, so it's clearly a new chain. I measured and it appears to be a 530 chain. it's dirty but it's oiled with no binding links or anything.

phew! well it's coming along at least. as long as the stator and ignition system are ok still, I hope this will have me up and running. I need to run tests on those. i want to put a dyna on at some point.

i'm a little concerned about the wiring in general. the small gauge red wire with the fuse on it was getting pretty warm when i had the battery plugged in and the headlight on. there's a bullet connector on that wire that i tried cleaning up some. maybe once i wire in the 775 box and put a led headlight in, it will be a little happier.

the last todo list item for the moment: the 'driver' spark plug looks pretty rich and the 'passenger' plug looks really lean. i'm hoping that cleaning the carbs and replacing the intake orings fixes that but i also need to get the stuff to check the sync.

that's it for tonight, thanks for reading
 
Valve clearance gets tighter as the valve wears itself deeper into the valve seat
 
before i lose it again. carb o-ring sizes on a bs34ss

"For your emulsion tube, you need a 1.1mm x 3.1mm (cross section by ID). I've tried O-rings that were extremely close, and they would not get the job done. I've seen this O-ring available at parts outlets like Beach Blvd. The Suzuki part number is 09280-03003, and its current price is $1.40 at Beach. This particular O-ring has to be spot on to provide the proper interference fit to hold the emulsion tube in place.

The adjustment screw takes a 1.25mm x 3.8mm. This one shouldn't be too tough to find.​"

drain plug o-ring is Item #: 13249-41310​ size unknown
 
Alright, did some work on the bike today. She's been lying on her belly for over a month now. But I finally got the wheels back on! She's a roller again! I managed to get it back up on the center stand by tipping her over onto a stack of pillows and tipping it back up onto a floor jack. Thankfully she's not too heavy especially with no wheels.​

I struck out twice trying to find new brake shoes for er. My bike, the TXZ, has spoked wheels which use an older size shoe that was mainly used in the 60's-70's, mine being the last year model to run them. Pretty difficult to find and expensive. Third time's a charm though, ebay special. I swear there's gotta be like half a dozen sets of those shoes left on earth! I'm glad to know now that you can get them re-padded, I saved the old shoes.

I boogered up that valve cover bolt pretty bad that's stuck in the head. At least I know my limits now; it's gonna take a drill press to fix it. I'm gonna "pretend I didn't see that" and see if I can just goop rtv around that area and get her running for the time being until I can get the top end off and fix it properly, maybe this winter. So I just jammed that cam cover back on and called it a day.

bike with her wheels back on
 
Back
Top