• Required reading for all forum users!!!

    Welcome!
    Register to access the full functionality of the GSResources forum. Until you register and activate your account you will not have full forum access, nor will you be able to post or reply to messages.

    A note to new registrants...
    All new forum registrations must be activated via email before you have full access to the forum.

    A Special Note about Email accounts!
    DO NOT SIGN UP USING hotmail, outlook, gmx, sbcglobal, att, bellsouth or email.com. They delete our forum signup emails.

    A note to old forum members...
    I receive numerous requests from people who can no longer log in because their accounts were deleted. As mentioned in the forum FAQ, user accounts are deleted if you haven't logged in for the past 6 months. If you can't log in, then create a new forum account. If you don't get an error message, then check your email account for an activation message. If you get a message stating that the email address is already in use, then your account still exists so follow the instructions in the forum FAQ for resetting your password.

    Have you forgotten your password or have a new email address? Then read the forum FAQ for details on how to reset it.

    Any email requests for "can't log in anymore" problems or "lost my password" problems will be deleted. Read the forum FAQ and follow the instructions there - that's what we have one for...

  • Returning Visitors

    If you are a returning visitor who never received your confirmation email, then odds are your email provider is blockinig emails from our server. The only thing that can be done to get around this is you will have to try creating another forum account using an email address from another domain.

    If you are a returning visitor to the forum and can't log in using your old forum name and password but used to be able to then chances are your account is deleted. Purges of the databases are done regularly. You will have to create a new forum account and you should be all set.

1980/81 GS1000G US Spec UK import

  • Thread starter Thread starter eddypeck
  • Start date Start date
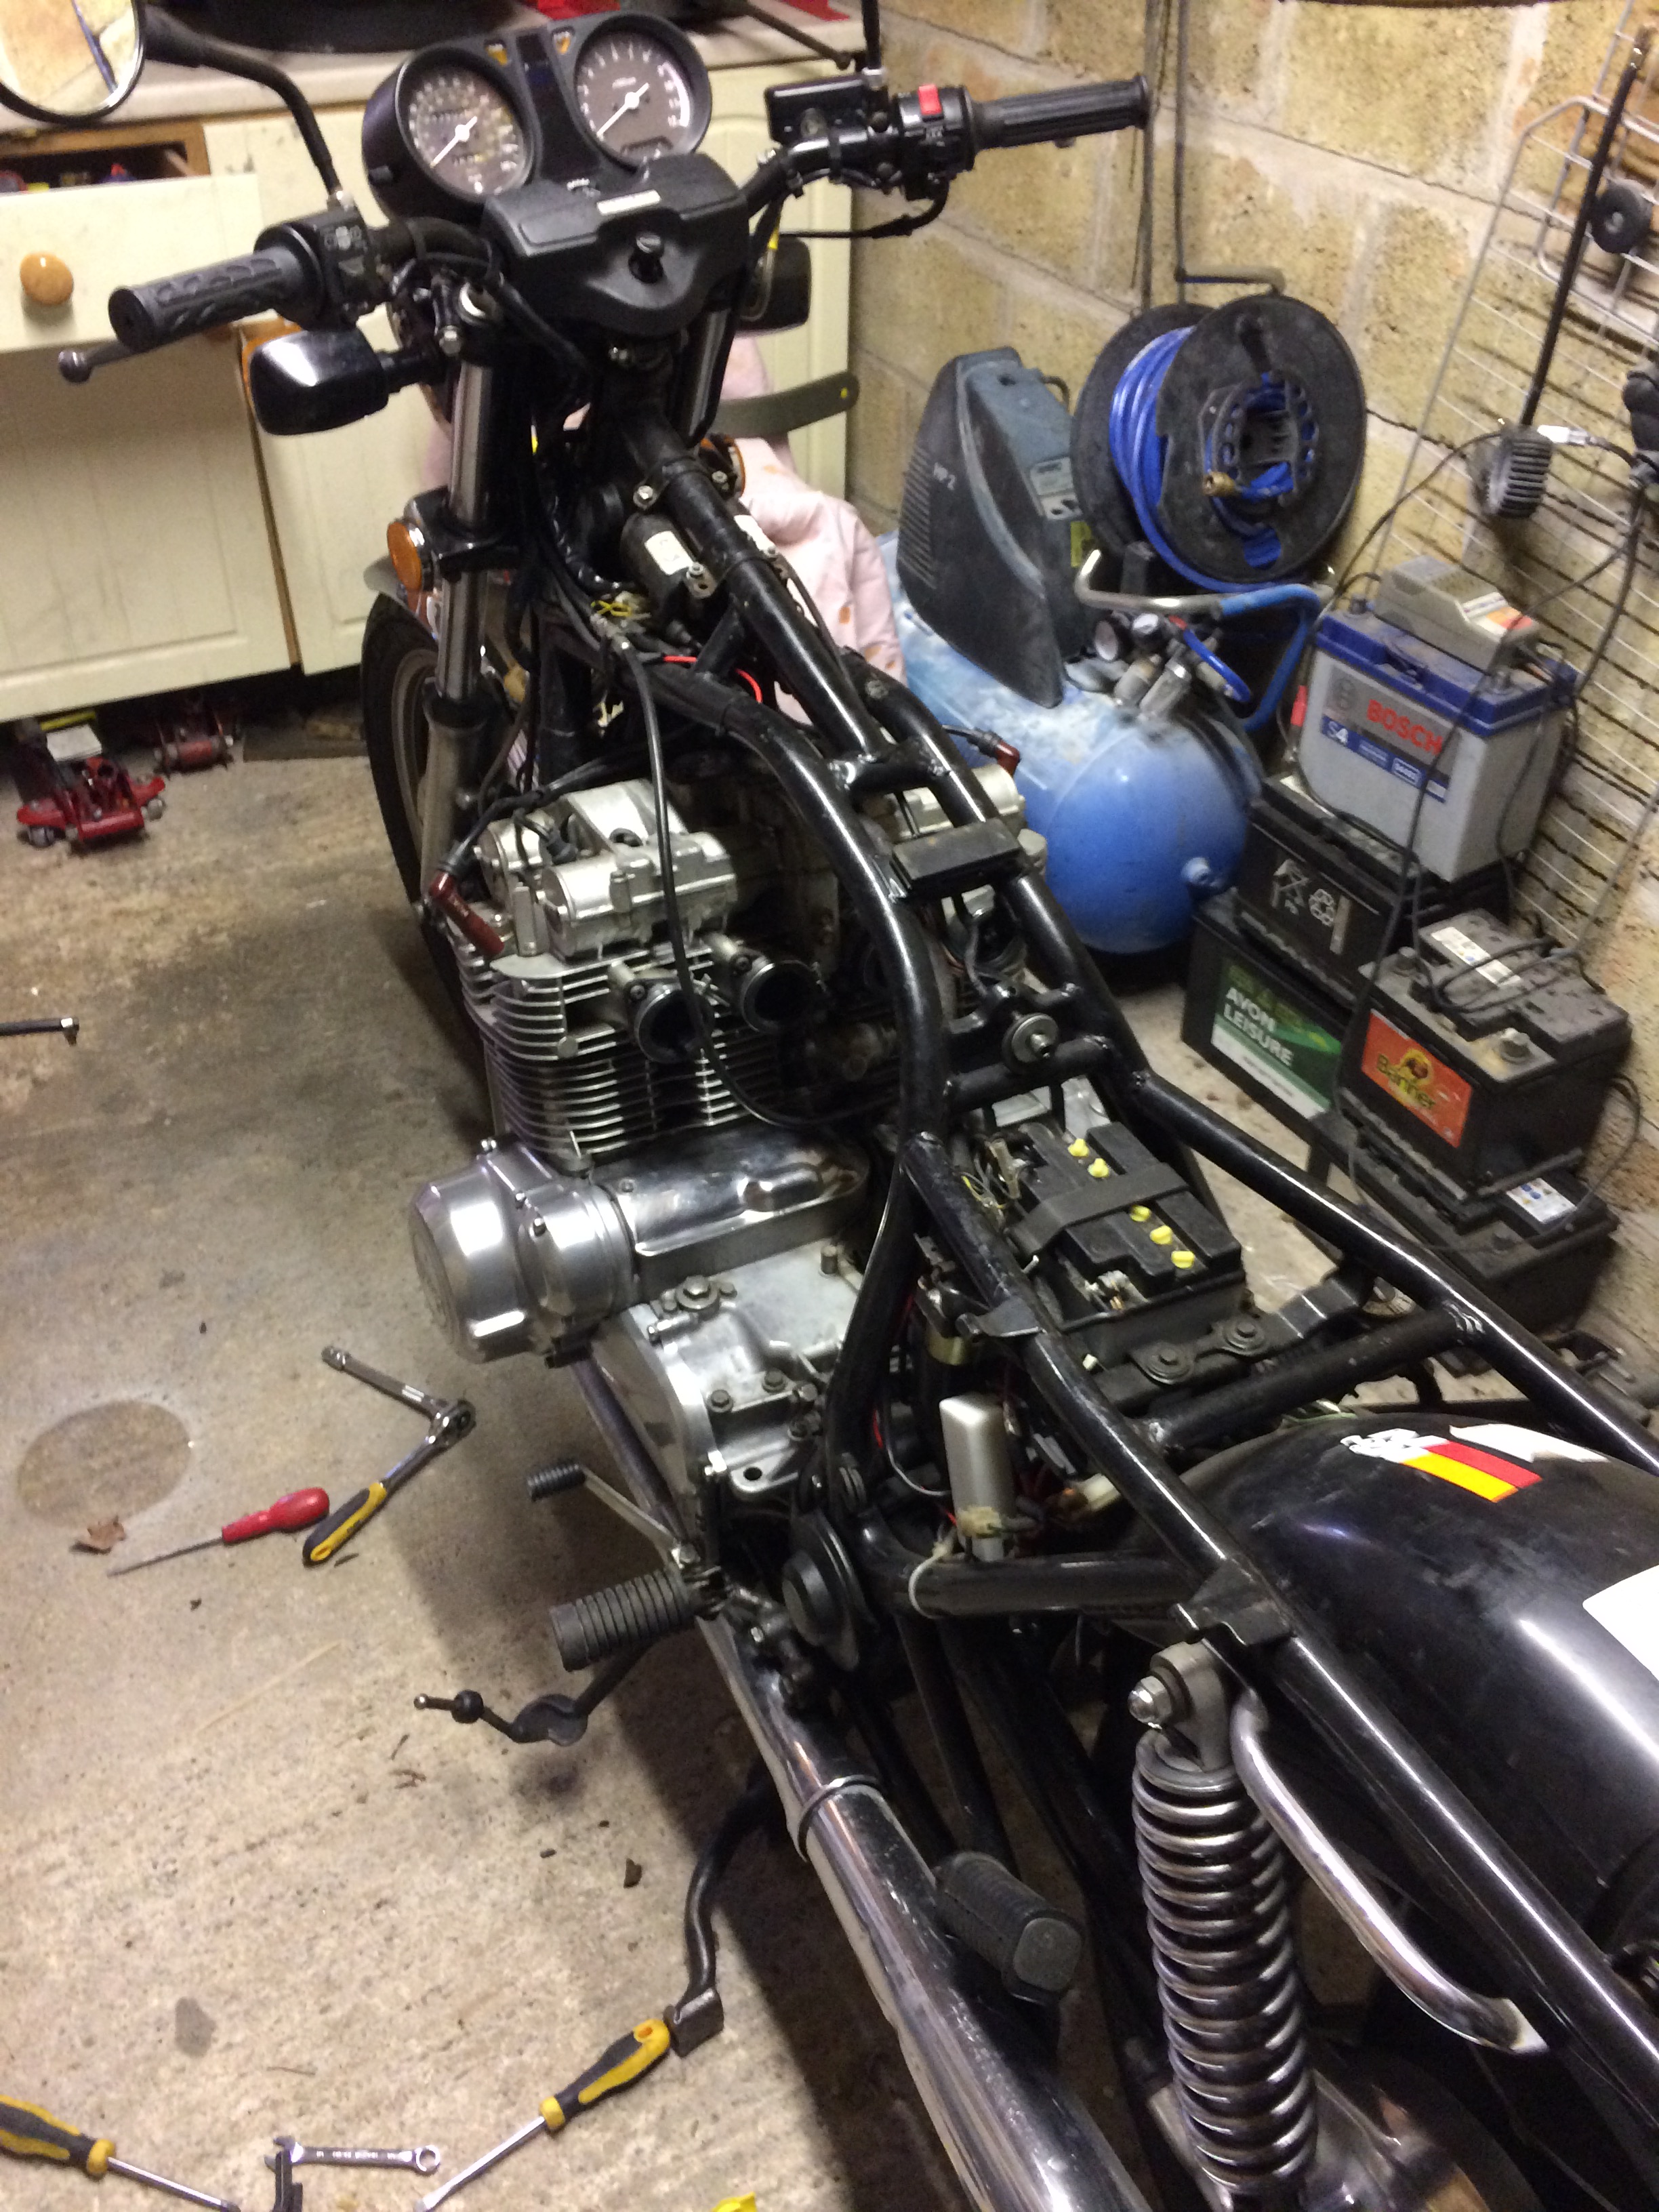
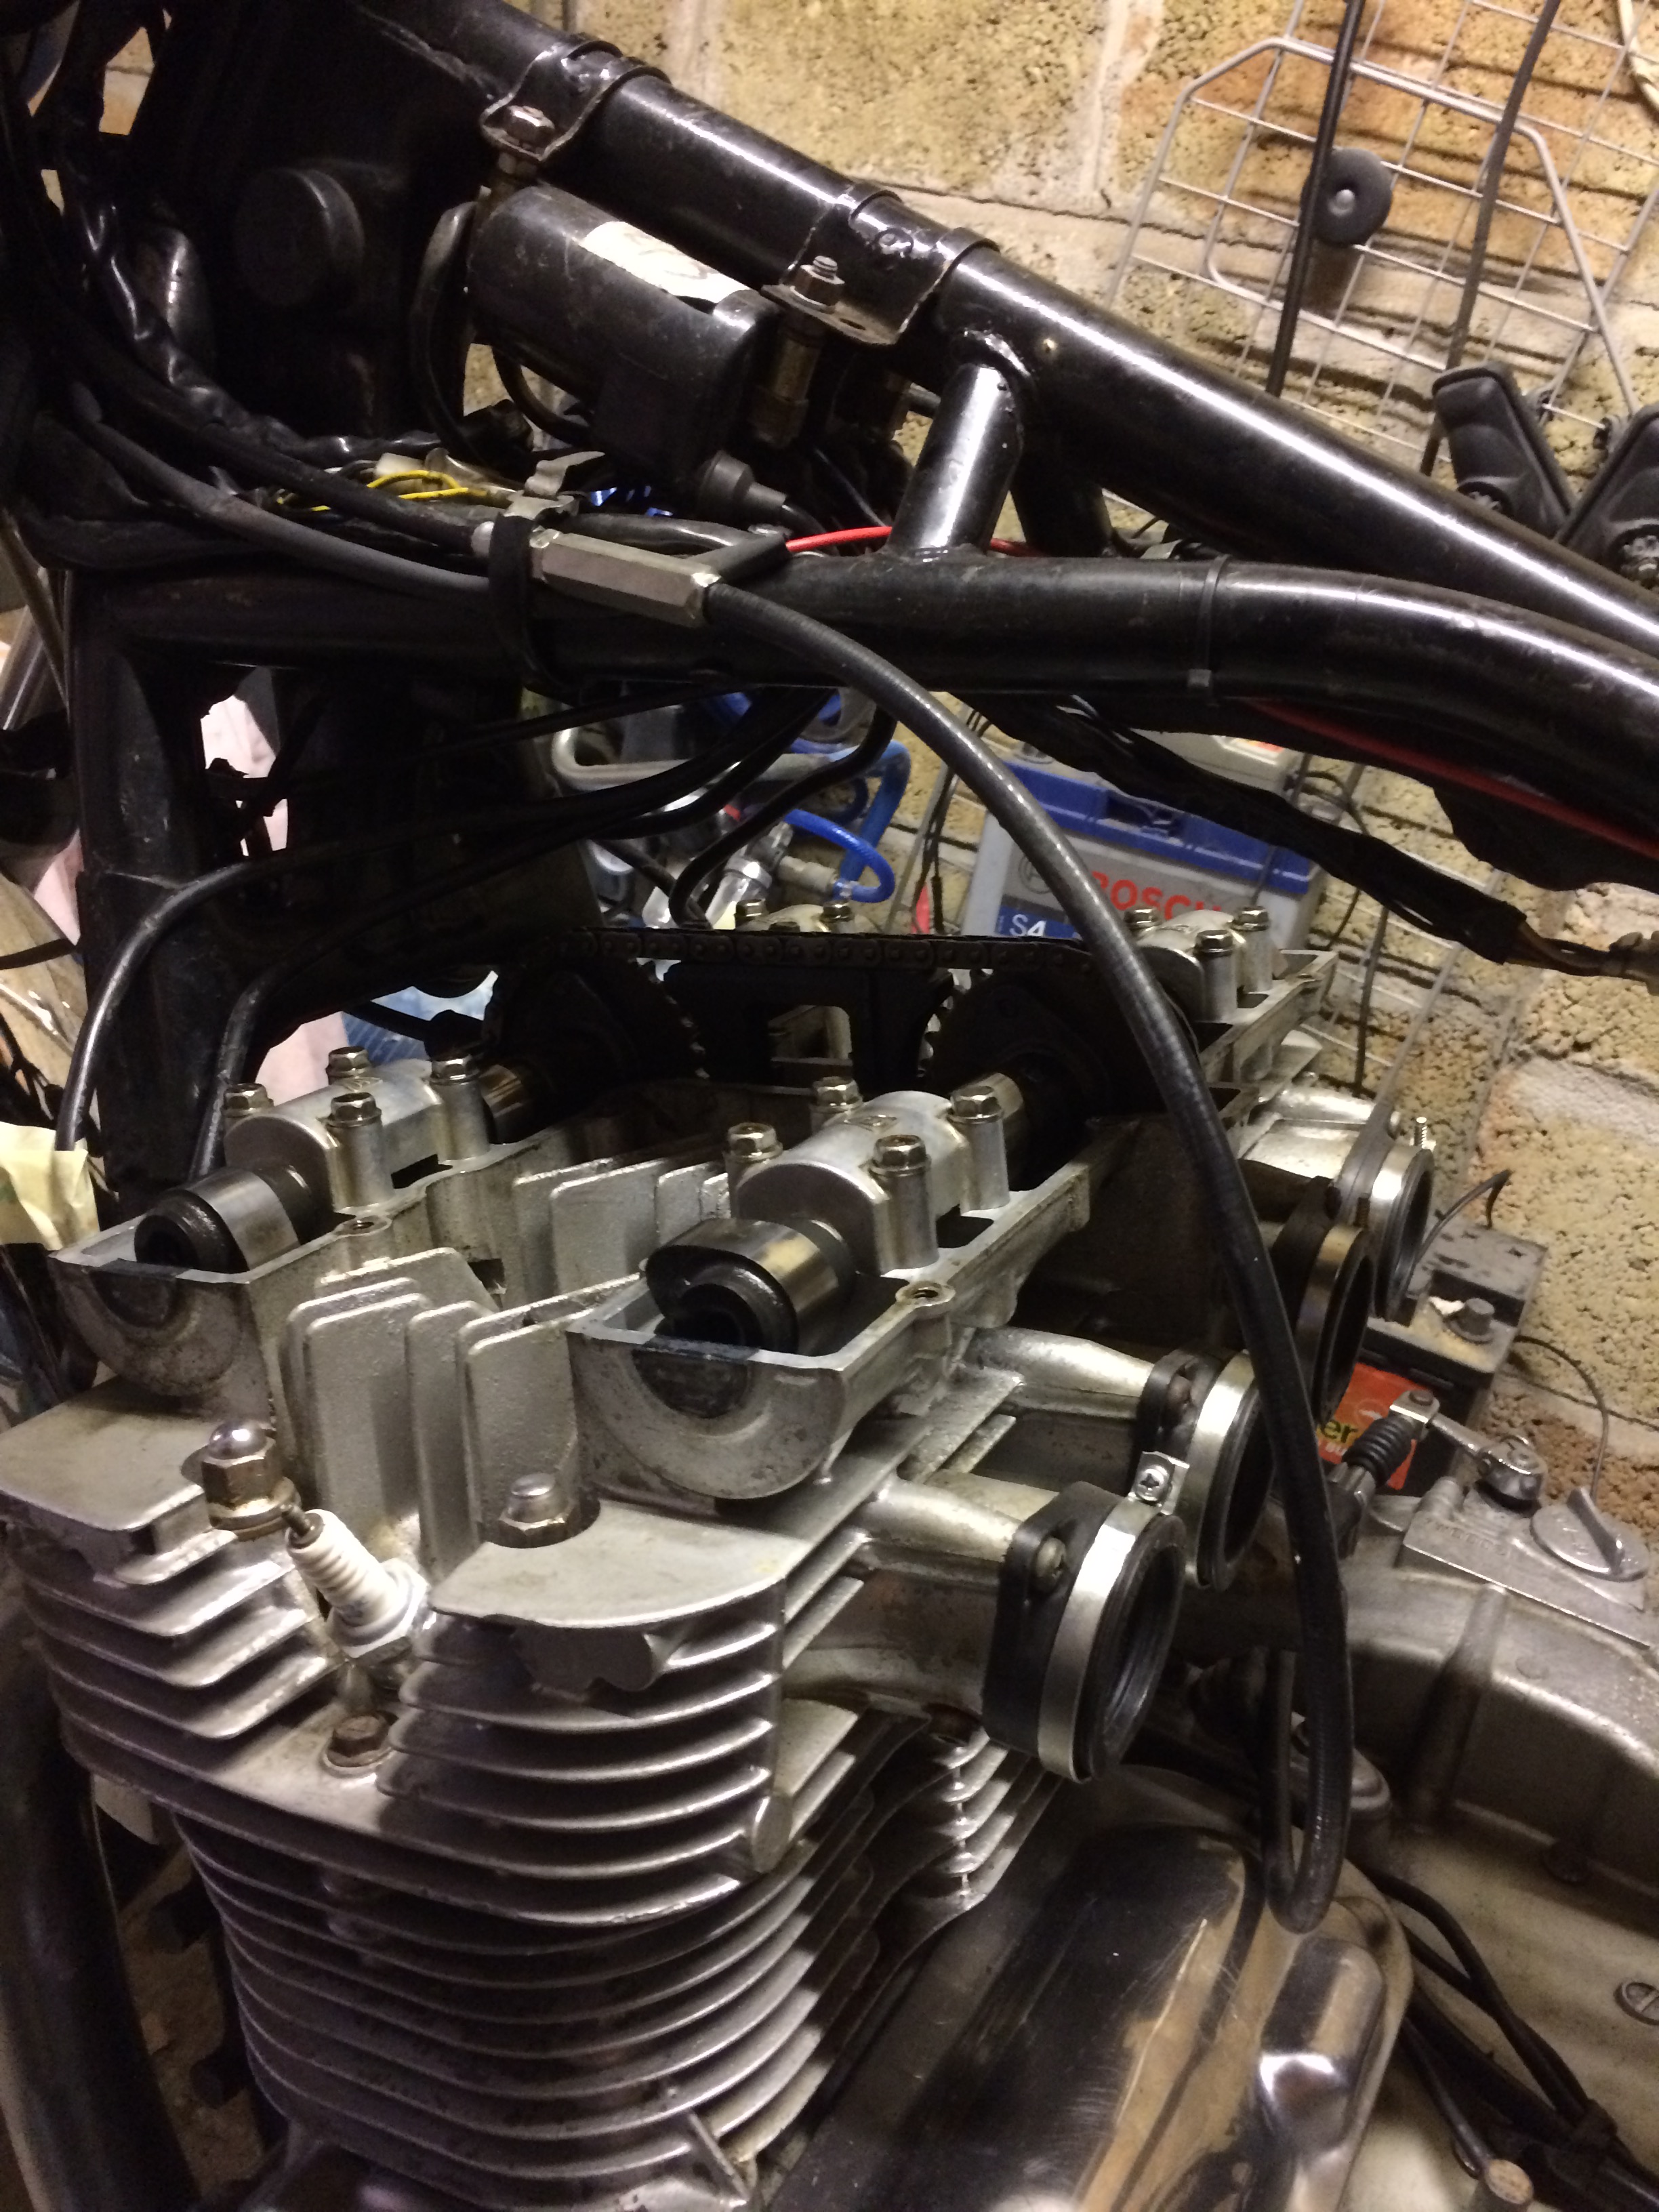
OK, so a little update on the head gasket issue. No action, but I've been reading up and gathering info to the point where I decided to take make some purchases.

From various eBay sellers I've found NOS genuine Suzuki gaskets for the Head and base gaskets and cam chain o-ring, saving me a fair amount compared to the main dealer price. The head gasket is the original type not the MLS one, but information suggested this was more forgiving so when I get it apart I'll see if I can get away without skimming.

For the rest of the parts I've ordered a Vesrha full engine gasket kit direct from Japan, reviews were mixed on this brand but seemed to be generally more positive than Athena kits. There's a few other gaskets that I may still swap out for OEM ones before I actually kick off, but for now at least I've started the ball rolling.
[FONT=&quot]On Vesrah[/FONT][FONT=&quot]Vesrah[/FONT]
 
Just caught up with you on here (I'm the Admin on the UK GS Suzuki Owners Group) and I love the pics. I have several GS1100Gs which are pretty similar (1982 and 1983).

I also run a mobile motorbike Dyno (www.dynABike.co.uk) and have done a few dyno runs over the last year. Including a run on my own GS1100G:

GS1100G.JPEG

Compare yours to mine. The biggest issue I can see is that your Air/Fuel ratio suddenly drops from mid range to max revs and you are running pretty rich at that level.

On mine you can see a little dip in the A/F level around 6K rpm which I can cure with a needle clip adjustment.

On yours you might need to look at your main jet which is mostly likely to be what is causing this richness in that range.

Going a size down will give you better top end and better mileage.
 
Thanks for the advice, I'm never really sure how to read a dyno chart but interesting to see the difference in mine and your chart. Priority is to stop it leaking oil, then I can take a look into getting it running better. I presume, with a leaking head gasket I must be down on compression? Even though it goes well, certainly better than I was expecting since I'm coming from much more modern super sports bikes.
 
So, the bike's been parked up since the end of October.

The full aftermarket gasket kit arrived from Japan, the NOS head gasket arrived from the states but was damaged so I had to find another one, which arrived safe and sound - eBay refunded the first one.

NOS base gasket and a genuine cam chain o-ring found locally and purchased off eBay.

You might think it's a bit of a faff gathering all these parts but I have to say it's saved me a small fortune compared to going to a Suzuki dealer.

I was off work over Christmas but didn't get chance to pop out to the garage as I had some decorating to do to keep the family happy. But I've just had a week off work, did some more decorating, but did manage a couple of sessions on the bike.

so it started:
2018-02-15-14-12-39.jpg


and before long looked like this:
2018-02-15-14-28-27.jpg


at which point I started getting very nervous having never gone this deep into an engine before, and then suddenly:
2018-02-15-16-53-34.jpg


That was enough for one the first day.
 
So what did I find?

Well after market head and base gaskets for a start, and this:
2018-02-15-16-24-19.jpg


The egg shaped O-ring was there but had been sealed in with a little extra help. Is wasn't leaking obviously from this area but it could be seen to be damp from one of the earlier photos.

For day two I cracked out the over the top power tool:
2018-02-16-13-49-39-1.jpg


To make these, as spec'ed in the Clymer manual. I had to work in inches, which I'm not used to over here!
2018-02-16-13-49-51.jpg


After reading another thread where someone damaged the base gasket while fitting the cylinder I got a bit nervous again. But I wasn't convinced with fixing the gasket to the base of the cylinder and holding it in place with elastic bands as suggested. So I fitted it to the deck of the crank case, and cut out some cardboard to protect it, and with the wooden blocks and I have to say it was all very straight forward.
2018-02-16-14-11-56-1.jpg


The valves looked like this after a bit of a clean up:
2018-02-16-14-29-54.jpg


I then went ahead and fitted the head:
2018-02-16-14-52-09.jpg


At this point the nuts are finger tight and the head is just sitting there.

And then had a change of heart....

I only have a large 1/2" torque wrench with a 30 to 210 nm range. The head bolts are supposed to be 36.6 or there about and I decided the range of mine was too wide to be that accurate. So I'm currently waiting for a 3/8" one with a 10-80 range to arrive.

I also thought, actually let's not cut corners, let's do this right. So I've ordered some lapping compound; course and fine, a valve spring compressor and some other bits and bobs. So when those arrive, hopefully in a few days I'll whip off the head, clean up the valves, pop them out, try and lap them in properly and fit the new oil seals since they came in the kit anyway.

Also ordered new plugs, oil and filter for when I'm done. Can't wait to crack on, but also want to take my time do it right and hopefully do it once.
 
Tools and parts have all arrived now.

I made a start cleaning up the head
2018-02-21-21-35-19.jpg


2018-02-22-22-57-52.jpg


2018-02-22-22-58-30.jpg


Now my valve spring compressor and lapping paste has arrived, this evening I'm hoping to take out the valves and finish the job
 
Nice work Eddy!

I have my bike somewhat apart at the moment. Seeing yours with tank/carbs/headlight off is how mine is sitting.


Ed
 
So the weekend brought me a puzzling situation.

With my newly acquired valve spring compressor I preceded to remove the valves. I might add, although a little daunting as I've never got this involved in a mechanical build before, the process was fairly straightforward. One thing I have learnt over the years is how much simpler a task is with the right tools.

Anyway I followed the Clymer manual, compressed the springs popped out the split keeper, released the tool and removed the top hat and springs, and dropped the valve out the bottom.

Then when it came to the bit about using needle nose pliers to remove the oil seals nothing seemed to move and things didn't look right. I tried to get some photos or videos to see if I could compare what I was looking at and found a YouTube video that suggested heat - I didn't go this far.

But I was beginning to suspect the valve seals weren't actually there. At first I thought maybe the rubber parts had gone and I was looking at the shell, then I tried a new seal and saw it fitted over the top. I eventually worked out, with confirmation from a few pics posted on Facebook, that the head had actually been rebuilt without valve guide oil seals fitted.... (or was it?)

2018-02-23-22-24-27.jpg


That was what I was looking at, just the naked top of the valve guide.

However 2 of the valves came out with the remains of the seal...

2018-02-23-18-29-37.jpg


Which was puzzling, how had this got onto the valve stem? Then I pulled a third that had the full oil seal still in situ and it dawned on me, they'd been fitted to the underside of the head on the hot side.

So the exhaust side ones were all gone, burnt up and blown out the exhaust no doubt. And of the inlet side, various bits remained, assuming the rest must had made it into the chamber - although no damage to pistons, valves or head luckily.

That mystery solved, I cleaned up the valves and head best I could. Lapped in the valves, another first for me and started to put it back together. So far only 2 inlet valves back in before I ran out of time. Those split keepers are fiddly. But I'm sure by the time I've done the other six I'll have got the knack of it. We're currently entering a cold spell again (not that it had really warmed up) apparently the next week is about to be the coldest week in the past five years - so still, no rush to get it back together but I am really looking forward to getting it done, especially now knowing things are getting done properly.

But I will be checking the whole bike over because I've no idea what other 'maintenance' the previous owners may have done and from what I've seen so far I've not been filled with confidence.
 
I managed a couple of hours in the garage yesterday and the head is built back up with all the valves now in, fitted with new oil seals in the right location. The head is back on and all torqued down, got the exhaust cam in situ, hopefully I'll get a bit more time this week.

Another hour or so should see the engine back together, I want to do a bit of a clean and tidy as I bolt the rest of the stuff back on though. Stuff like the underside of the exhausts that rarely see a cleaning cloth.


I'll need to set the timing and balance the carbs etc once it's back together so I'm a little bit concerned about getting is all set up right. But it was running all right before so if I get it right should be fine once again.


Then just a general service, clean up and good check over. I'm aiming to pay for my road tax it from 1st April and then start using it as much as possible.
 
2018-03-07-21-27-01-1.jpg


Cams back in, paying careful attention to the timing marks, tensioner fitted with new gasket and hopefully I'd set it right I found the instructions in the Clymer manual a bit vague. On the whole I'm finding the Clymer very well written and a lot easier to follow that the Haynes Manuals that are the UK equivalent I'm used to although I do need to convert your inches and lbs per foot etc. into "English" :p

Now working my way though the valve clearances. I've got 3 in tolerance the rest need adjusting. I think I should be able to swap 3 of the shims around meaning I just need to purchase two news ones once I'd calculated the correct size - it was late last night by the time I'd finished and couldn't quite get my head around it.

One thing I noticed, For the shims where the size was still legible I compared with my own measurements and they seemed a little bit out, is it possible they'd wear and reduce in thickness or should I be questioning the accuracy of my micrometer? I'm not sure if I should calculate replacements based on my readings or the spec. We're only talking 0.1 of a mm, but just want to be sure.
 
Wow! What a story! A sad one about the previous owner but you are correcting the problem.

Thanks for the update.


Ed
 
On another note, happy to confirm at least one of the previous owners did something right.

I'd picked up on comments that electronic ignition was a very worthwhile upgrade, and had been pricing up kits and watching a few on eBay. However I'm happy to say it looks like this has already been dealt with for me

2018-02-15-13-58-48.jpg
 
I've read here on GSR that it is a good idea to check shims thickness with a micrometer as sometimes they are marked improperly. The inconsistency you're encountering maybe mislabeling.
 
On another note, happy to confirm at least one of the previous owners did something right.
I'd picked up on comments that electronic ignition was a very worthwhile upgrade, and had been pricing up kits and watching a few on eBay. However I'm happy to say it looks like this has already been dealt with for me

2018-02-15-13-58-48.jpg


Don't be too fast to give a PO any credit (we all know they deserve none), but if I am not mistaken here, I believe the models after 1979 were equipped with electronic ignition from the factory.

Interesting documentation you are doing here as I am going through the exact same process with my 1000E model.
 
Bit more of an update following the weekend.

Finally got my head round the valve clearances and shim sizes. I started with only 3 within spec. but after a lot of shuffling around, double checking my measurements, I even made an excel spreadsheet... and finished with only two outside of spec so I’ve just ordered what I need. They should come in this week so I'll feel like I'm on the closing stages.

In preparation, and because I'm limited to what I can do right now I started generally cleaning stuff up ready for it all going back together. When I took it apart I basically took everything off and put it to one side without much thought. So when I decided to clean up and polish the exhausts I was gutted to discover a hole in the underside:

2018-03-11-12-07-16.jpg


Now I bought a mig welder about 2 years ago and am yet to have used it and I did night school to 'learn' classic car body restoration which included about 5 hours of welding. So I decided what I'd give it my best shot.

Cleaned up:
2018-03-11-14-51-33.jpg


Plate cut:
2018-03-11-14-51-42.jpg


Cleaned up some more, at this point I should have noted the area was actually bigger than I first thought and I should have cut a bigger plate.
2018-03-11-14-54-46.jpg


But I didn't, which meant when I got to one side of the plate I kept blowing holes so had to do an extra little patch
2018-03-11-15-49-04-1.jpg


Not the best weld in the world, but not the worse and considering it was my first time and on very thin rotted metal I have to say I'm rather pleased with myself.
Obviously I had to grind it down a bit:
2018-03-11-15-54-25.jpg


And then faced with the issue that orginally it was chromed ... I just had to paint over the now bare metal:
2018-03-11-20-05-43.jpg


Thankfully it's on the inside edge and underside so shouldn't be visible when fitted back to the bike and will buy me some time till I work out a replacement and save up.

I'm actually not that fussed about a 4 into 1 system, but unless I can find a good used original set up at a reasonable price I'm thinking a new replacement might have to be sought and all it seems is on offer are 4 into 1 systems.

I'd also need confirmation if the exhaust is the same on all GS1000's or do I need one specific to shaft drive?


I also started looking at the wiring :

2018-03-10-15-59-28.jpg


as I've got a replacement left hand switchgear from a more modern bike (I believe it was off a Yamaha but not sure which) anyway, my idea is to fit this as it will have the push to cancel indicators that I'm used to since the self cancelling ones don't work and it's a real pain trying to get the indicator back into the center spot without going too far. I'll also benefit from a high beam flash button which my original doesn't have.

More on that later.....
 
Excellent work so far. If your weld job is not visible when back on the bike, I would not worry about it at all. It's a good looking exhaust otherwise. I hope you remembered to put the locator dowels back in when reassembling the lower end. As me how I know about this??? If I were you, I would replace those electrical connectors with spade connectors. Thanks for the nice write-up.
 
Finally got my head round the valve clearances and shim sizes. I started with only 3 within spec. but after a lot of shuffling around, double checking my measurements, I even made an excel spreadsheet... and finished with only two outside of spec so I’ve just ordered what I need. They should come in this week so I'll feel like I'm on the closing stages. ...
No idea what your Excel skills are, but I would like to invite you to take advantage of the offer in my signature.

I am no 'master' with Excel, but my version has been sent out to 1087 users so far.

.
 
Back
Top