Thanks Vmass. I'll give that a stuff a try.I painted the front MC with Duplicolor Low Gloss Black DE1634 Engine paint 500 degree.
-
Required reading for all forum users!!!
Welcome!
Register to access the full functionality of the GSResources forum. Until you register and activate your account you will not have full forum access, nor will you be able to post or reply to messages.A note to new registrants...
All new forum registrations must be activated via email before you have full access to the forum.A Special Note about Email accounts!
DO NOT SIGN UP USING hotmail, outlook, gmx, sbcglobal, att, bellsouth or email.com. They delete our forum signup emails.A note to old forum members...
I receive numerous requests from people who can no longer log in because their accounts were deleted. As mentioned in the forum FAQ, user accounts are deleted if you haven't logged in for the past 6 months. If you can't log in, then create a new forum account. If you don't get an error message, then check your email account for an activation message. If you get a message stating that the email address is already in use, then your account still exists so follow the instructions in the forum FAQ for resetting your password.Have you forgotten your password or have a new email address? Then read the forum FAQ for details on how to reset it.
Any email requests for "can't log in anymore" problems or "lost my password" problems will be deleted. Read the forum FAQ and follow the instructions there - that's what we have one for...
-
Returning Visitors
If you are a returning visitor who never received your confirmation email, then odds are your email provider is blockinig emails from our server. The only thing that can be done to get around this is you will have to try creating another forum account using an email address from another domain.
If you are a returning visitor to the forum and can't log in using your old forum name and password but used to be able to then chances are your account is deleted. Purges of the databases are done regularly. You will have to create a new forum account and you should be all set.
You are using an out of date browser. It may not display this or other websites correctly.
You should upgrade or use an alternative browser.
You should upgrade or use an alternative browser.
1980 GS1000S Progress!!
- Thread starter Vmass
- Start date
There is no badging. I have a print out of a Yoshimura fitment chart.
Shows Yoshi # 3150 is for GS 750/850/1000 for years 77-82. The header is stamped with the numbers 3150.
Came from a former bike shop owner on the West Coast.
Nice!
I suggest sending one of them out for ceramic coating. It will rust in short order otherwise.
Nice!
I suggest sending one of them out for ceramic coating. It will rust in short order otherwise.
Something I'm not familiar with, can you elaborate on material and what it may cost?
I haven't made much progress lately......you know how life can slow these types of projects down.")
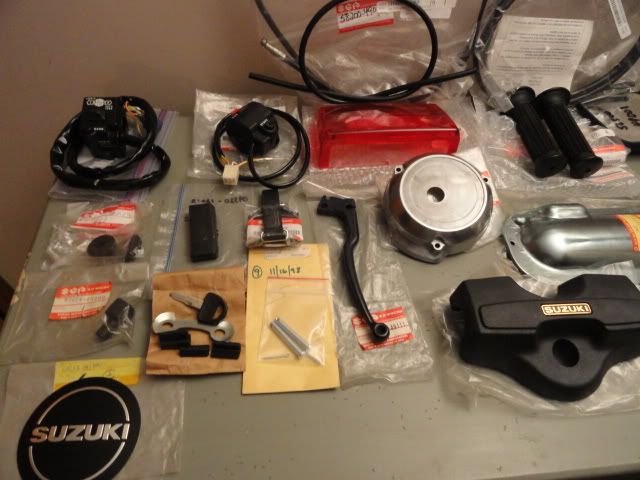
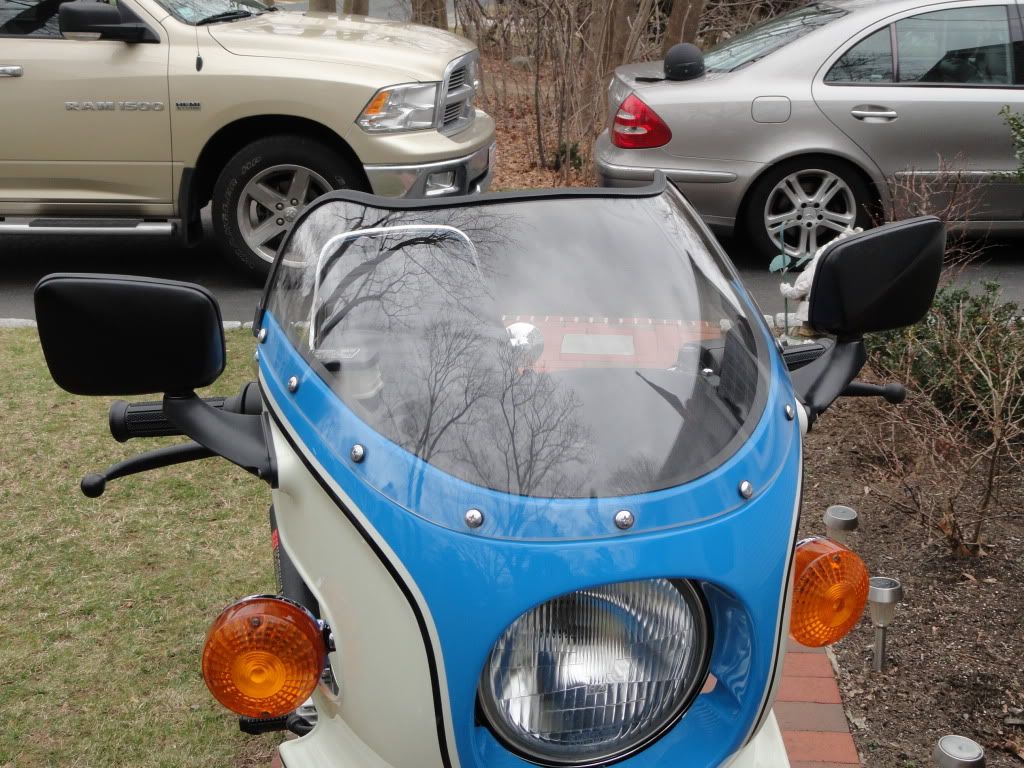
I did put the windshield/fairing together. I also thought I should do a little inventory of the parts I have collected over the past several months.
I plan on putting it back together for some spring riding and continue as a " rolling restoration".
Thanks again to all who are helping with this.
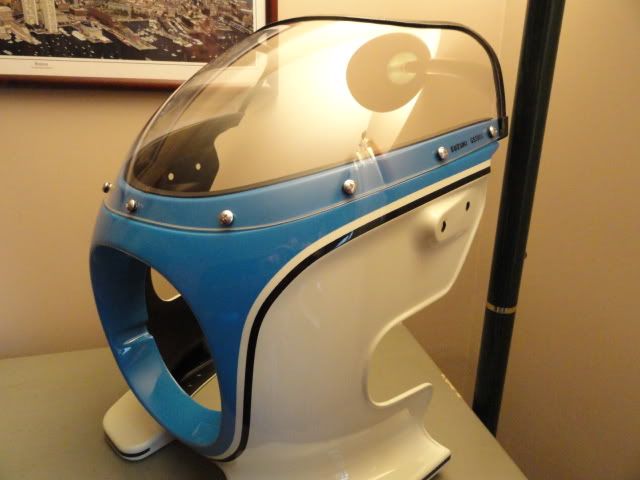
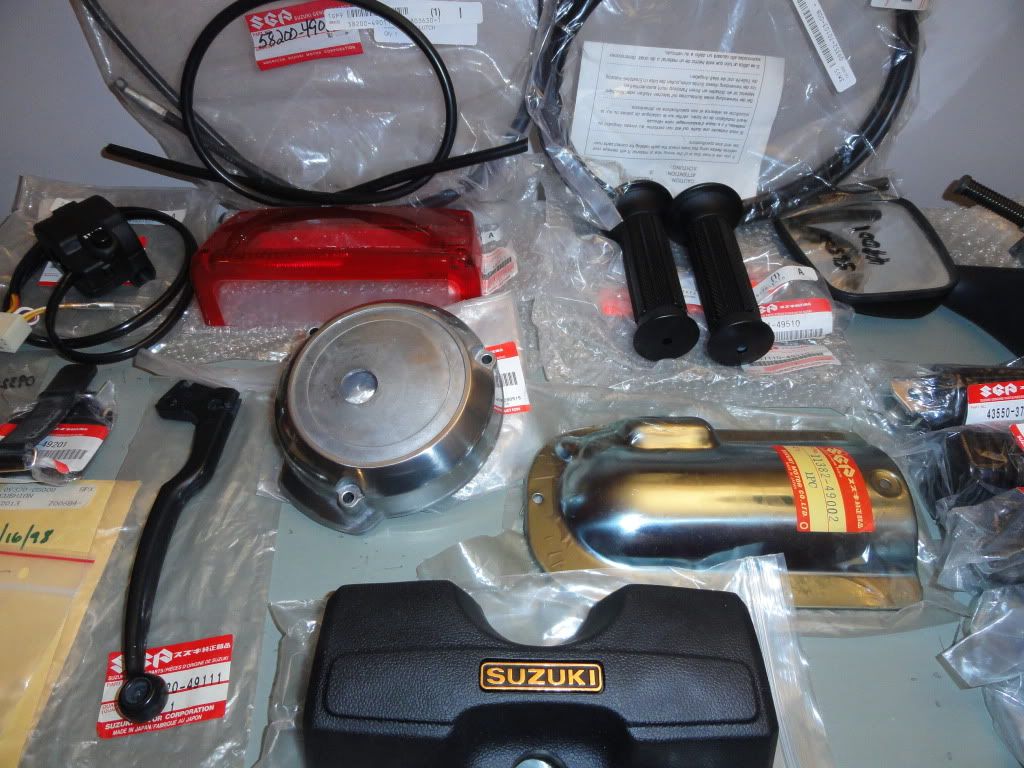
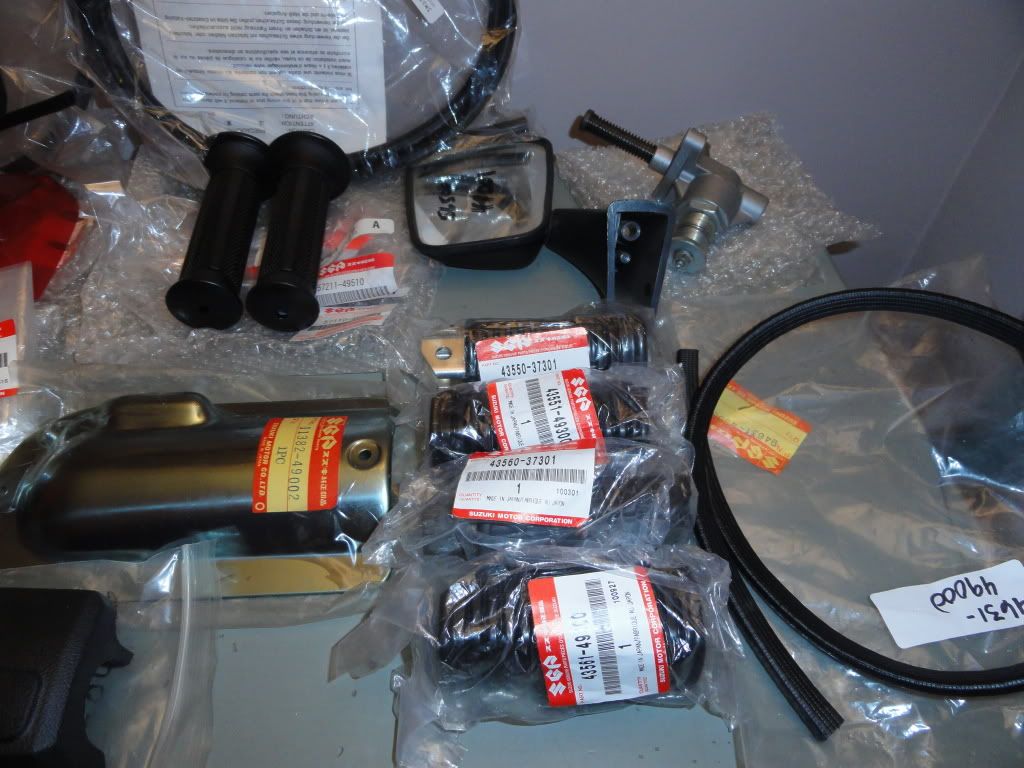
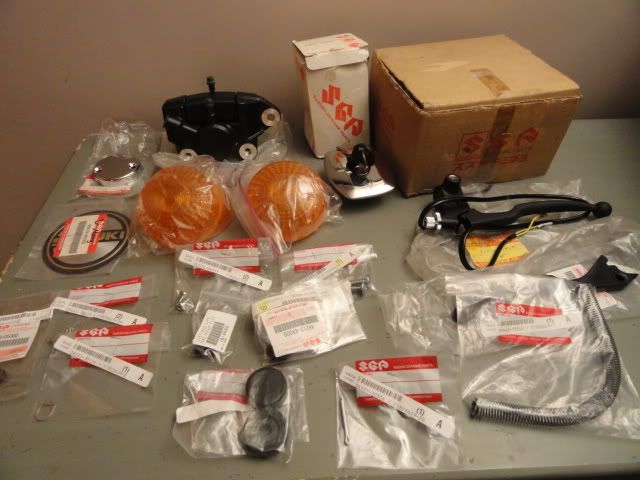
I did put the windshield/fairing together. I also thought I should do a little inventory of the parts I have collected over the past several months.
I plan on putting it back together for some spring riding and continue as a " rolling restoration".
Thanks again to all who are helping with this.
G
GateKeeper
Guest
WOW,,,,that's a lot of nice new parts.......
may I ask where your getting them from ? typical placess like Z1, and Boulevard Suzuki ? as I have not really ordered anything that has come in those type of packages, and it looks really cool with all the SGP on everything...
may I ask where your getting them from ? typical placess like Z1, and Boulevard Suzuki ? as I have not really ordered anything that has come in those type of packages, and it looks really cool with all the SGP on everything...
WOW,,,,that's a lot of nice new parts.......
may I ask where your getting them from ? typical placess like Z1, and Boulevard Suzuki ? as I have not really ordered anything that has come in those type of packages, and it looks really cool with all the SGP on everything...
A good amount of the "still available" parts are from Z1 (Chris has been very helpful). The other parts I have just found here and there.
Made a little progress today:
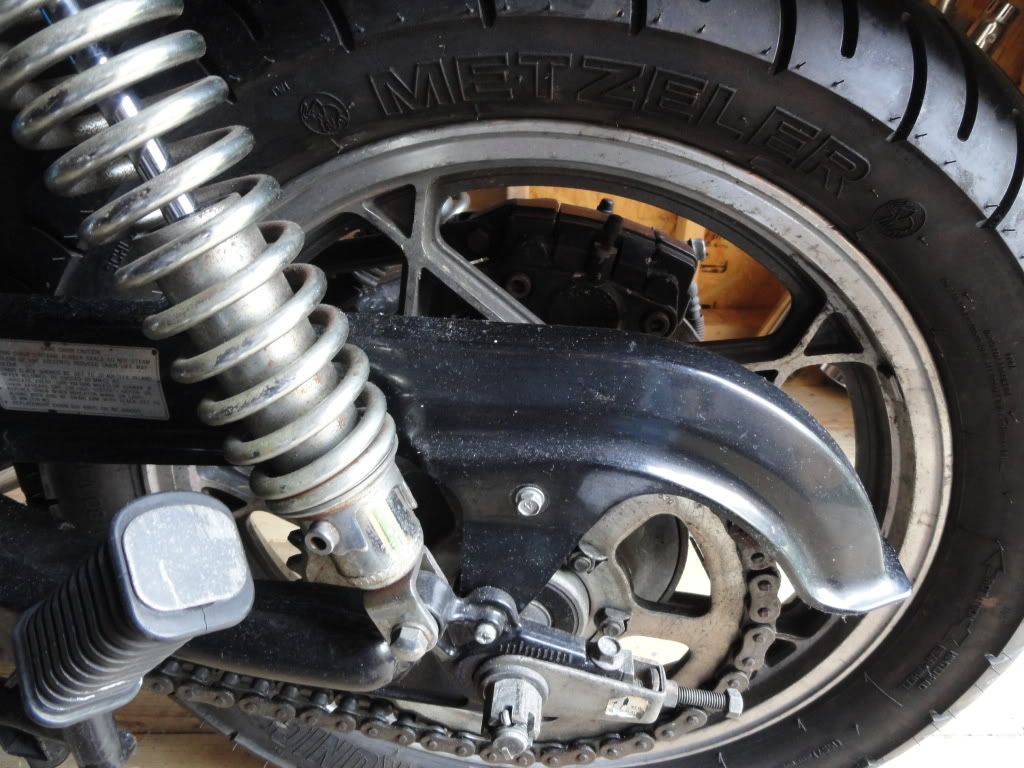
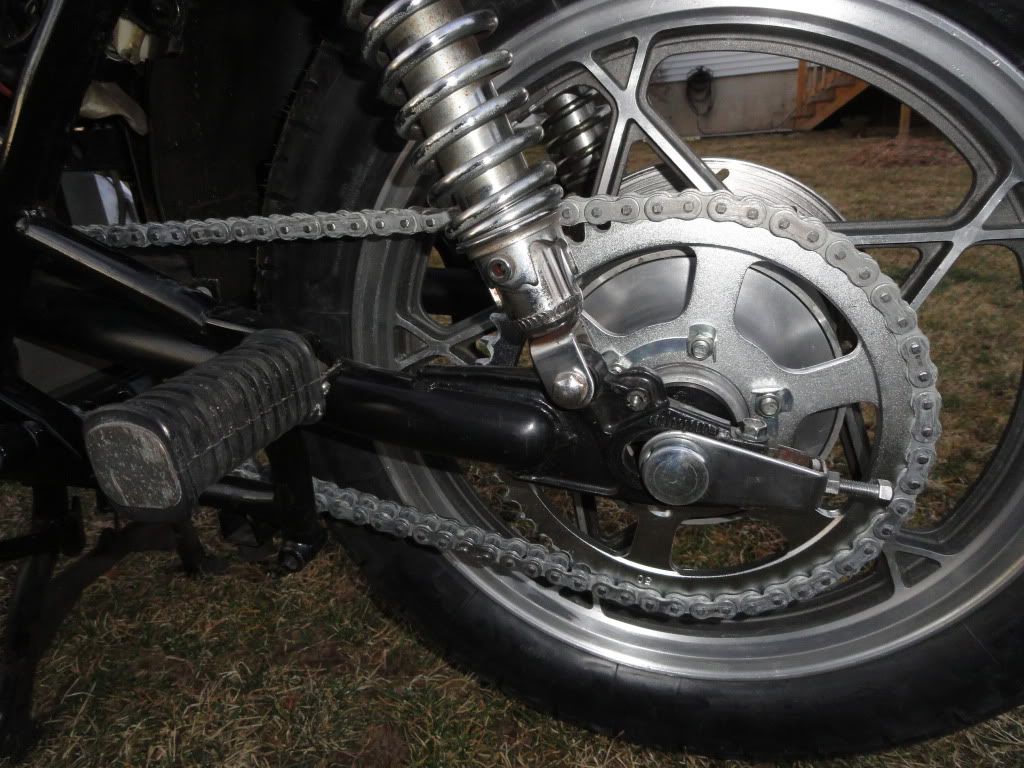
1) Rear wheel reinstalled with new tire, sprocket and cleaned up a bit.
2) 530 conversion kit installed
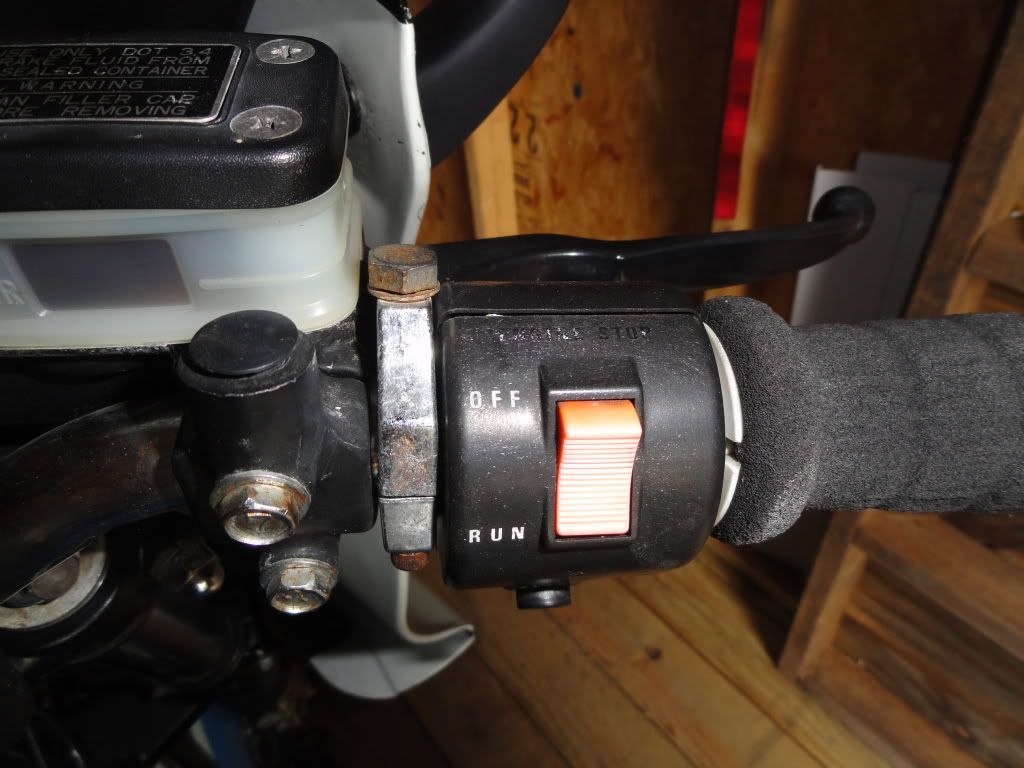
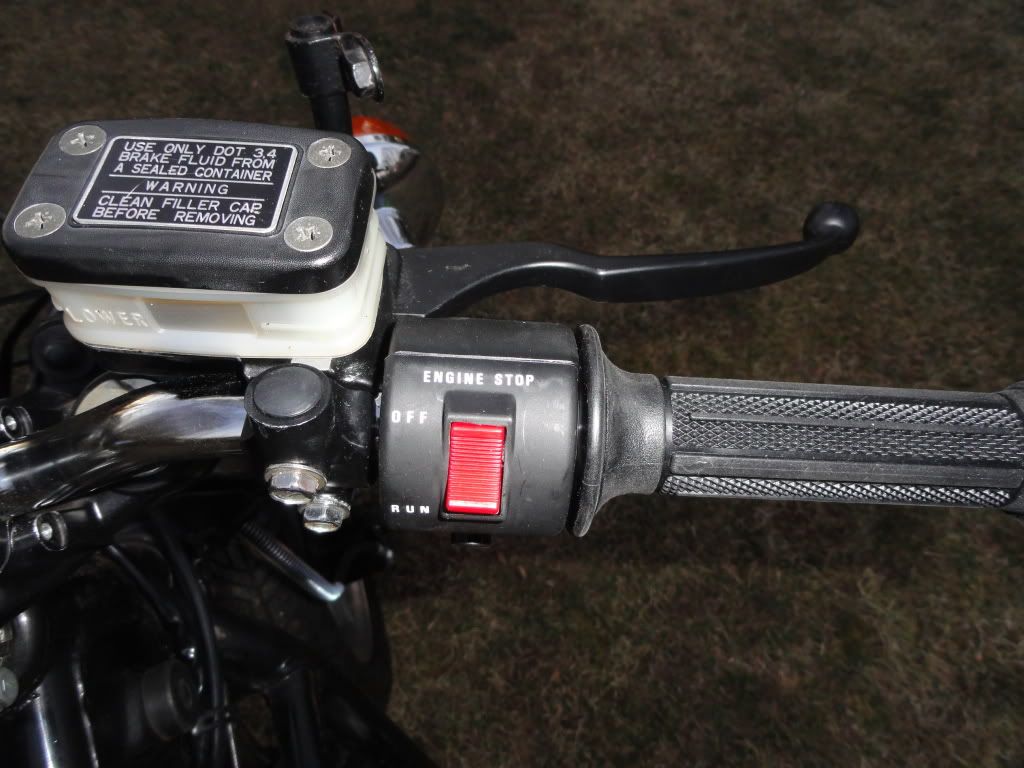
3) New grips, switches and clutch perch.
4) New clutch cable.....need to learn how to adjust!!
Next up is new rear caliper caliper and brake line and then on to the gauge reinstall.
1) Rear wheel reinstalled with new tire, sprocket and cleaned up a bit.
2) 530 conversion kit installed
3) New grips, switches and clutch perch.
4) New clutch cable.....need to learn how to adjust!!
Next up is new rear caliper caliper and brake line and then on to the gauge reinstall.
Clutch adjustment..basics.
At the handle bars, turn the adjuster about half way in on the threads.
At the top of the engine case where the cable passes thru, you want that to be just about all the way threaded thru.
Turn the knurled end of the clutch actuator rod all the way clockwise( to the right) and put the link on with the cable hole facing back paralell to the seam of the clutch cover and hook up the cable to the lever.
Adjust the bottom threaded end of the cable back till you start to get some lever resistance. Adjust till you have about 1/4 to 3/8 inch freeplay at the lever beforem it starts to have resistance from the clutch. This will be pretty close and you can fine tune it with the end below a bit more once you start the bike and get a feel for the levers gripping point. Further fine tuning is done with the adjuter at the handlebars.
If all goes well, I plan on firing up the bike tommorow. This evening I put the new Yoshimura pipe on and finished with the rear brakes.
Some of the things I've done over the past few months:
Clutch Cable
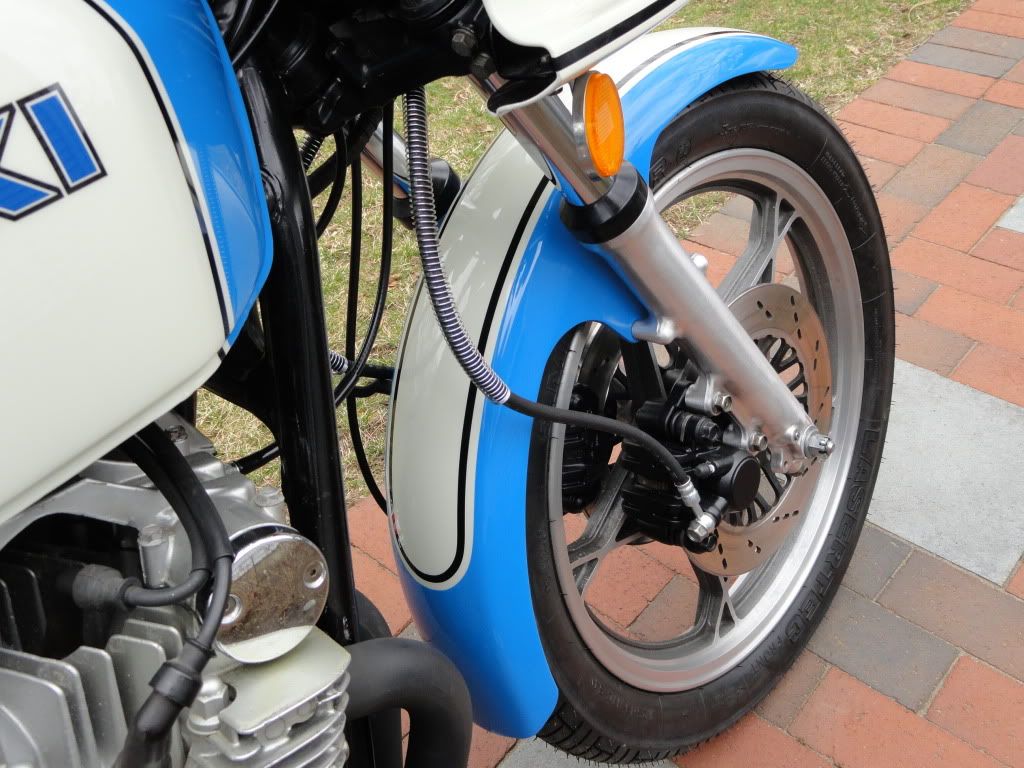
All new brake components
New tires
530 chain conversion
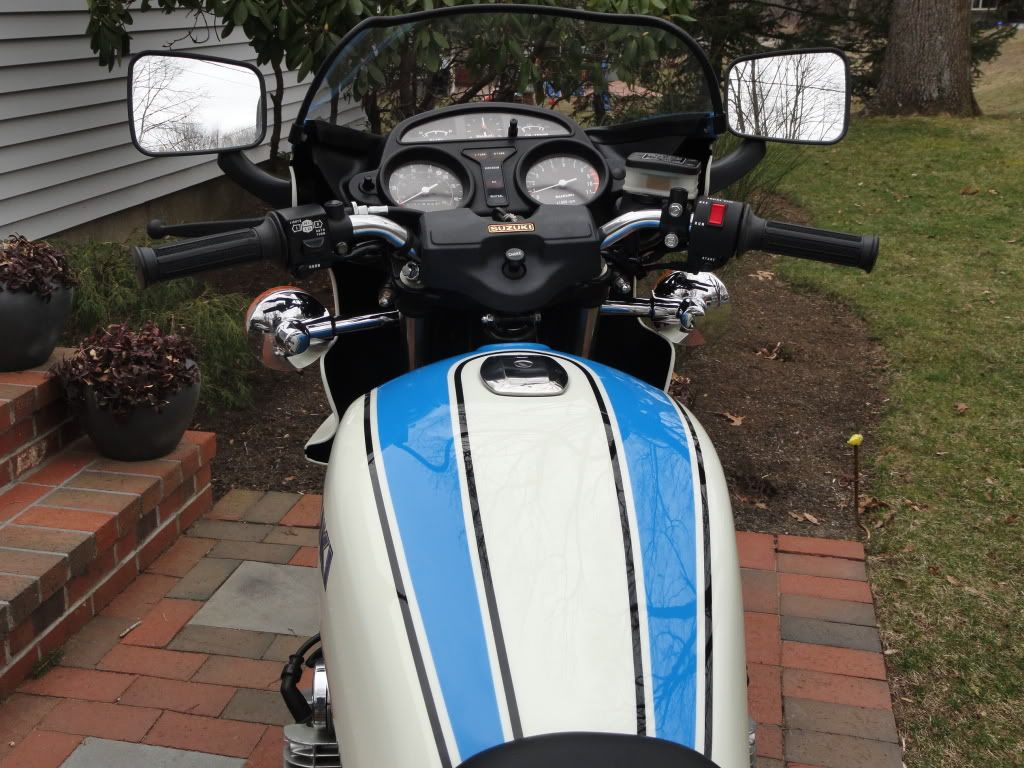
New switches and grips
A little painting here and there (still plenty to do on engine and frame)
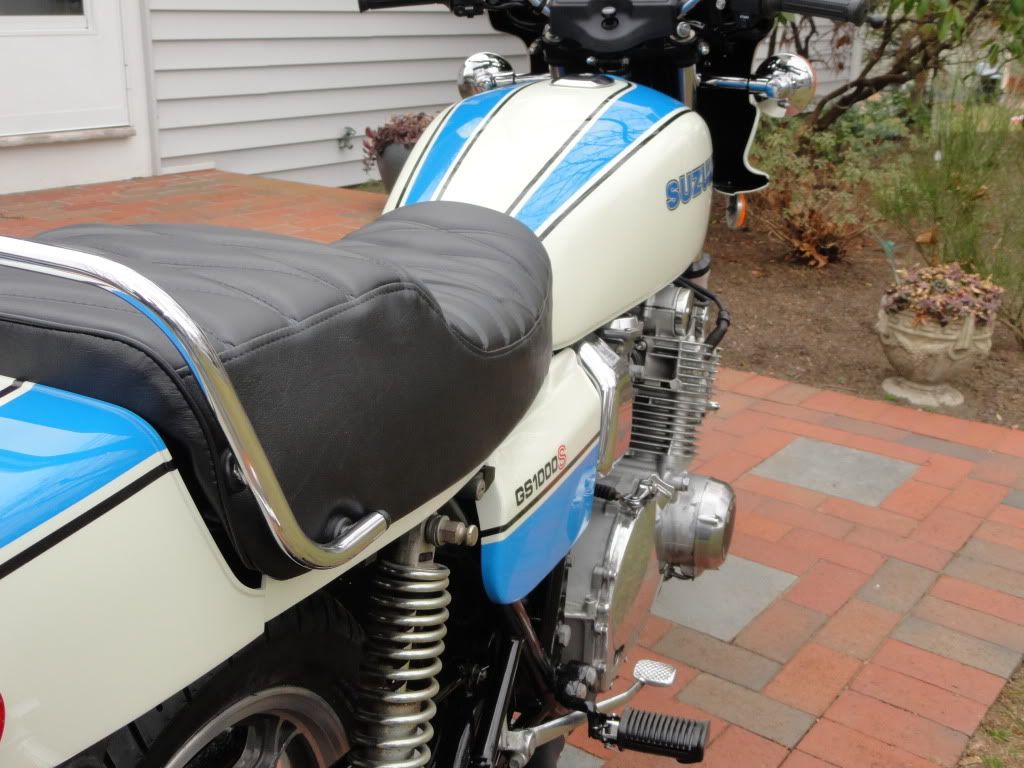
New seat cover
New battery
New front pegs
New tail lens
New windshield
New Yoshimura pipe
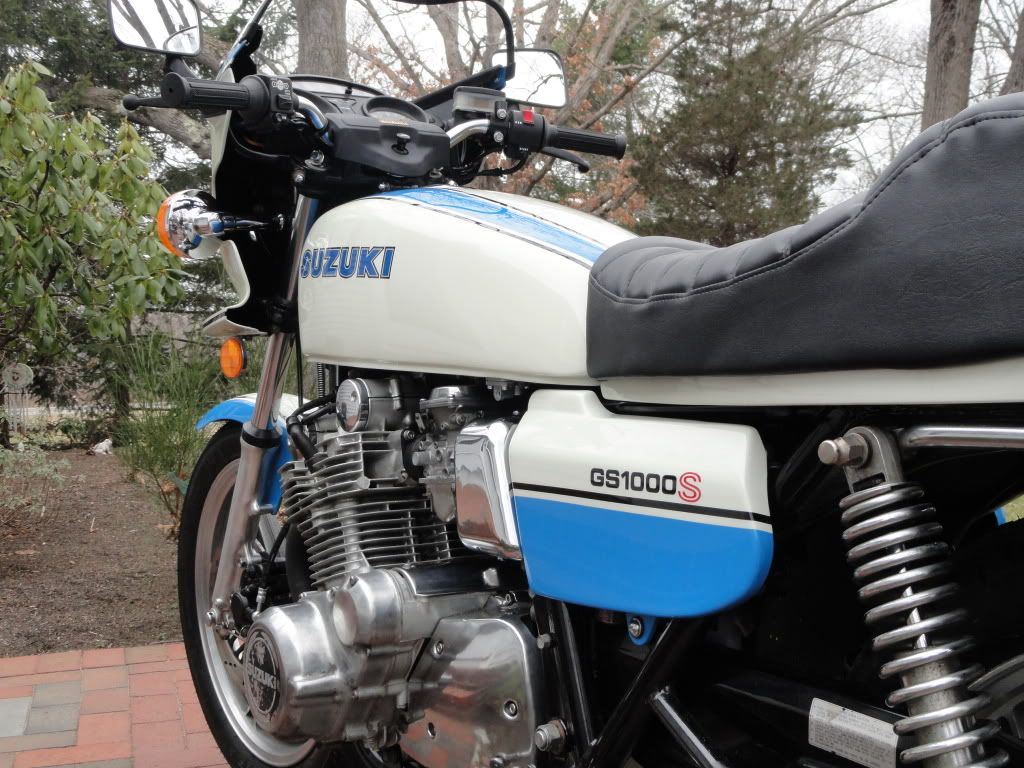
And of course...Paint by Larry
If I find it running well tommorow, I will put the body parts on and go for a ride!!!!
Some of the things I've done over the past few months:
Clutch Cable
All new brake components
New tires
530 chain conversion
New switches and grips
A little painting here and there (still plenty to do on engine and frame)
New seat cover
New battery
New front pegs
New tail lens
New windshield
New Yoshimura pipe
And of course...Paint by Larry
If I find it running well tommorow, I will put the body parts on and go for a ride!!!!
Keep the pictures coming!
Chain changeover go smoothly?
I should have some pictures today.
The 530 conversion was very easy.
Cutting the old chain off took a couple minutes and only one dremel cutting wheel.
I did use the removable clip master link for the new chain. I know it is not ideal, but I didn't want to go the rivet route, at this time.
The only notable change is adding the washer to the outside of the front sprocket.
I compared the old sprocket teeth to the new, there didn't seem to be a lot of wear. However, I was not comfortable with a chain that was sitting for 10 years so I figured I might as well do all the components at the same time.
If all goes well, I plan on firing up the bike tommorow. This evening I put the new Yoshimura pipe on and finished with the rear brakes.
Some of the things I've done over the past few months:
Clutch Cable
All new brake components
New tires
530 chain conversion
New switches and grips
A little painting here and there (still plenty to do on engine and frame)
New seat cover
New battery
New front pegs
New tail lens
New windshield
New Yoshimura pipe
And of course...Paint by Larry
If I find it running well tommorow, I will put the body parts on and go for a ride!!!!
May the luck 'o the Irish be with you today, Vmass. Ride her for a celebratory green beer or 3.

Vroom Vroom
Vroom Vroom
I would like to take this opportunity to thank all of you who made this day possible. Today, I took the bike for a 4.3 mile ride.
Without you, this Suzuki would have been just another washed up bike, that had seen it’s last ride.
It has been a great learning experience and I appreciate all of your help. A special thanks to the traveling GeniuS, who helped me get through a valve adjustment project, as well as various maintenance issues...you know who you are!.
Thank you to my family for understanding that motorcycle projects come before college tuition.
Thank you Ebay.... for allowing me to spend a ridiculous amount of money on both parts that I needed, as well as parts I didn’t need...sometimes you just get caught up in the excitement.
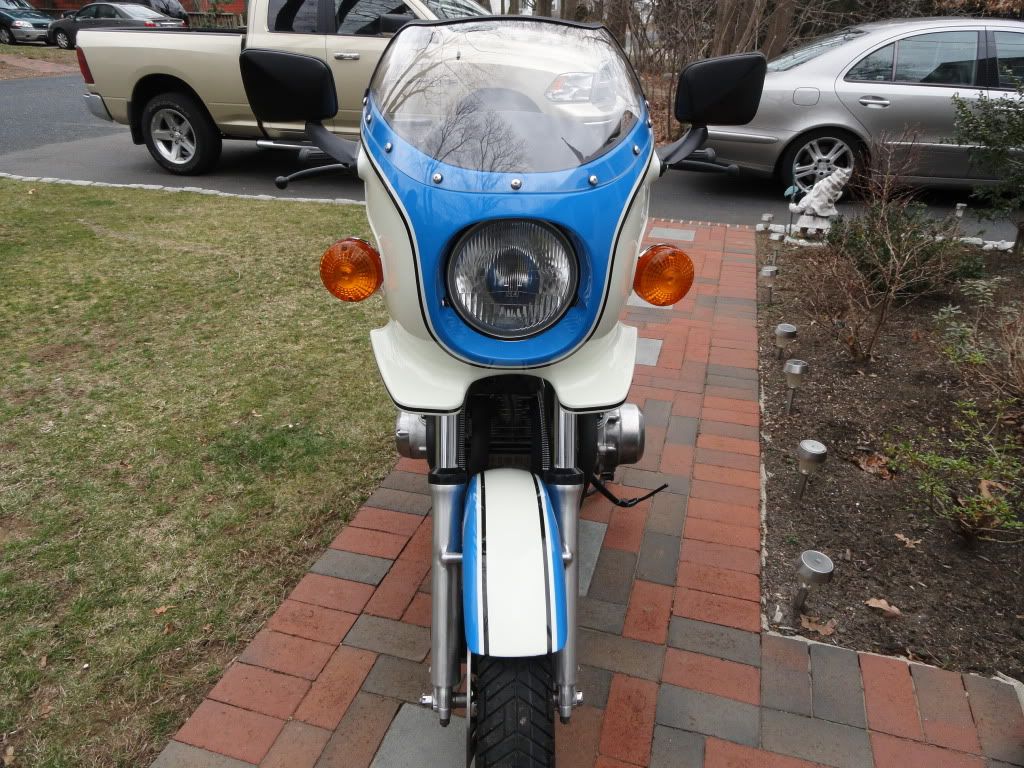
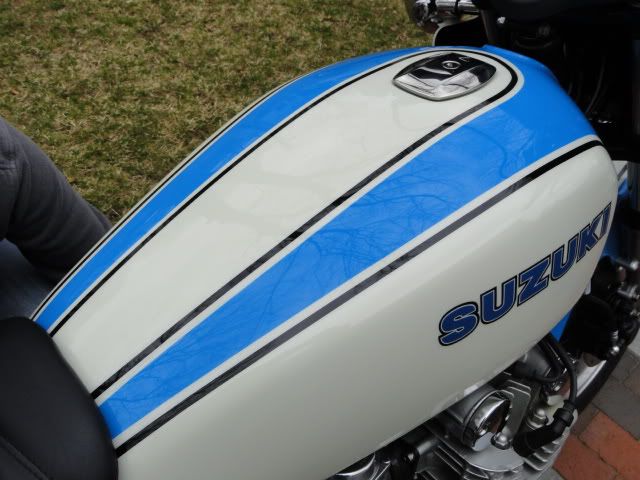
I didn’t write an exceptance speech, I know I am going to forget someone..... It goes without saying, what ties the whole thing together is the spectacular paint work of Larry Pearson. To this day, all I can say is pictures do not do his work justice, you have got to see his work in person to full appreciate it.
I would also like to thank the PO for at least keeping it out of the weather for 10 years and in his basement....that certainly helped a bit.
Thanks to the guy in California who kept several Yoshi pipes in his attic for 20+ years.... what a nice sounding exhaust (I have another NOS Yoshi I might let go).
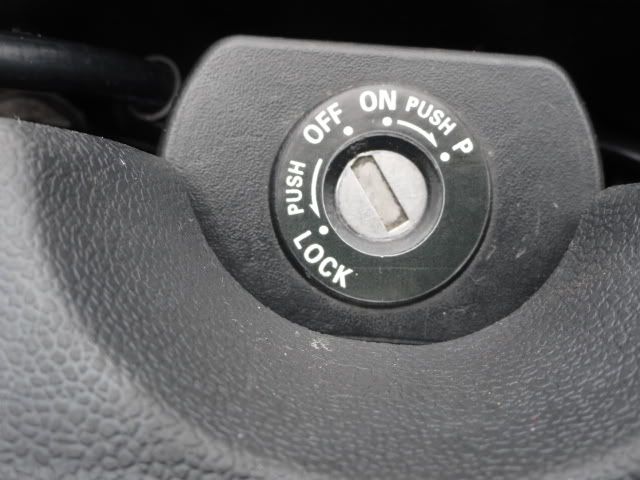
Oh and thanks to Frank....I don’t know how I forgot Frank...without his creativity, I never would have been able to put the ignition key in the right position to start the bike!!
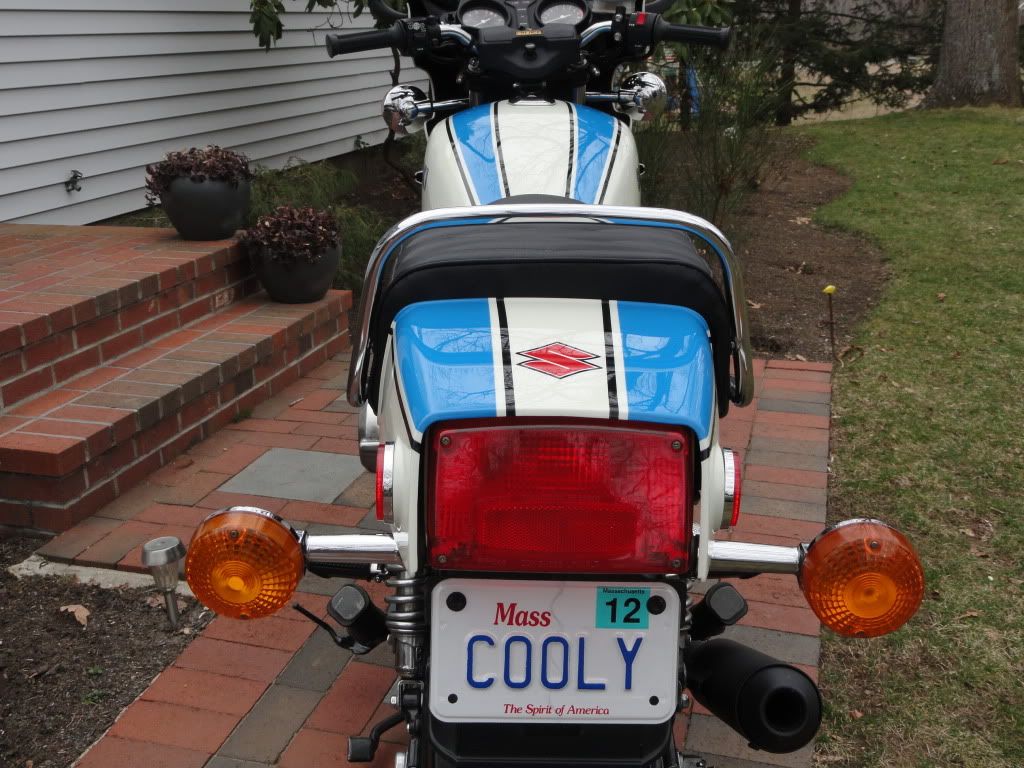
And here it is......:dancing:
Vroom Vroom
I would like to take this opportunity to thank all of you who made this day possible. Today, I took the bike for a 4.3 mile ride.
Without you, this Suzuki would have been just another washed up bike, that had seen it’s last ride.
It has been a great learning experience and I appreciate all of your help. A special thanks to the traveling GeniuS, who helped me get through a valve adjustment project, as well as various maintenance issues...you know who you are!.
Thank you to my family for understanding that motorcycle projects come before college tuition.
Thank you Ebay.... for allowing me to spend a ridiculous amount of money on both parts that I needed, as well as parts I didn’t need...sometimes you just get caught up in the excitement.
I didn’t write an exceptance speech, I know I am going to forget someone..... It goes without saying, what ties the whole thing together is the spectacular paint work of Larry Pearson. To this day, all I can say is pictures do not do his work justice, you have got to see his work in person to full appreciate it.
I would also like to thank the PO for at least keeping it out of the weather for 10 years and in his basement....that certainly helped a bit.
Thanks to the guy in California who kept several Yoshi pipes in his attic for 20+ years.... what a nice sounding exhaust (I have another NOS Yoshi I might let go).
Oh and thanks to Frank....I don’t know how I forgot Frank...without his creativity, I never would have been able to put the ignition key in the right position to start the bike!!
And here it is......:dancing:
Last edited:
G
Guest
Guest
Ok, you suck. That is a dang fine motorcycle, one to be very envious of. Very nice work indeed.
G
Good Times
Guest
Awesome specimen of a Cooley there. Love it. Congrats on finishing the build.
Love it when a plan comes together.
Take a bow.
Take a bow.