• Required reading for all forum users!!!

    Welcome!
    Register to access the full functionality of the GSResources forum. Until you register and activate your account you will not have full forum access, nor will you be able to post or reply to messages.

    A note to new registrants...
    All new forum registrations must be activated via email before you have full access to the forum.

    A Special Note about Email accounts!
    DO NOT SIGN UP USING hotmail, outlook, gmx, sbcglobal, att, bellsouth or email.com. They delete our forum signup emails.

    A note to old forum members...
    I receive numerous requests from people who can no longer log in because their accounts were deleted. As mentioned in the forum FAQ, user accounts are deleted if you haven't logged in for the past 6 months. If you can't log in, then create a new forum account. If you don't get an error message, then check your email account for an activation message. If you get a message stating that the email address is already in use, then your account still exists so follow the instructions in the forum FAQ for resetting your password.

    Have you forgotten your password or have a new email address? Then read the forum FAQ for details on how to reset it.

    Any email requests for "can't log in anymore" problems or "lost my password" problems will be deleted. Read the forum FAQ and follow the instructions there - that's what we have one for...

  • Returning Visitors

    If you are a returning visitor who never received your confirmation email, then odds are your email provider is blockinig emails from our server. The only thing that can be done to get around this is you will have to try creating another forum account using an email address from another domain.

    If you are a returning visitor to the forum and can't log in using your old forum name and password but used to be able to then chances are your account is deleted. Purges of the databases are done regularly. You will have to create a new forum account and you should be all set.

1980 GS1000S Reluctant Rebuild

Very impressive polishing. I would have never thought You'd get it looking that good. Autosol hugh? I'll have to look for some.

cg


Thanks Charlie and FJBJ40 for your kind words, I was surprised how well they came up myself after first seeing them.

That Autosol is an awesome product, it costs a few bucks but that one tube I have has lasted me for 4-5 years or more.

Cheers,
 
It is an awsome product. We use it on aircraft for spinner polishing or anything else that requires a high quality lustre.

Flitz is another great product that returns similar results.
 
The pipes look awesome. Hopefully they will bolt right up. The indent for the brake pedal is going to be in the wrong place but I don't think this will matter.
 
Those are for a 1982 Katana "S" not sure if they would fit a 1980 GS1000S Cooley.
They will not fit without modifying the spacing between outlets 2 and 3.
At one stage I had these on my GS 1000 XP:)
I liked them because the exhaust pipes sit inboard of the frame and not outboard as on the std GS 1000's.
Beware, the sidestand needs to be modified:rolleyes:
GS1000XP028.jpg
 
Dave

Real nice job on the pipes. Curious on what container you used to soak them in evaporust. Did you soak the mufflers as well or just the header pipes?
 
Dave

Real nice job on the pipes. Curious on what container you used to soak them in evaporust. Did you soak the mufflers as well or just the header pipes?

Thanks Mike,
Couldn't find a container suitable to soak the pipes in so I just soaked the short single headers from cylinders #1 and #4.
They just fit into a Rubbermaid bin with a bit of wrangling.

The mufflers were not too bad and I used the polishing/buffing wheel on the parts that needed it, and then finished with Autosol by hand.

On the end caps I used a small stainless brush to clean up the oxidized black paint and it polishes the center part which looks quite good, did the same on the other Cooley set. Thought that new black paint would look too new, so I just cleaned up the existing paint and it looked great so I left it that way.

You can see the end cap in this photo.


Cheers,
 
Great work on the pipes.......... I will be searching for some Auosol. I wonder if it is a similar compound to the old Hondaline polish that is NLA.
 
Beautiful day to work on the bikes in the sun

Beautiful day to work on the bikes in the sun

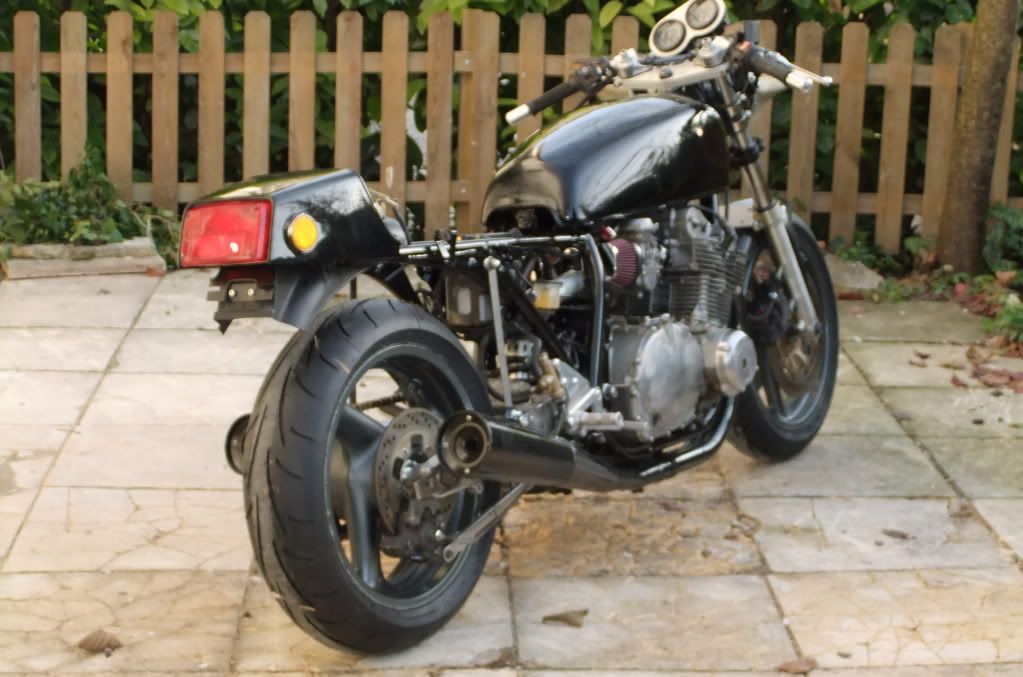
What an awesome day today to get some work done.
I have been concerned that the Boise Beauty was running a bit lean so I finally got to spend some quality time with her today.

First up was to adjust the valves as they had probably never been done.

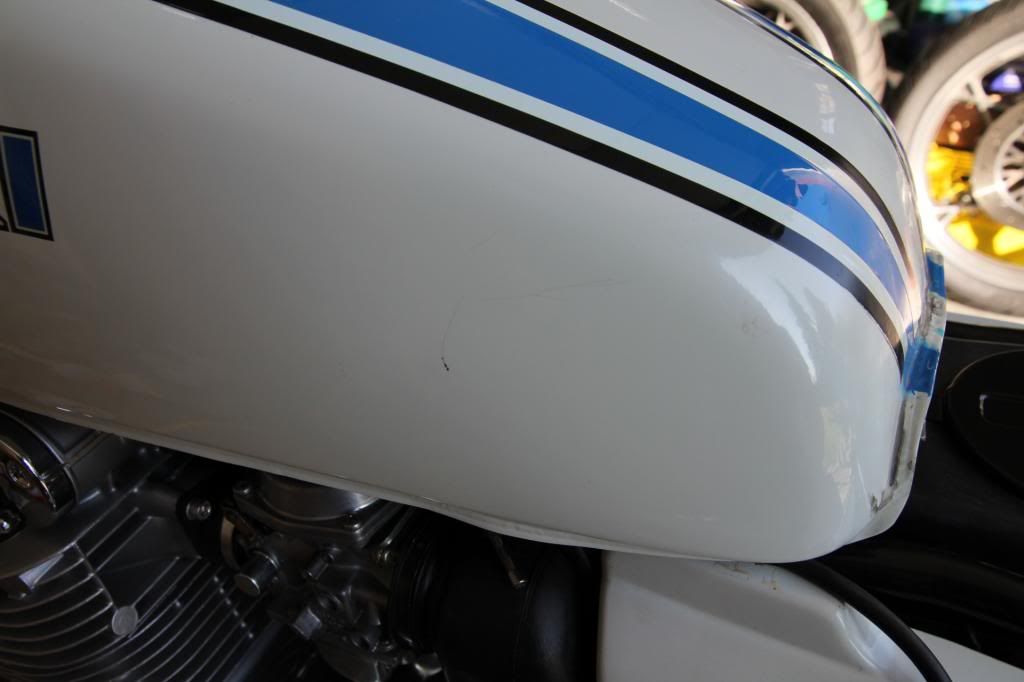
Before I got to the valve job I went to remove the tank for easier access and realised that it's very easy to damage the tank on the seat trim as it's very close when lifting it up to remove the fuel hoses and then pulling it back to remove it from the front rubbers.

Bingo, the lights went on, when I got the bike it had a large fresh scratch on the left side of the tank and the PO thought some-ones buckle may have caused it, I now see how it happened, it matches exactly to the front edge of the seat trim.
They had it in the shop to get it running before I picked it up and based on the sloppy work by Rice & Hogs in Boise, that explains what probably happened. I have polished most of it out and it almost gone but it still shows a bit.

I went ahead and removed the seat as that made it a lot easy to pull the tank without worrying about causing any more damage.


Any ways on with the job, had 3 exhaust valves tight and 1 inlet valve tight. some of the shims were 285 and 275X so very large shims and not much sign of wear.
I had a few that measured .0015" and a couple at .002" which I left as is and the rest were closer to .003 after I adjusted them, fortunately I have now got about 10 -12 spare shims and had exactly what I needed, which is not the case usually for me.
Maybe I will see if I can get those tighter ones up to .003 before I put it back together.
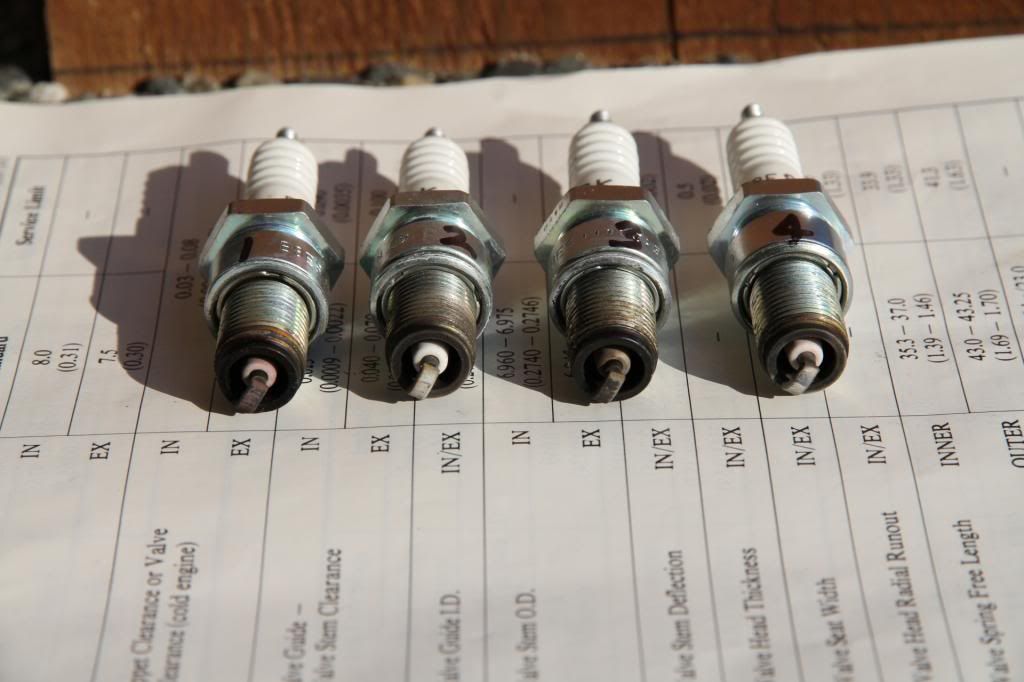
Here's the work sheet I had my 10 year old John helping with, he said this is boring and was having trouble staying focussed, I think he just wanted to get back to the Wii U or what ever it's called, anyway we got it done and he stuck it out for a hour or so as he removed the valve cover by himself and stayed till we cleaned everything up.


Also pulled the plugs to check them, all look very different, I'm no expert but a couple of them look very lean.
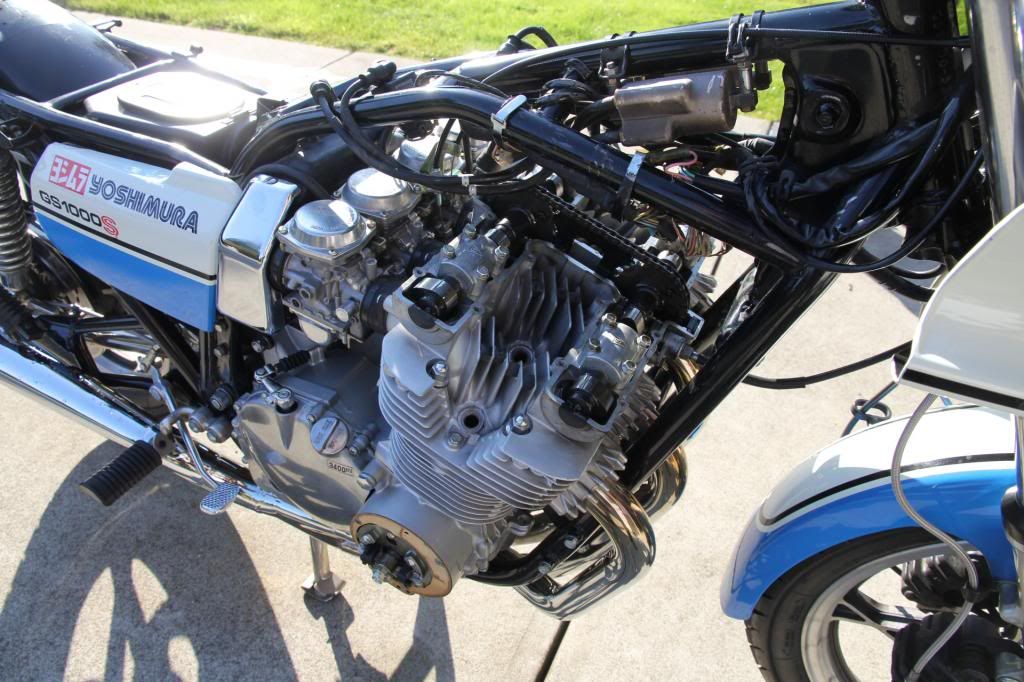
Main jets are 118's and the bike has standard air box but not fully sealed yet, (it came with no lid, which I have now replaced but forgot to buy foam tape to seal it) and a K&N filter, I have replaced the K&N with a stock filter.
The bike has a Bassani 4-1 pipe on it.
Any comments about the setup or reading the plugs.


Check out these interesting rubber plugs in the carbs, not a very good photo, but some-one used an old plugged jet and an o-ring to seal the pilot jet. All four were done the same way. very classy.

 
Last edited:
Carburation Day

Carburation Day

Got to work on the spare set of carbs I got, I finished dipping them, after reading the can and it suggested only 15 -30 mins.:eek:
I read a few of the posts here and some suggested 24 hours, but I did 8 hours on my first one (before reading the label) and then 2 hours each for the rest of them.
I worked outside, with plenty of fresh air as this stuff is pretty strong.


Freshly dipped, then into cold water rinse and then hot water and soap rinse, then blow dry with compressed air. Finally blown out with carb clean and the compressed air again.


They appear to be good and all the orifices are free and the carb clean blows out the correct hole as per the PDF I'm following, so that's all good and I have my o-ring set I received last week, just need one base gasket as one had a home made one that looks like a 5 year old made it at craft class.

I also got a bit of buffer fever and got loose on a few parts, here's a shot when I was about half done.
I tried to buff them enough to get rid of the tarnish but not too bright that it looks like I'm trying to make them look like I'm from Vegas.

 
Great work on the pipes.......... I will be searching for some Auosol. I wonder if it is a similar compound to the old Hondaline polish that is NLA.


Thanks Rich, just checked Amazon and they sell many different Autosol products by the case lot, including one for aluminum.
Here's the Autosol metal polish I use, available from a Canadian Retailer.

http://www.leevalley.com/en/wood/page.aspx?cat=1,43415,43439,67014&p=67014

And if you want to pay more for the same product, try here.

http://www.canadiantire.ca/AST/brow...R~0392954P/Autosol+Metal+Polish.jsp?locale=en
 
Last edited:
Cam Chain Tensioner Rebuild

Cam Chain Tensioner Rebuild

My parts came in yesterday from Boulevard Suzuki and it included a few new parts for the Boise Beauty, there was a new cylinder head cover gasket so I could put the bike back together.
But before I could finish everything I needed to take care of a few maintenance items while I had the bike apart.

My cam chain tensioner on the Boise Beauty was leaking oil, maybe it was from the base gasket or the o-ring on the threaded locking screw, so I pulled it off and spent an hour degreasing it and cleaning it up.

Didn't take a before picture but I got one of the cleaned up unit.


Here is a picture of the old o-ring, looks a bit suspect.


I had a spare o-ring and a base gasket, so I replaced both.


Funny how a small job can escalate, because I needed to get the cam chain tensioner off it makes sense to pull the carbs, while the carbs are off it makes sense to rebuild them.
Luckily I have a spare set of O-rings from Robert Barr so I guess I'll do that as well.

Not sure why I get so carried away but sometimes I just don't know when to stop, guess I love pulling stuff apart just to see what I'll find.
Unfortunately I usually find something that makes it worth pulling it apart.

I'm very pleased that the Boise Beauty has been well looked after and I have found very few issues with this bike, almost all the bolts and screws are perfect and very little evidence of shoddy workmanship. :D
 
Last edited:
Carb Rebuild

Carb Rebuild

So today my goal was to get the Boise Beauty carbs refurbished.

Here they are before I started, pretty clean so not too much work I hope.


As this is my 3rd set of carbs that I'm rebuilding in just a few months, I felt pretty confident going into it.

It helps that I've got a great set of screw drivers I purchased for these carbs, Vessel JIS drivers and Wera Flat blade 5.5 mm and 4.0 mm drivers really help to keep the screw heads in nice shape and can remove very stuck screws no problem.

Just 2 months ago I was looking to farm this work out, but now I'm hooked.

First I needed to put the spare set of carbs aside as I'm still waiting on some parts for those, here they are all nice and polished and packed up.


I got stuck in and started breaking them down which went pretty well until I needed to remove the needle jet sleeves, the first set I did came out by wiggling and pulling with my fingers, the 2nd set needed pliers and this set, nothing seemed to work.
I finally got out the MAP Gas and heated up the brass sleeve and that worked like a charm, out she came with the pliers, being careful not to deform the shape, all 4 needed heat, they were very gummed up.

Even though these carbs looked very clean and the PO had taken the bike in for a service to get it running before I picked it up, they paid $250 for the carb service IIRC, plus a bunch of other maintenance items and the bill was about $500, looks like everything they worked on needed attention including a non existent carb rebuild. These carbs were worse than either of the previous 2 sets I've worked on, I'm surprised that the bike ran as well as it did.

Once I got going I figured out a system, while one carb was in the Berrymans dip I'd rebuild the one that just came out, I was leaving them in the dip for 1 hour which was enough time to clean one in simple green to get ready for the dip and then polish some parts and assemble the one just out of the dip.
Almost got done but needed to stop for dinner while the last one soaked, so I will finish final assembly tomorrow.
I borrowed a few parts from the spare set as I needed some rubber plugs for the pilot jets and the polished top caps.

Here is one showing off the shiny parts.


Hopefully I can get them back on the bike tomorrow and see if it runs any better.

Still need to buy one of those handy offset 90 degree circlip pliers to adjust the needles.
 
Last edited:
Throttle Linkage Connection

Throttle Linkage Connection

Dang :mad: Thought I would know by now, got the carbs re-installed and forgot to reconnect the throttle cable to the linkage before I'd tightened everything down.
I tried turning the linkage to bring the connector up to horizontal but the #3 carb boot is in the way, tried from underneath which almost worked but limited working space and my patience was running low by this time and thought it best to take a break.

Looks like I need to pull the carbs off and these ones are "Tight like a Tiger" (as Gold Member would say)

How many times I did this on the Canadian Cooley and not a big deal as I had new boots on both sides and they came off and on without too much grief. Not this one though.

Oh well back at it, I'll report in later when it's done.
 
Plenty of work not much progress

Plenty of work not much progress

Well today was a strange day, I felt fine but was not on my game, probably tired from getting up at 2AM to watch the Australian GP.

I could not get anything done without doing it 2-3 times, finally got the throttle cable on and bolted up and then realized that I'd not connected the fuel hoses or the drain hoses to the carbs, once I got them connected with great difficulty, I noticed I had the choke assembly installed wrong.

Removed the carbs and fixed that, I don't remember making those rookie moves on my first set of carbs, guess I was a bit too comfortable and wasn't paying attention.

I was not done yet, got the carbs back on and forgot to attach the cables again, $hit, well this is one way of getting practise.:D

Got it all bolted up and double checked everything and then I rolled the bike out of the garage to see if the valve adjustment and carb rebuild made any difference to the slow warm up and the need to keep the choke on for at least 2-3 minutes.
Well, I turned the key, pulled in the clutch and pushed the starter, the starter motor turned the engine over for about 3-4 minutes before slowing as the battery got low and it would not start and I finally flattened the battery, not even a pop, so couldn't test my work. What a big bummer that was :(

I'm done for today, not sure what is up with it, I'll probably lay awake thinking about it for half the night.

Edit, maybe it was a good thing it didn't start, perhaps the bike knew better than to let me get on it and ride considering the day I was having.

Here is a photo of the completed carbs with the tools I used, before everything went pear shaped.

Edit* can you spot the choke linkage connected to carb #3 instead of carb #2? Clue, go back to post #295 to see it before disassembly

 
Last edited:
Just a daft question, did you make sure you had fuel in the carbs before/during starting, because the prime position on my S' does not function properly and I have to attach a pipe to it and give it a manual suck to get the fuel to flow.
The cure is to renew the fuel tap, but I haven't.
 
Just a daft question, did you make sure you had fuel in the carbs before/during starting, because the prime position on my S' does not function properly and I have to attach a pipe to it and give it a manual suck to get the fuel to flow.
The cure is to renew the fuel tap, but I haven't.

Yes, turned it to prime and I did check and had fuel in the bowls.

Not sure what is up with it, probably something simple, I'll check that I have spark tomorrow and then may have to pull the carbs to see what hair brained thing I messed up.
 
Awesome rebuild man! Very impressed.
Got off to a rough start, but it's a thing of BEAUTY now!
:clap:
 
Back
Top