• Required reading for all forum users!!!

    Welcome!
    Register to access the full functionality of the GSResources forum. Until you register and activate your account you will not have full forum access, nor will you be able to post or reply to messages.

    A note to new registrants...
    All new forum registrations must be activated via email before you have full access to the forum.

    A Special Note about Email accounts!
    DO NOT SIGN UP USING hotmail, outlook, gmx, sbcglobal, att, bellsouth or email.com. They delete our forum signup emails.

    A note to old forum members...
    I receive numerous requests from people who can no longer log in because their accounts were deleted. As mentioned in the forum FAQ, user accounts are deleted if you haven't logged in for the past 6 months. If you can't log in, then create a new forum account. If you don't get an error message, then check your email account for an activation message. If you get a message stating that the email address is already in use, then your account still exists so follow the instructions in the forum FAQ for resetting your password.

    Have you forgotten your password or have a new email address? Then read the forum FAQ for details on how to reset it.

    Any email requests for "can't log in anymore" problems or "lost my password" problems will be deleted. Read the forum FAQ and follow the instructions there - that's what we have one for...

  • Returning Visitors

    If you are a returning visitor who never received your confirmation email, then odds are your email provider is blockinig emails from our server. The only thing that can be done to get around this is you will have to try creating another forum account using an email address from another domain.

    If you are a returning visitor to the forum and can't log in using your old forum name and password but used to be able to then chances are your account is deleted. Purges of the databases are done regularly. You will have to create a new forum account and you should be all set.

1981 GS450E Rebuild

  • Thread starter Thread starter Guest
  • Start date Start date
I know what you mean there Woodsy, I moved up from a Honda Rebel 250 to this, and yeah, those 200cc's are good! :)

I'm planning at the moment to find a flat seat to replace the stock pan and get some custom pipes made up along the Triumph Scrambler style... budget and time will dictate how far I go along that path though...

Mind you, I like the concept of what you have there, could be a good design for a solo...

Anyways, house mate brought me home a present tonight:


One circlip in and oil pump is done. Clutch time!

Clutch basket on:


And the hub sleeve (excuse me if my terminology isn't 100% here):


Nut torqued up and washer folded up:


Plates and bearing installed:


And finally drive plate installed, and springs in with bolts and tightened down:


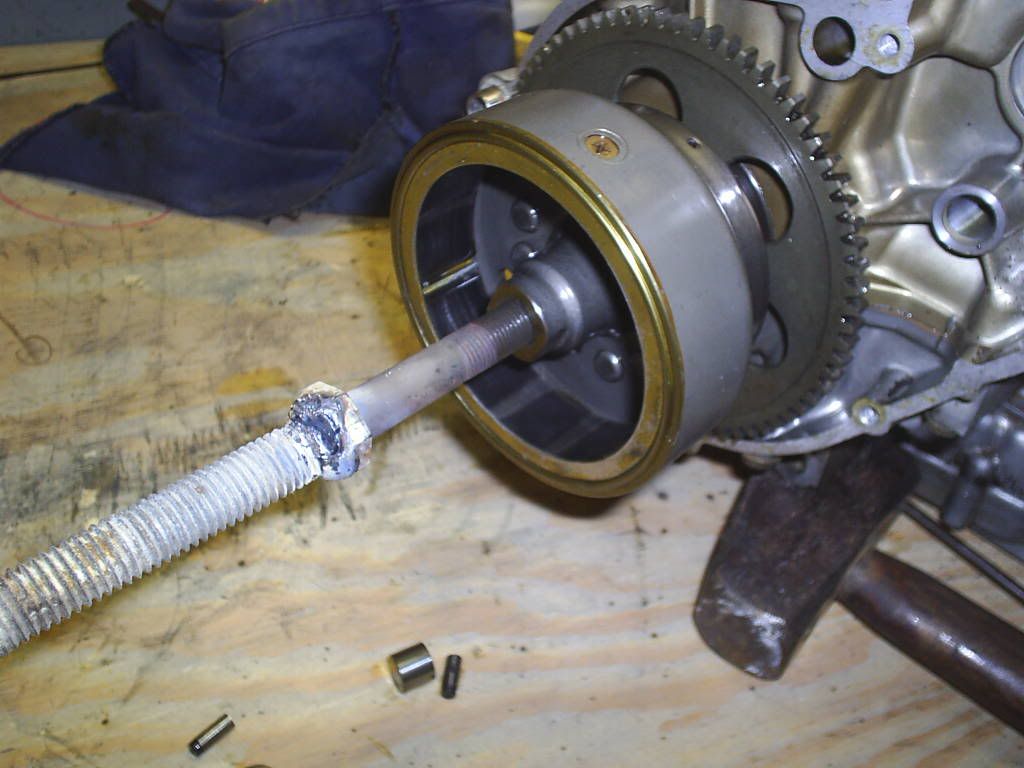
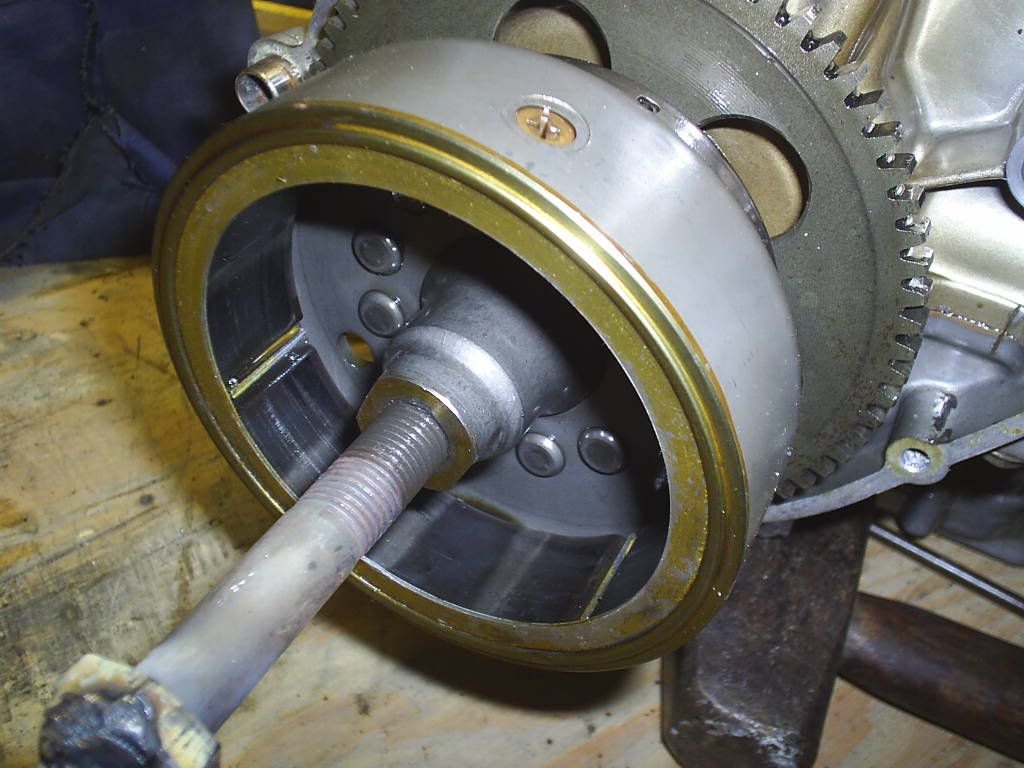
And you can see the left half of the push rod on the other side also:


That was actually quite painful, cleaning each clutch plate and giving them an eyeball, then getting them in and then the bolts done up. Ended up rather tedious and time consuming, but of course well worth it.

So, next up I need to start cleaning the pistons ready to go on and I still haven't heard about my cylinders and head, so will have to give him a call tomorrow.

Still waiting for my rings to show up too, although not much I can do with them until the cylinders are back and I've given them a hone.

I also need to start back on cleaning up and polishing the engine case covers as once the cylinders and pistons are on, it can go back in the frame and some of the covers can go back on.
 
Pete,
I just want to say you are doing a great job and thanks for posting your progress. I don't need to tear into my 450 yet but this is all good reference for when the day comes. :)
 
Cheers Kevin! Let's hope you don't need to tear into it any time soon, you have a very nice example of a T there already :)

Very glad to post up as much info and pic's as I can as I feel like I'm contributing something back to the people on here in return for all the great help I have gotten so far and will need down the track.

I have noticed a lack of these sorts of threads for the twins, so hopefully this will help others beyond just being another thread to read.
 
Hey Pete,

Are those new clutch friction plates? If so, you need to soak them in oil (overnight is best) or else the clutch won't work properly.

Just checkin' :-\\\
 
Cheers for the tip there Hillsy, but they're the old ones. Good to know for when I do replace them though, as I'm sure I will at some point down the track, otherwise I won't be riding it enough...

I did think about replacing them while I had it apart, but I had no issues whatsoever with the clutch when it was running so I figured a clean up would do for now so I could budget for other things that really need replacing. Guess I'll just have to wait and see when it runs...

And nothing done tonight, work intervened.

New technology and configuration + almost no testing + firmware upgrade means my phone was bound to ring tonight, so just finished working a little while ago and ran out of time to do anything on it tonight.

My rings arrived today (no pic's yet), so that was nice, and I also called the guy at Jimboomba with the cylinders and head and he hasn't got to them yet, but they won't be far away. Apparently he was blasting until 10pm last night on a difficult job, so he's dedicated! I know how he feels too...

Anyways, that's about it until (hopefully) tomorrow night when I can get down there again and make sure the rings are good and I can get the pistons cleaned up and on.
 
Rightio... I did do some stuff last night but I slept in this morning and rushed and didn't post an update.

So, one pair of piston rings:


And one left piston that needs some cleaning:


The right piston is pretty much in the same shape.

So, rings off, and I kept them in the right order top to bottom to ensure I get the new ones on the right way:


So, after lots of scraping off carbon, cleaning with kero, more scraping off carbon, they looked like this:


Basically I ran out of time and patience last night to finish getting the carbon off them. I'm not trying to make them perfect, but I'm trying to get most of it off without scoring the surface.

So, now on to tonight's work, and unfortunately I just got stuck in and didn't actually take any progress pic's, just some at the end.

Basically, I finished getting as much carbon off as I could, then I removed the remaining circlip off each piston and gave them a final going over with kero to make sure they were all clean.

Then I got the rings on, and if you're going to do this at some point, here's a tip. The image in the Clymer manual seems to indicate the rings are a different shape for the top and middle, but they both were identical shapes in the packet. The difference I found is that one has what looks like a chrome ring around the very outside, whereas the other doesn't. When I compared this with the old rings, the one with chrome was on top, so that's what I stuck with. It was also really hard to make out the "R" on the rings with the chrome strip, whereas it was plain as day on the other one.

Anyway, so I got a new circlip on the inside side of both pistons, put some engine oil on the rod, piston, and piston pin.

Popped the pistons on and slide the pin home, which required very gentle tapping with a rubber headed mallet and it was nice and easy.

Then I installed the outside circlips and the pistons were all done.

If you read the tip in the Clymer manual for installing the circlips, it makes it much easier. I tried first off with long nose pliers, but was driving myself round the twist trying it that way. I found the Clymer way of pressing it in with your fingers, then I was able to use a very narrow flat head screwdriver to lever the other open end of the circlip into the slot and then slide it all home quite easily.

That probably won't make sense but it's the best I can describe it...

Anyways, so both pistons installed, and note that as I said the pistons aren't perfectly clean, but as good as I could get them without scoring the surface:

 
Now I hit a BIG problem.

When I first started dismantling, the Haynes manual indicated I should remove the alternator rotor, so I attempted to do so. This is the second time the Haynes manual has led me astray as the Clymer says if you need to do this, take it to a dealer.

Anyway, long story short, using the method in the Haynes manual of putting a metal dowel inside the alternator rotor thread to use as a pin to screw in a wheel axle and lever it off resulted in me getting the metal dowel jammed down in the thread of the bolt. The damn thing wasn't quite large enough diameter! And of course I'd gone past the point of no return before I realised...

So, I now need to go get myself a slide hammer to try to get the alternator rotor off, as that's the only way I'm going to get that bit of metal out. As it's jammed in the thread, I can't put the alternator rotor bolt back in which is going to be quite dangerous if that rotor spins with no bolt to secure it...

Look closely and you'll see what I mean:


Fun fun fun... not.

There is a small hole in the middle of that piece of metal (it was so long ago I can't even remember what it is), so I tried an easy out, but it was getting to the point of flexing the easy out so I gave up on that approach. Last time that happened it broke off and it was a nightmare getting it out again.

I considered a left handed drill bit, but I don't want to get metal shavings stuck inside the alternator rotor.

So, here's where it sits now with the pistons installed:


And I need to share two tiny images I received via SMS from the guy doing the blasting...


Apparently the alloy is quite hard like the alloy Ducati uses so I expect the price will end up a bit higher, but man they look good! My cylinders should have been done today also, so now just waiting for a price so I can pay him and get them couriered back.

So that's about it, although if anyone has any tips on getting that rotor off that would be grand...
 
Uhoh.
You were right, Pete.
I stop and you make progress, I return and you hit a wall.


Which one do you want to be?
Yin or Yang?
 
OK Pete, first things first. What are you doing up at 12.06am in the morning.

Second thing, what's with white sealer on a black motor, haha.

Now seriously I do have a solution to the rotor nremoval. I made a slide hammer (literally a hammer) as you will see. I don't know if your rotor thread is the same as mine. But all youe need to do is buy a bolt of the appropriate thread, slide a heavy weight onto another very long, large bolt (preferrable about 5/8" thick), weld the small bolt to the large one as shown in the illustration.

Any questions, get back to me.

As a matter of point, I was unable to remove the rotor using the slide hammer in the conventional manner. As my rotor had ben Loctited to the taper on the crank and would not let go. So I moved the hammer head to the far end of the 5/8" bolt and a couple of whacks with the back of the axe and it came right off.

Puller1.jpg


Puller2.jpg


Puller4.jpg


Slidehammer.jpg


The factory tool. A bit more professional than my tool, but my bodged up slide hammer did the job. If you get desperate and my slide hammer fits your bike I will post it up to you for a loan.

Good luck.
 
Uhoh.
You were right, Pete.
I stop and you make progress, I return and you hit a wall.


Which one do you want to be?
Yin or Yang?

I'll take Yin... coz it rhymes with Gin... and I'll have two shots of Bombay Sapphire with a hint of dry vermouth shaken, not stirred, and served with a Sicilian green olive thanks :D

OK Pete, first things first. What are you doing up at 12.06am in the morning.

Second thing, what's with white sealer on a black motor, haha.

Now seriously I do have a solution to the rotor nremoval. I made a slide hammer (literally a hammer) as you will see. I don't know if your rotor thread is the same as mine. But all youe need to do is buy a bolt of the appropriate thread, slide a heavy weight onto another very long, large bolt (preferrable about 5/8" thick), weld the small bolt to the large one as shown in the illustration.

Any questions, get back to me.

As a matter of point, I was unable to remove the rotor using the slide hammer in the conventional manner. As my rotor had ben Loctited to the taper on the crank and would not let go. So I moved the hammer head to the far end of the 5/8" bolt and a couple of whacks with the back of the axe and it came right off.

The factory tool. A bit more professional than my tool, but my bodged up slide hammer did the job. If you get desperate and my slide hammer fits your bike I will post it up to you for a loan.

Good luck.

Don, that's great ingenuity there!

It was only 11.06pm up here :D

I haven't had a chance to get out and look at slide hammers yet, but so far all I can see are ones mainly designed for panel beating. I'd hate to see the price of the genuine tool!

I have seen a couple of kits advertised that might be ok and may clamp onto a bolt of the right thread size. Sort of along the lines of what you fabricated there without the welding.

I'm going to be a little out of action this weekend as the outlaws are visiting tomorrow which is always... well... an entertaining experience shall I say? But aside from that, I'll see what I turn up, otherwise your offer of posting it up for a loan could be a godsend. I'll have to check the thread sizes.

Oh, and as for the white sealant... yeah... not much choice there I'm afraid :rolleyes:
 
Actually I just had a thought... the rear axle fits the thread.

I wonder if it would be too hard on the axle to do what you've done there but just with the axle? And if not, would there be enough leverage with the length of the axle? Mind you, if I have to hit it with something (like you did with your axe), that may not matter. I do have a mini sledge hammer...
 
And apparently I enjoy replying to my own thread so much I'm doing it again... but this time with a bit of an update.

So I took a detour from the work side of things tonight to get a bit organised.

Seeing as I'm getting close to putting side covers on, I thought I'd organise my stainless bolts from Z1 so I don't have to go hunting while I'm trying to assemble.

All laid out neatly ready for selection:


And these are what are being replaced (amongst others):


Seriously, if you're doing your case covers for any reason, or a rebuild, you want the allen head bolts, those philips just plain suck.

Anyway, compared the stainless with the existing screws and the online fiche from Alpha Sports and I managed to group almost all of them nice and easy:


I got all bar 12 labelled ready to go. Two of the others I'm pretty sure are the starter cover, the other two I'm not sure on, and there's 8 counter sunk head ones that I have no idea on at the moment. If anyone's done one of these kits and knows what they're for, feel free to chip in...

Anyway, the guy from Specialised Blasting Services called today to tell me the cylinders are now done as well as the head, and it ended up a bit more than I expected at $219 but I'm not complaining as you'll see below. Apparently the alloy in the Suzuki motors is much harder and heavier than he expected (like a Ducati), which is why it took much longer. The blasting process is non-abrasive, so it takes time to work it apparently.

Anyways, here's some pic's he kindly emailed me today, before and after:


And a couple with the head on the cylinders:


I'm totally impressed with how they look in those pic's and cannot wait for them to get here so I can drool over them in the flesh!!!

The only down side to how good they look is that it will make my crank cases look crap, but at least if I can get all the case covers polished up nice and shiny it might distract from that a little. We shall wait and see.
 
Yeah I'm still amazed myself and I haven't even seen them yet!

If my crank cases weren't together ready to roll I'd be seriously thinking about sending them, but I think the price would kill me...
 
Hmm, maybe not because there is alot of detail in the cylinder and the head, the crankcase is pretty straight forward.... But its already together.
 
Bloody hell, Pete, they look swish. $200's not bad for a blasting job like that.
You better get that polishing arm busy on the cases.

I think you should print a photo of Simon's Thou and pin it on the shed wall.
Every time you think you are finished, look up at the photo and start again.
 
Hmm, maybe not because there is alot of detail in the cylinder and the head, the crankcase is pretty straight forward.... But its already together.

True, he did say the head was quite fiddly (as well as the harder alloy), which is why it took a lot longer than he thought it would. He guessed at 30 min's, but it actually took more like 50 min's. He also did me the courtesy of calling before he started the cylinders because it was going over time due to the head.

But I still aint' pullin' the cases apart again :rolleyes:

Come on Pete you want to take it all apart again,I know you do.(jk):D

Yeah yeah I know you want to fly over and help :p

Bloody hell, Pete, they look swish. $200's not bad for a blasting job like that.
You better get that polishing arm busy on the cases.

I think you should print a photo of Simon's Thou and pin it on the shed wall.
Every time you think you are finished, look up at the photo and start again.

Definitely! I'm absolutely stoked at the result, especially considering how it was before! I'm itching bad to get them puppies onto the bottom end.

I have this ready and waiting for my polishing, which is why I can't do it at night (too loud):


And one of the best tools I've put in the garage is this:


It's ancient and slow but it's extremely handy being able to do a quick forum search or look at stuff while working away. The Alpha Sports fiche is permanently on the screen these days.

This will make it very easy to have Simon's bike right there in front of me...
 
I really should get myself a bench grinder one of these days.
Clamping the drill or angle grinder into the vice probably isn't such a good thing.
 
Back
Top