• Required reading for all forum users!!!

    Welcome!
    Register to access the full functionality of the GSResources forum. Until you register and activate your account you will not have full forum access, nor will you be able to post or reply to messages.

    A note to new registrants...
    All new forum registrations must be activated via email before you have full access to the forum.

    A Special Note about Email accounts!
    DO NOT SIGN UP USING hotmail, outlook, gmx, sbcglobal, att, bellsouth or email.com. They delete our forum signup emails.

    A note to old forum members...
    I receive numerous requests from people who can no longer log in because their accounts were deleted. As mentioned in the forum FAQ, user accounts are deleted if you haven't logged in for the past 6 months. If you can't log in, then create a new forum account. If you don't get an error message, then check your email account for an activation message. If you get a message stating that the email address is already in use, then your account still exists so follow the instructions in the forum FAQ for resetting your password.

    Have you forgotten your password or have a new email address? Then read the forum FAQ for details on how to reset it.

    Any email requests for "can't log in anymore" problems or "lost my password" problems will be deleted. Read the forum FAQ and follow the instructions there - that's what we have one for...

  • Returning Visitors

    If you are a returning visitor who never received your confirmation email, then odds are your email provider is blockinig emails from our server. The only thing that can be done to get around this is you will have to try creating another forum account using an email address from another domain.

    If you are a returning visitor to the forum and can't log in using your old forum name and password but used to be able to then chances are your account is deleted. Purges of the databases are done regularly. You will have to create a new forum account and you should be all set.

1985 Suzuki GS700EF

  • Thread starter Thread starter tejasmud
  • Start date Start date
T

tejasmud

Guest
Well, the bike is a ?85 GS700EF (California Version) from what I can tell given the gas tank, and labeling inside the left frame cover. Here are a few pictures of the bike before. She is in decent shape, but in need of a major makeover. I?m thinking about switching to the red original graphics, but have not fully decided yet.

6xudmc.jpg


o5utzk.jpg


Instead of the before/after pictures on everything the thread will progress through putting the bike back together. I didn?t really take many before pictures, but if one can imagine a bike that has been kept outside for 23 years uncovered, it pretty much describes the picture.

First thing was to disassemble the bike to the bare frame then it was escorted to the carwash, and scrubbed thoroughly to clean off any oil and residue. This took a good full day to break the bike down, wash, and sort the parts into 100 projects.

The next process involved sandblasting the frame to remove the factory paint, and carefully grinding down the welds slightly that were excessive including all splatter beads. Now, the welds were not ground down completely to blend in, sacrificing the frames strength, just cleaned up in a few spots where welds extended beyond the joints along the tubes and where extreme build up was observed. Another full day in this process, and as a ?do-it your selfer? I had sand in my britches worse than any beach I have ever been too.

Here is a picture of the frame after powder coat. Satin black and the cost was $150 USD. Dropped off at noon and picked up at 5pm. I had another quote at $250.

IMG_2116.jpg
 
The 100 project list mentioned before? Not really 100 projects yet, but sure seems like it.

All the metal pieces that were originally painted black including engine brackets, battery box, torque arm, kick stand, electronics mount, tail section parts, and fork lowers were bead blasted and repainted satin black as well.

One project included the complete rebuild of the front dampeners/forks. Parts ordered for the rebuild included, Progressive springs, Leak Proof seals, upper guides and lower bushings, both sets of piston rings, valve locks and springs, fork bolts and copper gaskets, dust seals, o-rings, and spring seats.

IMG_2040.jpg

 
The spring seats that go in the top of the fork tube, which are held in place with little wire ID clips were rusted into place. The method of extraction included boring a hole through the center, and turning them out in a lathe. The surface of the ID of the fork tubes just above the spring seats on each fork tube was in pretty bad shape as well, and was cleaned up during the lathe work. Instead of going back with the wire clips, which the OEM were discontinued, internal snap rings were substituted, and the specified grooves were also cut while in the lathe.

IMG_2049.jpg

 
Instead of going with the anti-dives on the forks block-off plates were made. Here are a few pictures of the process. 3/8 inch aluminum plate was used for fabrication.

IMG_2024.jpg


IMG_2023.jpg


IMG_2028.jpg

 
New wheel bearings were installed in both front and rear rims.

IMG_2037.jpg
 
Now for this bike I decided it was going to be primarily a red-light to red-light bike, not much of a touring bike for the most part, and if needed I can bump up the front sprocket a few teeth easily enough. OEM sprockets on this machine were 14t front and 45t rear. In the front I have gone with a 12t acquired from Sprocket Specialists, and going with a 47t rear purchased from a local supplier, PMP Sprockets in Wylie, Texas. Kim at PMP is awesome to work with, if there is a rear sprocket for any machine that seems unobtainable. Just call her up, and if they don?t have a pattern you can send yours in, which I have done with a few bikes. Not sure if they can do off-set sprockets, but I bet they can.

Top View
IMG_2133.jpg


Polished Hub
IMG_2135.jpg


New Hardware
IMG_2137.jpg
 
The swing arm was stripped of clear coat, and as Stock was anodized on this bike. Sort of makes a bit of work to polish it out, but 100 hours of sanding, mini sst wire brushing with a dremil tool and polishing it nice and sparkly.

IMG_2139.jpg


IMG_2185.jpg
 
The rear shock was broken down, cleaned, and the spring was bead blasted and painted red for appearance. The dampener and pre-load controls were also disassembled, cleaned, painted, and lubed.

IMG_2181.jpg
 
On the handle bars decided to go with black anodized Vortex clip-ons. For the top caps on the fork tubes I made some with a couple of black anodized plugs I had in the garage. Turned them down and added an o-ring groove to keep water out of the tubes where the snap ring and upper spring seats are for the forks.

IMG_2178.jpg


IMG_2171.jpg
 
Now we have a rolling chassis. New tank and frame cover cushions. The stainless fasteners and washers were ordered through Bolt Depot. There are a couple of specialty OEM fasteners on order like the steering head center bolt and triple clamp bolts, but soon enough.

Here is where I left off Sunday morning.


IMG_2179-1.jpg


IMG_2186.jpg
 
Last edited:
Awesome job..that rear shock is trick! I would like to do that to mine in yellow, do you have some pics of the break down...luvin this, someone doin the same project...I'll be watching this one daily! BRAVO ! :clap:
 
Very nice, top quality work and attention to detail is first rate. I will be a regular viewer here, that's for sure.

Ps:
If you aint using that lighthouse on the front, can i have first dibs please? Lol
 
I noticed you replaced the locking clips on the rear sprocket, I couldnt use mine due to the Vortex having recessed bolt holes. Hopefully not an issue down the road what do you think?
 
Yea, Dan....fork braces!

Naw, I seen the thread a day too late. Really don't venture too far from the tech forums. I will end up purchasing from them direct possibly, it would have been good to get in, but all is cool.

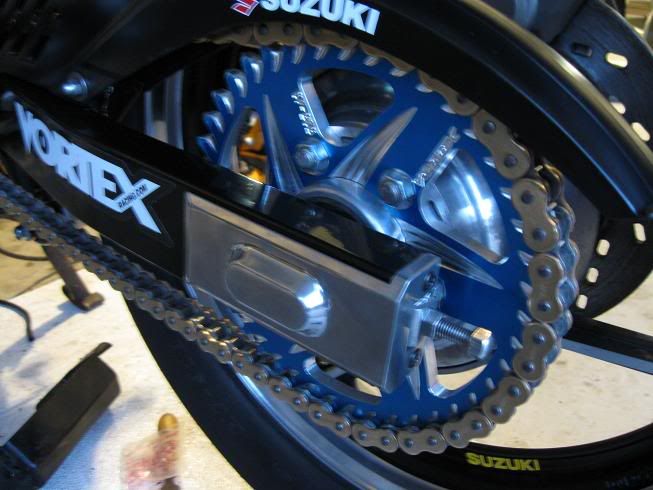
Joe, loctite would have been my recomendation as well on the sprocket. 242 blue would possibly work, but 271 red, I know would work. Might have to apply a little heat to the 271 to remove them if too much is applied, but it works. Or, just safety wire them B's and be done with it.

On the shock, the same press was used to disassmble it as was used to press the bearings in the wheels. Need a press to make it simple. The clip and ring will need to clear the dampener adjust cable, the cable just unscrews. I placed the knob on 1, then pulled it out with no problems. Didn't mess with the pre-load hose.

yaddy, first dibs if I ever decide to part with it. lol Keeping her as close to stock as possible, repainted the bucket as well in gloss black, and went with new on both the chrome rings, and even new turn signals, but the rears, went with shorties in the same style. ;) soon to come.

Y'all, appreciate the comments, and thanks. I have nothing but compassion for those builders out there. It takes a lot of work, but the reward is worth every drop of sweat.

This will be an on going thread, so please stay tuned. Shoot, I have about spent to date about $4.5k on the details. OEM parts was a big chunk, but we will be going VM smoothbores, now the $4.5k doesn't include the V&H pipe, or the Innovate LM1/LMA3 tuning equipment that will be used to tune her out, but.....

And the more I look at the dyna ignition stuff.... lol

Yes, it is a sickness...:D

No, I don't have the money, just the determination. Wifey gives me crap every time the Fedex or UPS comes to the door.

I would also like to thank GSR, and all those who have paved the way. Many of the things so far were read about here in the pages, I have just been searching. ;)

Block off plates to Progressive springs, it is all here. Might have not been this specific bike, but in general most of it pertains to any bike. :o


Eric
 
The swing arm was stripped of clear coat, and as Stock was anodized on this bike. Sort of makes a bit of work to polish it out, but 100 hours of sanding, mini sst wire brushing with a dremil tool and polishing it nice and sparkly.

IMG_2139.jpg


IMG_2185.jpg

Im likin that swingarm ..opposite of mine...

700chainandsprog.jpg
 
Pretty much opposite.

To tell the truth, I was about half way into polishing it out, and almost just went with powder coat. I didn't use clear coat on it. Instead I went with "Liquid Glass," and not sure how it is going to do. It works great on paints, and it says for use on aluminum. I put on 4 coats, so we'll see.
 
The swinger looks fantastic! I would really like to detail out my shock, you said you had the spring bead blasted?
 
Back
Top