• Required reading for all forum users!!!

    Welcome!
    Register to access the full functionality of the GSResources forum. Until you register and activate your account you will not have full forum access, nor will you be able to post or reply to messages.

    A note to new registrants...
    All new forum registrations must be activated via email before you have full access to the forum.

    A Special Note about Email accounts!
    DO NOT SIGN UP USING hotmail, outlook, gmx, sbcglobal, att, bellsouth or email.com. They delete our forum signup emails.

    A note to old forum members...
    I receive numerous requests from people who can no longer log in because their accounts were deleted. As mentioned in the forum FAQ, user accounts are deleted if you haven't logged in for the past 6 months. If you can't log in, then create a new forum account. If you don't get an error message, then check your email account for an activation message. If you get a message stating that the email address is already in use, then your account still exists so follow the instructions in the forum FAQ for resetting your password.

    Have you forgotten your password or have a new email address? Then read the forum FAQ for details on how to reset it.

    Any email requests for "can't log in anymore" problems or "lost my password" problems will be deleted. Read the forum FAQ and follow the instructions there - that's what we have one for...

  • Returning Visitors

    If you are a returning visitor who never received your confirmation email, then odds are your email provider is blockinig emails from our server. The only thing that can be done to get around this is you will have to try creating another forum account using an email address from another domain.

    If you are a returning visitor to the forum and can't log in using your old forum name and password but used to be able to then chances are your account is deleted. Purges of the databases are done regularly. You will have to create a new forum account and you should be all set.

DIY 16 valve adjustment tool,...

  • Thread starter Thread starter TiiMuch
  • Start date Start date
T

TiiMuch

Guest
Here's a very inexpensive tool to help rotate the small square valve clearance adjustment screws on a GS1100E I'm resurecting.

It's a #2 Robertson head screw, this one is a 2.5" long version and I've modified it by grinding the outer edge of the head down a bit on a belt sander.
That just makes the business end of the tool smaller with more clearance for the wrench.

Being in Canada this is the most common sized screw head configuration there is and I'm probally no further than 10 feet away from one at any time.
Your availability may be different in other countries,...ie., in the USA its much more common to see Phillips head screws.

It fits on the Suzuki adjustment screw perfectly tight.
I like this lengh as it gives me plenty to grip on.


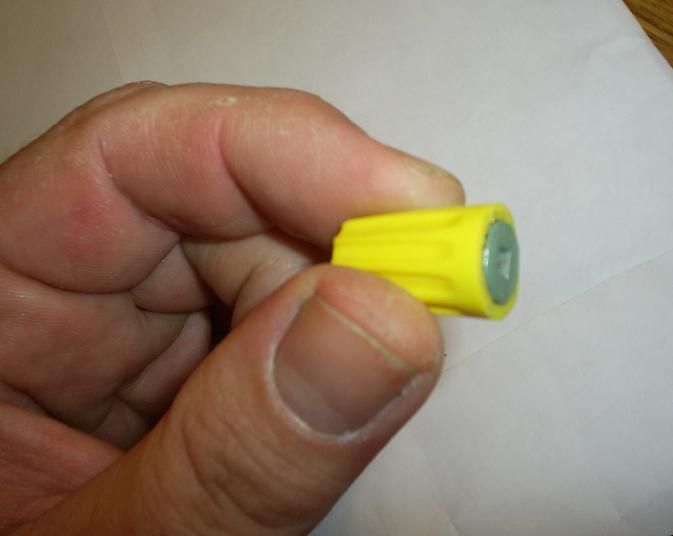
Full credit to a picture I found online showing a #2 Robertson screw mounted in a plastic wire nut.

I tried that and found it a little small to hang onto.

20151024_082158.jpg

 
Last edited:
I guess it is a better use of construction items that the typical Saws-All :)

For deck screws the Robertson heads work very well, but I have a box of stainless screws that horribly strip worse than any philips head.
 
It works even better if you screw it into the end of a 1/2" dowel, which makes a great handle.

.
 
After using a Robertson once, I decided that my time & frustration is more expensive than the MotionPro tool.

There's no reason you can't get the job done with the various Robertson 'tools', but that nice big comfortable knurled knob on the 'correct' tool just gives me more control over the clearance, and it holds a lot better when you snug the locknut down.

It's still necessary to anticipate how much the locknut is going to change the clearance, etc., but in my experience, the MotionPro requires far less patience to get the results I'm after. Maybe I'm just becoming a tool snob; I can live with that.
 
Well if you could put on something the size of a spool and knurl the outside, that would be pretty nice :)
 
Motion pro carries a nice interchangeable set of three different types of adjusters for the screw adjustment valves. I finally bought the set and wondered how I ever adjusted my valves with out them. They make it soooooo much easier now. I use a socket to brake loose the jam nut and adjust from there. I'll use the socket for the final tighten. Just make sure you do a final check after that. I also ordered the angled feeler gauges, they work really nice too.
 
Last edited:
I adjusted the valves today with the DIY tool.

Certainly better than trying to hold onto the small square adjusted end with a crescent wrench and tighening the jam nut.
The specific designed/produced tools, especially the ones that have the screw adjuster passing thru the wrench would be better.

Ok, getting closer to seeing if this thing will run after 6+ years hidden away in a carport.

Now,...how to get those freshened up carbs and airbox back into place?.
 
I adjusted the valves today with the DIY tool.

Certainly better than trying to hold onto the small square adjusted end with a crescent wrench and tighening the jam nut.
The specific designed/produced tools, especially the ones that have the screw adjusted passing thru the wrench would be better.

Ok, getting closer to seeing if this thing will run after 6+ years hidden away in a carport.

Now,...how to get those freshened up carbs and airbox back into place?.
 
I took a short flat blade screwdriver and ground a hole with a hand grinder that fits the square headed adjuster screw, works good for me
 
The screwdriver idea has made me think I can improve on my diy tool design.
Something that would have a bit more leverage to resist the torque/rotation of the lock nut being turned down.
 
For making carbs easier to put back on the engine, I like to loosen the carb to engine boots and rotate them until the line up with the carb outlet just right then tighten them back down. Then a little moly lube helps to slip them in and out each time. Air box is a little tricky.... Kind of angle the carbs and air box down sort of in a V shape and get the box boots "started" then pop those suckers on the motor. The air box should follow with a little "prostate check" motion from your fingers. Works for me, every time. No 2x4s or ratchet straps needed. Also helps if you straddle the bike while doing so.
 
OK.
After getting so wrapped up in trying to get a GS1100E to run without an air box on and struggling with that whole frustration and thinking maybe it was the valve clearances I had to revisit this clearance checking again.
Why so difficult. Small, bent tip thickness gauges, trying to bend them in there. The clearances changing when the nut was being tightened. Back and forth.
I wanted the clearances DEAD on. Damn it?!.

Then I thought back to all my Small Block Chevy motor builds. With a hydraulic lifter the "lash" was always a 3/4 turn in from zero.
Lightbulbs went off.
I pulled out my dial Guage and set it up with the magnetic base on the frame rail above the 1100 head.
Oriented the dial arrangement of the Guage was so that it was in line with the valve stem.
Put the tip on the end of the rocker and just started testing the clearance based on tilting the rocker on/off the tip of the valve stem.
Turns out .004" is slightly less than half a turn on the adjustment screw.
.006" is slightly more than half a turn.
And no kidding. You could asertain a .0005 difference on the Guage between settings.

Do you not think the Suzuki motor builders where using a similar technique building dozens of motors a day?.
So easy.
I'm putting this out there.
And someone should get back here with what they find trying similar.
But just saying. I'm pretty confident I've got my valves set bang on perfect. At least Valve to valve using this idea.

ie. I turn the adjustment screw down to get to zero gap. Back off a 5 hour turn or 7 hour turn and make sure that the screwdriver stays in that "clocking".

Comments?
 
Last edited:
Seems you figured out that +/- a small amount is +/-001.

i don't know what good enough is but I bet I get within +/- .00025. I make sure for example the .004 mm fits with a tug and the .005 mm does not slide in. The point is the proper tool and technique will be closer.

This is not to say the technique is invalid. I use the same technique on swing arm/chain adjustments following wheel alighn mints. The problem of course is the thread pitch makes this technique for valve adjustment debatable but probably passable.
 
Back
Top