• Required reading for all forum users!!!

    Welcome!
    Register to access the full functionality of the GSResources forum. Until you register and activate your account you will not have full forum access, nor will you be able to post or reply to messages.

    A note to new registrants...
    All new forum registrations must be activated via email before you have full access to the forum.

    A Special Note about Email accounts!
    DO NOT SIGN UP USING hotmail, outlook, gmx, sbcglobal, att, bellsouth or email.com. They delete our forum signup emails.

    A note to old forum members...
    I receive numerous requests from people who can no longer log in because their accounts were deleted. As mentioned in the forum FAQ, user accounts are deleted if you haven't logged in for the past 6 months. If you can't log in, then create a new forum account. If you don't get an error message, then check your email account for an activation message. If you get a message stating that the email address is already in use, then your account still exists so follow the instructions in the forum FAQ for resetting your password.

    Have you forgotten your password or have a new email address? Then read the forum FAQ for details on how to reset it.

    Any email requests for "can't log in anymore" problems or "lost my password" problems will be deleted. Read the forum FAQ and follow the instructions there - that's what we have one for...

  • Returning Visitors

    If you are a returning visitor who never received your confirmation email, then odds are your email provider is blockinig emails from our server. The only thing that can be done to get around this is you will have to try creating another forum account using an email address from another domain.

    If you are a returning visitor to the forum and can't log in using your old forum name and password but used to be able to then chances are your account is deleted. Purges of the databases are done regularly. You will have to create a new forum account and you should be all set.

Figured why gs750 not starting

  • Thread starter Thread starter baz666
  • Start date Start date
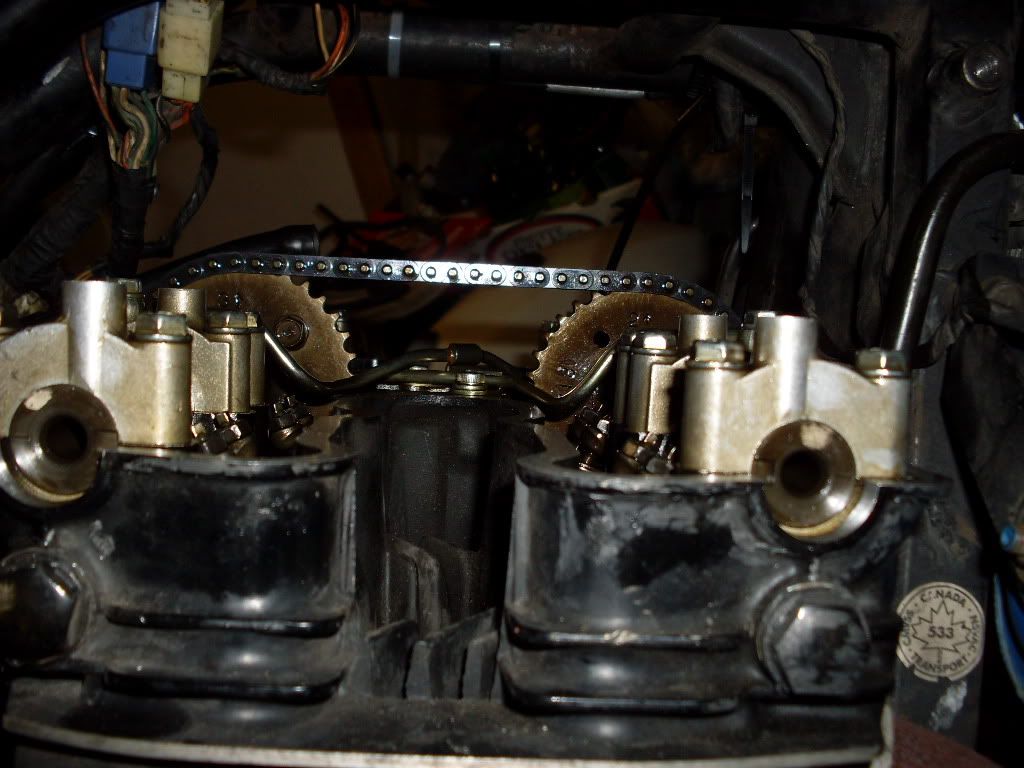
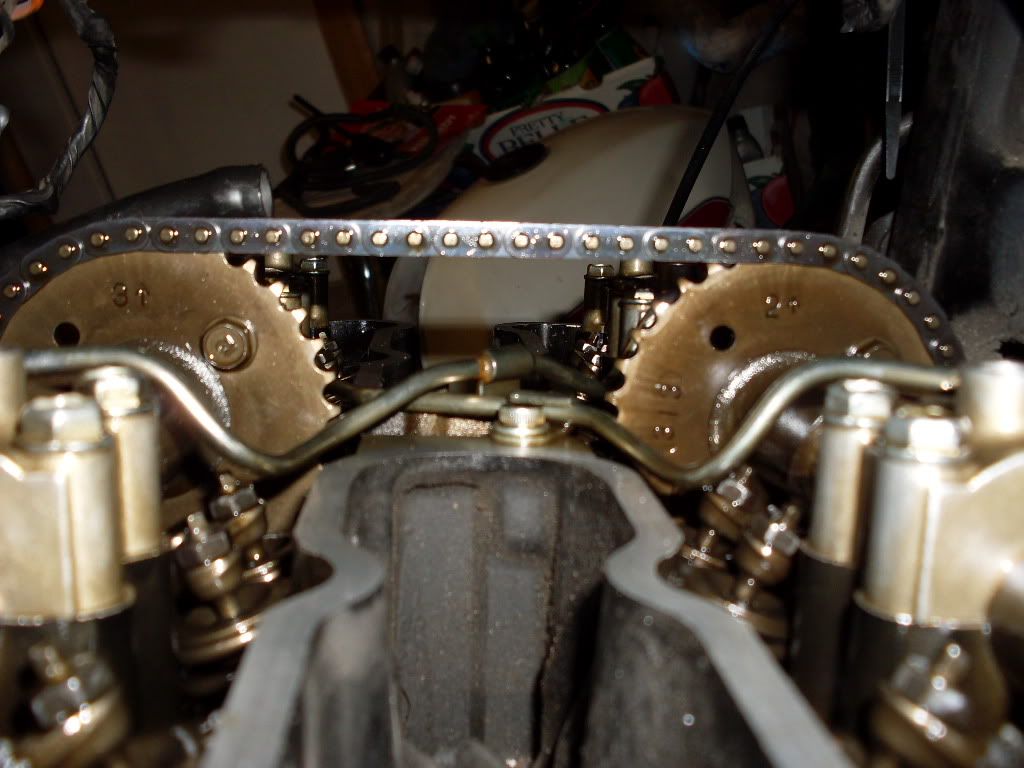
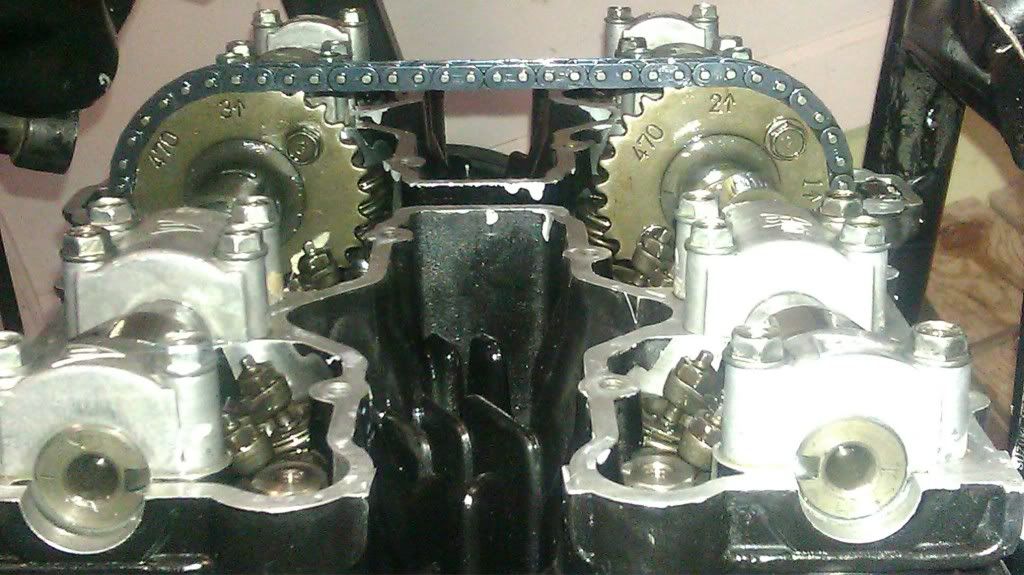
DOh! The instructions I'm looking for were staring me right in the face on page 81 to 85 of the shop manual, how to reassemble the cam chain tensioner. It says 1 complete counterclockwise revolution of the adjustment assembly spring, put on the knurled knob then attached the lock nut with 6 to 7 lbs of torque, and use loctite according to the bwringer instructions.
So hopefully the seals will arrived from Suzook soon and I can get the tensioner back on the bike, check the timing chain set up and see if that helps with the lack of compression.

It takes me a while to figure out the obvious so thanks to everybody for your help and patience.
baz
 
You do realize we are helping you because expect and require pictures, don't you? Especially when you start riding it... ;);)
 
You do realize we are helping you because expect and require pictures, don't you? Especially when you start riding it... ;);)

And a video of it starting up once you're done

Did you resolve your cam timing?
 
It's a deal.
I'll take some pics of the bike with the valve cover off and the disassembled cam chain tensioner. I haven't set up the timing yet because the tensioner is off the bike and I don't want to mess with the chain before putting everything back together. It took a while, and lots of 'splaining by wiser forum members, but the fog is finally clearing about how the tensioner works. I even have a glimmer of hope the bike will soon be running again - and I'll shoot some video to show her off!
Much better than the gloom and doom scenario of a week ago when I thought the bike was toast.
thanks again,
baz
 
It's helpful to set the cam timing before you reset the tensioner - easier to pull the cams and turn them as required

Once they're in place, reinstall the tensioner (before you rotate the engine again)

So:

1. Crank to T 1-4
2. Set exhaust cam with arrow parallel
3. Set intake cam 20 pins back
4. Install tensioner

Rotate a few times to confirm the cam timing

Your spark plugs should be removed for steps 1-4
 
Another probably dumb question about the tensioner.
I know that when I install the tensioner back onto the bike, I should loosen the pushrod lock screw by 1/4 to 1/2 turns to release the push rod.
While the tensioner was out of the bike I noticed that when opening the lock screw about 1/2 a turn, the push rod is released half way but still kept from being fully released. When I turn the lock screw another 1/2 turn, the push rod becomes fully released and would fall out of the tensioner if the whole assembly is turned to face the ground.

In other words, the push rod is free to move and even come right out of the tensioner body. Is this right? Once installed in the bike, should the tensioner be able to move as freely as possible? Is there any chance it would come right out of the tensioner body and fall into the engine or does the chain guide blade prevent that?
Sorry if this sounds like a dumb question. Like I said, it takes me a while to figure out the simple stuff.
thanks,
baz
 
take a close look at the plunger.


there is a notch in it that the lock screw slides in.


When you loosen it off a bit that allows it to push the plunger out untill it stops.

You can push it back in and let it come out and it shouldn't fall out

You should set the lock screw so it doesn't stop the plunger from sliding but it does stop it from coming out.


Oh and when it comes out, the automatic adjustment knob is probably going to unwind a bit.


The reason you push the plunger in and lock it down is to make it easyer to install it into the cylinder block


When you release it, the plunger shouldn't fall into the engine.


If you want. just look at where the slot on the set screw is pointing while you have it in your hand and loosen it until it moves freely and doesn't fall out.

Then push the plunger in and tighten the set screw.

When you have the tensioner installed just back off the set screw and set it where you had pointing before installing it.

good luck
 
Last edited:
take a close look at the plunger.

You should set the lock screw so it doesn't stop the plunger from sliding but it does stop it from coming out.

good luck

That's exactly what I needed to know but if I'd thought about it for a few minutes while I was staring at slot cut into the plunger, I might have figured it out on my own. It's logical. The plunger should be allowed to move the length of the slot but no more or less.
My 'doh!' count is really piling up.

Also, I'm getting my cam chain tensioner rebuild parts tomorrow (or so I'm told). I ordered the whole kit'n'kaboodle listed on bwringer's much appreciated instruction sheet - seals, spring, gasket, etc. The only bike shop in this region that can get old OEM GS parts (at less that 'gimme-your-first-born' prices) is about half a dozen towns west of us. So my saner half and I are taking a ceremonial drive out there to have lunch and celebrate.

thanks again for your patience,
baz
 
Got the cam chain tensioner rebuild parts from Suzuki Canada. I ended up mistakenly ordering the 3-hole gasket along with everything else. My bike takes the 2-hole gasket so if anyone needs a 3-hole tensioner gasket, just send me your address and I'll put it in an envelope, no charge. It's the least I can do to help a fellow member of this amazing forum. I very carefully cut a 2-hole gasket from some gasket material I bought so that should do the trick.
And wish me luck putting everything back together! I don't have time tonight but I'll be getting into it tomorrow afternoon after work and I will certainly let everyone know how it went - and I'll take some pics.
thanks,
baz
 
Baz

There's not enough room in the motor for the cam chain tensioner plunger to come out of its housing and fall inside, so don't worry about that

Reread the manual about each step - cam timing, tensioner, carbs as you go along and you'll be fine

I'm sure this will resolve the big issue (remember that?)

Yep, the big issue. Still scares me, to be honest. I'm being very careful about taking my time and doing the tensioner rebuild and cam timing, etc very carefully and praying that it all results in getting the engine's compression back. I'll be home in a couple hours to get started on it. Thanks again for all the back up.
baz
 
Okay, the tensioner is back in and the cam chain is in the correct position, according to the service manual. I took a couple of pics (see below).
The tensioner wouldn't go in at first and then, following the manual, I carefully and slowly turned the crankshaft backwards a bit and the tensioner went in. I used hex bolts, as suggested by the bwringer tip sheet. When I loosened the lockscrew 1/4 to 1/2 turn, I heard the tensioner pushrod snap into place, tightening the cam chain. When I turned the crankshaft very slowly forward, the tensioner knob moved clockwise very smoothly and freely without any binding or sticking - again as the manual said would happen if all was working correctly.
I had noticed that when I'd originally taken the valve cover off to investigate, the cam chain didn't seem to be as tight as it is now. There is a little bit of slack when I lift the cam chain between the sprockets but there was about 1/2 more play before I rebuilt the tensioner. I'm wondering if this was part of the problem.
Here are a couple photos of the cam chain and the tensioner reinstalled. I know, not much to look at but I will try to add a video if/when I can get the ol' gal running again. Wish me luck!

Something I do actually need to do is the carb rubbers between the carbs and the airbox. The two outside rubbers are fine but the ones on the inside seem to have shrunk and deformed a bit. I'm having a hard time getting the middle rubbers to fit over the carb mouths and have to sort of pry the rubbers forward and then tighten the clamp.

Also, about the air filter itself. The local shops didn't have a paper filter so I made one out of UNI green air filter foam, wrapping it around the plastic cage and zip tieing into place. Does anyone know if I should use some filter oil? It's that thin red stuff K&N makes and that I've used in other bikes with the K&N "lifetime" filters.

Thanks again for everybody's help. Much appreciated.
Baz

SDC10292.jpg

SDC10293.jpg

SDC10296.jpg
 
The cam chain looks right with a pin count of 20 from arrow to arrow. Can't really tell what the pic of the tensioner is showing but I'm sure its all good. If it spins freely and there are no clunks or bangs I'd say you are good to go.

With the carb "boots", you will find they are easier to work with when soft and pliable and you can make them this way again with heat. Get yourself one of the cheapo electric paint stripper guns from Crappy Tire ( they look like hairdryers). Carefully warm up the rubbers with it. You can get them really hot with no problem just don't get them smoking hot as they will burst in to flame ( well actually they will melt).

For the filter, you should use filter oil like the K&N stuff. Apply it liberally, work it in and squeeze out the excess. A question for you: where did you get the foam? I need some for my 750 and haven't had any luck sourcing it hereabouts.

Anyway good luck with the project and hopefully soon you'll be riding, if the weather ever co-operates.

Cheers,
Spyug

cheer
 
Hopefully everything will go back together properly and I'll be able to try out the compression soon. I'll keep everyone posted on that. Man, this has been an epic adventure - for me, at least, being a very amateur home wrench.

As for the filter foam. I paid $18 for a sheet that was something like 20" x 16". I ordered it from a local bike shop, T.O. Cycle out of one of their catalogs. I think it was the Thibault catalog. Any bike shop should be able to order it. The UNI filter material is of good quality, no rips or fraying and the sheet is good for a couple of filters with a bit left over, so I did my GS750ES and my friend's old XT600. I also used a bit as a vibration damper between the GS gauge box and the frame headstock.

thanks again for all the tips and advice,
baz
 
I don't know but looks like you might be off a tooth.


Double check your manual as it references 20 pins or 10 full links
IMAG0096.jpg


pic is big brother of your bike (1100es)

Nic
 
Damn, it looks like you guys are right.
Thanks a million for being on the ball - unlike me.

It's tricky - as if it's at 19 and a half pins, with the pin above the 3 on the intake sprocket being slightly to the right of the link, making it look like it could be 20 pins but it's definitely not 10 full links.
So how do I shift the cam chain back to its proper position?
 
Make sure the "T" mark for cylinders 1 & 4 are lined up withe the timing mark.

Withdrawl the tensioner so you have plenty of chain slack.

Line the exhaust cam up first, with the 2 arrow pointing UP to the correct pin.

Then, count back 20 pins (including the pin the arrow is pointing to), and align the intake cam (arrow 3) to point UP at the 20th pin.

You should have 10 full links or 20 pins from arrow to arrow.


As you tighten things down, (journal caps, and tensioner) it will draw the cams into the perfectly aligned possition, so initially one cam arrow might not point perfectly vertical but onces all is tight, it will be in possition. Most important thing is getting them on the correct pins 10 full links or 20 pins from arrow to arrow and the arrows generally pointing the appropriate way.

It can be tricky, but its really important, so just take your time (took me quite a while figuring it out the first time, and then to degree them in......)


Nic
 
Last edited:
So let me see if I understand the basic idea here:
I am trying to synchronize the cams with the crank, correct?
So if I line up the cams correctly, the "T" mark on the crank should be at the 1-4 position?
Also, do I need to remove the cams entirely?
Or can I remove the cam caps and then, with enough slack in the cam chain, turn the cam sprockets so they are in the correct position without actually lifting them off the cyl head.
I'm trying to get my head around how the crank and cam positions relate.
thanks for all your help and your very perceptive eye.
baz
 
The crank and the cams have to be "timed" in order to open/close valves and allow for combustion at the correct time and sequence.


"So if I line up the cams correctly, the "T" mark on the crank should be at the 1-4 position?"

Yep, have to make sure your crank is in the right possition first. Then don't touch the crank till the cams have been installed, the caps snugged down, and the tensioner is applying pressure.

It's easier for me to at least have the intake cam out and have the caps removed. I have a lot of chain slack so I can get the exhaust cam lined up first, then slip the intake cam in. You don't neccesarily have to remove both, but it will save your fingers from getting a pinch if you at least remove the intake cam while trying to orient the exhaust cam.
 
Last edited:
Back
Top