-
Required reading for all forum users!!!
Welcome!
Register to access the full functionality of the GSResources forum. Until you register and activate your account you will not have full forum access, nor will you be able to post or reply to messages.A note to new registrants...
All new forum registrations must be activated via email before you have full access to the forum.A Special Note about Email accounts!
DO NOT SIGN UP USING hotmail, outlook, gmx, sbcglobal, att, bellsouth or email.com. They delete our forum signup emails.A note to old forum members...
I receive numerous requests from people who can no longer log in because their accounts were deleted. As mentioned in the forum FAQ, user accounts are deleted if you haven't logged in for the past 6 months. If you can't log in, then create a new forum account. If you don't get an error message, then check your email account for an activation message. If you get a message stating that the email address is already in use, then your account still exists so follow the instructions in the forum FAQ for resetting your password.Have you forgotten your password or have a new email address? Then read the forum FAQ for details on how to reset it.
Any email requests for "can't log in anymore" problems or "lost my password" problems will be deleted. Read the forum FAQ and follow the instructions there - that's what we have one for...
-
Returning Visitors
If you are a returning visitor who never received your confirmation email, then odds are your email provider is blockinig emails from our server. The only thing that can be done to get around this is you will have to try creating another forum account using an email address from another domain.
If you are a returning visitor to the forum and can't log in using your old forum name and password but used to be able to then chances are your account is deleted. Purges of the databases are done regularly. You will have to create a new forum account and you should be all set.
You should upgrade or use an alternative browser.
GS1000G Shopper
Guest
1. Insert 19mm wide spacers where the long 6mm bolts go through. (McMaster sells these) (updated from 12-13mm to 19m 6/13/15)
2. Extend the throttle connection from the #3 to #2 throttle body. (Update: welded a 3/8" block onto the #3 TB)
3. Extend the fuel rail. Since I want to add a pressure regulator to the other end, I will likely cut it and see if the interior is round or oblong. If it is round, and based on the plug in the far end it is, I can slip in some aluminum tubing and have it welded so the proper spacing is achieved. Update: Cut it and drilled the openings to 3/8 and brazed in some 3/8" OD aluminum fuel line.
The fuel inlet fitting is similar to the late model GM fuel injected cars I've worked on- it is a plastic clip over a metal nozzle, and a plastic fitting on the inlet hose. I know Summit sells adapters for these to AN fittings.
EDIT
I forgot to add the secondary throttle shaft holes, which must be sealed. The quick & easy way here is to just tap them for 1/8 pipe- no drilling required as they are just shy of 3/8" in diameter. They can then be plugged with pipe plugs.
I have some more pics for some of this and will upload them later.
GS1000G Shopper
Guest
Fuel inlet fitting with hose removed:

Throttle body tab gap:

Spacer gap: UPDATE- I used a 19mm wide spacer after using the center linkage setup.

Test fit:

GS1000G Shopper
Guest
UPDATE:
I originally had used 3/8 OD fuel line and JB Weld but rethought this. I ended up using the same 3/8" aluminum fuel line that has a .245" ID. I drilled out the halves of the rail to 3/8" and then brazed the line into them.
These should allow the TB units to be seated and spaced properly.


GS1000G Shopper
Guest
While I had the rail off, I drilled out the brass plug on the far end. The opening is just slightly larger than 7/16, so it threaded as-is for 1/4 pipe. In the picture below, I have a 90 degree pipe adapter in it. I'll plumb the pressure gauge here.
1/4 pipe fitting at end of rail:

Guest
Guest
Note
A small comment. I like what you did with everything only, why not see if you could wedge the GSXR TB's into the stock GS1100 intake booties? They may be, at the most 2mm bigger than the 34mm cv carbs are but I believe, as I do have a set of them as well, that maybe only 1 to 1.5 mm bigger. Arttu used the same ones on his GS1100.
Laters
Greg
GS1000G Shopper
Guest
I've observed many a time in working on vehicles that the people that design them never work on them (the Sabre and my Gen 4 Trans Am are outstanding examples), so when I am designing something, maintenance is always in mind. The fewer battles there are to fight doing routine work the better.
That's why.
")
GS1000G Shopper
Guest
It's advisable to have a filter between the pump and injectors. It's not a bad idea have some kind coarse pre-filter on intake side of the pump too but probably the screen in the tank is enough for that. The filter before injectors should be "injection grade" i.e. fine filter, less than 10 microns.
Thanks, I'll look into it. I originally had an AN6 filter inline but it occurred to me I could use a barb one since the suction side does not need the expensive fittings. The GSX-G uses just those screens as its sole filtration system, and I've added an inline filter before & after the pump. I need to look at the GSXR-600 and see what it does.
GS1000G Shopper
Guest
Pics will follow if this is viable.
GS1000G Shopper
Guest
I did confirm that the GSX-G fitting with the tube re-bent will bolt up to the GS tank. It's a little taller than the GS feed fitting, so it will be excellent for a return line.
Here is a picture of the part with the added part numbers, all of which are available. They are about $70 or so from the looks of things. The "gasket" is the circular one for the bolt, not the one between the tank & fitting.

GS1000G Shopper
Guest
Stock position:

Reversed:

I'm also looking into re-wiring the fuse panel area, as the MS needs several fuses and relays. I found a relatively small (about 3.5" x 4.5") rear terminal panel at Waytek Wire (Bussmann 15303-2-2-4) that allows the use of several relays and 10 fused circuits. From what I can tell, it does not have a common or split bus design like some of their other panels (I have one on my 1975 280Z and 1988 Toyota Supra). A split bus is ideal for circuits that need battery power and others that need switched power. I can overcome this by wiring the terminals to create a bus, just a little more work.
The GS1000G has a steel plate that houses the fuse box, ignitor, and starter solenoid. I took it all apart today and used a cardboard template. The ignitor has a good bit of extra wiring, so I think it can be relocated.
To assess the idea, I cut out a piece of cardboard larger than the plate and marked an area where the fuse panel would be located. Allowing room for the solenoid, it appears I'll be able to use 3 of the 4 fuse panel mounting points. The GS uses a tab in the plate to hold it in place on the bottom. I won't be able to use this as the fuse panel will be in that area, but it looks like I can add a short piece of angle to the slot in the battery tray and extend the mounting point away from the panel. There is a good bit more work to do here, and of course I need to have a panel in hand to try it.
Here's a pic of the old plate with the solenoid and ignitor:

GS1000G Shopper
Guest
There are at least two things I can do here. One is to run pod air filters. I don't like this idea for two reasons- it takes away from the stock appearance, plus operationally I need to mount an intake air temp sensor. Using pods, I could only get the temp from one pod. I'd also have to plumb in a line to the breather.
The second option seems overly simple, but is more appealing. Reading about silicone hose, the 1.75" ID (45mm) hose is a little over 2" OD. Measuring the openings in the airbox, I get about 2.06". It looks like I can simply get a foot of the silicone hose and cut it into 4 pieces the same length as the GS1000 boots, run each one into the airbox, and then install the airbox, clamping the inside hoses first and the outer ones last. The boots on there now are not 100% sealing, so this would actually be an improvement. I bought a set of used clamps for the GSXR600 airbox boots.
I'm also looking at how to mount the air temp sensor on the GS1000 airbox. I'll likely weld on a small piece of steel and tap it for 3/8 pipe so I can use the GM sensor.
After reading descriptions of the fuse panels, I ended up buying the 15303-6-2-4, which has a buss on the relay side only. I need to have the fuses split onto 3 busses. I found an old panel from a GM truck leftover from an older project that is loaded with mini fuses and mini & micro relays, so that part will not be an expense.
The GS1000 fuse box connector is easy to take apart and replace with better quality wires. I did so on my blue bike after it arrived due to a green fuse for the headlight. It is using two ATC type fuse panels of 4 circuits each. The ATM style I'm planning here will be a much better setup.
I drew up the 15303-6-2-4 panel and applied it to what I'm doing:

GS1000G Shopper
Guest
If this can be confirmed, or if the 850 uses smaller boots at the carb, that may be an easier path.
EDIT
Various part numbers, all show as current:
1979 GS850G boots
HOSE AIR CLEANE
13728-45010
1981 GS1000G boots
HOSE RH
13881-45050
HOSE LH
13882-45050
1981 GS850G boots
HOSE RH
13881-45030
HOSE LH
13882-45030
eBay auction info:
1982-1983 Suzuki GS850G
1981-1983 Suzuki GS850GL
CONDITION :New
SUZUKI PART # :
13881-49070 x4 (Boots)
1977-1979 Suzuki GS750 (Standard)
1979 Suzuki GS750L
1979 Suzuki GS850G
CONDITION :New
SUZUKI PART # :
13728-45010 x4 (Boots)
GS1000G Shopper
Guest
After doing a lot of reading about fuel pumps, it looks like the Walbro inline model GSL414 may be a winner, although expensive at $155. I'm attaching a flow/current graph for it. At around 40 PSI, it is only drawing 3 amps and flowing about 29 gallons/hour (GPH).
I also looked into some OEM fitments using 80's model cars such as the Honda Civic- which was how I got the thermostat and fuel pump for the Sabre.
EDIT
I found this writeup on another forum, and the builder is converting a 1975 GT250 bike to FI and using the GSL414 pump.
Updating the fuel pump info, I found a page (PDF) from Bosch that shows their pump data. The lowest amp (maximum) rating is 5.2 amps for the "911" pump- people refer to the Bosch pumps by the last 3 digits. The 044 pump is popular, but is a very high output pump and rated at 15.5 amps. The 070 pump is rated at 6.5 amps and 3 bar (pressure) and has 3/8 x 5/16 inlet/outlets. 3 bar is 43 PSI, so it may be too power-hungry for this application. The 911 pump is rated at 5.2 amps and 4 bar, so it may be within range, but would require adapter fittings, as it has a 1/2" barb inlet x 12x1.5 outlet fittings. Still looking for some actual test data for amp draw.
UPDATE
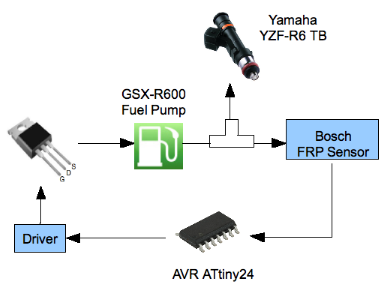
I found a page where a fellow has designed a pulse width modulation control circuit for a low-amp fuel pump (he used one from a GSXR600). The big advantage here is it works on a returnless system, just like the GS uses, so you can keep the petcock. The idea is it powers the pump to maintain a set pressure, which is sensed via an OEM type sensor. His page looks fairly detailed. I plan to inquire as to the cost of a completed board. Here is his high level graphic of how it works:
I found a price of $50 elsewhere on his site. The pressure sensors he references are not cheap. The least I could find one for was around $30. I'm not too sure about using an in-tank pump externally. He mentioned possible pump heating problems above 90 degrees. Being in Florida, that's like 10 months of the year.

I will likely stick with plan A.
GS1000G Shopper
Guest
The known factors for the GSXR600 system so far is 43 PSI and 39 gallons/hour (148 LPH) for the pump. From what I have read, the injectors are in the range of 225~240cc/minute at 43 PSI.
According to the RC page, to get 90 HP out of my 4 cylinder engine, I only need 149cc/m injectors at 43 PSI. Since the GSXR600 ones are much higher than this, I do not need to run the pressure as high to obtain the desired output. Lower pressure= less amps drawn by the pump (this is likely why other conversions have used 5 amp+ pumps and still worked). Using the RC page, to get 150cc/m out of my 225~240cc/m injectors, I only need to run about 17~20 PSI ideally. Allowing for variables, it looks like I can operate on under 30 PSI OK. Injector timing will be performed by the MS, and fuel pressure regulated by a regulator.
GS1000G Shopper
Guest
I was reading through some older FI threads here, and one problem was a lack of a fast idle for warmup. I noted the GSXR600 has a cable and linkage that operates much like a choke- except all it does is tweak the throttle open slightly via a cam on the linkage. The shop manual says it will raise the RPM from 1,300 to 3,000. It appears it may interface with the GS1000G choke cable, but I have not pulled the cable yet. My throttle bodies were complete with the linkage and short cable.
The fast idle mechanism on GSXR600 TBs should work fine with choke lever and cable. I'm using the stock choke lever for that but I can't recall if I used stock cable or if I made new one. Not a big deal any ways.