• Required reading for all forum users!!!

    Welcome!
    Register to access the full functionality of the GSResources forum. Until you register and activate your account you will not have full forum access, nor will you be able to post or reply to messages.

    A note to new registrants...
    All new forum registrations must be activated via email before you have full access to the forum.

    A Special Note about Email accounts!
    DO NOT SIGN UP USING hotmail, outlook, gmx, sbcglobal, att, bellsouth or email.com. They delete our forum signup emails.

    A note to old forum members...
    I receive numerous requests from people who can no longer log in because their accounts were deleted. As mentioned in the forum FAQ, user accounts are deleted if you haven't logged in for the past 6 months. If you can't log in, then create a new forum account. If you don't get an error message, then check your email account for an activation message. If you get a message stating that the email address is already in use, then your account still exists so follow the instructions in the forum FAQ for resetting your password.

    Have you forgotten your password or have a new email address? Then read the forum FAQ for details on how to reset it.

    Any email requests for "can't log in anymore" problems or "lost my password" problems will be deleted. Read the forum FAQ and follow the instructions there - that's what we have one for...

  • Returning Visitors

    If you are a returning visitor who never received your confirmation email, then odds are your email provider is blockinig emails from our server. The only thing that can be done to get around this is you will have to try creating another forum account using an email address from another domain.

    If you are a returning visitor to the forum and can't log in using your old forum name and password but used to be able to then chances are your account is deleted. Purges of the databases are done regularly. You will have to create a new forum account and you should be all set.

Istalling Vetter 4 fairing on 1980 GS100G

  • Thread starter Thread starter Mickeymoe
  • Start date Start date
M

Mickeymoe

Guest
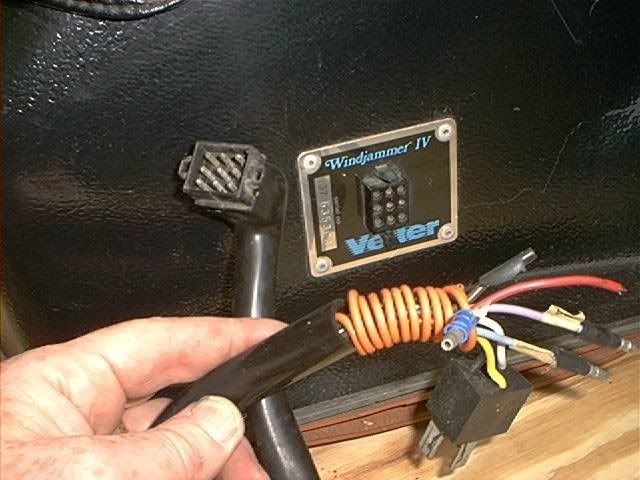
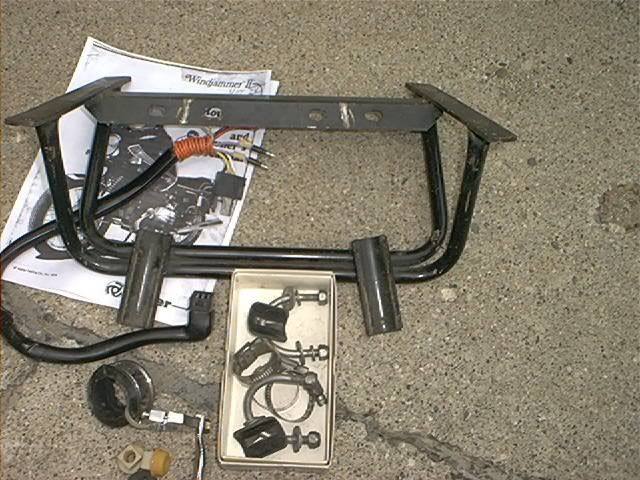
While I really like the looks of a "naked" classic bike, riding long distances is much more enjoyable and comfortable with a a fairing. My previous GS850G came with one from the dealer with the matching Vetter bags and trunk. I've collected all of the pieces to make the bike a full dresser (can always put it back to stock at a whim), including a professional repaint of the classic Vetter 4 fairing.

Given that my previous faired bike came with the faring, I don't really know what it entails with the front end/ triple tree/ forks, etc. to get the headlight, turn signals and Suzuki emblem off. I don't want to dive into this without some kind of preparation but I've found nothing on YouTube and even the few Vetter "hits" I've gotten on Google don't go into disassembly to remove stuff and mount the fairing bracket. I've found several Vetter "manuals" on the fairing but nothing else.

Does anyone know of a link or have any info they can provide? In my younger days I'd just start taking things apart but not any more!

Thanks in advance.

Mark

P.S. here's a pic of the bike next to the fairing I want to install. I've already restored and fitted the hard Vetter bag brackets to the bike and the trunk will mount on the luggage rack.
Vetter_Fairing_1980GS1000G.jpg
 
Hopefully you have the wiring harness, too? :-k

The easiest way to mount the fairing is to remove the headlight (lens/reflector assembly), remove the turn signals from their mounts, remove the headlight bucket from its mounts and wiggle all the wiring out of the bucket. Set the bucket aside, but KEEP IT. This is the perfect time to install the wiring harness and tuck it into the Naugahyde sleeve that should have come with it. Install the fairing mount on the frame, make sure it is level from side to side. Fold the headlight mounts toward each other. If you wish to remove them, you will have to take the forks out of the bike, which requires removing the wheel and fender, so just folding them is MUCH easier. Mount the fairing on the bracket, leave the bolts a bit loose. Turn the handlebars from lock to lock to make sure there is no interference. Tighten the mounting bolts. Connect the wiring. Install your headlight into the Vetter bucket, lock it in place. Test everything. Go for a victory ride.

.


Hey thanks Steve, and yes, I do have the wiring harness and am going to do some additional LED lighting (side markers, etc) at the same time. I had THOUGHT about leaving the headlight mounts on the bike and just folding them together, (making things MUCH easier as you point out) but didn't think that was possible since I'd never heard of it being done before. If you do it that way, what do you do with the Suzuki tie bar emblem across the fork tubes? Does that come off without having to slide it up and over the forks?

I just had the wheels off for new tires and didn't want to have to do THAT again. My previous GS850 did not have the headlight mounts folded, and I've never seen that done on a GS while adding a fairing before, but it it works that would be fantastic.

Of course I absolutely want to be able to put the bike back to stock if the mood hits me, or if for some reason I had to sell it.

Thanks for the input.

Just curious, if one were going to remove the headlight brackets, why would the front wheel have to come off? To slide the fork tubes down? What if I jacked the bike and left the wheel on?

Just wondering....


Mark
 
You don't have to do anything with the fork trim piece (the one you are calling a "tie bar"). It will still sit there, hiding the brake manifold on the triple clamp.

Yes, there is more than one way to remove the headlight mounts. One is to remove the wheel and fender, then loosen the clamps on the fork tubes and slide them down to release the headlight mounts, which just slide over the fork tubes on their rubber bushings. Do the fork tubes one at a time, it's not all that bad.

The other way is to remove gauge cluster (as one assembly) from the upper triple, remove the handlebars (you might be able to keep all the 'stuff' on it, just move it out of the way), then remove the upper triple clamp and slide the headlight mounts up, then re-assemble everything. I would rather remove the wheel.

One thing to be aware of, if you do choose to remove the headlight mounts. There will be nothing left to keep the "tie bar" in place, and it might just sit there and rattle.

.

Thanks again Steve. I drew a blank on what to call the Suzuki trim piece, so since it just visually tied the forks together, I named it "tie bar!" I'm not looking for extra work so I'm going to leave everything on; I just got home from the gym and took another look and it doesn't look like there's room for all that stuff but it can't hurt to try. If I did take the headlight mounts off I surely would take off the Suzuki emblem too. Over the years I've found it amazing at how many guys who put fairings on never keep the original brackets n' stuff.
 
If you have any questions you can always email Steve Vetter, he's always happy to help. His email is on the vetter site, it's a neat site.
 
If you have any questions you can always email Steve Vetter, he's always happy to help. His email is on the vetter site, it's a neat site.

I agree with the advice, but it's Craig Vetter and his wife, Carol. :-k

.
 
I think I have a different Vetter so it's possible this might not apply but your style of highway bar/case guard might clash with the bracket for mounting the Vetter.
 
I'll ask/add these things;
- search here for advice http://www.vetterowners.com/ ...there's a few GS forum folks there too...{I own a vetter windstar fairing}
- ...or here on FB {above web page is far better though} https://www.facebook.com/vetterowners
- In your pic I saw the fairing...but do you have the frame brackets?

- I'd also suggest the rear tire be chained to the table...to better secure the table! :)


Hey thanks Bob, I have two (2) identical frame brackets actually and have 3 fairings. I chose the best one to repaint with basecoat/ clearcoat. What a job it was masking the pinstripe triangle on both sides. I was going to mask the word "Vetter" on each side too, but they needed to be replaced so I took them off with a heet gun. Actually I kind of like the way the fairing looks with no name- the Suzuki emblem on the tank is very near - will have to see when it's on.

The card table the fairing is resting on is only for pictures- I have a serious 85lb 8' folding table that I'll set up when I do the install.

Thanks too for the links. I have my doubts that all that stuff is gonna fit behind a Vetter 4 fairing but I'll be pleasantly surprised if it does!
 
1948man- You are right- I've pretty much resigned myself to the fact that the highway bar will have to come off and I'll have to get some good engine case bars. I like the idea of the highway bar if the bike goes over, but I don't like the looks. That's why a lot of it is covered in black electrical tap. The good thing about the fairing is that if the bike falls over (or some MOFO kicks it over) it will rest on the fairing and the rear bag and not the engine cover or the exhaust. My previous GS850G with the same setup fell over on angled pavement ~15 years ago because I didn't realize he straight up and down the bike was. A big wind gust and "BOOM". Nothing happened except the chrome on the faring and the bags got chewed up.
 
Mark,

Good that you have the frame bracket. THose are specific to what bike they were meant for. (I, too, was looking for one of those in your pic, and didnt see one.)
THe fairing should have the frame bracket suitable for your bike, and a wiring harnes that plugs into the fairing and wires to interface to bikes wiring. SOmetimes those get seperated from the fairing, and faring sold without those.

I have some scans of jammer IV and jammer V manuals. PM me your email, if you are interested.

The jammer IV that I had for 850, had a rubber boot thing to put over the headlight shell after taking out the headlight.
I dont recall if NEED to remove the headlight for clearence, or if remove headlight to put put in the fairing.

...later note.
I see you have email listed.
Will send those.

Dave
 
Last edited:
No prob...and to me it looks like the front tire is locked to the card table.

Your fairing shouldn't be near the tank emblems...should be more towards the bottom of the tank.
 
Picture of wiring harness I had, just so we know we are talking about the same thing.
Jul04_08.jpg
 
Pic of frame mounting bracket, just to be sure we are talking about the same thing.
Jul04_15.jpg

THrottle lock is not part of this, but the U-clamps in the box are.

.
 
Last edited:
Picture of wiring harness I had, just so we know we are talking about the same thing.
Jul04_08.jpg

If you look at the connector on the fairing, you'll see the top and bottom tabs that lock the wiring harness on....push those inward and you an remove it to clean and/or check wiring. You can also make your own direct wire harness if need be and use other wire connectors.
For my windstar fairing the headlight bucket has to be removed, but you can just swing in the two brackets to clear the inside of the fairing...dropping the forks enough to fully remove the brackets is probably the best way, but once you have the fairing test fit in, you'll know if that will work or not.
 
Pic of frame mounting bracket, just to be sure we are talking about the same thing.
Jul04_15.jpg

THrottle lock is not part of this, but the U-clamps in the box are.

.

While my bracket is for the 1000g, it also works for the 850g. My fairing mounts are the early heavy duty version {or just read "heavy"}...two cross rods and two side plates..plus four U clamps.
 
Mark,

Good that you have the frame bracket. THose are specific to what bike they were meant for. (I, too, was looking for one of those in your pic, and didnt see one.)
THe fairing should have the frame bracket suitable for your bike, and a wiring harnes that plugs into the fairing and wires to interface to bikes wiring. SOmetimes those get seperated from the fairing, and faring sold without those.

I have some scans of jammer IV and jammer V manuals. PM me your email, if you are interested.

The jammer IV that I had for 850, had a rubber boot thing to put over the headlight shell after taking out the headlight.
I dont recall if NEED to remove the headlight for clearence, or if remove headlight to put put in the fairing.

...later note.
I see you have email listed.
Will send those.

Dave

Dave, I just checked out the Vetter insall .pdfs and they look really good. Very helpful, include a lot of small details that could be easily overlooked. Here's a picture of all the stuff I have ready to go. The hardware is in the bag tied to one of the faring brackets which came of a '80GS1000G so I should be good. With regard to the rubber boot over the back of the headlight, yes, my fairing has it too and it doesn't seem to get in the way of anything and looks as if it's designed to protect the connectors from moisture. I'm going to take my time and maybe I'll get it all done tomorrow. I especially like the idea of doing it from the top- taking off the tripple tree clamp and moving the brackets etc. upward as opposed to taking the whole front end of the bike off.
Vetter_2.jpg

Mark
 
MUCH easier to just drop the front wheel and fender. Loosen the triple tree pinch bolts and drop the forks down. Use a jack or some wood to support the bike underneath the exhaust or oil pan. I just use a floor jack and piece of 2x4. Jack her up while on the center stand until the rear tire touches the ground.
 
Back
Top