Chris and I are patiently waiting on the answer from the doc. I know that doesn't take care of all life has been throwing at you lately, but it's a start.
-
Required reading for all forum users!!!
Welcome!
Register to access the full functionality of the GSResources forum. Until you register and activate your account you will not have full forum access, nor will you be able to post or reply to messages.A note to new registrants...
All new forum registrations must be activated via email before you have full access to the forum.A Special Note about Email accounts!
DO NOT SIGN UP USING hotmail, outlook, gmx, sbcglobal, att, bellsouth or email.com. They delete our forum signup emails.A note to old forum members...
I receive numerous requests from people who can no longer log in because their accounts were deleted. As mentioned in the forum FAQ, user accounts are deleted if you haven't logged in for the past 6 months. If you can't log in, then create a new forum account. If you don't get an error message, then check your email account for an activation message. If you get a message stating that the email address is already in use, then your account still exists so follow the instructions in the forum FAQ for resetting your password.Have you forgotten your password or have a new email address? Then read the forum FAQ for details on how to reset it.
Any email requests for "can't log in anymore" problems or "lost my password" problems will be deleted. Read the forum FAQ and follow the instructions there - that's what we have one for...
-
Returning Visitors
If you are a returning visitor who never received your confirmation email, then odds are your email provider is blockinig emails from our server. The only thing that can be done to get around this is you will have to try creating another forum account using an email address from another domain.
If you are a returning visitor to the forum and can't log in using your old forum name and password but used to be able to then chances are your account is deleted. Purges of the databases are done regularly. You will have to create a new forum account and you should be all set.
You are using an out of date browser. It may not display this or other websites correctly.
You should upgrade or use an alternative browser.
You should upgrade or use an alternative browser.
M
Matchless
Guest
Hi Stan,
Glad to have helped! At that price a quick suicide may be prevented if you happen to mangle the oil scraper when refitting the cylinders!
Good going so far!")
You most likely wondered why I mentioned this back in post 626.

Sorry to hear that, and don't ask me how I know!
F
Flyboy
Guest
NO, I never wondered Andre, your comment came straight to mind and the blame fell squarely on your shoulders right there and then, you're a jinx. 
Don't worry china, you will still have the nicest G in the country, you can call your sangoma off now.")
Don't worry china, you will still have the nicest G in the country, you can call your sangoma off now.
M
Matchless
Guest
Sorry about that is was not intentional!
Don't feel too bad I know someone who only got it right on the 3rd try!
Try walking the piston into the sleeve with a screwdriver in the gudgeon pin by wiggeling it sideways with minimal pressure from the cylinders and lots of oil. A torch and eyeballing it all the way around is a must.
At least you will have enough rings and scrapers in reserve now!
Hope it goes well
F
Flyboy
Guest
Ya I was using a small flat screw driver to guide the rings onto the bevel at the bottom of the cylinder, as I always do,

In fact, if I am not mistaken it is the one cylinder I used a jubilee clamp on as a ring squeezer.
Phaaaa, no worries, will give it another go on Saturday and hopefully have the motor buttoned up by Sat night so I can get on with the tail piece and fairing on Sunday.
Now there is the problem, can't see.A torch and eyeballing it all the way around is a must.
In fact, if I am not mistaken it is the one cylinder I used a jubilee clamp on as a ring squeezer.
Phaaaa, no worries, will give it another go on Saturday and hopefully have the motor buttoned up by Sat night so I can get on with the tail piece and fairing on Sunday.
Ya I was using a small flat screw driver to guide the rings onto the bevel at the bottom of the cylinder, as I always do,
I would never use a screwdriver to poke rings in as a busted ring is likely, (on the cast ones anyway) significant point loading any place other than the end of the ring is likely to end in disaster. As Dale says popsicle sticks or my favourite on small motors, my fingers. Composite oil rings are a little different and likely be ok.
But that's just me, I not criticizing just saying...
F
Flyboy
Guest
Chris, me ain't got none popsicle sticks, but got lots of screwdrivers, so .....
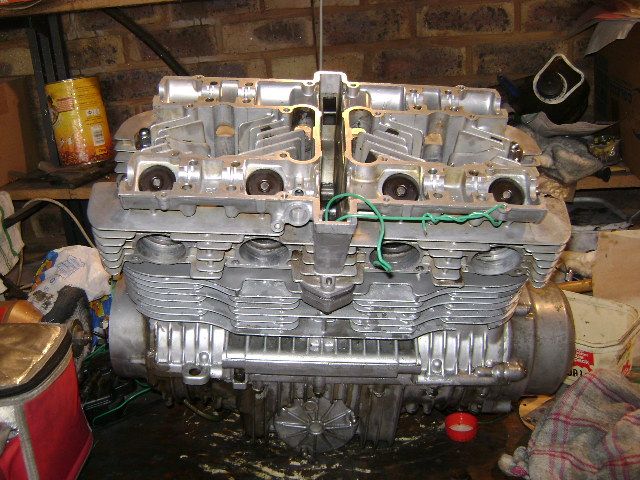
Anyway, had a productive day and got the motor buttoned up.
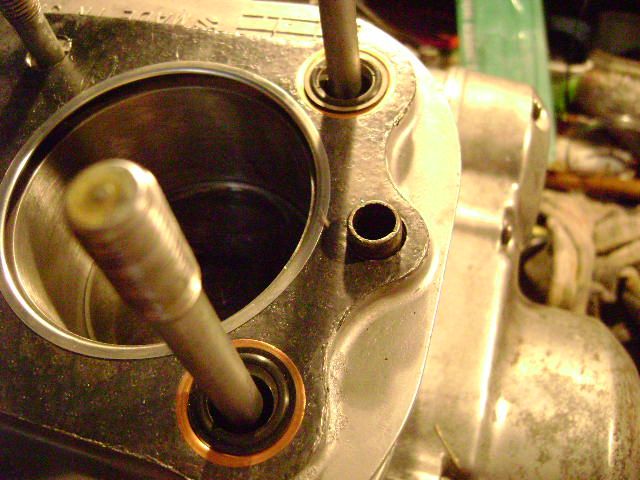
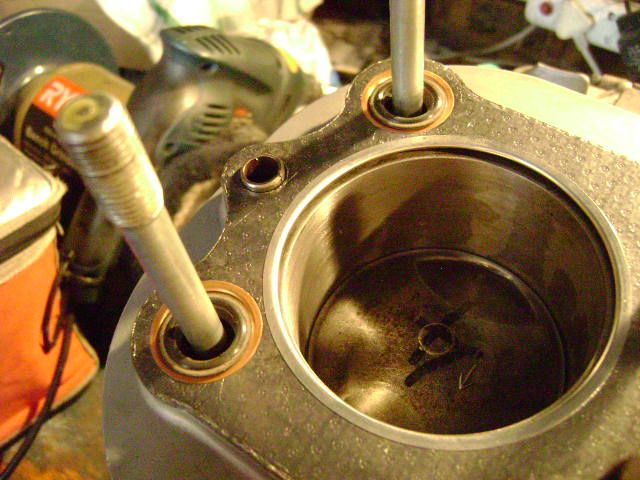
replaced the buggered ring and dropped the barrels, using a screwdriver.
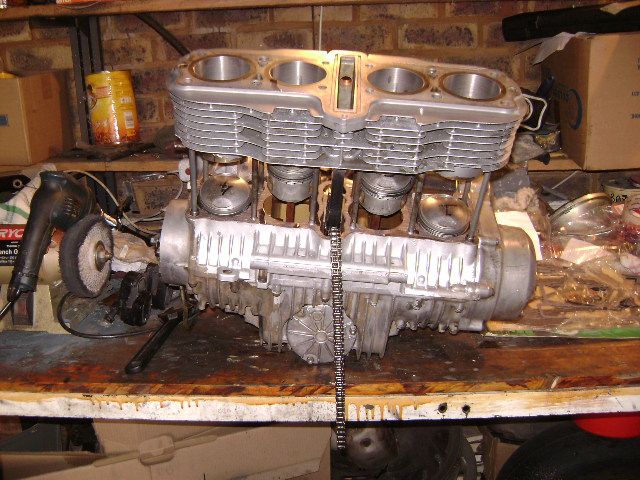
Pretty cylinders, hey, I think there is a song in there somewhere........lived in a GS, down by the crankshaft, everyone called them, pretty cylinders....
One more, just because I can....
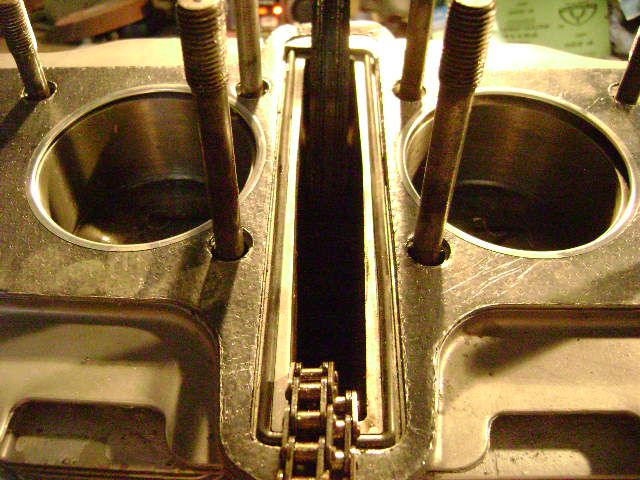
Then dropped the head on
YES and YES
Anyway, had a productive day and got the motor buttoned up.
replaced the buggered ring and dropped the barrels, using a screwdriver.


Pretty cylinders, hey, I think there is a song in there somewhere........lived in a GS, down by the crankshaft, everyone called them, pretty cylinders....

One more, just because I can....

Then dropped the head on

YES and YES


F
Flyboy
Guest
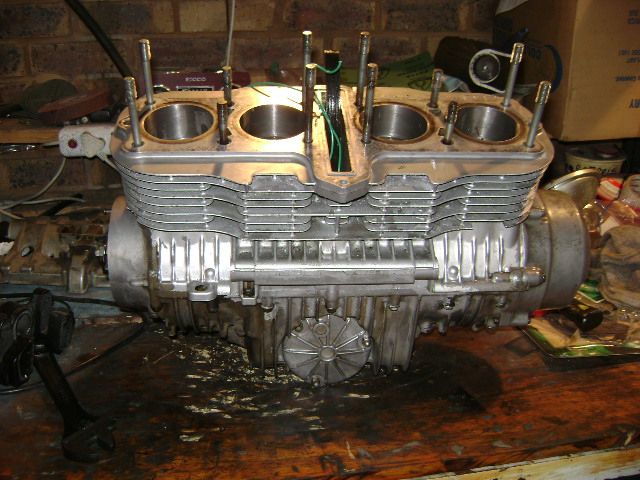
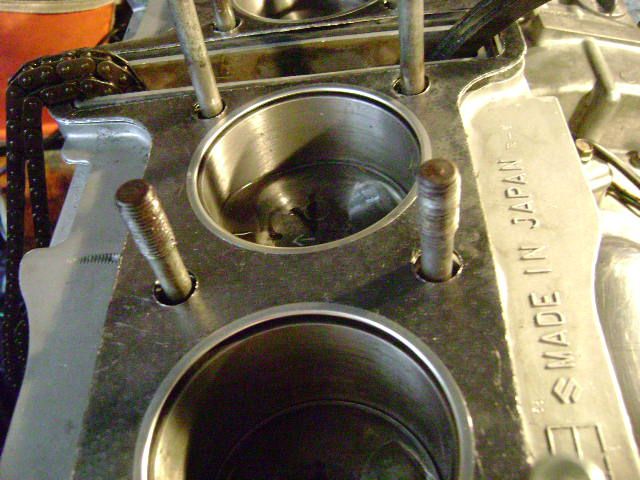
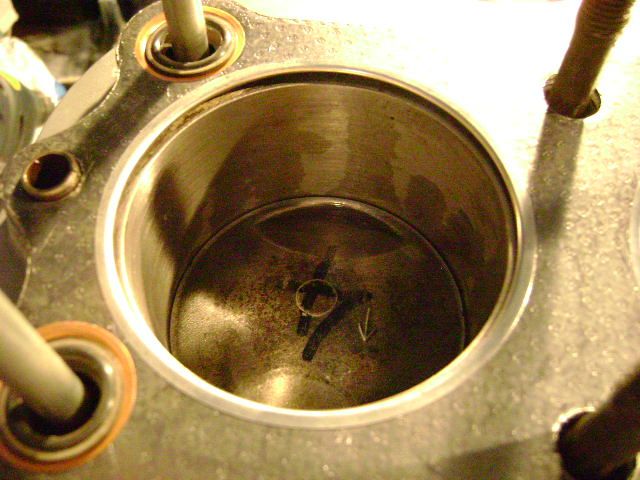
Dropped the cams in and measured the valve clearance.
Though while I have it open, might as well do a small tutorial, as the subject comes up ever so often.
Valve timing 101
NOTE: This applies to the GS1000 engine, other engines have slightly different variations, but the basic concept is the same.
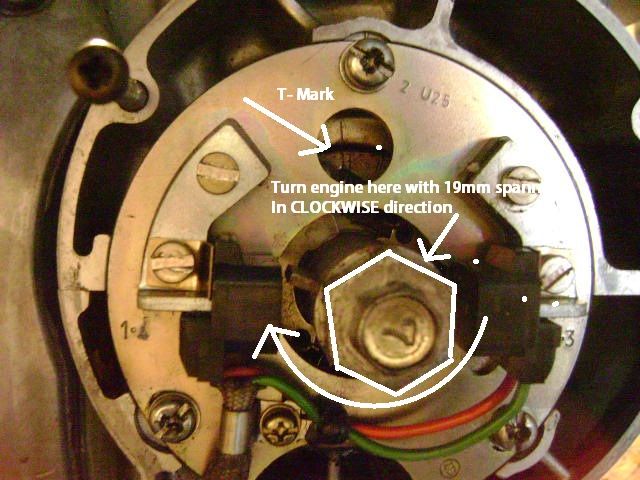
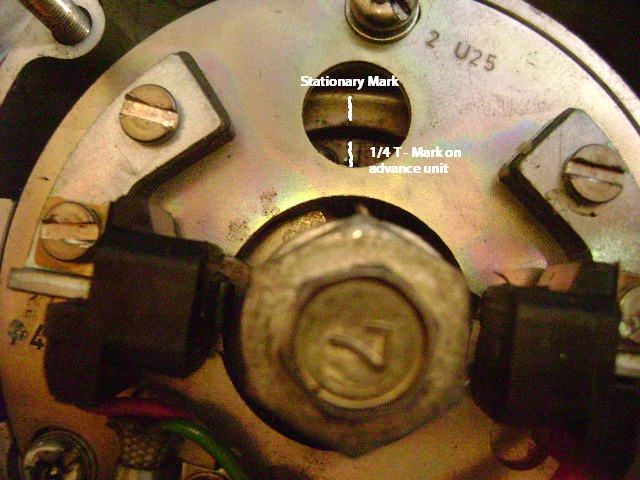
First thing we need to do is turn the engine over and get cylinders 1 qnd 4 to top dead center this is marked on the advance unit behind the ignition pick ups on the right hand side of the crankshaft.
I just put a screwdriver into the plug hole and turn it until it is at the very top, then fine tune by lining up the marks, it is marked 1/4 T, remember to turn the engine clockwise and keep tension on the timing chain to prevent it from bunching up in the crank case.
Ok, once we have our crankshaft mark lined up with pistons 1 & 4 at the op of their stroke, it is time to turn our attention to the exhaust camshaft.
The sprocket has two arrows, marked.....you guessed it, 1 & 2.
Rotate the camshaft so arrow 1 points straight ahead at the head casing and parallel to it.
This will leave arrow 2 pointing straight up, as they are 90 degrees apart.
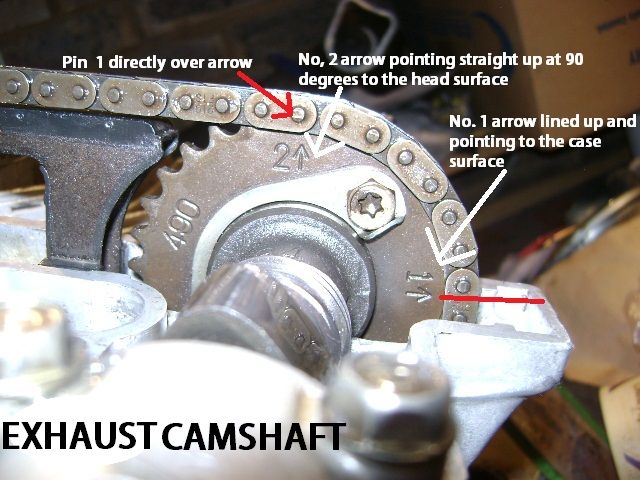
Make sure you remove all the slack from the chain between the crank and the exhaust camshaft (that is the run coming up the front of the engine, and lay the chain around the sprocket.
The pin lying directly over arrow 2 we will call pin 1.
Now the idea is to lay in your intake camshaft so that it's arrow, numbered 3, is pointing straight up, as arrow 2 is, and there should be 20 pins between arrow 2 and 3, including the pins over the arrows.
Rotate your intake cam until you have 20 pins arrow to arrow, remember to make sure there is no slack on the chain between the two camshafts.
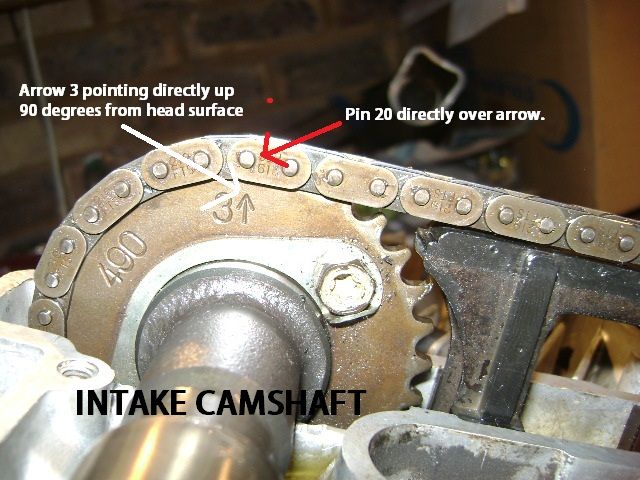
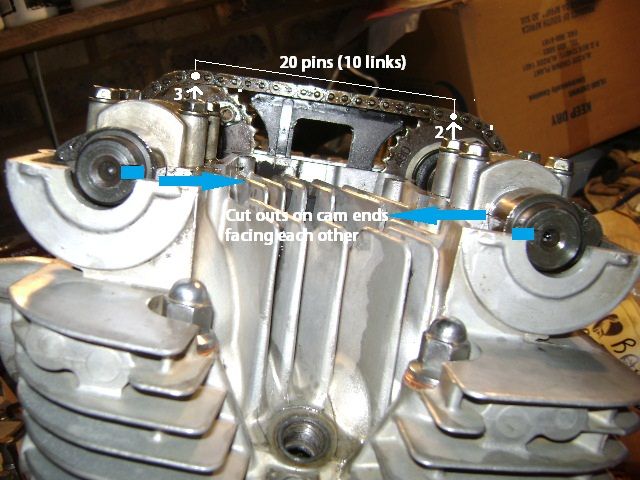
Each camshaft also has a cutaway on the end, when everything is lined up correctly, the two cutaways will be facing each other.
Easy peezy lemon squeezy.
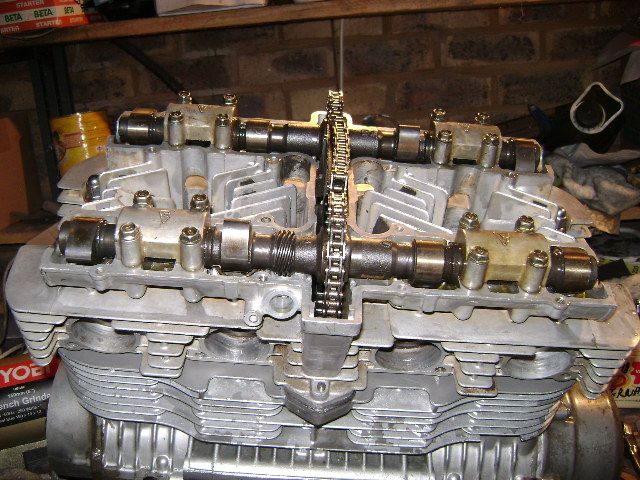
Then valve clearances were checked,
1 Int <0.04mm and shim won't turn
1 Exh 0.15mm
2 Int 0.09mm
2 Exh 0,06mm
3 Int 0.10mm
3 Exh 0.06mm
4 Int <0.04mm shim turns
4 Exh 0.04mm
So all in all not bad, considering I did lap the valves to clean up the seats and get them sealing properly again.
A bit of shuffling should see them all in spec.
Though while I have it open, might as well do a small tutorial, as the subject comes up ever so often.
Valve timing 101
NOTE: This applies to the GS1000 engine, other engines have slightly different variations, but the basic concept is the same.
First thing we need to do is turn the engine over and get cylinders 1 qnd 4 to top dead center this is marked on the advance unit behind the ignition pick ups on the right hand side of the crankshaft.
I just put a screwdriver into the plug hole and turn it until it is at the very top, then fine tune by lining up the marks, it is marked 1/4 T, remember to turn the engine clockwise and keep tension on the timing chain to prevent it from bunching up in the crank case.


Ok, once we have our crankshaft mark lined up with pistons 1 & 4 at the op of their stroke, it is time to turn our attention to the exhaust camshaft.
The sprocket has two arrows, marked.....you guessed it, 1 & 2.
Rotate the camshaft so arrow 1 points straight ahead at the head casing and parallel to it.
This will leave arrow 2 pointing straight up, as they are 90 degrees apart.

Make sure you remove all the slack from the chain between the crank and the exhaust camshaft (that is the run coming up the front of the engine, and lay the chain around the sprocket.
The pin lying directly over arrow 2 we will call pin 1.
Now the idea is to lay in your intake camshaft so that it's arrow, numbered 3, is pointing straight up, as arrow 2 is, and there should be 20 pins between arrow 2 and 3, including the pins over the arrows.
Rotate your intake cam until you have 20 pins arrow to arrow, remember to make sure there is no slack on the chain between the two camshafts.


Each camshaft also has a cutaway on the end, when everything is lined up correctly, the two cutaways will be facing each other.
Easy peezy lemon squeezy.

Then valve clearances were checked,
1 Int <0.04mm and shim won't turn
1 Exh 0.15mm
2 Int 0.09mm
2 Exh 0,06mm
3 Int 0.10mm
3 Exh 0.06mm
4 Int <0.04mm shim turns
4 Exh 0.04mm
So all in all not bad, considering I did lap the valves to clean up the seats and get them sealing properly again.
A bit of shuffling should see them all in spec.
F
Flyboy
Guest
Got the hot oily bit painted and back in her cradle, happy and snug.
Almost starting to look like a motorcycle.
[URL=http://s225.photobucket.com/user/PA34Driver/media/Bikes/DSC03713.jpg.html]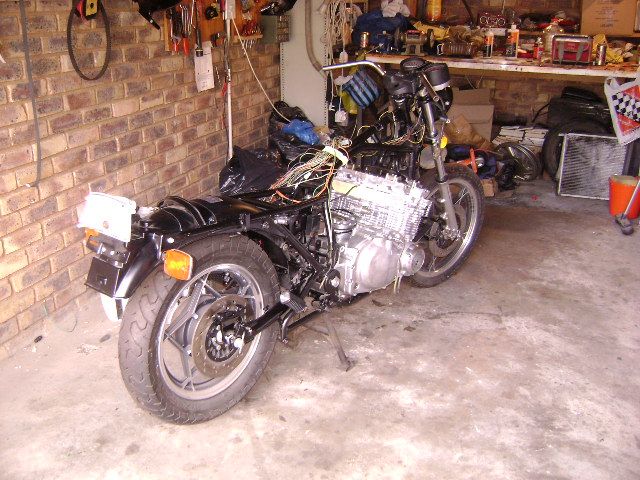 [/URL]

Almost starting to look like a motorcycle.
[URL=http://s225.photobucket.com/user/PA34Driver/media/Bikes/DSC03713.jpg.html]
 [/URL]
Last edited:
H
harley10
Guest
Looks great well done !!:clap::clap::clap:
M
Matchless
Guest
She is beautiful and the center stand is proof of what she looked like before.
Good work Stan!:clap:
Looking great Stan.
G
Guest
Guest
Wow Stan I haven't logged in for ages and what do I find? Jennifer with a heart and some clothes! :clap:
G
Guest
Guest
the center stand is proof of what she looked like before
oh yes, what a transformation! :clap:
N
nuitdevotremort
Guest
Jennifer is looking gorgeous! 'Dem cylinders ;-) Hopefully going through your posts will encourage me to spend some time on my own gs!
F
Flyboy
Guest
Thanks guys, ya Psy, she is getting there slowly but surely, some strange Auzzie once said, if you do something everyday, you will eventually get there....
nuitdevotremort, its pretty easy when you love doing it and don't see it as a chore, it's therapy for me.
Just wish the wallet could keep pace with the enthusiasm.
Maybe better it can't or I would have a whole garage full of bikes.
nuitdevotremort, its pretty easy when you love doing it and don't see it as a chore, it's therapy for me.
Just wish the wallet could keep pace with the enthusiasm.
Maybe better it can't or I would have a whole garage full of bikes.
G
Guest
Guest
some strange Auzzie once said, if you do something everyday, you will eventually get there....
i think i might know the guy
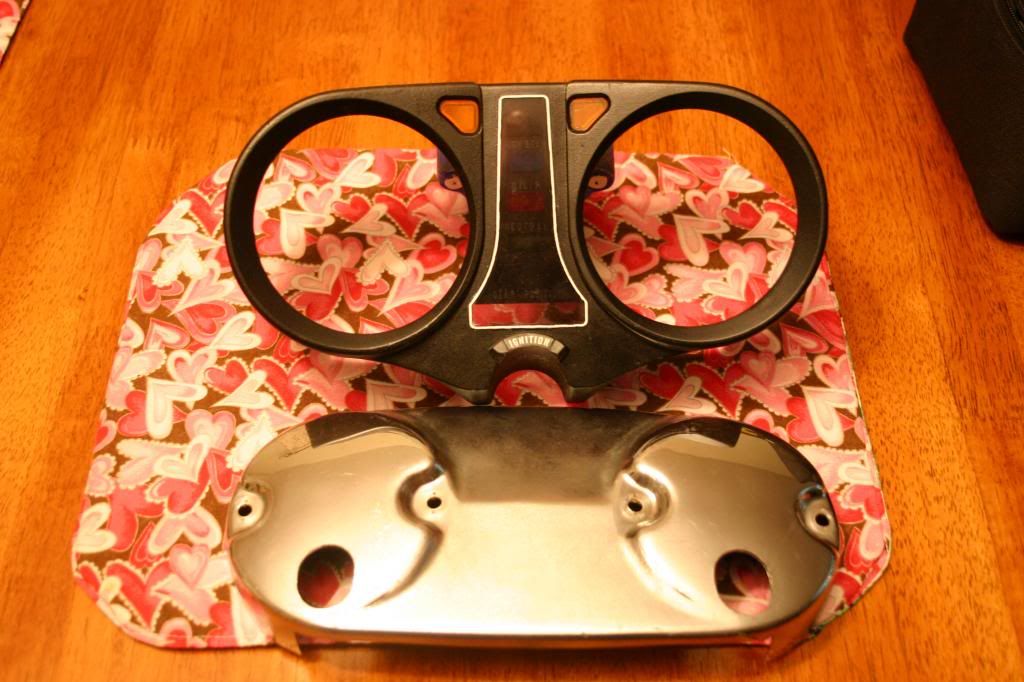
I had to repaint the housing black three times before it was acceptable to me. I wish my hand was steadier when repainting the white around the center but I guess it will have to do for now.
These should look nice enough to go along with the rest of Stans build after I'm finished with them. I even asked my wife if she could print up some white labels to replace original lettering for the turn indicators and such. (my hand isn't that steady!)
Step one... washed and repainted the black housing. Repainted the white.
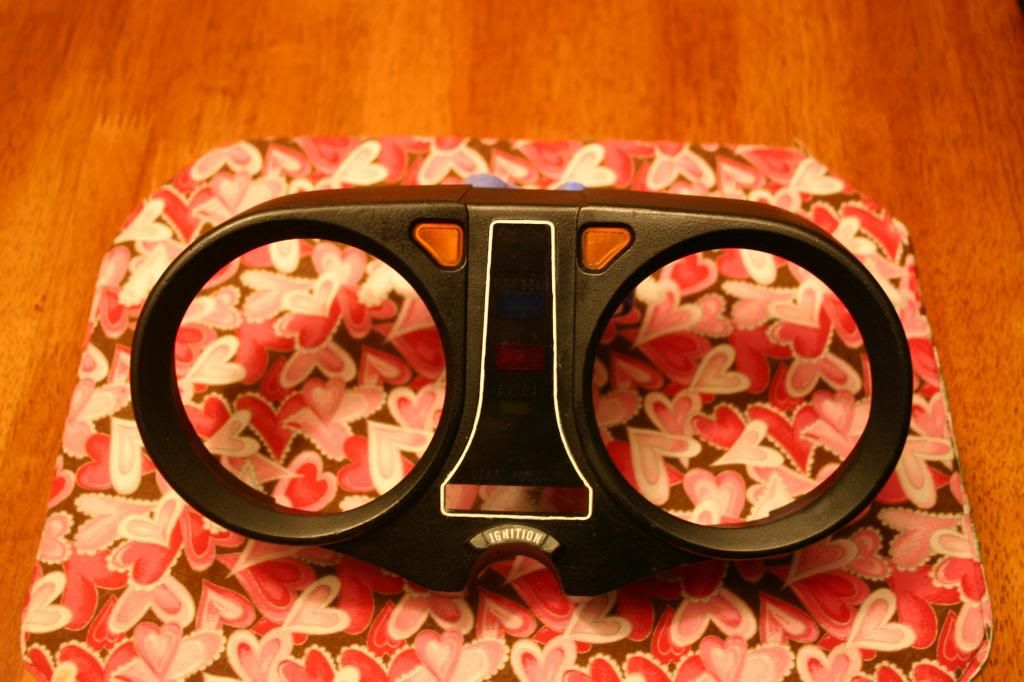
Polished the front chrome cover as best I could. Not as good as new, but better than most used ones normally are. Acceptable.
Pieces parts for the gauge rebuild. Two plus sets of gauges. The plan is to make a set of km/h spec'd gauges. We'll see how that goes after I dissect them.
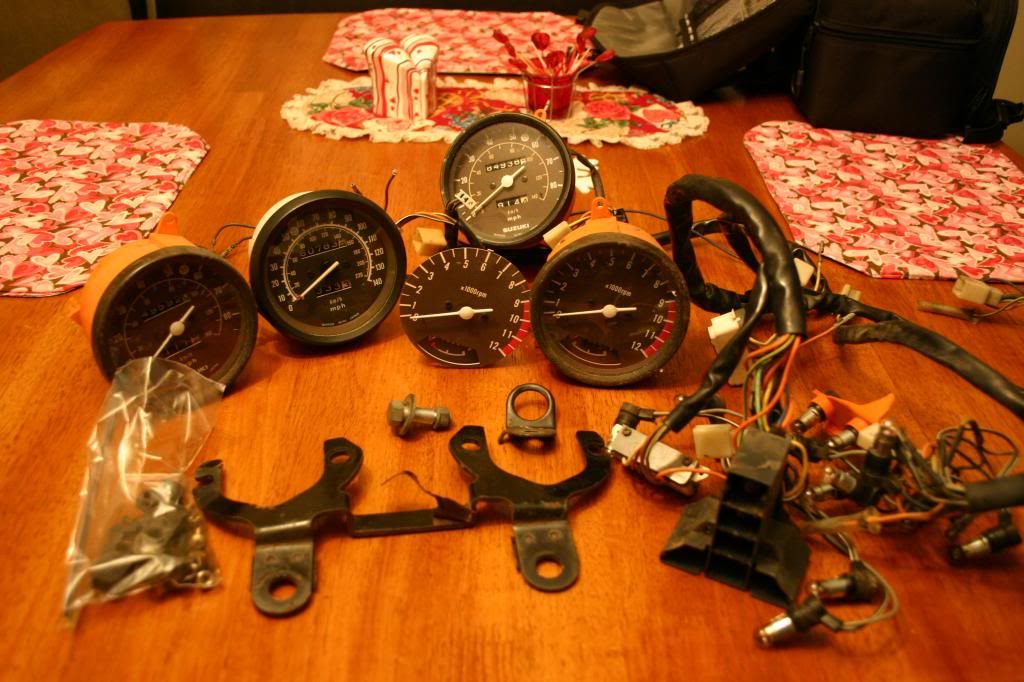
I'll take the best of what is there, repaint the needles, restore the bracket and fix one broken tab. I just need to find a set of new/good acorn nuts to finish it off properly.
These should look nice enough to go along with the rest of Stans build after I'm finished with them. I even asked my wife if she could print up some white labels to replace original lettering for the turn indicators and such. (my hand isn't that steady!)
Step one... washed and repainted the black housing. Repainted the white.
Polished the front chrome cover as best I could. Not as good as new, but better than most used ones normally are. Acceptable.
Pieces parts for the gauge rebuild. Two plus sets of gauges. The plan is to make a set of km/h spec'd gauges. We'll see how that goes after I dissect them.
I'll take the best of what is there, repaint the needles, restore the bracket and fix one broken tab. I just need to find a set of new/good acorn nuts to finish it off properly.
Last edited:
F
Flyboy
Guest
I am speechless Doc, I'll leave it at that