• Required reading for all forum users!!!

    Welcome!
    Register to access the full functionality of the GSResources forum. Until you register and activate your account you will not have full forum access, nor will you be able to post or reply to messages.

    A note to new registrants...
    All new forum registrations must be activated via email before you have full access to the forum.

    A Special Note about Email accounts!
    DO NOT SIGN UP USING hotmail, outlook, gmx, sbcglobal, att, bellsouth or email.com. They delete our forum signup emails.

    A note to old forum members...
    I receive numerous requests from people who can no longer log in because their accounts were deleted. As mentioned in the forum FAQ, user accounts are deleted if you haven't logged in for the past 6 months. If you can't log in, then create a new forum account. If you don't get an error message, then check your email account for an activation message. If you get a message stating that the email address is already in use, then your account still exists so follow the instructions in the forum FAQ for resetting your password.

    Have you forgotten your password or have a new email address? Then read the forum FAQ for details on how to reset it.

    Any email requests for "can't log in anymore" problems or "lost my password" problems will be deleted. Read the forum FAQ and follow the instructions there - that's what we have one for...

  • Returning Visitors

    If you are a returning visitor who never received your confirmation email, then odds are your email provider is blockinig emails from our server. The only thing that can be done to get around this is you will have to try creating another forum account using an email address from another domain.

    If you are a returning visitor to the forum and can't log in using your old forum name and password but used to be able to then chances are your account is deleted. Purges of the databases are done regularly. You will have to create a new forum account and you should be all set.

Kiwi Canuck tries his Luck with a Six Fiddy

I used a Burgundy coloured 3M pad and set the wheel up vertically on a 5 gallon bucket full of warm water, the bottom of the rim rotates in the water bath and I get at it with the abrasive pad, I also use a stiff plastic bristle brush, (like used for dishes) and clean the painted part of the wheel, I do use the pad on the painted part but very lightly if the buildup is thick or it's corroded.

http://solutions.3m.com/wps/portal/...ite-Hand-Pad-7447?N=7581709+3293241244&rt=rud

The bucket works well as you can also lay the wheel on the bucket for cleaning in the crevices, I also put the bucket up on a box to bring it up to a good working height to save my back.

I used some orange pumice hand cleaner to assist with degreasing during the first pass.

I've made the mistake of using simple green on aluminum before, so be careful if you do use any of those types of cleaners as they can etch aluminum and will require extra work to clean it up.

This is a great tip! I wish I learned this 10 wheels ago. I have used the orange hand cleaner on very old neglected paint and had some decent, non damaging results......please try this in an inconspicuous location.
 
Definitely a heplful tip. I did one last night, but used a geeen Scotchbrite, (it was all i had) and some 400 grit sand paper on the rim - they are getting painted all black and the finish is pretty bad, so I had no issues using the sandpaper. The hardest part was getting old brown stains off the wheel. I had to use a combo of some pretty harsh cleaner and Scotchbrite scrubbing to get it off.
 
Great thread David and fantastic build....so many of the early 550 and 650 Kats were just driven into the ground and forgotten about. Nice to see one coming back to life!

Keep up the good work

Doug
 
Great thread David and fantastic build....so many of the early 550 and 650 Kats were just driven into the ground and forgotten about. Nice to see one coming back to life!

Keep up the good work

Doug

Thanks Doug for the comments, wow you have been around for a while but not posted much, nice to have you following along.

David.
 
Update on the progress so far.

Update on the progress so far.

I've been busy with work and family commitments so not too much time to dedicate to the bike in the last week or so. (not all work though, I did get to see Jim Jefferies last night, which was great)

I got a few hours to finish up the rear sprocket and cut the new chain to the correct length and rivet it together.

A few of you may remember the frustration I had with the Chain Tool I purchased for my GS1000S restore a few years ago, I couldn't get it to stay straight when trying to rivet the chain, it felt like it wanted to always twist and cause the tool to get damaged.

I did get a set of instructions from one of our GSR members in Europe, (John Kat) which did help but I finally was able to figure out what was wrong with the way I was using it.

Here's the kit I got, pretty standard and was about $35 IIRC


I ground off the rivet I needed to punch out and used the largest pin and no anvil in the end, the pin came out no problem.

This guy.


Then I needed to install the supplied rivet with the little o-rings and some grease which was also supplied, I used the anvil plates and the one with a slot goes on bottom and the one with the holes goes on top so you can see the pins as they come through the top plate. I used the handle and bar to wind the plates together and once it was close I removed it a couple of times to make sure the chain link wasn't binding up, once it was set to right height and not binding I was ready to rivet the pins.


This is were I really had trouble last time, but this time I used the round anvil without the recess for the rivet.

Not this one as the recess is not big enough and it causes the tool to tilt and once pressure is applied it binds up, I used the one without any recess.


After using the tool to start the rivet I then setup a makeshift anvil and finished the job with a small ballpein hammer I got from my Dad's tool collection, thanks Dad, thinking of you every time I use any of your tools.


Here she is finished beside the old chain.


OK one more small post and that's a wrap for tonight.

David
 
Last edited:
I purchased a new front sprocket and chain but looked at the rear sprocket an figured it should be good for a bit more life, so I put it in the parts washer to soak for a week.

It was still pretty nasty when I pulled it out this afternoon, if you look at the picture above of the old chain that's what it looked like.

If I could get an OEM one from Suzuki I'd probably order it but they are not available and some of the after market ones from JT I've bought came with round holes, which I dislike so I made the decision to clean up the one that came on the bike.

After about 2 hours of cleaning and scrubbing the sprocket and polishing the nuts and bolts, which that part makes no sense should have ordered new washers plates or whatever they're called, as they are only about $1.00 each.

I got it to an acceptable state and I'm calling it done.

Here she is all together but I've not locked the washers down yet.


The sprocket looks a bit worn in this picture but in real life it looks straight, unless I look at it for too long, then I start to doubt myself. ha ha it's going to have to be OK because that's what's going back on.

Taking the boys snow boarding tomorrow so no more bike work this weekend.

David
 
Last edited:
I have used JT sprockets but I really don't like they're round holes.I believe Sunstars come with the proper style,worth the $10ish more.
 
I have used JT sprockets but I really don't like they're round holes.I believe Sunstars come with the proper style,worth the $10ish more.

Good to know, if I need to change it I'll make sure I get a Sunstar then.

Thanks.

Should have an update soon as I just got a Parts Outlaw partial shipment in from the US mailbox, can't wait to dig in and see what they shipped.

David.
 
Last edited:
Here's some of the pieces I got today, a new mirror and got the engine decals and they are the correct ones, I saw one of these on ebay for $45 US located in Japan, but still available from Suzuki for $15.88 I'm stoked about that.

k9p0420a.jpg


Also got a replacement front fender, undamaged and a good donor for this rebuild.

I got a quote to fix the sliver one and it was far more than buying a used one, the silver one is actually pretty beat up so good to find a usable one for a very reasonable price.

 
Last edited:
After 4 hours in the garage today I only got two pictures to post, I got a bit of stuff done but not worth posting pictures of.

Cleaned up the fork stanchions as they had quite a few rust specks on them, cleaned and stripped the triple tree, removed the turn signals and disassembled them as I cleaned them, they had a few dodgy wiring connections and wrong hardware on a couple of them and one had the lens screw mount broken off, not sure I want to spend $76.00 US on a new one so I'll see what my options are.

Cleaned up a pile of parts ready for my next batch to go off to the powder coater.

I also made a new list of bits and pieces needed for the next order from Parts Outlaw.

Straightening levers, if you ever had the misfortune of bending a lever on your bike and tried to straighten it by bending it back and had it break then here's a tip that may work for you.

Remove the lever from the bike and put it in a vise or support it so you can hit it with a hammer, for some reason the alloy will straighten when hit but will crack if slowly bent back.

It's worked for me almost every time.


Two good taps and it was spot on.

 
Last edited:
Definitely a heplful tip. I did one last night, but used a geeen Scotchbrite, (it was all i had) and some 400 grit sand paper on the rim - they are getting painted all black and the finish is pretty bad, so I had no issues using the sandpaper. The hardest part was getting old brown stains off the wheel. I had to use a combo of some pretty harsh cleaner and Scotchbrite scrubbing to get it off.

Hey Glen, how did the wheels turn out, I've been thinking about painting my wheels but the task of applying masking tape always deters me, same for disk rotors.

I stopped by my body shop supply place and picked up a 10 pack of green pads, the green is medium course and the burgundy is fine, didn't know that before, so I have something to cleanup the engine covers to help with getting the lacquer and corrosion off. Hopefully it will make it quicker than with the burgundy pads.

They are only a couple of bucks a pad so not too expensive and they last a good while.

David.
 
David, overall, I'm happy with them. I painted them all black, spokes included. There were a couple of small spots where the paint did not stay on the sharp edge of the spokes, but one would have to look close to see them. I did mask off where the rotors sit though. I did the tedious job of masking the rotors while watching TV in the living room. I found that the paint doesnt seem to cover quickly, especially on the bare aluminum, and had to be built up in light coats (VHT epoxy paint used). The can says 2 light coats then a medium wet coat. I did more then 2 light coats to get where I needed.
20170306_202535.jpghttp://
 
Last edited:
Masking rotors are a pain. I got to the point where I just said screw it, painted the centers and then simply wiped off the over spray on the rotors with a rag and some acetone. Done. ;)
 
Masking rotors are a pain. I got to the point where I just said screw it, painted the centers and then simply wiped off the over spray on the rotors with a rag and some acetone. Done. ;)

Larry, I thought of doing the same or perhaps find a plate or circular thingy the right size, make a cutout in cardboard, hold it so it masks the rotor and spray the center and wipe away any over spray.

I tried masking one of them and after 10 mins and half a roll of tape gave up, they require patience or skill I don't have.

David
 
David, overall, I'm happy with them. I painted them all black, spokes included. There were a couple of small spots where the paint did not stay on the sharp edge of the spokes, but one would have to look close to see them. I did mask off where the rotors sit though. I did the tedious job of masking the rotors while watching TV in the living room. I found that the paint doesnt seem to cover quickly, especially on the bare aluminum, and had to be built up in light coats (VHT epoxy paint used). The can says 2 light coats then a medium wet coat. I did more then 2 light coats to get where I needed.
View attachment 50135http://

I see, not a lot of masking, on the stock wheels on the GS1000/GS650 looks like about 2 hours a wheel (or more)

Did the new paint on the wheels get marked up putting the tires on?
 
Small update, as I took my boys snow boarding today and only had a few hours of shop time this evening.

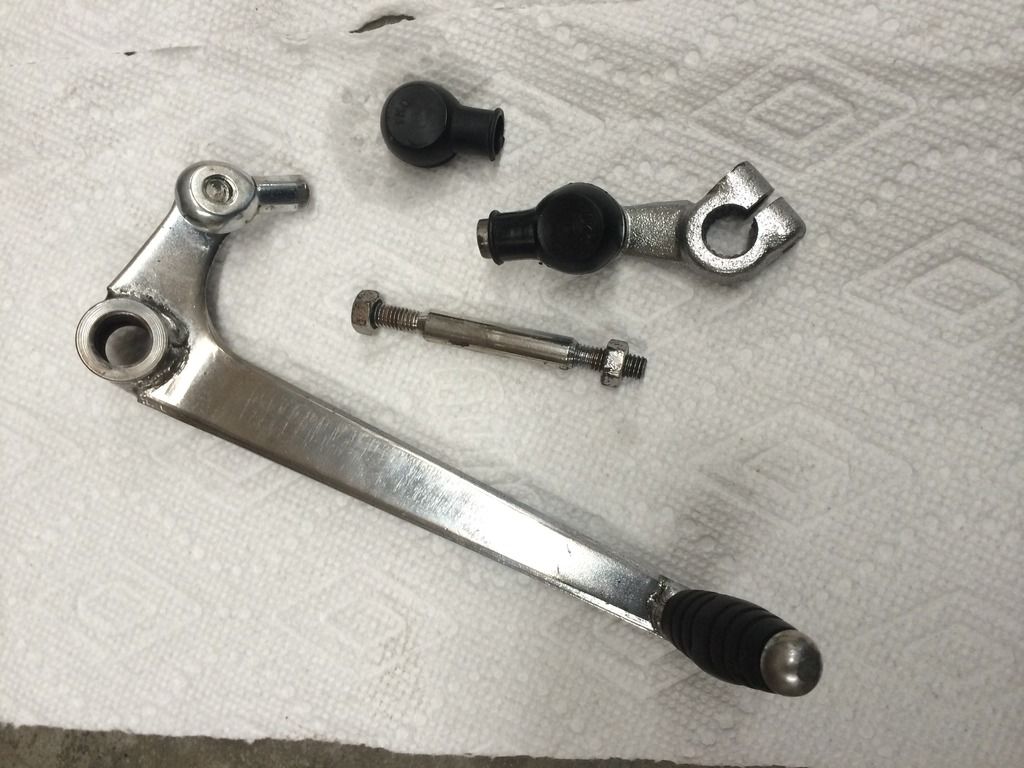
I was working on the engine covers but got bored so I moved onto the gear shifter, it was really loose and sloppy and pretty rusted up.

The ones on both my GS1000S's were not in good shape either and I didn't do a very good job trying to rebuild them, but did learn what not to do, with left hand threads and all.

Any who, I noticed both rivets were almost out and there was a fair amount of play in the ball joints, both nuts were seized as well.

I sprayed them with lube and worked the nuts back and forth until I got one of them loose, then worked the other until it came loose and was able to remove it, fortunately the left hand thread was OK but the standard thread was a bit messed up.

I then washed them in hot water and sprayed the boots with Silicone spray which really helped with getting the rubber boots off without damaging them.

Once they were apart I was able to polished up the chrome and figure out how to fix the rivets without doing anymore damage to the ball joints.

Here's what I used as an anvil to support the rivet, a broken drill bit with the base ground down to allow it to fit inside the opening in the ball joint.


Placed the rivet on it and beat the heck out of it with a ball peen hammer until it was snug.

Getting the boots back on went OK once I figured out how to hold them firmly and used silicone grease to keep them lubed and not hurt the rubber boots.


Now it was time to check how bad the threads were messed up on the adjuster, the nut needed a wrench to move it so I brought out my Craftsman Thread Chaser kit, one of my best tool buys and a must for any restore project.

I got it from Sears USA on sale for $48.00 IIRC with free shipping, it's made in the USA and it's a really good set.


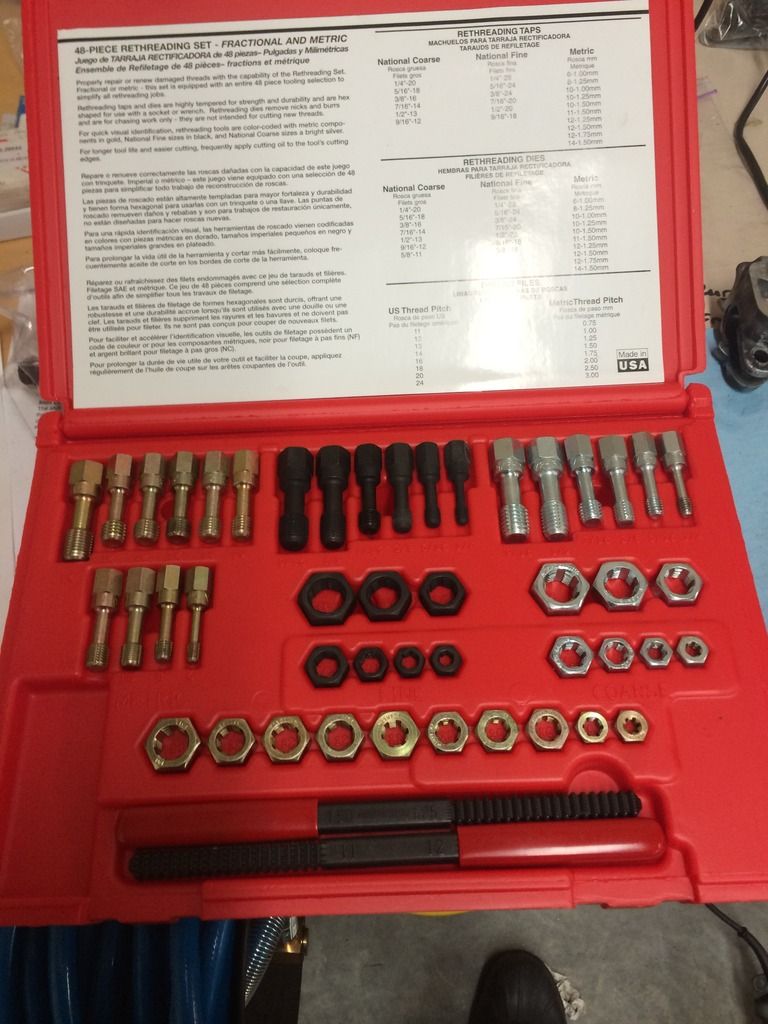
I had always used taps to cleanup threads before learning about these tools, but the tap or die will actually remove material but a thread chaser will reform the thread without removing any material.

So I cleaned up the nut, end of the adjuster and the threaded end in the ball joint, all 3 were messed up from removing them, after running the thread restorers through everything they all worked smoothly.

Here is the kit I bought about 2 years ago and it's on sale for $54.99 includes free shipping.

http://www.sears.com/craftsman-48-p...uct_type: hand tools?sid=ISx20140327xNonBrand

Here it is completed, ready to be bagged and put aside.


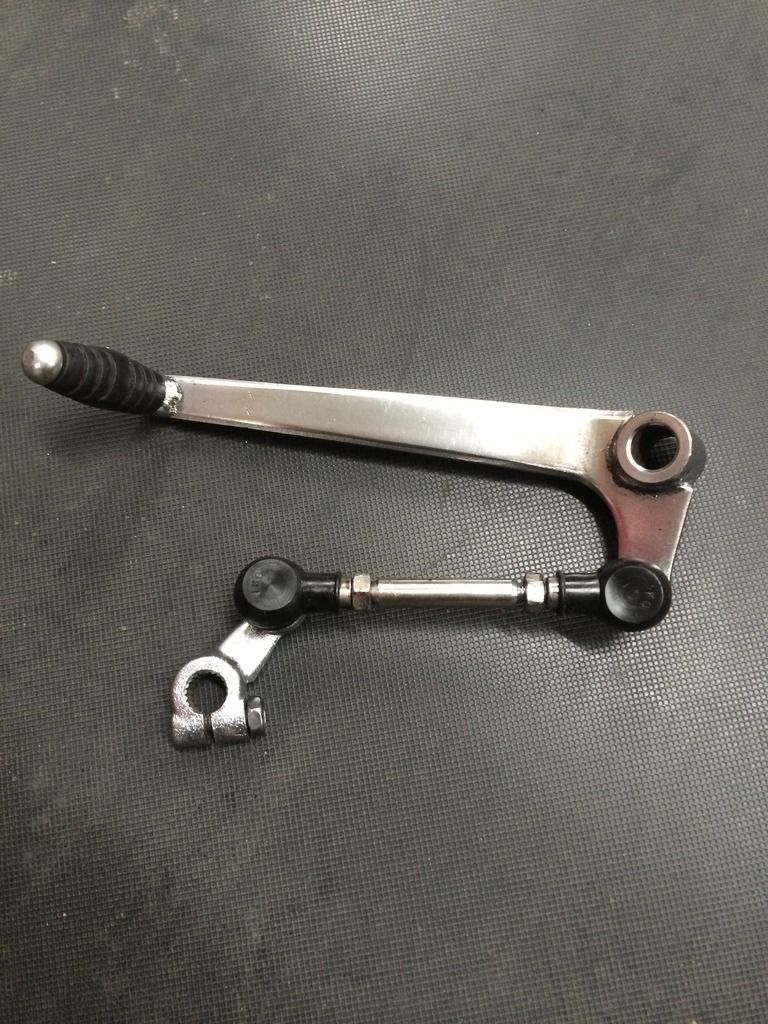
One more piece completed only about a thousand to go.

David
 
Last edited:
I see, not a lot of masking, on the stock wheels on the GS1000/GS650 looks like about 2 hours a wheel (or more)

Did the new paint on the wheels get marked up putting the tires on?

I mounted the tire - something I've never done and wanted to try.... I put a few small dings in it, nothing major. If I actually had tire irons it may have gone better, but even still it was not a big deal to do.

Regarding masking the rotor and NVR2OLD's method, the 1150 has floating rotors, and cleaning up around the bobbins between the center and outer parts would he tough. I'll keep it in mind though if I ever do a one piece rotor.
 
Got a batch of parts today, so I can get some work done on the bike as soon as I can get some time in the garage.

The shipment included a bunch more rubber parts, grommets, hoses, and new carb intake boots. (carb to engine)

Also got new hand grips and unfortunately the patterns don't match, same thing happened on my GS1000S and I put the throttle grip aside and refurbed the one that came with the bike.

Now I have 2 as it was the same part number for both bikes, guess I should have checked before I ordered it.

I'll post up a picture in the next day or so.

I did get the foot pegs reassembled and reinstalled tonight, they looked a bit wonky when the brackets are installed backwards, only took me 2 tries to figure it out.

One other thing that came in the shipment was a new side cover and same thing as once before, part number showed one for silver and one for red, so I ordered the silver one, but it came unpainted.

I need some parts painted so no big deal, I'll just include it with the front fender, tank and rear seat cowling when I drop them off to the painter.

Not much else happening other than I have a new milling machine and lathe arriving next week so I'll need to put some time aside to get them setup.

Both are 3 phase so I will be installing a Hitachi VFD for each machine and rewiring the controllers to take advantage of electronic braking and variable speed control.

I purchased the machines from Quality Machine Tools (Precision Matthews) out of PA and the machines are coming direct from Taiwan.

Here's the lathe if any ones interested, http://machinetoolonline.com/PM1340T.html

PM-1340GT-267x269.jpg


and the Mill, http://machinetoolonline.com/PM-935HighPrecisionMills.html

FullSizeRender-175x277.jpg


David.
 
Here's the issue with the grips, one old style one new style.


Not sure if I'll just install them as is or try and make a matched set, this sort of stuff does bother my OCD.

I'm not sure I want to use a good throttle grip and as a donor for the clutch side grip and build up the handlebar as it's a larger inside diameter.

The bike came with a set of foam grips that had deteriorated so I need to install new ones.

I'll figure something out later.
 
Last edited:
Crazy day today, I started working on the rear brake caliper, it took me a while to get the pistons out, I put them in the ultrasonic cleaner and heated them up to 80 degrees celsius and cooked them for 15 mins, after that I got one side out with compressed air and the other one came out after i used a clamp and moved the piston inwards and then used air to pop it out. Just about squished a finger when it finally popped, I had been very careful with a big rag around it but as it wasn't coming out I was trying different positions and when it popped and I didn't have the rag fully covering the piston, anyway just a small ding in the finger and it hurt for about 30 minutes.

Looks like the pistons will clean up OK so just seals required and paint to get them done.

The front calipers caused even more stress and took me a few hours of cleaning with the ultrasonic and working carefully with compressed air, finally got them done and they were less corroded than the rear caliper so again a new set of piston seals and paint and they will be good to go.

I have been going back and forth on whether to pull the engine apart or not, the cost of gaskets is quite substantial and the bike has 35,000 KM so not high but after looking into the spark plug hole with a light I decided I should just get it done.

The amount of carbon build up was extreme, and it was flaking off in big chunks, so that motivated me to tear it apart today.

Gave it a good cleaning again, but still got grit everywhere when I pulled the jugs.

Here's a couple of pictures to show the condition of the piston crowns, I've now removed the pistons and packed it in for the night.


Back
Top