• Required reading for all forum users!!!

    Welcome!
    Register to access the full functionality of the GSResources forum. Until you register and activate your account you will not have full forum access, nor will you be able to post or reply to messages.

    A note to new registrants...
    All new forum registrations must be activated via email before you have full access to the forum.

    A Special Note about Email accounts!
    DO NOT SIGN UP USING hotmail, outlook, gmx, sbcglobal, att, bellsouth or email.com. They delete our forum signup emails.

    A note to old forum members...
    I receive numerous requests from people who can no longer log in because their accounts were deleted. As mentioned in the forum FAQ, user accounts are deleted if you haven't logged in for the past 6 months. If you can't log in, then create a new forum account. If you don't get an error message, then check your email account for an activation message. If you get a message stating that the email address is already in use, then your account still exists so follow the instructions in the forum FAQ for resetting your password.

    Have you forgotten your password or have a new email address? Then read the forum FAQ for details on how to reset it.

    Any email requests for "can't log in anymore" problems or "lost my password" problems will be deleted. Read the forum FAQ and follow the instructions there - that's what we have one for...

  • Returning Visitors

    If you are a returning visitor who never received your confirmation email, then odds are your email provider is blockinig emails from our server. The only thing that can be done to get around this is you will have to try creating another forum account using an email address from another domain.

    If you are a returning visitor to the forum and can't log in using your old forum name and password but used to be able to then chances are your account is deleted. Purges of the databases are done regularly. You will have to create a new forum account and you should be all set.

Reinstalling 1100G exhaust (stock)

Redman

Forum Guru
Super Site Supporter
Past Site Supporter
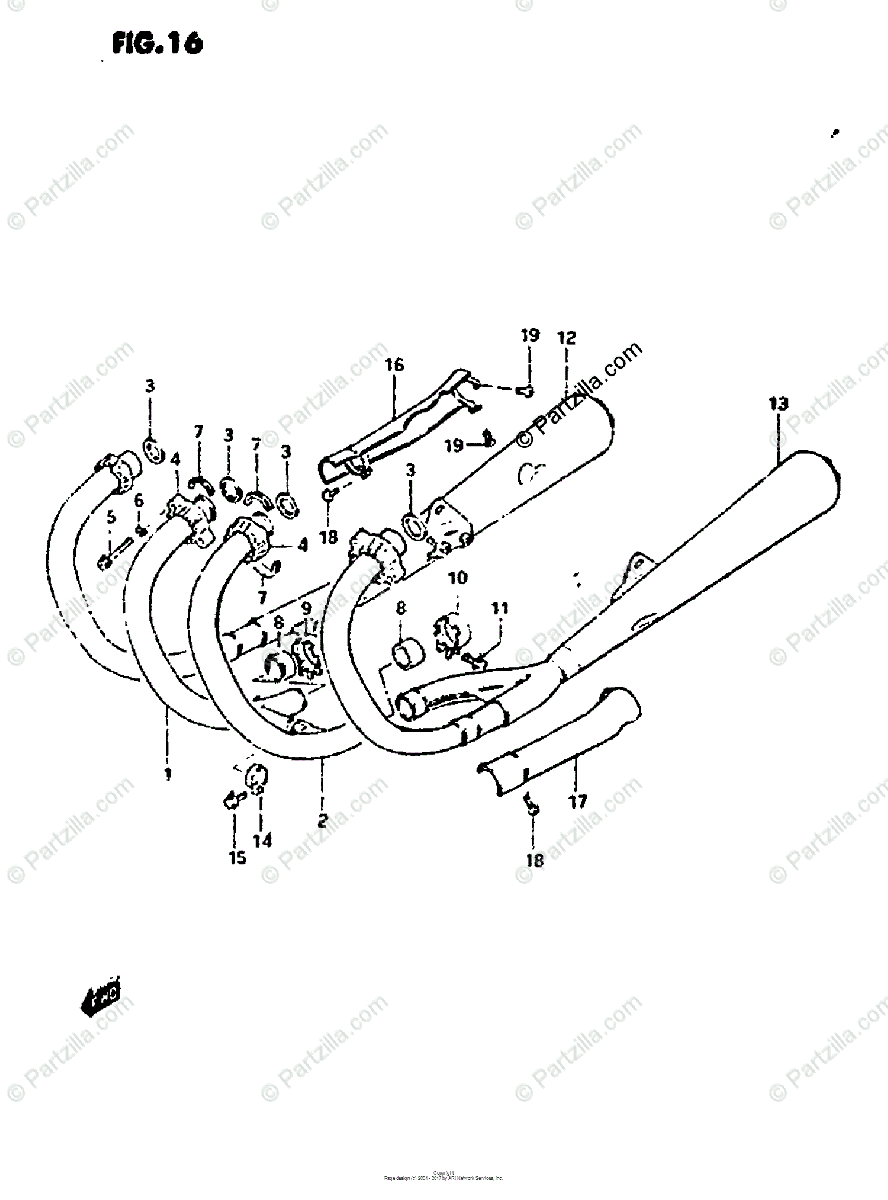
The exhaust system Is basically four parts:
- Right muffler and #4 exhaust pipe ("12" on microfiche)
- #3 exhaust pipe ("1")
- #2 exhaust pipe ("2")
- Left muffler and #1 exhaust pipe ("13")

MjEzNjM1Ng-cbefeb7a.png

Notes:
Doesn't have the pre-muffler part like the 850s.
Is connection between#2 and #3 pipes.

Note: On disassembly, I did take apart the connection between #2 and #3, but did not completely take #2 from the left, nor #3 from the right, but did loosen the clamps a little.
 
Last edited:
At present I have, all laying on the floor, #2 exhaust pipe loosely into its mulfler pipe, and #3 exhaust pipe loosely into its muffler pipe. On dissasembly, I did take apart the connetion between #2 and #3, but did not complletly take #2 from the left, nor #3 from the right, but did loosen the clamps a little.

Bike is on center stand (with tiedown strap between centerstand and front wheel).

When reinstalling the exhaust system, do I want to

A: Get all kinda inplace under the bike, get all four all together (snugly, not too tight), and then lift it all up and into place ??

or

B: Install left, and install right, put #2 & #3 together, and then install them into place.

or

C: some other option I am not thinking of

? ? ?


I seem to recall some complication of the left with the side stand.

Yep, new gaskets in exhaust ports.
Yep, have the flanges("4") and spacers("7") for #2 & #3.
 
Last edited:
No crossover?????
(extra ? because message was too short...)
 
Maybe I should get my son-in-law (competitive weight lifter) to help, har har har
 
IIRC when I had the "G" system on my 1000N I tucked the outer pipes (1 and 4) into ports and put the hanger bolt in just a few threads to hold them loosely in place and keep the pipe in the port, kind of like a third hand. Then if you hold your tongue just right you assemble the center pipes and wiggle the whole thing together .......maybe. Good luck.
 
Ah, I see.

What I would do is remove 2-3 an install the outer pipes first. Don't tighten them up, just loose install.

Then install 2-3 as an assembly into the outers.

Once that's accomplished you can then start tightening things up. Do the header bolts first. As you tighten these the pipes will move slightly rearward so the muffler bolts need to remain loose. Do the outer header bolts first, then the inners. Once all the header bolts are tight, then tighten the rear muffler bolts.

With some luck nothing will leak.
 
If you have a hydraulic floor jack:
With carpet pieces on the floor under engine and either side of rear wheel. You?ll have to remove that safety strap. Leave all connections a bit loose so you can twist things as needed. Slide the whole thing in from front left or right. Probably have to turn handlebars toward you. When assembly is centered under the bike, put a length of 2x6 under the balance point of the assembly, and floor jack under that. Lift assembly up into position. I used zip ties loose where the rear mount holes are bolted, so the mufflers can just sort of hang near where they belong, but with enough play so you can get all 4 headers lined up. Tricky to get the the inserts in position on 2&3 by yourself. Extra hands would help. I?ve done this 4 or 5 times by myself. Works for me.
 
Last edited:
One thing I did with the inserts was to use a small of masking tape to hold them together sort of clam shell style then they would just hang in place over the pipe until you got the clamp in place. The tape soon enough just burned off.
 
Last edited:
I took mine off a few times. Try to keep it in one assembly. I sat next to the front wheel and pulled the headers up and got them into the ports, then found some object the right size shoved under them for support. Then moved around to a side and lifted the muff as high as it would allow and supported it. Then the other side muff lifted and support, if possible shove the bolt in.
Go back to the headers and bolt them into the block. Finally bolt the muffs.
Not too hard, for a young fit man like you. ; )
 
One thing I did with the inserts was to use a small of masking tape to hold them together sort of clam shell style then they would just hang in place over the pipe until you got the clamp in place. The tape soon enough just burned off.

Sandy, that's so simple and brilliant! Wish I'd thought of that. Will definitely do next time.
 
Hey Guys ! Thanks !

THis is what is great about this site.
I post an ignoramous problem/question late in the evening, and before night is out, and before next morning, there are great responses from multiple knowledgeable/experienced folks that know what they are talking about and explain themselves well. (although, har har, with opposed answers - - har har). And provide additional pointers.

I had been thinking that the idea (my "A") of assembling all the exhaust together and then installing on bike (Rich, BB) made the most sence, since then had the most freedom of movement to work the pieces together, and I already had the2 & 3 exhaust pipe in the muller pipes.

But the more I read and the more I looked at the parts, it seemed the idea of installing the outside pipes/mufflers (loosley) first and then putting 2 & 3 together and then install them (my "B", and Sandy and Mr Ed Nessman) just seemed to be what was intended, how things were designed, and could attend to difficulty of each pipe one at a time, rather than having to align all of them with everything all at once, and more manageable for one person. So that is what I decided to do, and took the 2 & 3 pipes out of the 1 & 4 pipes/mufflers.

As it turned out, SonInLaw came over, and we worked on it together. (which I greatly appreciated, and that is an entire story in its own).
Things went fairly well.

Maybe biggest problem was deciding if the longer bolt or the shorter bolt went on the right or left side muffler mount. THe right side is closer to swing arm, so thought shorter bolt went there, but short bolt didnt seem long enough, but long bolt seemed too long. Took a while to get things lined up properly (GK has complication of having sidebag rack mount there also) so the short bolt would work. Probably spent more time on that one step than any other one step.

,,, more later
 
Last edited:
Sandy's idea of taping the two inserts together was great. Had to brush the rust off some so tape would stick.
THen the two halves would just hang there while maneuvering the pipe, but could not get it all to fitt into the opening in the head. Took a while, and multiple trys, to figure out that I had the two pieces right adjacent to each other, but they needed to be spaced apart evenly, duh, so they are circular, duh, to fit in a round hole with limited clearance, duh..

... more later.....
 
We got everything in place fairly easily.
Like I said, probably spent most time with the long bolt / short bolt situation at the muffler mount.

ANd I was quite particular about putting in each exhaust flange bolt. Made sure I got a good eyeball on everything, to see that things were lined up straight.
SonInLaw got this picture (unbeknownst to me at the time, sneaky guy, says he is repaying me)
1fc7LPhl.jpg


And then the clamps below
ir9iWP5l.jpg


And then we had lunch at his favorite place in town
Ux6oIugm.jpg


So, even though folks were suggesting opposite approaches to reinstalling exhaust, it seems that everyone did contribute some words of wisdom that I used.

Thanks.

I should update my project thread. (It is behind by about three different problems-setbacks.) But I need to get back out there and finish up a few things. Might warm back up to the low 60s in a couple days.

(wife keeps asking " ... ... ... and THEN is it done?")
 
Last edited:
A little late now, but for me studs work better than bolts, to attach the exhaust to the head. Just slide the collar up on them & they hang there till you add the nut on, no holding them while getting the bolt lined up down in there without cross-threading, then less than 1/2 the chance to twist bolt off, in the head, if (when) it gets seized. Also use plenty of anti-seize on threads. Bike work went well & belly got full...what else can you ask for??...Congrats.
 
Last edited:
Back
Top