• Required reading for all forum users!!!

    Welcome!
    Register to access the full functionality of the GSResources forum. Until you register and activate your account you will not have full forum access, nor will you be able to post or reply to messages.

    A note to new registrants...
    All new forum registrations must be activated via email before you have full access to the forum.

    A Special Note about Email accounts!
    DO NOT SIGN UP USING hotmail, outlook, gmx, sbcglobal, att, bellsouth or email.com. They delete our forum signup emails.

    A note to old forum members...
    I receive numerous requests from people who can no longer log in because their accounts were deleted. As mentioned in the forum FAQ, user accounts are deleted if you haven't logged in for the past 6 months. If you can't log in, then create a new forum account. If you don't get an error message, then check your email account for an activation message. If you get a message stating that the email address is already in use, then your account still exists so follow the instructions in the forum FAQ for resetting your password.

    Have you forgotten your password or have a new email address? Then read the forum FAQ for details on how to reset it.

    Any email requests for "can't log in anymore" problems or "lost my password" problems will be deleted. Read the forum FAQ and follow the instructions there - that's what we have one for...

  • Returning Visitors

    If you are a returning visitor who never received your confirmation email, then odds are your email provider is blockinig emails from our server. The only thing that can be done to get around this is you will have to try creating another forum account using an email address from another domain.

    If you are a returning visitor to the forum and can't log in using your old forum name and password but used to be able to then chances are your account is deleted. Purges of the databases are done regularly. You will have to create a new forum account and you should be all set.

took apart fuse block

Redman

Forum Guru
Super Site Supporter
Past Site Supporter
I will skip the detailed story about problem I had, but will say it involved:
- being 200 miles from home,
- 1st day on a 4 day trip,
- in a down pour for about half hour,
- getting sent on a highway detour,
- then lightning and getting blown across the lane
- and still raining
... and ... then noticing turnsignals not working, no gear indicator, (and I image no tail light, no brake light).

Was wondering if entire electrical system having a problem. Then looked at voltmeter (I had just installed that week), voltmeter indicating 18.0 volts.
Oh!
I surmised a problem with the "signal" circuit (where R/R sence line is tied to).

Then it cleared up after several minutes, then symptoms came back for a few more minutes, then cleared up.

Stopped when I found an awning to park under. Still raining hard.

Found this:


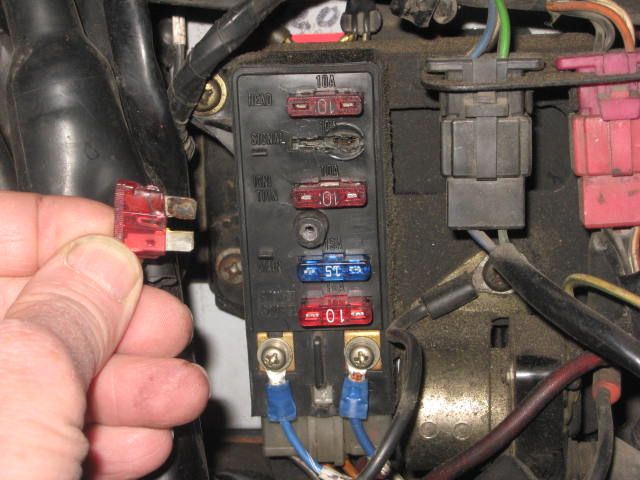
Fuse didn't seem to be all the way in. And was hard to remove. Fuse deformed, but not blown.
That appears to be melted plastic on the fuse tab.
Can see the fuse block melted also. Obviously some bad connetion somewhere there causing some heat.
So not excess current, but bad connection causing heat and voltage drop and reduced current.

I replaced the fuse with a new one, and continued on.
Did stop and look a couple times to see if getting worse.
Did have some knowledgeable GSR folks tell me that can easy get back off the fuse block and can pinch the fuse holder clips to fit tighter.
Did start to remove the fuse block there in motel parking lot, but said,
"ah, it seems to be doing okay without getting worse, I am 360 miles from home, don't make it worse."
(and it was dinner time!)

Had no repeat of the problem, did not melt any worse during the four days and 1200 some miles.


.
 
Last edited:
When got home, did take apart.

Main point of this post is to show what I found.

First, let me say, this is an 82 GS1100G fuse block. THe blade type fuses that I think most all models changed to in 1982 (from the glass fuses). It also has a connector on it.

If you look, you can see how the connector spades are in two rows.
One row is inbetween the back and the middle, and other row is inbetween the middle and the front of the fuse block. (this becomes more significant later)


Did find that can pry off the back. I used a thin sharp small screwdriver (maybe small putty knife might be good too).
Seems to be glue / solvent in just a few spots, so is easy to break the glue/solvent spots.
If they had used more glue/solvent in more places it might be harder or even not possible to get apart.


Last edited:
Got Back off fairly easy.
Can see the back row of circuits (only the back row).
Notice that only thing that holds those circuits in place are the little cutouts on the back.
Provides no access to anything of much any use relative to the fuse connections.


Thought maybe can get the remainder of the fuse block to come away intact from the front,
Nope.

 
Last edited:


Hum....


And before too long, had more of the circuits falling all over the place.


Doah !


Could see the offending connection at the Signal fuse.
Was not so much where the fuse plugs into the clip, but looked more like the problem was where the clip then plugs onto the circuit in the fuse block. (more on that later).
So I did crimp that in a little tighter, and scrapped off some of the melted plastic.

Spent a couple minutes trying to reassemble it all.

Then said "pooie on that".
"I'll just install a spare fuse block that I have."

So, yah, That is my recommendation:
- Have a spare fuse block on hand.
- Keep an eye on ebay, can find one for 10 or 12 or 15 bucks. THey seem to be all the same (if 82 or after, is a blade type, with the aux source fuse and the connector).
- AND ... AND ... and take it with you if going to be 360 and 425 miles from home.

(I had one but didn't take it with me, I thought of it but didn't find it right away when was packing up)

.
.
 
Last edited:
SOme other observations:


Fuses plug into a clip, and the clip plugs onto the circuit in the fuse block. Either of those connections can cause a problem. Actaully where the fuse plugs into the clip seems to be a larger connection. WHere the clip plugs onto the circuit in fuse block seems to be a smaller connection (less surface).


Notice the circuit in the fuse block, the one that is from the key switch and goes to the 3 fuses (headlight, signal, and ignition). Notice how that circuit does not power all three fuses on the same side. The headlight and the ignition fuse (1st and 3rd) are powered on what would be the left, and the signal fuse (2nd) is powered on what would be the right. That is interesting to know next time I am troubleshooting around there with a voltmeter.

Just finding these two little facts may prove useful sometime.

Dave

.
 
First, let me say, this is an 82 GS1100G fuse block. THe blade type fuses that I think most all models changed to in 1982 (from the glass fuses).
Some features started at the top of the model lineup, then trickled down a year or two later.

I can say for certain that the '82 850L and '82 650L both have glass fuses.

I have also seen a couple of '83 850Gs, they had blade fuses.

.
 
Great pics and write-up, Dave!


Your fuse box actually looks pretty good compared to most...

I've cleaned up, re-crimped connections, re-assembled, and re-installed that type of fusebox with good results. You don't have to re-glue if you have zip-ties.

It would be a good idea to make sure the same problem isn't festering away in the replacement, or at least spritz some good connector cleaner (like DeOxit) in there and make sure the connections aren't loose.

It would also be fairly simple to install a later model fuse box as well. With only four circuits, there are a couple of aftermarket fuse blocks (Blue Sea) that could work quite well, although they're physically larger and may be hard to fit.
 
Last edited:
this fuse box looks pretty similar to the ones on the 82/83 GS1100Es. The benefit is that all of the connections are exposed to the outside (fuse sockets) and connector plug).

I dip them in Naval Jelly and then wash with water and use dielectric grease on all exposed contract. Detocit should work as well. You can do this without popping the back cover.

The melted plastic is basically showing that the fuse/contact was corroded and created enough resistance to melt the plastic. A little maintenance was over due.It really was not a fuse box failure, it was the dirty fuse contact.

The older style that have crimps, need to be disassembled and cleaned as well, then I flow solder into those crimps to ward off the same corrosion.

picture.php
 
Last edited:
.........................
Your fuse box actually looks pretty good compared to most...

I've cleaned up, re-crimped connections, re-assembled, and re-installed that type of fusebox with good results. .................
......................


Well, Brian,
Went back at it with a bit more patients this time.
This time I was just trying to get this fuse block back together, not trying to get bike back in operation.

Got all the circuits back in place.


ANd then got it all back together.


So now have a spare fuse block to carry with me for rally. (if I remember it, and can find it)

Have a tywrap on it, here in picture, just to hold together while solvent curing.

Actaully, the mounting tabs bolt holes are on the main body of the fuse block, so bolting it in place will hold the whole thing together. So really only need the back glued on for while it is off the bike.


Oh, and also now have a spare oil fill cap also. (in addition to clutch cable and throttle cable).


.
 
Last edited:
Nice dissection and autopsy. More importantly, though, good to see this problem didn't interrupt your trip or strand you somewhere.

I bought a spare to rework -- ebay, around ten bucks -- and thought it was probably just a waste of money on a part I'd never need. Not so sure about that now!

I also bought a Bosch 70A relay to take almost all the load off of the ignition switch & original wiring. The relay, and not the switch/wiring, will handle the load from now on.

Nice job on the macro photos, too!
 
Back
Top