• Required reading for all forum users!!!

    Welcome!
    Register to access the full functionality of the GSResources forum. Until you register and activate your account you will not have full forum access, nor will you be able to post or reply to messages.

    A note to new registrants...
    All new forum registrations must be activated via email before you have full access to the forum.

    A Special Note about Email accounts!
    DO NOT SIGN UP USING hotmail, outlook, gmx, sbcglobal, att, bellsouth or email.com. They delete our forum signup emails.

    A note to old forum members...
    I receive numerous requests from people who can no longer log in because their accounts were deleted. As mentioned in the forum FAQ, user accounts are deleted if you haven't logged in for the past 6 months. If you can't log in, then create a new forum account. If you don't get an error message, then check your email account for an activation message. If you get a message stating that the email address is already in use, then your account still exists so follow the instructions in the forum FAQ for resetting your password.

    Have you forgotten your password or have a new email address? Then read the forum FAQ for details on how to reset it.

    Any email requests for "can't log in anymore" problems or "lost my password" problems will be deleted. Read the forum FAQ and follow the instructions there - that's what we have one for...

  • Returning Visitors

    If you are a returning visitor who never received your confirmation email, then odds are your email provider is blockinig emails from our server. The only thing that can be done to get around this is you will have to try creating another forum account using an email address from another domain.

    If you are a returning visitor to the forum and can't log in using your old forum name and password but used to be able to then chances are your account is deleted. Purges of the databases are done regularly. You will have to create a new forum account and you should be all set.

top end rebuild of a 1978 GS1000

superawesome

Forum Mentor
Past Site Supporter
Hi again,

as already noted here I found a broken valve guide in my engine while replacing the valve stems seals.
WP_20180529_16_49_40_Pro.jpg
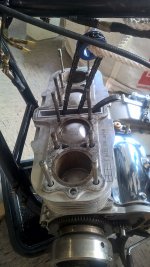
I followed azr's guide, as not to remove the head but I doubt that replacing the guide is possible like this, so head needs to come off.
Obviously I don't want to do that again anytime soon so what else should I consider doing? Here's what I planned so far:

replace broken valve guide:
I read here that most people only replace the broken ones since they are quite expensive (while the manual states to replace all).
base gasket:
I did order a base gasket as well as I heard it is worth replacing that at the same time (and it costs only a fraction of the head gasket).
lap valves
replace valve stem seals

Compression is good so I hope the piston rings are ok, but I will see when everything is apart.

Any helpful links (here or on BassCliff's site) on replacing guides or top end rebuild?

Thanks
 
Last edited:
Replacing guides is beyond the scope of most garage wrenchers. You best find a machine shop to install the guide and touch up the seat since that's a mandatory part of the process.
 
Also from what I read so far I think you are probably right Ed.

Trying to find time this weekend to take it apart, excited to see what I find in there. It's done 52000km after all...

What do you think on the base gasket?
 
Any time you pull the head the cylinder should also be pulled to replace the base gasket and rubber seals. What's not so clear is whether or not to do new rings as well. I'd do so if the budget allows. Use a 240 grit bottle brush hone to create the crosshatch pattern. Oh, and be sure to use OEM gaskets and seals. Not aftermarket. And NEVER Athena.
 
Thanks Ed. I did order OEM parts n gaskets, everything arrived yesterday.
However, that broken valve guide was definitely broken before I touched it since it came out very easily. What harm can a broken vale guide do? I guess it at least causes an oil leak, wouldn't it?

What puzzles me is that I mainly had oil smoke on the left exhaust, while the broken guide is cyl #3. Well I did not check #1 and #2 yet, so I wonder what I find there.
 
In the meantime I disassembled the cylinder head and cylinder. Poured WD40 over the exhaust and cylinder bolts and let it soak for few days and got no issues loosening them. Well, extension helped.
DSCN9530.jpg

Brought the cylinder head to a machinist for replacing the valve guide. He will take care of honing cylinders as well (the guy proposed a 240 grit bottle brush, same as you Ed :rolleyes:), so yesterday I spent a few hours scraping the old base gasket off the cylinders. Pretty shiny now.
Ordered new OEM piston rings plus all other O-rings and gaskets.
 
See the two screws in the holes beside the chain tensioner mount?
I looked several hours for those few months ago! Of course they fell into where the sun don't shine...
One is from a carb cap (lost due to finger trouble), the other one from the choke bar (forgot the loctite :-|)...


scraping off the gasket with a razor and lots of scotch brite...


This is how it looks after several strips of scotch brite. Pretty nice.
 
Last edited:
I renamed the thread since it's scope widened quite a bit.
While waiting for parts, I make use of the time to polish the side covers, clean the rust and burnt oil off the exhaust. Will post some before/after pictures later.
 
Honing and replacing the rings is a job I may do soon.
Did you measure the compression before this?
I'd like to know the psi compression afterwards.
 
Ok, while waiting for piston rings n stuff to be delivered I took some parts home from the workshop and spent the evenings polishing off rust, burnt oil, grime, ...

Stator cover:
42462611054_436c212f74_c.jpg


Too shiny from my understanding, but I am sure they will get dull and dirty pretty fast... needs to fit to the rest of the bike :P


Had to get off the clear paint with steel wool, then different buffing wheels.


Exhaust had a mix of rust and burnt oil/grime. Used tin foil to rub off the rust and had some success with the rough buffing wheels (they are pretty black now...)


The machinist got all the parts now, hopefully he'll get cylinders and head finished soon so I can start reassembling.
 
Morning all,

just a short update after a few weeks of little progress.
My machinist finally honed the cylinders, and I gave them a basic cleaning. A week ago I mounted the pistons and wanted to put in the base gasket when I discovered a little piece of old gasket stuck on the base. Quickly got some scotchbrite to rub it away, got somehow stuck in the gasket, tore the gasket. Aaaargh!
Thoughts about liquid sealant (Hylomar, whatever) came to my mind, but I quickly came to the conclusion that the base gasket is probably the worst place to do a cheap fix. It was very hard, but I had to admit that I need to get a new gasket and finish the job a week later.
So yesterday I went to the garage again and with two helpers finally managed to mount the cylinders. We did make some clamps out of metal sheets, but ended up using fingers and some old dentist's tools instead of those.


Regarding the head, one of the exhaust valves was out of spec, so I ordered a new one and have been waiting to get that delivered. Once that is at the machinist he can do his magic (valve guide is in, but he is renewing vales and seats). So I am hoping to get the head back soon and can finally finish this. I guess I will need new shims still, right?

The bike has been in the workshop for most of the summer now, and it would be nice to put some miles on it this year still.

Thanks for reading
J
 

Attachments

  • 43048085680_f02d2206d9_c.jpg
    43048085680_f02d2206d9_c.jpg
    96.2 KB · Views: 0
Last edited:
You seem to be doing a great job. Keep going...
 
Have your machinist check the depth he cut the valve seats. That depth will reduce the valve clearances and he may have to trim the valve stems. Can take .5 mm off the tips.
 
Hi all,
here's some news from my top end rebuild:

I got the head back from the machinist last week. Felt like it's been gone forever (most of the time was waiting-for-parts though).

He did replace the broken valve guide, as well as the respective exhaust valve. All others were still in spec. He cut all the seats, and replaced valve stem seals. Also some basic cleaning. Looks good:

44578392755_eb49dde94f_b.jpg


So I mounted the OEM head gasket, placed cylinder head and torqued the bolts to spec
43675468610_6913ddfe16_z.jpg


only to discover those two sleeves that I missed to put in!
30551978547_3d98cb4e4f_z.jpg


:confused: Looking at the fiche they belong in between the cylinder and head, around the two outer screws, probably to fully center the cylinder head.

Well, head ready and torqued there was no way back (at least not without waiting for parts another two weeks), so I spun the crankshaft paying special attention to unknown noises, did not hear anything unusual. So I decided to continue, always keeping in mind that I might redo everything if hearing strange noises.
One of the shim buckets was very tight and hard to get in, so I swapped them around and eventually got all of them in (using quite a bit of oil). Label them if you plan to do this, might save you some time fiddling around!

With the help of the manual I mounted the camshafts, but when I spun the crankshaft without the chain tensioner installed the chain jumped a link, so I had to redo it. Next time, tensioner first, then spin crankshaft.
After mounting camshafts and chain tensioner the chain feels pretty tight (see below), any opinion on that? It is that tight all the way round so i assume it is ok.

31619171818_1dde47e17f_z.jpg


I did work on shim clearance before so I had all the necessary tools (feeler gauge and camshaft depression tool). As the machinist cut the seats all of the shims were 1-2 sizes too big.
Got some used shims from my dealership (luckily in stock), so they are all in spec now (between 0.05 and 0.1 mm clearance)
30551980457_30f1185194_z.jpg


Spinning the crankshaft a few times did not reveal anything unusual (still checking for noises because of the missing sleeves), so I torqued the camshaft cover and hit the starter button.
I was quite tense at that time, after all it was a few months working on this. Guess you know how that feels.

No unusual sounds. So I assembled everything, spark plugs, tank, exhaust, side covers. Brought the bike outside, primed the carbs, hit the starter. Almost instantly fired up. Relief. So far so good.
44766986754_4290fba451_c.jpg


After a few seconds I saw liquid running down the engine. Fuel or oil? Fuel, dripping down the carbs.

Felt like a bowl of petunias: "Oh no, not again!". But hey, could be worse. I'm an expert in leaking carbs by now. Having a close look revealed that the rubber on the T-piece between #2 and #3 has shrunk. Read that before, somewhere in this forum. So I decided to sit and wait if it expands. Still sitting and waiting...

In case it doesn't expand (or for the next carb disassemble) does anybody know where I can get a decent aftermarket t-piece for a GS1000?

I feel a bit unsatisfied now, having worked three straight days on the bike, she even runs, but still I cannot take her home. On the other hand it seems my top end rebuild was successful, and hopefully soon the bike season can finally start...
 
Congratulations on the build...but sorry to say those dowel pieces are needed. They hold the head and cylinder in proper alignment. Without them the head may walk around leading to oil leakage and worst case, restriction of oil flow up to the head.
 
The head looks good. I'm curious to see what happens without the locating dowels in place... If it was me, I'd back up and put them in.
 
Hmm, sounds valid. That'd mean new head and base gasket.
I'd think the 12 bolts would be enough to keep the head in place?
 
Hmm, sounds valid. That'd mean new head and base gasket.
I'd think the 12 bolts would be enough to keep the head in place?

Salty_Monk and I put together his 1100G top end yesterday. I noticed when installing the head gasket that those dowels located the position of the gasket to a much more exacting position compared to the studs themselves. The outer studs are oil flow passages and without positioning the gasket exactly it can shift and block part of the passage. With the dowels the seals in the head gasket were perfectly centered around the studs.
 
Back
Top