• Required reading for all forum users!!!

    Welcome!
    Register to access the full functionality of the GSResources forum. Until you register and activate your account you will not have full forum access, nor will you be able to post or reply to messages.

    A note to new registrants...
    All new forum registrations must be activated via email before you have full access to the forum.

    A Special Note about Email accounts!
    DO NOT SIGN UP USING hotmail, outlook, gmx, sbcglobal, att, bellsouth or email.com. They delete our forum signup emails.

    A note to old forum members...
    I receive numerous requests from people who can no longer log in because their accounts were deleted. As mentioned in the forum FAQ, user accounts are deleted if you haven't logged in for the past 6 months. If you can't log in, then create a new forum account. If you don't get an error message, then check your email account for an activation message. If you get a message stating that the email address is already in use, then your account still exists so follow the instructions in the forum FAQ for resetting your password.

    Have you forgotten your password or have a new email address? Then read the forum FAQ for details on how to reset it.

    Any email requests for "can't log in anymore" problems or "lost my password" problems will be deleted. Read the forum FAQ and follow the instructions there - that's what we have one for...

  • Returning Visitors

    If you are a returning visitor who never received your confirmation email, then odds are your email provider is blockinig emails from our server. The only thing that can be done to get around this is you will have to try creating another forum account using an email address from another domain.

    If you are a returning visitor to the forum and can't log in using your old forum name and password but used to be able to then chances are your account is deleted. Purges of the databases are done regularly. You will have to create a new forum account and you should be all set.

what did you wrench on today??

Changed the oil on a TFE731 Westwind engine.... I hate airplanes :)
 
what did I wrench on today?? 02 Blaser, honda 350ES 4 wheeler, yamaha 1100 V-twin and cr250r.
 
I am doing the polishing on the engine covers on the 78 1000 C..I did the stator cover and repainted the Suzuki cover emblem on that as well..Now i gotta do the clutch cover, the sprocket cover, and the point cover and emblem for that side and i will be all done with the restoration aspects.. then put the engine back in the frame and tighten all the bolts and out new cotter pins in all the appropiate places..bleed the brakes and that should be about it.
 
It goes much easier if you use plenty of tire lube. If you dont have any, Murphys Oil soap is the same thing. Two tire irons is about impossible. Three is mucho easier.

Earl

In addition, I cut several pieces out of the side of an ice cream pail and use them as buffers between the irons (Snap-on Pry Bars) and the rim. Leaves NO dings, scuffs, ect when you're done. ;)

Baby powder also works very well and is a lot less messy.

I've been using Murphy's Oil Soap, at about 10% in an spray bottle. Great stuff. I have five tire irons, two 24" from Harbor Freight, and three 6" ones. I started with strips of plastic cut from milk bottles, but they are thin and don't protect well enough. (My rims are still OK on the bead sealing surfaces, but there are a couple tiny dings on the outside.) So I cut new strips from two much thicker bottles.

Basically, my hands are weak and I'm working by myself. So I have to think it through, and use trial, error, and learn something from it. I've watched about ten videos on the process. Most who do it quickly have made or purchased a better apparatus than I have. Some have better tire irons, or commercial rim protectors. Most remove the brake disks. Lots almost throw the bottom bead of the tire on the rim while mounting it. And lots of them skip rim protectors. I'm guessing that they are racing and add air to their tires daily.
 
My truck, kind of. I got it so encrusted with lime rock dust and mud, it has taken me two long days to wash it. LOL

Earl
 
Electrical system on my GS1150. Looks like I'll be ordering a new one... :-\\\
 
Wrenching

Wrenching

I started the dismantling my '73 Yamaha RT3 to finish its restoration. It's down to doing the cosmetics. It shouldn't take much, as I already have the correct paint, decals, and new fasteners. Once it's done, I'll probably sell it to get my hands on a TS400.
 
This thing again, yesterday...seems like a waste of time, but I REALLY love the little thangs. :o
DSCN0903.jpg
 
A carb rack for a 75 Goldwing(probably some of the worst plugged up ones I've done in a while,looks like they sat with water in them for a LONG time!)
a rear tire change on a GSF400,and the starter solenoid on my LS650.
 
Finished repainting the RH and LH handle bar switches and redoing all the letterings..dissasembled all the switches and cleaned every contact..reassembled all that and put them on the bike..Checked everything and it all works properly. She is all redone from the gropund up and reassembled. All thats left is to rebench the carbs, put in the airbox and carbs and run the clutch cable, and bleed the brakes.. then it will be to move on to redoing the newly aquired free 1100.
 
wrenchin.....

wrenchin.....

I havent wrenched on anything for quite some time because funds are really tight. But I still have my Big Zuke and my Lil zuke. So I am jealous and glad to hear and see what you all are working on...Maybe spring time when I get some tax money I can get my new ignition for my lil zuke....:D
 
Finally got the new bigger windscreen on and fitted some grip heaters.
 
I installed a Monster 900 shock to the back of one of my GS1150 EF. I wound in preload all the way before installing it. Other than four extra washers for spacers she was a straight swap and now has about 10mm static sag and feels sooooooo much better than the 99% knackered original which pretty much bottomed out when I sat on her.:).

Also installed a spare seat release lock assembly (it didn't have one) and a used set of coils and leads and set of carbs (off my other 1150 which was running well enough) to get her to start and run properly. It would only start if I cleaned the plugs and had a fully charged battery and was down about 65% on power. The PO had been screwing with the carbs amongst so many other things that if I attempted to list them I'd hit the word limit for posting before I got half way. He gave me a bit of a list of his DIY maintenance for about three years... It (and the bike condition) are best described as a shocking example of dysfunctional love (Shudddder)

Anyhoo I took it for a lap around the block and she feels way better. Next I'll have to strip the front end to sort her out so she will allow counter steering (badly notched steering bearing very much over tightened, blown fork seals and springs) and salvage the 2" of static sag.

I must say that it is nice to be able to put her on the side stand without worrying that she will fall back the other way because the stand was too long... Lol


P.S who woulda thought you could run the rotors down to 3.2mm?

.
 
Last edited:
Cleaned the carbs real good. used barymans carb dip, the carb section on the home page and an oring kit from cycleorings.com. very easy and well worth it. I had rust in the bowls and corrosion everywhere. the orings were D.O.A. Now everything look new...umm...ish...lol. Now all i have to do is put them in the bike, and sync them after i get a tach.....
 
I havent wrenched on anything for quite some time because funds are really tight. But I still have my Big Zuke and my Lil zuke. So I am jealous and glad to hear and see what you all are working on...Maybe spring time when I get some tax money I can get my new ignition for my lil zuke....:D

You aren't alone there. I work on mine in fits and starts and sometimes find lack of $ hold things up. If i am keen but have no $ I get into stripping bits off and cleaning them while my credit card is recharging:( Elbow grease is free and a smidgen of petrol is always handy:)
 
You aren't alone there. I work on mine in fits and starts and sometimes find lack of $ hold things up. If i am keen but have no $ I get into stripping bits off and cleaning them while my credit card is recharging:( Elbow grease is free and a smidgen of petrol is always handy:)
+1 on that, or spend time here getting ideas and inspiration, building the know how.
Right there now as payday is still a day or two away, so, being tired and frustrated with working on the garage floor like a shade tree mechanic, I threw together a nice work bench, using an old single bed frame that I had lying around, went out and bought a length of 40x40x5 mm angle iron for $22, cut it into 1m lenths and drilled for the legs, now I have a nice big work bench, 1m x 2m.
Just have to organise a top now.....after pay day:(
Also continued to prep Jennifers frame for its trip to the powder coaters, drilling out a few broken bolts and fixing the side stand bracket, which was bent.
 
Killed My hands on Ford Truck !

Killed My hands on Ford Truck !

I wrenched on replacing power window gears in the gearbox that hangs on the end of the drive motors in a 1990 Ford Pickup w/ power windows. Ford - in it's 90's wisdom made the main drive gear out of Nylon!!! Made to Crash!
You must have window glass up, speakers out, and all door panels off, then drill a 1/2 hole and dremel out two others to get to the three 8mm bolts that hold motor and drive to window regulator. Nice engineering!Then you get it loose, pull it thru speaker hole, clean-out ton of broken olastic in ancient grease from gear box and replace all gears and grease. Then stand on head to get it all into place, only dropping bolts a dozen times down into door bottom. (magnetic pick-up stick will save you there!) Then you put all the plastic covers and crap back together and hope it works.
They are FIXED! I don't know what it would have cost to have a shop do this and it is on an old truck that is just used as a fram truck, but Holy Crap - it is really hard to do!
Thanks Ford!
There went my whole yesterday...
Ozarkdrb
 
Installed new rear speakers in my 95 Mazda Protege. Old versus new is pretty grizzly:

comparerearspeakersoldtonew.jpg


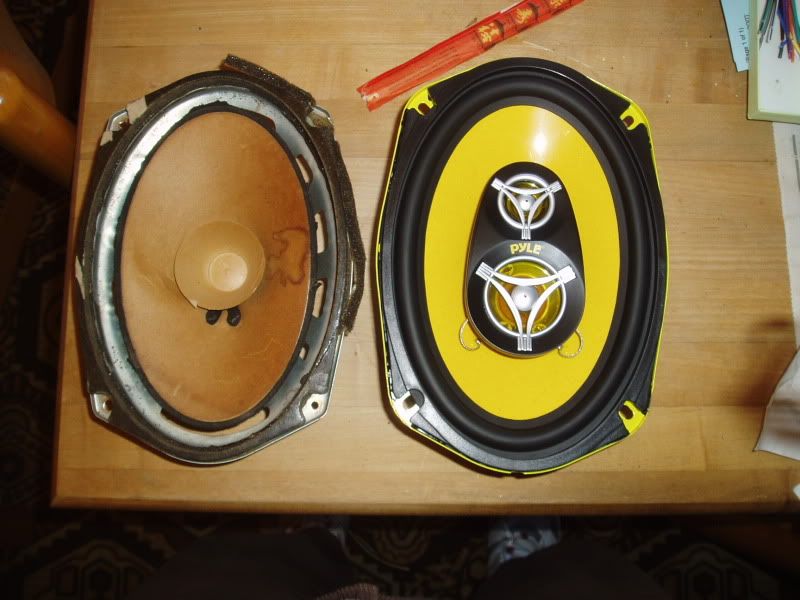
Grills aren't on yet, as there is no good way to attach them. I'll probably end up using a few dabs of construction adhesive. Replacing front door speakers will follow. The old ones are just as bad as the rears. Figuring how to remove/reinstall the door panel without damaging it will be at least half of the battle.

For anyone who needs to replace speakers, check out Parts Express. Excellent prices (both pairs totaled $70 including S&H) and broad selection.
I've wondered how those Pyle speakers sound. So, how do they sound?
 
Back
Top