• Required reading for all forum users!!!

    Welcome!
    Register to access the full functionality of the GSResources forum. Until you register and activate your account you will not have full forum access, nor will you be able to post or reply to messages.

    A note to new registrants...
    All new forum registrations must be activated via email before you have full access to the forum.

    A Special Note about Email accounts!
    DO NOT SIGN UP USING hotmail, outlook, gmx, sbcglobal, att, bellsouth or email.com. They delete our forum signup emails.

    A note to old forum members...
    I receive numerous requests from people who can no longer log in because their accounts were deleted. As mentioned in the forum FAQ, user accounts are deleted if you haven't logged in for the past 6 months. If you can't log in, then create a new forum account. If you don't get an error message, then check your email account for an activation message. If you get a message stating that the email address is already in use, then your account still exists so follow the instructions in the forum FAQ for resetting your password.

    Have you forgotten your password or have a new email address? Then read the forum FAQ for details on how to reset it.

    Any email requests for "can't log in anymore" problems or "lost my password" problems will be deleted. Read the forum FAQ and follow the instructions there - that's what we have one for...

  • Returning Visitors

    If you are a returning visitor who never received your confirmation email, then odds are your email provider is blockinig emails from our server. The only thing that can be done to get around this is you will have to try creating another forum account using an email address from another domain.

    If you are a returning visitor to the forum and can't log in using your old forum name and password but used to be able to then chances are your account is deleted. Purges of the databases are done regularly. You will have to create a new forum account and you should be all set.

  • In order to help others find info on a particular bike, be sure to put the year, make or model of bike that you are asking a question about, in the Topic Title. This will allow people to pass by posts they have no interest in.

1974 Laverda 3C

Going through wiring, some things to correct, takes time, but gotta get it right.

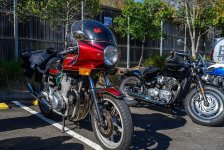
I moved the Voxbell horns up under the headlight, technically a later mod. They moved around on the Laverdas. Mine were originally on a bracket connected to the oil cooler, but that caused cracks, so I read. They were modded by a service update to put them on the engine mounts, facing sideways, and I felt that, being chrome (decent, not perfect in this case), putting them on display and facing forward made sense. Strangely, there are rubber horn mounts under the headlight, unused. Maybe fouled the brake lines.

Anyway, the 1/4" spade connectors were the straight-on type, and stuck out like dog's nutz (1st pic). I was thinkng some flag-type black terminals would work out, and I thought hmm, where did I see those? Well, my GS1100E donated its bits to the cause. They aren't visible behind the oil cooler on that bike anyway, so I swapped them. I think it's more 'sano' as we oldstars used to say.

Loudest horns I've ever heard on a bike, one low and one high. The washers are labeled high and low, alto & basso. Cheap way to ID them on the assembly line, I suppose.

5gLGblm.jpg


1Meej3C.jpg
 
Last edited:
I got an LED H4 headlight bulb, but because of its longer protrusion from the back, it wouldn't fit into the shell, even though the Bosch-style 3-prong connector is compact. I resorted to doing the mod I did on a Honda Dream, which had an unobtanium square-ish sealed beam that I cut up to mount an LED - bent the prongs 90 degrees and ditched the connector. I dissected an old plastic connector to grab the 3/8" spade terminals and got out the shrink wrap - solved. Thankfully, my hackery is hidden.

Ed (Nessism) came through with a SH775 - I am hoping that plus the LED headlight and fancy flashing LED taillight I had on hand will do the trick with this weak charging system. Somehow, the bike racked up 12.7K miles on the weak original ignition and simple regulator-only charging system. Like my KTM450, only one coil from the alternator is for the charging system; the other is dedicated to the ignition. It's rated at 120W. My KTM 450 is similary split, gives about 60W on DC output and ran the headlight on the AC circuit. I changed it to the DC side, and LEDs worked out fine on it. And we think Suzukis have weak/troublesome systems! Big bucks to upgrade the ignition and charging system on these bikes.

Bleeding the front brake is proving to be the mult-day chore I expected. I got the calipers reverse-bled (I think), but nothing's pushing up to the master cylinder. I bled the MC and it's pushing out fluid at the calipers but there's a lot of air in there to purge. My least favorite job on a bike.

wqUPlPs.jpg
 
Last edited:
Remember, we're going to need extensive video and, perhaps more importantly, quality audio!

Knowing of a few of your previous projects, I don’t think it's too soon to congratulate you on a job well done. :applause:
 
Remember, we're going to need extensive video and, perhaps more importantly, quality audio!

Knowing of a few of your previous projects, I don’t think it's too soon to congratulate you on a job well done. :applause:

Thanks, Rob, I know you like videos. I scored a free GoPro, which only needs a new battery, and I'll be all set for a riding video. My other one, a Rylo, is OK but GoPro is easier to use.

I got the front brake bled, about my least favorite task on a bike. I bench-bled the MC with the line to the splitter intact, 'sealed' the end of the line with a baggie and zip tie, then quickly joined it to the splitter. I got an M10x1.0 x AN-3 adapter, so I could use a brake line with a swivel/compression fitting. I had to work quickly to get it routed and fastened. A bit of spillage when I removed the baggie, but not too bad. Brakes are firm.

I struggled for about an hour with the reverse bleed, nothing through the MC, then I realized that I had put in a little eccentric screw that allows for adjustment of the brake lever. That means the return feed is blocked, so yeah, shot myself in the foot. Took it out and saw bubbles in the reservoir once it was all together. A bit of this and that, and it was done.
 
Last edited:
My habit of hoarding motorcycle parts forever unless totally clapped is paying off, lots of little bits now on the Laverda are Suzuki items - nice thick ground for the SH775 with a copper terminal end, rubber boot for starter terminal, right angle flag style horn rubber terminals. Sounds terminal, eh? Plus several baggies of nuts, bolts, and washers come in handy when I drop something that disappears into some nether region of the garage to hide for a few years.
 
Last edited:
The tank mounts at the front like the Suzuki GS1100E, two rubber discs which I 'Goop' glue on - tired of chasing them around the garage, learned that from the GS's. Then, on the back, it sits on two rubber plugs, rounded at the top, which plug into the open mid-frame tube ends. The seat is fastened at the back very simply as well, with two bolts and a sort of bayonet metal protrusion on the seat pan. So putting on both takes 2 minutes. I just wanted to ogle it and share.

I got the alternator cover polishng done today. Tomorrow, I will do the primary cover. Won't be long now.

CL4Aay9.jpg
 
Well worth sharing. It's a beauty.

Just curious, have you found a dedicated Laverda website that have been providing helpful info?
 
Well worth sharing. It's a beauty.

Just curious, have you found a dedicated Laverda website that have been providing helpful info?

Yeah, there's Laverdaforum.com. Many Brits and Aussies. I did meet a sort-of local guy who has helped me out with a stock airbox and some other small bits, and given me good advice. I may buy some RaceTech stiffer springs from him, they are a gread deal. The front end does seem softly sprung but I'll wait until I ride it to see how it feels. I checked out some FB groups, and the forum is better.
 
Primary cover polished (whew), SH775 wired. up, carbs mounted. Nearly done with the fuel and breather plumbing. A curvy rubber breather tube meant for the bike goes for over $100; I'm doing it for $10 with some 3/4" ID hose and barb adapters; it will be fine and not visible anyway.

VwQ60B8.jpg


C4nvmh0.jpg


v2309LT.jpg
 
Running. Some things to sort out, but it fired right up and idles. Still warming up in this video.

 
Had it running in the garage, fired right up and idled perfectly, but (and there's always a but), the center carb overflowed. A few taps with a screwdriver got it to stop. Then today with the bike ready to ride, it overflowed again. At least it's one bolt rather than four tough-to-reach Phillips screws. Hope to fix it today and ride, depends if it's just needing a jiggle or something more.

lANWiTy.jpg


21vvYfZ.jpg


kJrBecq.jpg


e3573fb.jpg
 
A real beauty. I hope we'll be invited along on a ride, with clear sound and a good view of the tach and speedo. :cool:
 
Runs great. Shakedown today, bed in brakes, check for leaks. Everything is spot on, pulls hard, idles well. Brakes, suspension, and instruments are all good. Maybe my last post on this subject. Well, for Rob S, a ride video will have to happen.

fEx3aVb.jpg
 
As pretty a motorcycle in every way as anyone could ever desire. What a wonderful retro-refresh!
 
Back
Top