• Required reading for all forum users!!!

    Welcome!
    Register to access the full functionality of the GSResources forum. Until you register and activate your account you will not have full forum access, nor will you be able to post or reply to messages.

    A note to new registrants...
    All new forum registrations must be activated via email before you have full access to the forum.

    A Special Note about Email accounts!
    DO NOT SIGN UP USING hotmail, outlook, gmx, sbcglobal, att, bellsouth or email.com. They delete our forum signup emails.

    A note to old forum members...
    I receive numerous requests from people who can no longer log in because their accounts were deleted. As mentioned in the forum FAQ, user accounts are deleted if you haven't logged in for the past 6 months. If you can't log in, then create a new forum account. If you don't get an error message, then check your email account for an activation message. If you get a message stating that the email address is already in use, then your account still exists so follow the instructions in the forum FAQ for resetting your password.

    Have you forgotten your password or have a new email address? Then read the forum FAQ for details on how to reset it.

    Any email requests for "can't log in anymore" problems or "lost my password" problems will be deleted. Read the forum FAQ and follow the instructions there - that's what we have one for...

  • Returning Visitors

    If you are a returning visitor who never received your confirmation email, then odds are your email provider is blockinig emails from our server. The only thing that can be done to get around this is you will have to try creating another forum account using an email address from another domain.

    If you are a returning visitor to the forum and can't log in using your old forum name and password but used to be able to then chances are your account is deleted. Purges of the databases are done regularly. You will have to create a new forum account and you should be all set.

1983 GS1100ES Engine Rebuild.

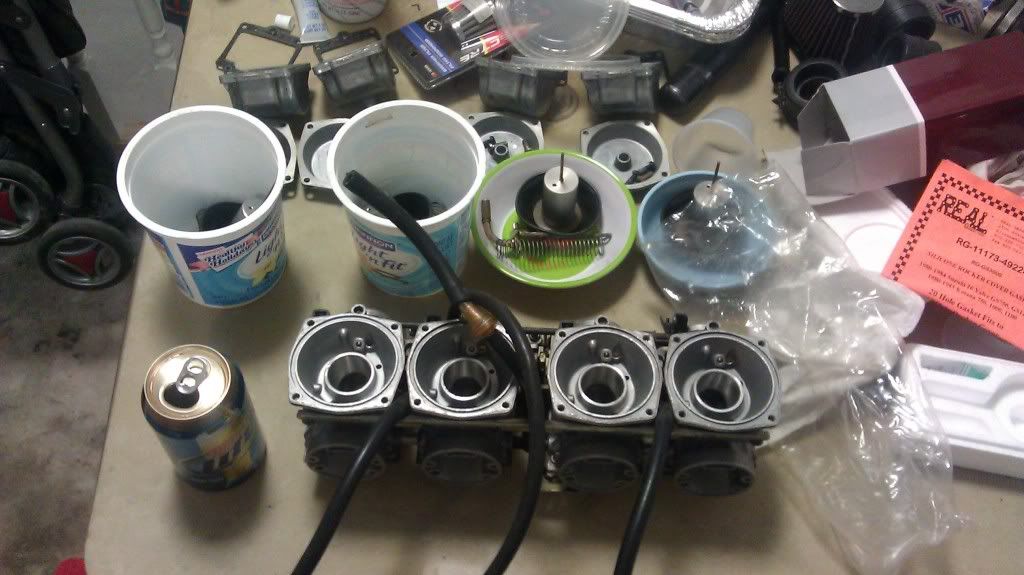
It is the stock ignition...however I've encountered some good deals on Dynatech items...what is the advantage to using them as opposed to OEM that seem to work fine?

If you were to get a Dyna 2000 ignition you would get a less aggressive advance curve while starting the bike which will reduce the chance that the bike kicks back against the starter motor while cranking. Additionally you also get a programmable rev-limiter that will protect your engine against blown shifts. You can also adjust the timing advance curve for the bike throughout the rev range. (I leave mine on the most advanced curve though). Lastly you can set the total ignition advance easily with the marking on the aftermarket plate and rotor.

There is also a wire you can use to retard the ignition timing for turbo/nitrous applications or you can use it as a built in safety switch (i.e. your kickstand is down so it doesn't allow the coils to discharge and create a spark).
 
I was going to install an Ape clutch kit I got on the Bay for $15.

My Oem friction plates looked good so I kept them, but i did use the HD springs...I like a bit of a stiff clutch so that's what i'm hoping for. I'll reserve the APE fibers for the red beast if she starts to slip.

Cams have been shipped. Thanks to Nicholachase29 I've got a nice set of 1150 cams to add to the project.

Nic
 
I'm more of a mechanical guy and the electronics tend to mystify me. Dyna S, Dyna 2000, Dyna 4000.

Street, Prostreet, Drag in that order?

If i could pick up a dyna 4000pro for 100 bucks including ignition plate, would it still be applicable to street use or is it only for high RPM?

I don't need or want overkill but to supplement aggressive street riding.

Nic
 
Oh and since I reassembled and painted, obviously i couldn't cure it in an oven so i used my Wagner heat gun in rotation around the cases to hopefully aid in the paint structure.

Seems ok. I've accidentally whacked it a couple times with my socket wrench and the paint held up. I did cure my cylinders and starter cover in the oven and god damn did it stink up the house LOL.


My wife almost killed me. HOWEVER, the finish turned out great and she was smiling after i showed her how everything looked together.

Nic
 
Last edited:
Looks like you'd need different coils if you got the Dyna 4000:

http://www.dynaonline.com/skins/downloads/instruct/DP4000-1.pdf

Looks like it requires 0.7 ohm ones - stock is 3 ohm.


If i were you I'd get a 2000 if you can find a nice deal on one or else i'd forget about it. I had a DLR-200 I bought (but never installed) for like $30 New on eBay. It's just a rev limiter. If you're not running anything fancy i'd stick to the stock electrics (if you're on a budget) and maybe get one of those for protection. If money is less of an issue the dyna 2000 is nice.

You can change your overall timing advance by radially slotting the holes on the signal generator plate and then using some math to determine how much of a turn will give what amount of advance/retard. (even here I doubt you'll be able to feel any difference "by the seat of your pants" by advancing your ignition --- besides more kick back on starting as it'll move the ENTIRE ignition timing).
 
Pistons installed and cylinder jugs in place.


IMAG0057.jpg


IMAG0058.jpg


Next up is the head. There was quite a bit of debrees once everything was dissasembled.

Used a milk crate and plastic soufle cups to organize my valve components:

IMAG0059.jpg


IMAG0061.jpg


Valves Before:

IMAG0065.jpg

IMAG0066.jpg


With the valves cleaned and lapped its time for reinstall.

IMAG0068.jpg


Little painting on the head and cover and it will be time to pop everything back on the frame.

Nic
 
well with the valves lapped and everything cleaned up and put back together, It was time to put the engine back in the frame.

IMAG0070.jpg


Used my trusty milk crate to get it off the floor, straddled the bike and dead lifted it in. Almost perfectly lined up.

Using a jack, I raised it up to get the motor mounts secured and poof!

IMAG0072.jpg


Did a leak test on the valves and they are holding gas, so looks like I'm good there. I'll Paint the head and cover this afternoon then it's on to installation and valve adjustment.


Nic
 
Cams bolted down and lined up.

IMAG0077-1.jpg


Valve adjustment now. Really tight atm. Staying on the fat side of .04 and using wood screw for fine tuning.

IMAG0076.jpg


valve cover ready for reinstall.

IMAG0078.jpg


Nic
 
Last edited:
You really need to degree those cams if you haven't. Rather than buying aftermarket slotted sprockets I slotted mine myself with a die-grinder and a carbide cutting tool. You can set them for high end power or low end. It really makes a pretty big difference. I had mine set at 104 intake and 106 exhaust. If i were to do it again i'd go 105 intake and 107 exhaust. I guess rule of thumb is to set the exhaust 2 degrees higher than the intake to maximize the scavanging effect. 106/108 will give higher top end, while 104/106 will give low end torque. Somewhere in that range is good.

Good Luck.

Nick
 
HOLD ON!!! :eek: 
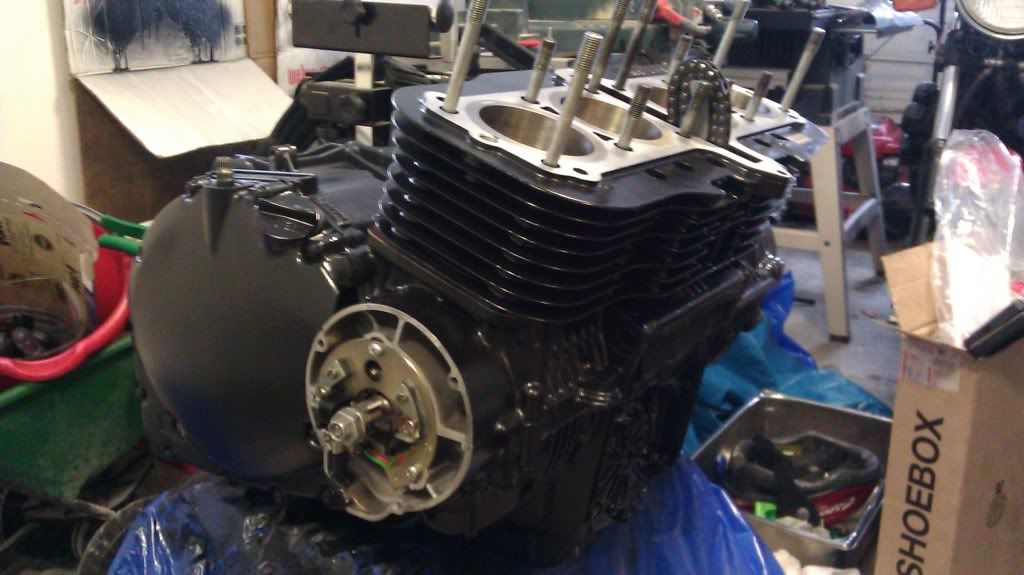
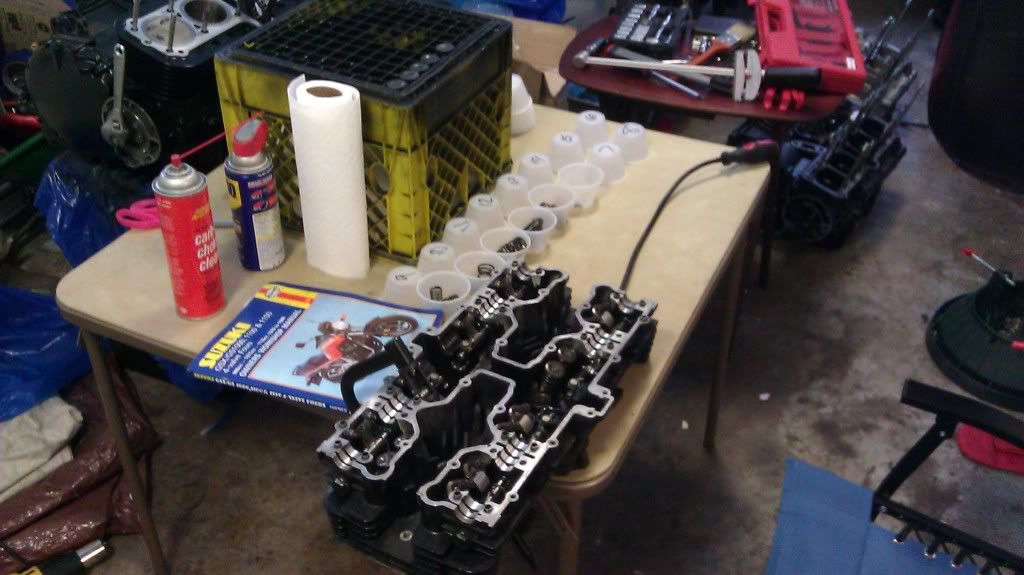
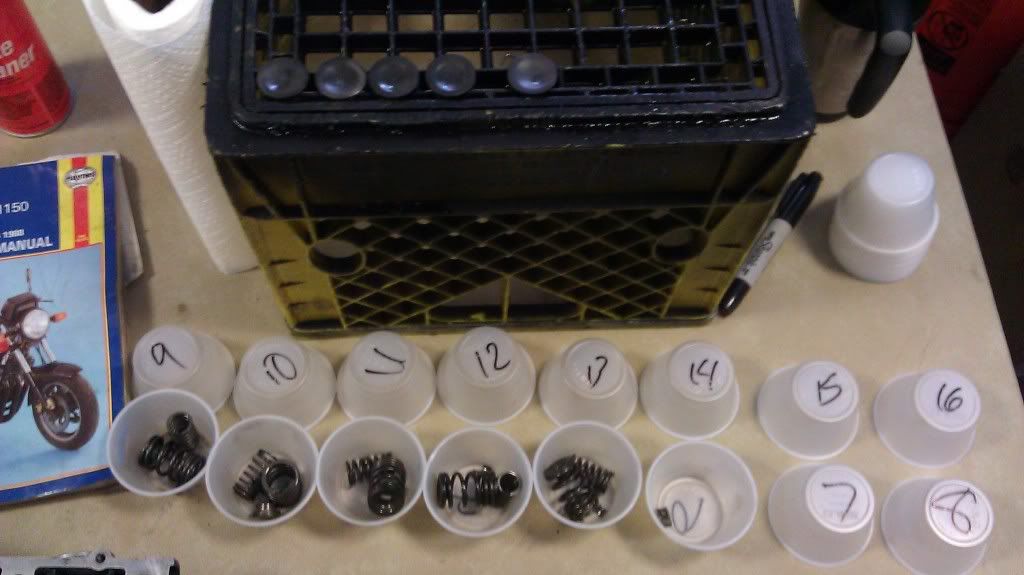
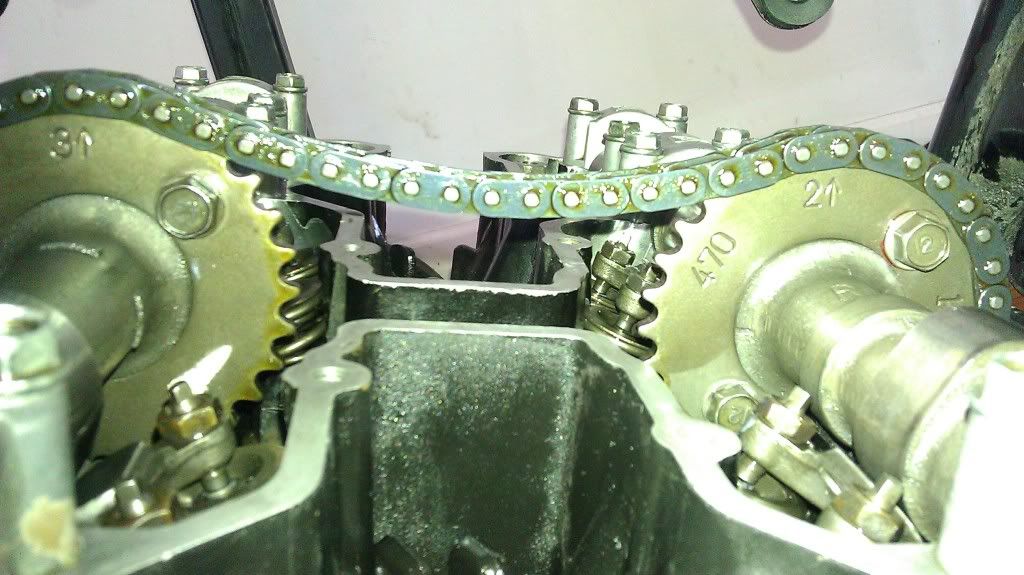
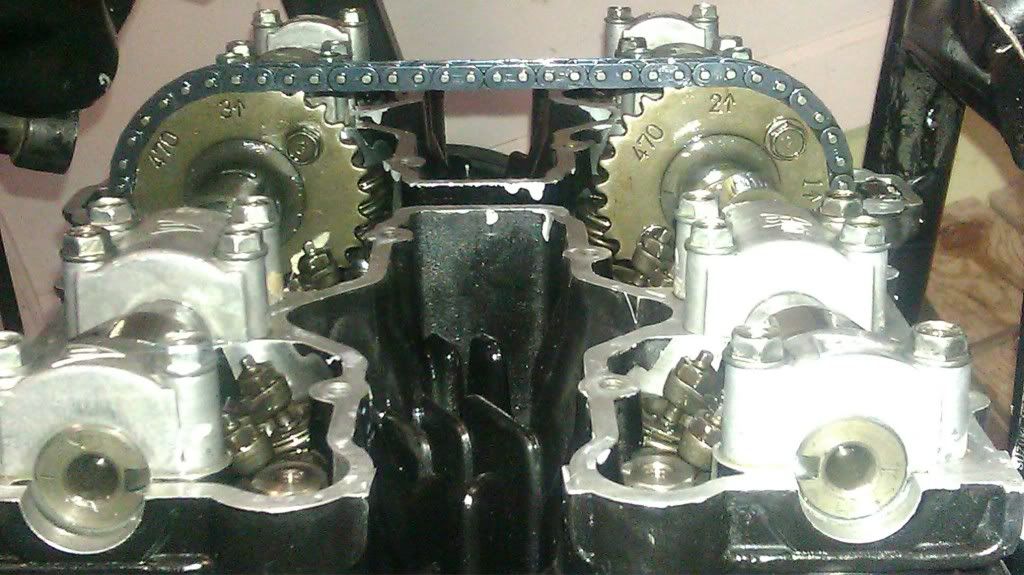
Looking at your picture (from the angle I can see) you have the cams lined up INCORRECTLY! You need to have 21 pins between the timing marks & I only count 20!!! Check to be sure! You will be sorry if it's wrong!!! Ray.

ray am i loosing my mind...it has been a while sense i been inside a GS but i thought from memory it was 20 pins?
 
DATE: January 26, 1999
QUESTION: Cam setting instructions needed - 1982 GS1100

I need instructions for setting the cam timing marks on a GS1100.

RIDER: David Johnston

REPLY: Frank Perreault
The camchain tensioner should already be out.

1) Remove the side timing cover and rotate the crankshaft clockwise until the "T" mark for the Number 1 -4 aligns with the mark.
2) Lube the journals and bearing surfaces on the exhaust cam (marked EX) with assembly lube.
3) Take the exhaust cam and slip it through the cam chain with the notch on the end of the cam facing to the right-side of the engine.
4) Position the chain on the camshaft so that the arrow on the side of the cam sprocket is lined up with the gasket surface of the cylinder head. (facing forward). Make sure no slack is in the front of the cam chain and that the mark still lines up.
5) Install the inside and outside bearing caps. The letters in the casting of the bearing should match the number stamped into the cylinder head. The triangle faces forward. Torque bolts to 6-8.5 ft. lbs..
6) Lube the journals and bearing surfaces on the intake cam (marked IN) with assembly lube.
7) Position the chain on the cam sprocket so that 20 chain pins are between arrow 2 on the exhaust camshaft sprocket and arrow 3 on the intake camshaft sprocket.
8) Install the inside and outside bearing caps. The letters in the casting of the bearing should match the number stamped into the cylinder head. The triangle faces forward. Torque bolts to 6-8.5 ft. lbs..
9) Install the cam chain tensioner.
10) Adjust the valves.
 
Post deleted!!! It is LATE, I had a LOOONG day & I am operating on only 5 hours sleep in the last 2 days. 20 pins IS correct! I had to go dig out my 1150 manual when I came back here & saw your post Terry! Thanks for the correction. Elvis has left the building, good night! Ray.
 
Nick, I am planning on degreeing the cams however money is getting pretty tight atm, so I'll probably do it after the first 500 miles of the initial break in period.

I don't feel comfortable slotting the sprockets myself so will need to get an aftermarket pair. Also, I need to get a degree wheel and TDC gage/tool. All said around another hundred or so shipped.

I've got a couple other items on order so can't quite swing it for a month or so, which will give me more than enough time to start her up and get a few miles in (weather permitting!!!)


For now I'm using my stock 1100 Sprockets with the 1150 cams. Everything is lining up good and it appears I should be OK for the mean time.

IMAG0096.jpg


And Ray,

I went back up to take a look after your post and actually I WAS off on the timing. I hadn't fully tightened down the tensioner and/or bumped the crank... Once the slack was taken up my alignment was about 2 teeth off counter clock wise.

Nic
 
Last edited:
I have some CNC slotted stock cam sprockets if you are interested. I can send them to you for 40 bucks shipped to you. Let me know, Ray.
 
Well yesterday and today I got the cams degreed in. I'm sitting right at 105.5 and 107.5.

IMAG0101.jpg


Took me some time, but after triple checking I ain't gonna move it no more!

Guy in my neighborhood had an 82 1100E that he was going to mod. However, he lost interest in the project and sold his bike (good condition and RUNNING! for $350). I asked him if he had any extra parts and he gave me a set of slotted sprockets that he never got around to using. Might still hit up Ray for another set that will eventually go into the red bike.

Just finished checking the valve clearances and I'm set on the fat side of .04.

Real gasket install, which is actually kind of a pain since it's wiggling all over the place.

IMAG0104-1.jpg


Sprocket conversion kit got here today! Went 17/48.

IMAG0103.jpg


Started breaking down carbs to install new O rings.

IMAG0105.jpg


Carb body interiors are super clean.

IMAG0106-1.jpg


Nic
 
two things

#1 THROW AWAY THAT REAL GASKET IT WILL CHEW UP YOUR CAM GEAR. Dont use it on 16V motors

#2nd you might find this method interesting to improve the accuracy of the measurements so you can get the degree adjustments dialed in faster.

http://www.thegsresources.com/_forum/showthread.php?t=139950&highlight=DEGREE+WHEEL


Well yesterday and today I got the cams degreed in. I'm sitting right at 105.5 and 107.5.

IMAG0101.jpg


Took me some time, but after triple checking I ain't gonna move it no more!

Guy in my neighborhood had an 82 1100E that he was going to mod. However, he lost interest in the project and sold his bike (good condition and RUNNING! for $350). I asked him if he had any extra parts and he gave me a set of slotted sprockets that he never got around to using. Might still hit up Ray for another set that will eventually go into the red bike.

Just finished checking the valve clearances and I'm set on the fat side of .04.

Real gasket install, which is actually kind of a pain since it's wiggling all over the place.

IMAG0104-1.jpg


Nic
 
This bike has an electronic tach, so no gear to worry about.

From my research I should be OK using the Real Gasket.

Without a mechanical tach, the thicker Real Gasket doesn't cause an issue?

Nic
 
This bike has an electronic tach, so no gear to worry about.

From my research I should be OK using the Real Gasket.

Without a mechanical tach, the thicker Real Gasket doesn't cause an issue?

Nic

Sorry ; I forgot you had an ESD. :o

I see there is no tach gear; are those stock cams or 1150?

Edit: OK you got the 1150 cams from Nick
 
Last edited:
Back
Top