• Required reading for all forum users!!!

    Welcome!
    Register to access the full functionality of the GSResources forum. Until you register and activate your account you will not have full forum access, nor will you be able to post or reply to messages.

    A note to new registrants...
    All new forum registrations must be activated via email before you have full access to the forum.

    A Special Note about Email accounts!
    DO NOT SIGN UP USING hotmail, outlook, gmx, sbcglobal, att, bellsouth or email.com. They delete our forum signup emails.

    A note to old forum members...
    I receive numerous requests from people who can no longer log in because their accounts were deleted. As mentioned in the forum FAQ, user accounts are deleted if you haven't logged in for the past 6 months. If you can't log in, then create a new forum account. If you don't get an error message, then check your email account for an activation message. If you get a message stating that the email address is already in use, then your account still exists so follow the instructions in the forum FAQ for resetting your password.

    Have you forgotten your password or have a new email address? Then read the forum FAQ for details on how to reset it.

    Any email requests for "can't log in anymore" problems or "lost my password" problems will be deleted. Read the forum FAQ and follow the instructions there - that's what we have one for...

  • Returning Visitors

    If you are a returning visitor who never received your confirmation email, then odds are your email provider is blockinig emails from our server. The only thing that can be done to get around this is you will have to try creating another forum account using an email address from another domain.

    If you are a returning visitor to the forum and can't log in using your old forum name and password but used to be able to then chances are your account is deleted. Purges of the databases are done regularly. You will have to create a new forum account and you should be all set.

82 GS1100G "patina mod"

miked

Forum Apprentice
We have resto mod, pro street - I'm going with patina mod. No painting, limited polishing, rust removal, a lot of WD-40 t to lift the crud, and cleaning as much of the deep crud off the bike as I can so that it wears a clean patina shine. Let it show it's age

So far - forks rebuilt, dead R/R that was cut out of the harness removed from under the battery tray, the R/R sitting on the back fender behind the battery wired in with wire nuts was soldered in with heat shrink and installed under the battery tray. New Shinkos front and rear. New throttle cable. New battery. New petcock. Replaced intake O-rings. Prob more that I can't think of. Lots of rags sacrificed cleaning the thing and much more to go. Big box of weather pack connectors arriving soon to change out all the 43 year old connectors, and do a bunch of relay mods with new sheathing and heat shrink tape as I go thru the harness.

Reassembled the battery/fuse box/starter relay today. Saw spark in all 4 holes. Compression tester was ancient, hose cracked and leaking, so it got tossed and a new one arrives soon, but all holes were moving the dial.

Tank is off, and I threw some gas down the carb feed fuel hose from a bottle to fill the float bowls and tried to get it to fire. It barked once but wouldn't go.

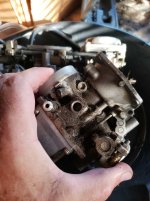
Tore the carbs off and disassembled them.

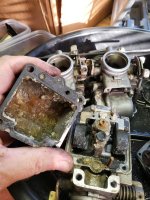
I've never ever seen anything like this. Wet bowls were full of gas jelly, dry bowls full of jelly powder

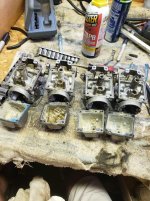
Was able to get them stripped and 1 and 2 are in the solvent soak overnight. 3 still has a stuck pilot that is soaking in PB. 4 has so much crap in the pilot tube that the loose jet won't come out. Pilots and nozzles were gummed up, barely see day light thru 2 of the 4 mains. Honestly, it was pretty impressive level of mayhem. Photos to follow
 
Last edited:
Those carbs are rough! Water got in there. Gas leaves varnish, which is relatively easy to clean, unlike what you have there.

Do you have a pressure washer? If so, maybe blast some of that crud loose.
 
that's the kind of patina that we don't like!

can't believe that I forgot almost 6 hours of work - someone in the bikes past life had filled both tires with fix-a-flat and then just left it all in there. What-a-mess. Big puddle of green goo rolling around in the back tire when I pulled it from the rim. Both beads were full of crusty green goop and black tire rubber, and the center was 1/2" deep (not kidding/exaggerating) with fix-a-flat jelly that needed to be scooped out - more jelly! Took the red scotchbrite pad to the bead and got it pretty well cleaned up, but the shop vac seemed constantly in use to get all the mess that was falling off the tire. Should have gotten a pic but...
 
Last edited:
That’s some gnarly carb gunk, jelly and powder is next level. Sounds like water sat in there forever. You’re on the right track though, soaking and cleaning slow.

Love the patina mod approach. Clean it up, don’t cover it up. Once the carbs and wiring are done, I bet she’ll come to life. Can’t wait to see pics!​
 
That pic must have been taken looooong before it sat and decomposed inside. Looks really nice. I wouldn't have guessed all that crud was hiding in the carbs or tires.
 
bike looked "period correct" when I saw it with 2 flats. But once those covers, the seat, and the tank came off I got the bad news. Nah, I shouldn't say that, it's just *so* dirty and oily. But it's also 42 years old and has a questionable past. Spotted a couple of things on the cam end caps and some wiring splices that lead me to believe that the motor has been out and worked on. Has 36k on the clock

The carbs are a hot mess. O-rings and tiny washers missing on 2 of the idle screws, the air/fuel screw covers had already been taken off, so someone has been thru these carbs before. And I've got the jelly dust everywhere.... Non Mikuni 114 main jets (that at least are all the same size), hogged out frozen screws on top of the #2 cap so it's never been cleaned, just jetted. Got those hogged out screws off with vice grips. One of the needles poking out of the bellows has a washer epoxied to the bottom (#4??) that I've never seen before. I had to destroy the #20 float seats to get them out of all the carbs. Wrong fuel hose size used - had a shutoff valve installed right off the petcock and in between where one side was 5/16, then the output was 3/8, then the 3/8 had another stretch of 5/16 stuffed into the 3/8 clear hose held together with a clamp. The vacuum port on #2 carb completely open, no hose to the tank or blockoff cover.

But I should be able to overcome all of this.

Think I'm going to get a 6x6 alum baking pan with tall sides and fill it with gas, and go at the carbs with a couple of new toothbrushes and scrub them all up to get them clean. Then blow them out with the compressor. Couple of clogged pilot jets that should blow out. The small holes on the sides of pilots and the nozzles are clear, just clogged pilots. I'm surprised that it barked once when I tried to start it tbh given the mayhem I'm seeing.

Ordered a brush kit to get into the tight spots, that arrives on Monday. Have an o-ring kit from Nessism inbound "soon"

truthfully, I'm kinda having fun with it, I like a good challenge and this is certainly one. Very optimistic.
 
non GS content:

One of my other projects is a 74 GT-750 Lemans that I'm customizing "soon". While it was semi original when I bought it, it was rough and wasn't near enough to consider restoring but I'm not cutting it up either to cafe it or something like that. I put 92 GSXR USD forks with extenders on it, and am building a custom braced swingarm out of DOM that will mimic the original but hold the GSXR 3 spoke rear wheel. Want to keep the original suspension geometry as close as I can. The big train headlight is going on it

Anyhow, a guy somewhat near me had a pretty beat up looking 750 engine on Marketplace for over a year. Yesterday I decided to pull the trigger on it and I did the big drive out to the entrance to Yosemite (he is in Mariposa, CA) and grabbed the motor for $350 which I thought was a good price for unobtainium. About 52 miles from me but the drive took 1:30 up what the local riders call "The little dragons tail". Pretty crazy drive up with 1,000' drops about 4' from the edge of the road and it twists and turns along the hillside. Popular ride with the sportbike guys

https://www.youtube.com/watch?v=tIWMHyBLAds&ab_channel=NorCalTwisties%28No rthernCaliforniaBackRoads%29
 
Last edited:
It's been awhile since an update.

Carbs took *a lot of work* to disassemble, clean in the dip bucket, scrub, clean in gas, scrub, blow out passageways with compressed air, scrub some more, reassemble, and finally got them back on the bike yesterday afternoon. I had to use the heat gun to soften the intake boots enough and I used a ratchet strap to apply initial pressure to hold the bottom of the carb intake at the bottom of the carb boot. Got the clutch side into the boot pretty quickly by hand, but the other side was fully hanging out and the assy was all cock-eyed. That's when the heat gun came out. I was able to push the last bit by hand and they popped in once the boots were warmed up. That's a good cheat

Downside: I have a overflow on #3 that I'm going to need to strip them off again for that looks like it's draining gas into the oil pan.... Needs an oil change anyway so no big deal. The rebuild kit I bought was kinda meh - https://www.amazon.com/dp/B0D17GK95S Nice that it came with 4 diff sized jets per carb, but I went with the original jets. I used new float seat valves, the float valves, and bowl gasket from each kit - but used the old of most everything else.

The original #40 pilots in the bike were really odd - no hole in the top. Never seen that ever before, ever. None of the original internals had the Mikuni stamping on them, but maybe the nozzle. Cleaned the small pin holes in the sides of the nozzles and pilots and reused them along with the original mains. Used my new brush kit to clean out the mains.

I'd ordered a new throttle cable, but it's way too long at almost 46", prob long by about 10". https://www.amazon.com/dp/B0B3JQJ88C Looking around for the right length for the throttle cable still.

Adjusted the choke rail so that all the choke valves had just the tiniest bit of play so that the valves weren't being pulled out by one actuator (??) that was too tight with the choke all the way off.

I used my fuel bottle hanging from my canopy to fill the short 8" stub of clear fuel line once the carbs were mounted. But, I could see the fuel level slowly sink down, me: that's not good.

Had already checked for spark, but wasn't the best spark I've ever seen. Confirmed that the coils were going to the correct plugs, 1-4 and 2-3. Compression is 140 on the outer cylinders, and 125 in the middle, didn't check clearances on the valves.

I hit the start button and it cranked good with the new battery, but didn't light up. No airbox on it, so I put a shot of ether into each carb and tried again, no joy. Not even close, just cranked, no bark. In my world I'm thinking I should have gotten something at this point if I have fuel, compression, and spark.

So I'm thinking ignition right now.

Action items:
- Grabbing 4 new NGK B8ES plugs today to replace the whatever-Tiger branded cheapo plugs are on it now, and gap them correctly at 0.6-0.8 mm
- Read the coils out with the meter to make sure they are in spec
- Check that the timing mark lines up, read the service manual or maybe basscliff
- There was a CDI test somewhere on here that I recall reading that I could use now, if someone has a link to that I'd appreciate it so that I can ensure that it is working correctly
- Put a timing light on each plug wire just to be sure I'm getting flashing from each out of the coils
- Assume nothing was done right on this before I drove it home/question everything, and assume that it was not running and parked due to sketch maintenance that left it inop

I'm back to Houston for a few months this Friday, and I really want this thing running before I go. But starting to feel really jammed up for time.
 
Last edited:
Click image for larger version  Name:	2b44f03a6eeb5427d96814f74a1fb5b8.jpg Views:	0 Size:	22.6 KB ID:	1777540

Ignored the game plan list above, and brute forced it for a sec. I was at the store and I grabbed a new can of starting fluid, this one with a long straw on the nozzle to get past the bellows and the opened butterflies.

Filled the carb float bowls again from the remote gas bottle till the clear feed pipe had gas showing, double tap spray in each cylinder so that there was no doubt, and hit start and It barked and then came to life.

Didn't run for sh*t but it took throttle blipping until it ran out of gas. Wouldn't idle. Lol, I'm just running the header without an exhaust, and was backfiring flames here and there on the decel from the blipping, some crap and carbon coming out, header was starting to emit smoke from years of oily hands being on it. Scared all the dogs in the neighborhood with the racket.

Spent the rest of the late afternoon putting bolts on the wire wheel to clean them up. Prob use the float drain screws to run the bowls dry tomorrow, park it back inside, and then leave the carbs for the holiday season when I'm back in CA. Going to order real Mikuni parts from Sudco this time.

But good progress was made today

ETA: 1 image limit per post?? I'm trying to be entertaining here and I'm having my roll slowed
 
II had to use the heat gun to soften the intake boots enough and I used a ratchet strap to apply initial pressure to hold the bottom of the carb intake at the bottom of the carb boot. Got the clutch side into the boot pretty quickly by hand, but the other side was fully hanging out and the assy was all cock-eyed. That's when the heat gun came out. I was able to push the last bit by hand and they popped in once the boots were warmed up. That's a good cheat

I just put the carbs back on my 1100G and used two quick clamps set up as spreaders. One side on the carbs and the other against one of the mounting points for the side cover. Worked pretty well, but would have been less frustrating if I had two people to run each clamp. They fell off a couple times while I tried to switch back an forth, but got them in.

The original #40 pilots in the bike were really odd - no hole in the top. Never seen that ever before, ever.

I would look at those pilot jets again. They should have a hole in the end. With the amount of gunk in those carbs, they are definitely blocked.
 
I would look at those pilot jets again. They should have a hole in the end. With the amount of gunk in those carbs, they are definitely blocked.

I took the brass bristle brush to them, as well as a thin piece of safety wire to try to run it thru bottom to top. The top of the pilot where there should be a hole is plugged by brass, not plugged by crap.

Sad to see sudco go away, used to do a lot of biz with them back in the 90s
 
Back
Top