• Required reading for all forum users!!!

    Welcome!
    Register to access the full functionality of the GSResources forum. Until you register and activate your account you will not have full forum access, nor will you be able to post or reply to messages.

    A note to new registrants...
    All new forum registrations must be activated via email before you have full access to the forum.

    A Special Note about Email accounts!
    DO NOT SIGN UP USING hotmail, outlook, gmx, sbcglobal, att, bellsouth or email.com. They delete our forum signup emails.

    A note to old forum members...
    I receive numerous requests from people who can no longer log in because their accounts were deleted. As mentioned in the forum FAQ, user accounts are deleted if you haven't logged in for the past 6 months. If you can't log in, then create a new forum account. If you don't get an error message, then check your email account for an activation message. If you get a message stating that the email address is already in use, then your account still exists so follow the instructions in the forum FAQ for resetting your password.

    Have you forgotten your password or have a new email address? Then read the forum FAQ for details on how to reset it.

    Any email requests for "can't log in anymore" problems or "lost my password" problems will be deleted. Read the forum FAQ and follow the instructions there - that's what we have one for...

  • Returning Visitors

    If you are a returning visitor who never received your confirmation email, then odds are your email provider is blockinig emails from our server. The only thing that can be done to get around this is you will have to try creating another forum account using an email address from another domain.

    If you are a returning visitor to the forum and can't log in using your old forum name and password but used to be able to then chances are your account is deleted. Purges of the databases are done regularly. You will have to create a new forum account and you should be all set.

82 GS650E Build Brat / Cafe

  • Thread starter Thread starter ddlaz
  • Start date Start date
D

ddlaz

Guest
Hey all, been working on this bike for few months or so. Slow progress but I thought I'd put up some photos and keep track of the changes. Partially for myself and hopefully it'll spark some thoughts in others' builds.


Bike wasn't in terrible shape but it was burning oil through the valve seals so I replaced those. I couldn't stand having the bike sitting there idle while I waited for parts and tools so I decided to chop it and build this with a brat seat.

Mods so far(mainly looks):
Clip-ons
lowered headlight bracket
chopped front fender
rear cafe hoop with upsweep
brat seat held on by DZU winged fasteners
LED tail light with signals integrated
headlight with LED signals integrated
solid state electronic flasher relay to fix the fast flasher syndrome from LEDs
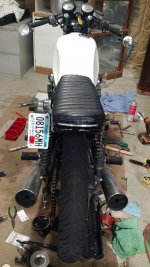
aluminum vertical license plate bracket
repainted tank and fenderwith blue pearls on ultra white paint (unfortunately the pearls are hard to see in the pictures, but it's a subtle blue in the fluorescent light and much better in sun light)

Plans for the winter:
4-1 exhaust
velocity stacks
dynojet s3 kit
acewell gauge cluster
monoshock rear
hide battery and electronics for an open "V" under the seat
dyna s ignition
clean and paint engine

Made the hoop and seat myself. Learned how to do the upswept bend from Dime city cycles' video on that cafe racer show....
Mounted the led tail light strip in the rear of the seat. This thing is really blinding in the daytime. Love the slim look.
I lowered the headlight by cutting out about 2 inches from the bracket and rewelding it back together. I was originally planning on putting the clipons under the top triple tree clamp but the brake reservoir was hitting the gauge cluster. I didn't want to, but I ended up just putting the clip ons on top. It may be temporary until I get the acewell gauge and get more clearance.
Instead of going with a Mac 4-1 exhaust, I'm planning on building my own 4-1 just for the heck of it. Also plan on turning my own velocity stacks.

Can't attach more than one picture per post??

Anyhow, excuse the mess... just finished putting the seat
IMG_20151105_233012883.jpg
 
view from behind.
 

Attachments

  • IMG_20151105_233029430.jpg
    IMG_20151105_233029430.jpg
    98.4 KB · Views: 0
Thanks. Put the emblems on and took her for a ride over the weekend. Since I've been itching to ride it, I probably won't be doing much until the cold really hits and I put her away for the winter.
 
Very nice! What clip on's are those?
Not sure... some generic fleabay ones. They look and feel just like woodcraft clipons from my local bike shop though. I think I paid 50 bucks or so.
Took out the plastic end cap and put in some bar end mirrors.
 
Some older pictures.
Picture of the rear before tank and seat dzu install

IMG_20151010_233743080.jpg

Why can't I attach more than one photo per post?
 
Aluminum seat pan hand bent to the seat frame/hoop. I should have went with a thinner foam for the seat since I like the minimal look but it sure is comfy.
IMG_20151003_140702281.jpg
 
Knee dents
First time doing this and it was surprisingly easy. It "naturally" dented in at the front of the tank by the emblem. If I were to do this again, I'd probably just cut out a section, form it, tig it back in and go with a polished or raw steel look.
I was also worried that the dent would interfere with the in-tank fuel level float but it didn't.

IMG_20150816_192240036_HDR.jpg
 
Last edited:
Some older pictures.
Picture of the rear before tank and seat dzu install

View attachment 42886

Why can't I attach more than one photo per post?
You have to use something like photo bucket, then copy the image link, and paste the code in your message

Not sure... some generic fleabay ones. They look and feel just like woodcraft clipons from my local bike shop though. I think I paid 50 bucks or so.
Took out the plastic end cap and put in some bar end mirrors.
Cool. they don't have "risers" on them right? IDK if that's the correct terminology but can't tell if they're offset in any way from the hoop to the bar I guess.
 
You have to use something like photo bucket, then copy the image link, and paste the code in your message


Cool. they don't have "risers" on them right? IDK if that's the correct terminology but can't tell if they're offset in any way from the hoop to the bar I guess.

I figured I'd have to do something like that. Was hoping there was an easier way or a limitation from my account or something.

No riser height on these bars, although they did have ones specified with a riser height. they are angled downwards from the fork tube clamps. meaning the handlebars arent perfectly perpendicular to the clamp.
 
Last edited:
Damn, you made that seat? It looks really good .
Puts my homemade 850 brat project seat I made to shame. May have to rethink that one. Lol
Looks like you are doing a quality build. Thumbs up
 
Ok time to 'fess up. I made the seat pan,foam, and pattern for the seat cover. After my crooked sew lines, I taught the mother in law how to sew the pleats for me.
 
Diggin what ya done with the tank.....may be doin similar to mine, but wont be using a ball-peen, lol.....btw....a nice filler fer the deep stuff is called KittyHair or Tiger Hair.....its basically Bondo mixed with fiberglass fibers....works great for the deeper fills....gotta get it down to raw steel though....in those spots....after you do that, you can use the regular Bondo scratch filler to smooth....

I actually thought about building like wing type things onto my tank with the KittyHair....just for texture and to make it different....almost like downward spoilers.....

I downplay myself, but so many have told me I have a mega eye for design.....I dunno....I just start cutting and welding and painting....from my heart......if I dont like it, the 12 lb sledge comes out and I redo it.....
 
Ok time to 'fess up. I made the seat pan,foam, and pattern for the seat cover. After my crooked sew lines, I taught the mother in law how to sew the pleats for me.

Well imo the foam smoothness and shape are the two hardest parts to get right. That and The proper shape for the cover so when stretched there are no wrinkles or bunches.
The stitches are theoretically just decoration.
You did good man.
 
Back
Top