-
Required reading for all forum users!!!
Welcome!
Register to access the full functionality of the GSResources forum. Until you register and activate your account you will not have full forum access, nor will you be able to post or reply to messages.A note to new registrants...
All new forum registrations must be activated via email before you have full access to the forum.A Special Note about Email accounts!
DO NOT SIGN UP USING hotmail, outlook, gmx, sbcglobal, att, bellsouth or email.com. They delete our forum signup emails.A note to old forum members...
I receive numerous requests from people who can no longer log in because their accounts were deleted. As mentioned in the forum FAQ, user accounts are deleted if you haven't logged in for the past 6 months. If you can't log in, then create a new forum account. If you don't get an error message, then check your email account for an activation message. If you get a message stating that the email address is already in use, then your account still exists so follow the instructions in the forum FAQ for resetting your password.Have you forgotten your password or have a new email address? Then read the forum FAQ for details on how to reset it.
Any email requests for "can't log in anymore" problems or "lost my password" problems will be deleted. Read the forum FAQ and follow the instructions there - that's what we have one for...
-
Returning Visitors
If you are a returning visitor who never received your confirmation email, then odds are your email provider is blockinig emails from our server. The only thing that can be done to get around this is you will have to try creating another forum account using an email address from another domain.
If you are a returning visitor to the forum and can't log in using your old forum name and password but used to be able to then chances are your account is deleted. Purges of the databases are done regularly. You will have to create a new forum account and you should be all set.
You should upgrade or use an alternative browser.
Chris P
Guest
Look at this pic -lots of hiding places for goop.( note that the idle/air mixture screw on upper left is not marked.)
Nessism's tutorial spells out the specifics-
Chris P
Guest
Chris P
Guest
Ms Mitchell
Guest
Thanks eli, Im just sitting down to bench sync them right now. Doing a bit of reading on the forum on the appropriate steps. Have you done this before on yours? Thats probably a dumb question. Im wondering if this is right: Carbs 1,2,4 the butterfly valve is open just enough so I can see the first hole at the top of the inside of the carb. Carb 3, is completely closed. The throttle screw is backed off completely. Does this sound right?
Did you get her running good? Im in the process myself of deep cleaning my carbs.
Chris P
Guest
Cheers
After that, you should have read this:
CV carb rebuild tutorial
If you didn't do it EXACTLY per the manual then rebuild the carbs again. Make sure you adjusted the float heights correctly without the float gaskets in place using an accurate gauge.
Second, you didn't do the bench sync correctly. You need to adjust carb #3 using the idle adjustment screw just enough that a paper clip will slide through with just a slight amount of drag. Then adjust carbs 1,2 and 4 to match #3.
Once started, you need to allow it to warm up. Once warmed up, you need to do a proper vacuum sync using a 4 carb sync tool. Adjust the idle to around 1500 to 2000 RPMs when doing the sync with the choke off. After the sync, adjust the idle to around 1100 RPMs.
All of this should be done with the air filter in place and the airbox all sealed up.
Chris P
Guest
Steve
GS Whisperer
Whenever I have rebuilt a set of carbs (and I have done dozens), I start with the mixture screws out 3 full turns, not 2. After the bike is warmed up, you will adjust each screw until it gives you the highest idle speed possible. They might end up in the 2 to 2 1/2 turn range, but starting at 2 turns might be just a bit too lean to run properly, and you still won't think you have it right. Starting with 3 turns is like having the "choke" partly ON, it gives it a richer mixture, making it easier to start.i have the air/mixture screws turned out 2 turns. I've inspected the air box and it seems pretty well sealed up. Before i put these carbs back into position, is there anything else I should take care of while this space is open?
No. Don't worry about the first hole at the top of the inside of the carb.Thanks eli, Im just sitting down to bench sync them right now. ... Im wondering if this is right: Carbs 1,2,4 the butterfly valve is open just enough so I can see the first hole at the top of the inside of the carb. Carb 3, is completely closed. The throttle screw is backed off completely. Does this sound right?
Don't worry about using a paper clip, either.

Adjust the master idle speed knob until you see a very slight sliver of light under the butterfly. Turn the center sync screw until you see a sliver the same size under carb #2. Then do the same thing with the left sync screw to get the same-size sliver under #1. Finally, adjust the right screw to adjust #4. Here is what you are looking for:
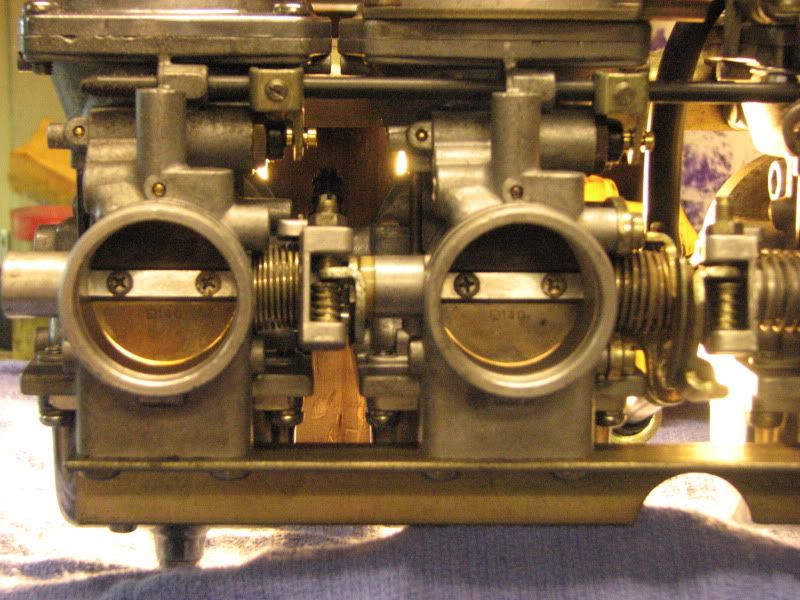
Note the light under the butterfly. When you can operate the idle speed control and see that ALL the butterflies close at the same time, you have done a good bench sync. Turn the idle speed in a couple of turns and put the carbs back on the bike.
Keep in mind that #1 is always the LEFT carb, and the LEFT carb is always on the LEFT side of the bike as if you were sitting on it, ready to ride.
I tried the Real Gasket on one bike, but sold it soon after, so I don't know how well they really work. I have had no problems with the stock 'cardboard' gaskets. Just use a light film of oil or grease on them, they will come off easier at your next valve clearance check and can be re-used several times. New half moons are a good idea if you have just gotten the bike. They are cheap insurance.Thanks for the to do list. Im looking into the valves shortly, was wondering if i should purchase the "real gasket" or the stock cardboard one, also do you think its a good idea to order new half moons (dont know the actually term for these but thats what they look like)?
If you do decide to go with a Real Gasket and new half moons, install the half moons (with a thin film of RTV on the curved surface only) and then install the valve cover with no gasket at all. You only need to install the outer bolts, snug them down to clamp the half moons into place overnight. When the cover is removed, the half moons will be sitting flush with the head, and will not leak right at the corners. A cardboard gasket will push them into place right away, a Real Gasket will not be installed with enough force to do that, so take your time, do it right.
.
Badooka
Guest
Thanks for the to do list. Im looking into the valves shortly, was wondering if i should purchase the "real gasket" or the stock cardboard one, also do you think its a good idea to order new half moons (dont know the actually term for these but thats what they look like)?
Real gasket was a waste of 25$ for me. They would not refund or issue a partial.
Use the OEM and never worry about leaks.
Chris P
Guest

Thanks for all the info. Im going to order the stock gasket but there seems to be a question of 16 holes or 17 holes. This is a picture of where my tach comes in. Can anyone tell me if i need the 17 hole pattern. Obviously when i count the bolts there is only 16, but Im not sure if a hole is required for the tach thingy. Sorry, Im new.
Also dont know why the pic rotated but it should be rotated 90 clockwise, hopefully that helps
Cheers
Steve
GS Whisperer
If you count 16 bolts, then that is what you have.Thanks for all the info. Im going to order the stock gasket but there seems to be a question of 16 holes or 17 holes. This is a picture of where my tach comes in. Can anyone tell me if i need the 17 hole pattern. Obviously when i count the bolts there is only 16, but Im not sure if a hole is required for the tach thingy.
The question is not "holes", but "bolts". :-\\\
Yeah, we're sorry you're new, too.Sorry, Im new.

Did you take the picture with an iPhone, iPad or other device that auto-rotates a picture? :-kAlso dont know why the pic rotated but it should be rotated 90 clockwise, hopefully that helps.
It knows which way is 'up', but doesn't bother to tell that to a REAL computer.
.
Chris G
Guest
Adjust the valves first before you waste time trying to get it running right. GS's are very sensitive to valve adjustment and will not run correctly if any of the valves are too tight.
This is the way to go, I was chasing a poor idle / lean running issue did the clearances made it a much easier process after they were sorted, idle now sounds very good, blip the throttle and she drops back to idle no problem.
Chris G
Guest
Chris P
Guest
Did you take the picture with an iPhone, iPad or other device that auto-rotates a picture? :-k
.
It was taken with an iphone, damn you Apple!!!!
Thanks for helping me sort out the hole/bolt situation there.
Chris P
Guest
Did you take the picture with an iPhone, iPad or other device that auto-rotates a picture? :-k
Like this:
