• Required reading for all forum users!!!

    Welcome!
    Register to access the full functionality of the GSResources forum. Until you register and activate your account you will not have full forum access, nor will you be able to post or reply to messages.

    A note to new registrants...
    All new forum registrations must be activated via email before you have full access to the forum.

    A Special Note about Email accounts!
    DO NOT SIGN UP USING hotmail, outlook, gmx, sbcglobal, att, bellsouth or email.com. They delete our forum signup emails.

    A note to old forum members...
    I receive numerous requests from people who can no longer log in because their accounts were deleted. As mentioned in the forum FAQ, user accounts are deleted if you haven't logged in for the past 6 months. If you can't log in, then create a new forum account. If you don't get an error message, then check your email account for an activation message. If you get a message stating that the email address is already in use, then your account still exists so follow the instructions in the forum FAQ for resetting your password.

    Have you forgotten your password or have a new email address? Then read the forum FAQ for details on how to reset it.

    Any email requests for "can't log in anymore" problems or "lost my password" problems will be deleted. Read the forum FAQ and follow the instructions there - that's what we have one for...

  • Returning Visitors

    If you are a returning visitor who never received your confirmation email, then odds are your email provider is blockinig emails from our server. The only thing that can be done to get around this is you will have to try creating another forum account using an email address from another domain.

    If you are a returning visitor to the forum and can't log in using your old forum name and password but used to be able to then chances are your account is deleted. Purges of the databases are done regularly. You will have to create a new forum account and you should be all set.

  • In order to help others find info on a particular bike, be sure to put the year, make or model of bike that you are asking a question about, in the Topic Title. This will allow people to pass by posts they have no interest in.

Kiwi Canuck's 1981 Honda CT 110 Restore

I got some of the parts I was expecting but 2 of the packages that were supposed to be at the mail box were not there or the person who was working there couldn't find them.

I got the first 2 orders from Beatrice Cycles but no tires or the last shipment that arrived 2 hours before my wife went there.

Oh well, I got some stuff to work on this weekend.

Check out this haul.


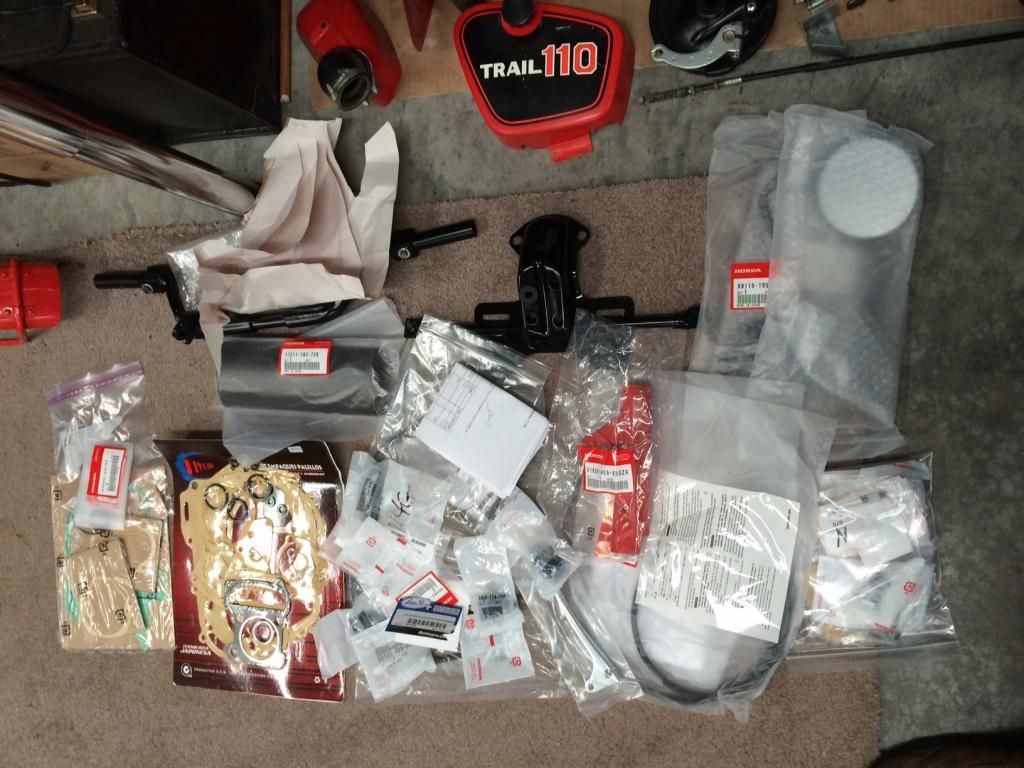
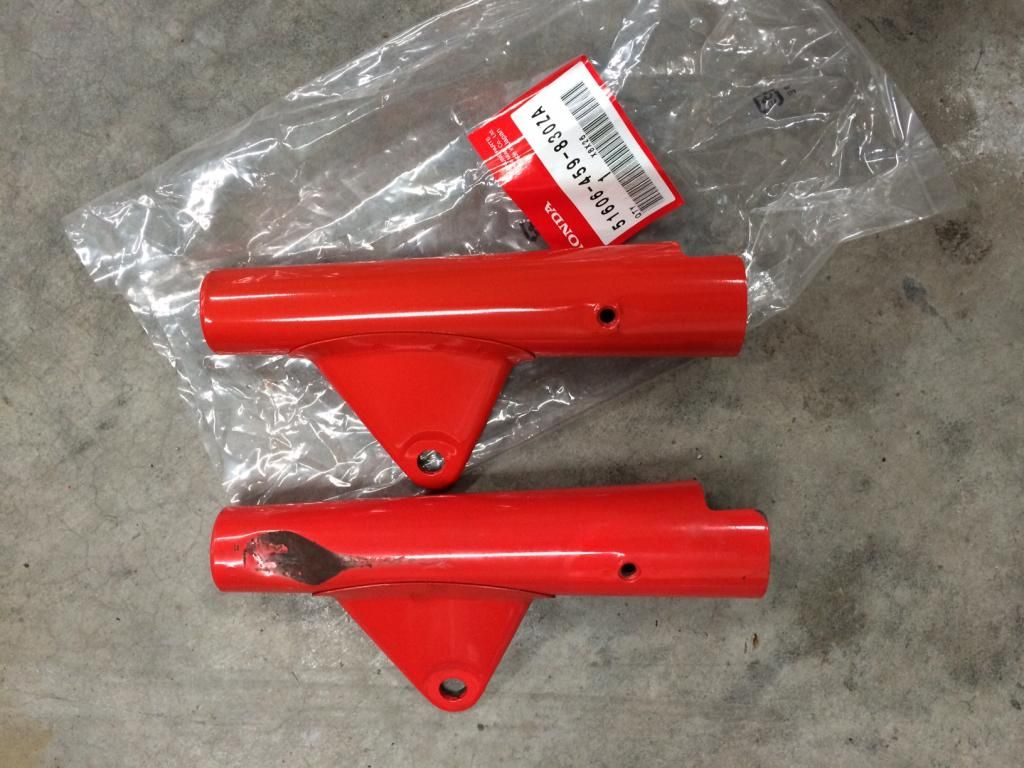
My new fork ear in Tahitian Red, it looks really good in the picture, but I must say that Honda hasn't wasted any paint on this part, in fact the paint is so thin it reminds me of the beakfast sandwich special they used to have at ihop in the US, the bacon on that baby was so thin it only had one side.
roll.gif


Old and new


I only got one can of Honda Color-Rite Tahitian Red paint as it was about $40 a can and I need to paint quite a few pieces, I thought I would try a few colours to see if I could find a paint that is compatible with the Color-Rite paint and be close so I would get better coverage from the one 11oz can.

I found this at an auto parts store and picked it out just by eye, it's actually quite close but I still need to see if it's compatible as an undercoat.


Sample paint job on the old fork ear, certainly not the best picture, as I took it with my phone but hopefully it shows the clour as fairly close, good enough as an under coat.

 
At the stage that the bondo is in that pic I would switch to a polyester glazing putty to finish it off. There will be fewer pinholes and it will feather much better than regular filler and with a much finer grit paper. I did bodywork in Vegas for a few years and learned to love glazing putty.

Glazing putty is a nice product and it has it's application purposes, but it should only be used for filling sand scratches and pin holes which are usually caused by cheap plastic fillers. It's not something to use for actually filling a dent. It's too thin and brittle. Quality auto-grade body filler can be finished with 180 grit before primer, but that's about as smooth as you want to get it because it needs some tooth for the primer to adhere to. The high-build primer (even from a rattle can) will fill 80 grit scratches really well. Prime it, sand it with 180, prime it again, sand it with 400, then spray color. Filler work, primer, and painting needs to be done in steps with progressively finer grits. It's easy to skip steps, but it usually causes problems with adhesion if you do.
 
Last edited:
I was pleasantly surprised at the number of Honda labels there were in your pic of the parts.
Lots of repro stuff from the East for these restorations.
 
Steve, actually most of the parts are factory OEM Honda parts in my order which is pretty nice, the CT 110 was made until about 2008 and sold until maybe 2011 for the Australian & NZ markets, so a lot of parts are still available.
It was discontinued in the US & Canada in 1986, so you will not see anything newer than 1986 here, but we are still able to buy a good amount of OEM stuff for these little beauties.

The parts are still reasonable and the one thing that was out of wack with the Suzuki's was the price for screws, bolts and washers etc.

Beatrice Cycles who I've used for most of my parts sells OEM screws in 2 grades for some sizes and the best grade is about .50 cents per and maybe .25 cents for washers etc. JIS 6MM bolts for engine cases are between .44 cents and .50 cents, I seem to remember the GS ones being double that or more and some washers being 2.49 each.

I bought an after market gasket kit and they included 3 OEM gaskets with the kit, maybe because the ones are missing from the kit or just that they don't fit, not sure yet but I'll check to see why as I didn't order them.

Anyway, nice to be able to buy most of what I need, but I see a few of the pieces starting to show NLA. or discontinued.
I think maybe I should pick up some of the larger items that will probably be discontinued within a year or two, a spare fuel tank, beautiful chrome rear rack and bash plate, all available new and still reasonable by GS standards, even front fenders are still available for $115 each which seems like a deal.

The one thing that is not available are the OEM carbs and those are being made by after market companies and selling for maybe $30 each, not sure on the quality but I see some ebay stores have sold hundreds and they have good ratings, so they must be OK.

I think the OEM seat is still available and only $100, oh and the OEM exhausts are still available for the CT 110 including those beautiful chrome heat shields, it just incredible, I want to buy it all sometimes.

Very happy with the service from Beatrice, everything shipped from their store that showed in stock on the website, and I only ordered one part incorrectly, a small spacer. (wrong length)

Well got to get back to the garage.

Thanks for all the positive comments, and it's great to know a few members on a GS forum are interested in this little project and that you are following along with me.

Cheers,

David.
 
Well this weekend went by too quickly, I was hoping for a bit more progress on the CT, especially as I have got a good load of parts to get started on.

Saturday I helped the neighbours by wiring their new garage, a fairly simple job but another thing to take me away from my CT.

I was hoping to get into the garage after my Sunday morning coffee meeting with the BC Classic M/C club, but as the weather was quite nice I got onto some much needed yard work, finally got done at 4:30PM and I was just exhausted so not too much bike work was done.

I did get an hour or so after dinner and got the rear license plated holder reinstalled, also cleaned up the turn signals with back to black and the same restore product I used on the fork gaitors, hopefully they will come up as nice as the gaitors.

Finally got the footpegs completed as well, they came up very nicely, and I reinstallld the little black metal things on the bottom, the tabs to lock the bolts were pretty weak after bending them back, so I broke them off and cleaned the sharpe edge up on the grinder before painting them, I didn't bother with getting new ones even though they are only about $4 each but who sees them anyway.

One other thing I did was remove the handle bars and pull all the wiring out as I'm going to paint them, they are really sctratched up and quite a few rust spots are needing some work, I hope I can get the wiring back inside without too much grief.

I left the left grip on as I didn''t want to risk damaging it by taking it off, I've taped it up but now I realize I will probably have to take it off as I'll need to bake the paint at 200F and I'm not sure if the grip could handle that.

I'll use WD40 and a long screw driver to open up a channel for the WD40 to penetrate.

I purchased a Schumacher 1.5amp charger for my new battery as I didn't have a 6V one, it's a pretty basic model, it can charge or maintain either 6V or 12V batteries. The charger has a few sets of leads, with quick disconnects, and I had a spare 4 pin plug from Vintage Connections http://vintageconnections.com/
so I was able to make up a plug to match the one on the battery.

And once again no painting today (Sunday), humity was under 50% but it was quite windy and my outdoor paint booth was out of service due to blustery conditions.
 
Last edited:
My footrest with nicely cleaned up rubber footpegs and painted frame, I used VHT SP671 Satin Finish on the metal.


Side stand with same paint, looks better in person, removed the rust and old paint with a fibre wheel and then sanded with 280 grit wet & dry paper.


Here's the bars all taped up ready for paint, but now I'm going to remove the grip so I can cure the paint in the oven which should help with durabilty.


My new charger, seems to work well, battery was fully charged this morning.

 
Nice job there Dave.I've actually been meaning to post up for a bit but never did:mad:Funny thing happened Saturday,walked into my local dealer and what did I spy against the wall but a CT110.Thought of yours right away:encouragement:
 
Nice job there Dave.I've actually been meaning to post up for a bit but never did:mad:Funny thing happened Saturday,walked into my local dealer and what did I spy against the wall but a CT110.Thought of yours right away:encouragement:

Thanks Greg, I am having a big learning curve on this bike, but it's been a pretty relaxed restore and nothing too technical, as with the GS1000 I'm starting to know which parts fiche to reference and I can almost recognize all the parts now.

Is the CT 110 at the dealer for sale, if so what year and how much? I know a couple of guys looking for one.

Cheers,

David
 
Last edited:
Don't really know Dave it was in the service bay so I doubt it.Just a bit small and weird and Honda for my taste:devilish:So I didn't ask much about it.
 
Polishing Parts

Polishing Parts

Today I got to cleaning up a few aluminum parts, I was unsure as to how much I wanted to clean these parts up and still stay somewhat true to stock.
I had previously polished one of the cam adjuster caps and it looked out of place with a dirty engine, I have since cleaned the engine and it's starting to come together.
I went ahead and sanded out a large gouge in the top triple tree yoke with 280/320 grit W&D, I did it in the garage sink as I wanted to use the wet option as aluminum really plugs up the sand paper quickly, I then polished it up on the buffing machine.


You can just see the remains of the gouge just below the lower left handle bar bolt, I did not remove the gouge completely as I would have needed to remove a lot more material and it would reshape the part too much, I did enough to make it a minor scratch and much less obvious.
I buffed the handle bar retainer bolts as they were very tarnished, just a quick buff and the chrome base shows up, I'm not usually into the shiny look but this looks OK to me and I don't have a plating kit to replate all the hardware(yet).
Casswells carries plating kits and they're fairly inexpensive but just one more thing to take care of, I know a few guys on this forum with them and their restorations are usually stunning.
I also did the points cover and a few other minor parts.


I made my own castle nut tool to tighten the steering stem nut, used a piece of 1 1/4 iron pipe and 20 minutes with a hacksaw and a file and it was done, a bit crude but it works.
I fitted a 32MM socket by grinding down the threaded area to accept the socket so I could tighten it to the correct torque of 45-50ftlbs


I picked up my new tires today and installed them both in about an hour or so, just used my motorcycle boots to press them on, it works great and no chance of pinching a tube with a tire iron.
I had already cleaned up the front wheel and had the old tire off already, but the rear was really messy and the axel was a bit corroded so it needed a bit of persuasion to come out.
Both rims had a few minor rust spots on the inside so I used a stainless steel wire brush to clean up the rust and then used a chrome polish to protect the area.
The tires look great installed and really suit the bike, I had been offered everything including the Shinko SR244's and some other brand, Duro I believe, but I really wanted these so I was willing to wait until they ordred them in.


I will need to do a bit of cleanup around the rear wheel and the sprocket area as it looks like it was stored while it was still wet and the brakes need a little attention before I reassemble it all back together.

Also got the carb finished and reinstalled.
 
I got the rear license plate and turn signals all setup as well and when I took a picture I noticed it was not very straight.


I pulled it apart and gave it a twist before tightening it and it seemed to help.


That's better, yes I can be a little fussy when it comes to certain things and things being straight and aligned is one of them.

I think I find something else to clean as I'm taking a break from body work and paint until the rain clears up around here.
 
Last edited:
Funny seeing this thread just as my friend is looking to sell his father's. How much do these low km one's sell for??
 
You've been working quickly. Did you already get the bike approved for the collector plate (and I think I know the answer to that ;) )?
 
nvr2old, what I noticed in a previous picture, what u are using as filler (bondo) is actually just a thick lacquer primer in a tube, "nitro stan, red eye, glazing putty. They are not made to fill dents, just tiny imperfections, finger nail thickness, to fill and build up you need a filler that has a hardener, usually "Bondo" brand available at Walmart or any auto parts store. Those tube fillers are usually lacquer based and are usually used on top of sanded primer or filler just to fill pin holes or deep scratch marks. Then primer goes on top. That is one reason that your having a problem with sanding it all away, it has no fill capacity and it also shrinks as it drys, even under your paint, because the solvent in the primer and paint soften the "filler" and it produces a halo around the product sometimes on lighter colors it will bleed through, also that is why "we" in the business use 2K primer and paints. Chemically or cross linked cured. :cool: Still have fun and learn as you go. Answered questions are always free!
 
nvr2old, what I noticed in a previous picture, what u are using as filler (bondo) is actually just a thick lacquer primer in a tube, "nitro stan, red eye, glazing putty. They are not made to fill dents, just tiny imperfections, finger nail thickness, to fill and build up you need a filler that has a hardener, usually "Bondo" brand available at Walmart or any auto parts store. Those tube fillers are usually lacquer based and are usually used on top of sanded primer or filler just to fill pin holes or deep scratch marks. Then primer goes on top. That is one reason that your having a problem with sanding it all away, it has no fill capacity and it also shrinks as it drys, even under your paint, because the solvent in the primer and paint soften the "filler" and it produces a halo around the product sometimes on lighter colors it will bleed through, also that is why "we" in the business use 2K primer and paints. Chemically or cross linked cured. :cool: Still have fun and learn as you go. Answered questions are always free!
Thanks for the input jbird, I have since purchased some proper "Bondo" and have been learning with that, hopefully it will yield better results.

It's been very wet here lately so I'm in no hurry with the prep as I can't paint yet anyway, but I still need to get this figured out as I always seem to struggle to get a result I'm happy with.
 
Funny seeing this thread just as my friend is looking to sell his father's. How much do these low km one's sell for??

Depends what year and the condition, is it a CT 90 or CT 110?

For the CT 110's the 1980 model is the least collectable as it only has the standard 4 speed box and not the hi/lo ratio, also after 1983 I believe they went to electronic ignition and better electrics and those models bring in slightly better $$ than an 81 or 82.

I have seen a few low mileage models for sale on Kijiji and the asking price is between $1,800 and $2,800.

Give me some details and I'll give you a ball park price from what I've seen.
 
Last edited:
You've been working quickly. Did you already get the bike approved for the collector plate (and I think I know the answer to that ;) )?

Nope, just using that plate off one of my GS1000S's for alignment purposes, it should be done in a few weeks ready for plates, not sure if I'll go for the single plate for multiple collector bikes or plate each one seperately.

The Multi plate permit requires the full year coverage, were as with individual plates I can insure for a partial year apparently.
 
I have got way behind posting to this thread so here a few posts to catch up with the progress, they are cut and paste so the reference to days and weekends are not relative anymore.


I cleaned up a few aluminum parts, I was unsure as to how much I wanted to clean these parts up and still stay somewhat true to stock.

I had previously polished one of the cam adjuster caps and it looked out of place with a dirty engine, I have since cleaned the engine and it's starting to come together.

I went ahead and sanded out a large gouge in the top triple tree yoke with 280/320 grit W&D, I did it in the garage sink as I wanted to use the wet option as aluminum really plugs up the sand paper quickly, I then polished it up on the buffing machine.


You can just see the remains of the gouge just below the lower left handle bar bolt, I did not remove the gouge completely as I would have needed to remove a lot more material and it would reshape the part too much, I did enough to make it a minor scratch and much less obvious.

I buffed the handle bar retainer bolts as they were very tarnished, just a quick buff and the chrome base shows up, I'm not usually into the shiny look but this looks OK to me and I don't have a plating kit to replate all the hardware(yet).
Casswells carries plating kits and they're fairly inexpensive but just one more thing to take care of, I know a few guys with them and their restorations are usually stunning.

I also did the points cover and a few other minor parts.


I made my own castle nut tool to tighten the steering stem nut, used a piece of 1 1/4 iron pipe and 20 minutes with a hacksaw and a file and it was done, a bit crude but it works.

I fitted a 32MM socket by grinding down the threaded area to accept the socket so I could tighten it to the correct torque of 45-50ftlbs


Last edited:
Back
Top