Dismantled the dodgy starter, to find it in very good condition internally - the armature was like new, everything was just crudded up. The brushes had only worn about halfway and stuck because of cruddiness on them, but there's an inherent design fault - the snailsprings don't have enough push on them to maintain force on the brushes past the half-worn point if there's any muck there. So, new brushes will be on order and I'll toss the old ones in a box as desperation spares in case I'm stuck any time. They will actually work, but not for a long time, so not worth putting them back into this one.
-
Required reading for all forum users!!!
Welcome!
Register to access the full functionality of the GSResources forum. Until you register and activate your account you will not have full forum access, nor will you be able to post or reply to messages.A note to new registrants...
All new forum registrations must be activated via email before you have full access to the forum.A Special Note about Email accounts!
DO NOT SIGN UP USING hotmail, outlook, gmx, sbcglobal, att, bellsouth or email.com. They delete our forum signup emails.A note to old forum members...
I receive numerous requests from people who can no longer log in because their accounts were deleted. As mentioned in the forum FAQ, user accounts are deleted if you haven't logged in for the past 6 months. If you can't log in, then create a new forum account. If you don't get an error message, then check your email account for an activation message. If you get a message stating that the email address is already in use, then your account still exists so follow the instructions in the forum FAQ for resetting your password.Have you forgotten your password or have a new email address? Then read the forum FAQ for details on how to reset it.
Any email requests for "can't log in anymore" problems or "lost my password" problems will be deleted. Read the forum FAQ and follow the instructions there - that's what we have one for...
-
Returning Visitors
If you are a returning visitor who never received your confirmation email, then odds are your email provider is blockinig emails from our server. The only thing that can be done to get around this is you will have to try creating another forum account using an email address from another domain.
If you are a returning visitor to the forum and can't log in using your old forum name and password but used to be able to then chances are your account is deleted. Purges of the databases are done regularly. You will have to create a new forum account and you should be all set.
You are using an out of date browser. It may not display this or other websites correctly.
You should upgrade or use an alternative browser.
You should upgrade or use an alternative browser.
what did you wrench on today??
- Thread starter chuck hahn
- Start date
J
jeffgs
Guest
My 12 year son surprised me today and spent all day with myself in the garage. We took to peg mounting plates off, back wheel and swingarm off. He used paint stripper to remove this horrible nasty trying to pass for paint off the braking plate and the rear wheel. We sanded the rest and greased the pin and wheel bearing. He even attempted to use wet 400 to polish the braking plate to match what i did to the spocket and the hub it mounts too. The wheel is ready for paint thanks to him wielding a steel brush.
I have to say i will keep the events close to my heart and hope this continues. I am losing him to the world and his friends and hope this might be a start to him coming back to his dad
I have to say i will keep the events close to my heart and hope this continues. I am losing him to the world and his friends and hope this might be a start to him coming back to his dad
G
GSX1000E
Guest
My 12 year son surprised me today and spent all day with myself in the garage. We took to peg mounting plates off, back wheel and swingarm off. He used paint stripper to remove this horrible nasty trying to pass for paint off the braking plate and the rear wheel. We sanded the rest and greased the pin and wheel bearing. He even attempted to use wet 400 to polish the braking plate to match what i did to the spocket and the hub it mounts too. The wheel is ready for paint thanks to him wielding a steel brush.
I have to say i will keep the events close to my heart and hope this continues. I am losing him to the world and his friends and hope this might be a start to him coming back to his dad
Great story and good to hear. You can never share enough time with them before they are grown up.
Excellent post, Jeff.
Can't think of a better father-son activity than motorcycles.
Can't think of a better father-son activity than motorcycles.
Jeff, thats great..once in a great while my kids (8 & 11). Will hang out in the garage...I always enjoy it. I had a fun little time yesterday though. I have an antique scooter, and the younger wanted me to take him for some laps around the neighborhood. He watches and knows the startup routine....Gas on, sink the carb float with the button to fill the bowl, choke, kick.....When after stopping to talk to neighbors, the scooter failed to start (didnt turn off the fuel and it flooded), he immediately began, fiddling with all of the above fuel controls. Not the correct response, but I was thrilled at seeing him use his head in a mechanical way.
After riding last night and to work this morning without issues, I started to leave the hospital this afternoon when I realized my high beam indicator was lit and my left mirror was messed up. I realized the headlight was out and made my way home instead of the meeting I was supposed to attend tonight. I got home and started checking the headlight and taillight again (taillight worked), fuses (all good), and then tore into the headlight bucket where I found this:

and this:

I'm not sure what caused it but did find some corrosion on the inside of the connector. I'm assuming it's possible that I caused it by leaving the bike uncovered during some recent heavy rainstorms but I'm not sure.
I also ran same basic checks and noted that:
With the key on but without the engine running, voltage at the headlight wiring was 12.14
With the engine running, voltage at the headlight wiring was 12.6
Cheyenne helped at this point and with the engine at 3000 RPM, voltage at the headlight wiring was 13.7v
We then ran some tests at the battery and found pretty much the same information:
Key Off - 12.89v
Key On, not running - 12.4v
Idle - 12.5v
5000 RPM - 13.8v
Key Off - 12.8v
This is with an AGM battery, SH-775 R/R, Eastern Beaver Fuse Block, and LED bulbs for the turn signals/brake light
I verified the bulb itself still works so I'll clean off the terminal and pick up a new connector tomorrow.
Back in the late winter I rebuilt a spare speedometer drive to replace my squeaky one.......I finally put it on tonight. I had some enjoyable company.

G
Guest
Guest
I'm going to have a hard time sleeping tonight. I've replaced 3 shims and got the clearances to spec. I've cleaned, rebuilt, and rejetted my carbs.. I've been following the tutorials from BassCliff's site, and various Youtube videos.. Tomorrow I'm going to get some gas flowing and see if it will fire up. Between waiting for parts and studying this whole thing has taken 2 weeks now. All things being equal I should be able to sync carbs tomorrow.
Had to laugh today - ancient and modern together. Should have got a picture too.
Got a 1930's sidevalve Triumph single running for a friend - he'd lost the ignition timing when he refitted the magneto drive chain...nice and simple and it chuffs away like a good'un.
Still pulling down a blown Kawasaki ZX1400 motor. It's in a race car and the new owner went the wrong way on the sequential gearchange....bang.
Put a Carrillo out the front....it's turboed and dry sumped and full of those lovely very expensive bits. I didn't build it but I'm building it's replacement.
Quite a difference.
G
GSX1000E
Guest
Still pulling down a blown Kawasaki ZX1400 motor. It's in a race car and the new owner went the wrong way on the sequential gearchange....bang.
Put a Carrillo out the front....it's turboed and dry sumped and full of those lovely very expensive bits. I didn't build it but I'm building it's replacement.
Quite a difference.
What are you putting it in?
W
Wester Cooley
Guest
Still pulling down a blown Kawasaki ZX1400 motor. It's in a race car and the new owner went the wrong way on the sequential gearchange....bang.
Put a Carrillo out the front....it's turboed and dry sumped and full of those lovely very expensive bits. I didn't build it but I'm building it's replacement.
Quite a difference.
Pictures PLEASE!!! Big Buck Goodies. Yea!!! Yea!!!
A broken Carrillo! Thats rare. Be curious why and where it broke!!
J
Joe H
Guest
I always enjoy that. I have one son 13yrs old wants NOTHING to do with bikes or wrenching the other is 6yrs old and he almost always shows up, has me flip his bike upside down and get him wrenches and screwdrivers and he "works" on it. Managed to get the rear wheel loose last spring!.....I finally put it on tonight. I had some enjoyable company.
Pictures PLEASE!!! Big Buck Goodies. Yea!!! Yea!!!
A broken Carrillo! Thats rare. Be curious why and where it broke!!
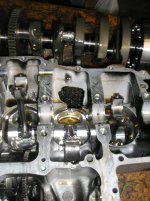
Looking at the wreckage, a rod bolt went first. The other one is bent - and also broken - that side of the bigend eye is broken off too.
Why ? Peak revs in 2nd - and the driver changes the wrong way with the sequential shift ? Fairly obvious I'd have thought.
It's in a Radical, which is a small sports race car. British design, quite a lot of them in Australia and one or two here as well. Owner has supplied a second ZX14 motor - standard - which will receive all the salvaged trick bits. Dry sump with big external pump, lockup clutch,balance shaft replacements. German forged pistons coming along with a new set of Carrillos. The original head is pretty well ported so a set of new exhaust valves and one inlet, and it's reusable.
Pic is not very clear, that's the stump of the rod sticking up.
I'd have thought there would have been more interest in the 1930's Triumph....
Attachments
W
Wester Cooley
Guest
Do the other rod bearings show any gauling from oil starvation? Thats the only time I have seen a Carrillo snap a rod bolt in a motorcycle motor.
How much trash got into all the dry sump lines, pump, and the tank??
Make sure you make him a BIG sticker to put near his shifter showing this way for faster, and the opposite way for slowing.
Have fun playing with that motor. Its always fun putting all kinds of trick parts together!!!
How much trash got into all the dry sump lines, pump, and the tank??
Make sure you make him a BIG sticker to put near his shifter showing this way for faster, and the opposite way for slowing.
Have fun playing with that motor. Its always fun putting all kinds of trick parts together!!!
Do the other rod bearings show any gauling from oil starvation? Thats the only time I have seen a Carrillo snap a rod bolt in a motorcycle motor.
How much trash got into all the dry sump lines, pump, and the tank??
Make sure you make him a BIG sticker to put near his shifter showing this way for faster, and the opposite way for slowing.
Have fun playing with that motor. Its always fun putting all kinds of trick parts together!!!
Two of the other rod bearings were just starting to show pickup signs. As far as i can tell that rod didn't seize - it was simply too high rpm for the yeild stress of the rod bolt. Builder tells me they were new SPS bolts...gauze in the dry sump caught most of the trash.
Given the lockup clutch and the much higher vehicle weight of the car Vs a bike, the result of a wrong way change is going to result in some incredible accelerations of engine parts. Do it in a bike and the rear wheel will lock. Too much grip and weight for that to happen here.
According to the guy who engineers the car for the owner, the hit to his wallet - and pride - should make him remember which way the shift goes...
Had plans to go out tonight to verify the speedo drive works after everyone left from my sons birthday get together, so I drank a lot of coffee....Then it rained its a$$ off. Having no wine on hand to unwind me, i found myself tinkering in the garage unil late. Cleaned up a bit, did the $1 throttle mod, which was incredibly and deceptively simple, and tried to locate the source of the fairing's incessant rattling. I think it was a combination of the aftermarket windscreen and a loose mid panel that lost its mounting studs long ago.
We shall see......
We shall see......
G
gordinho80
Guest
$1 Throttle Mod looks interesting... might try to do that on mine.
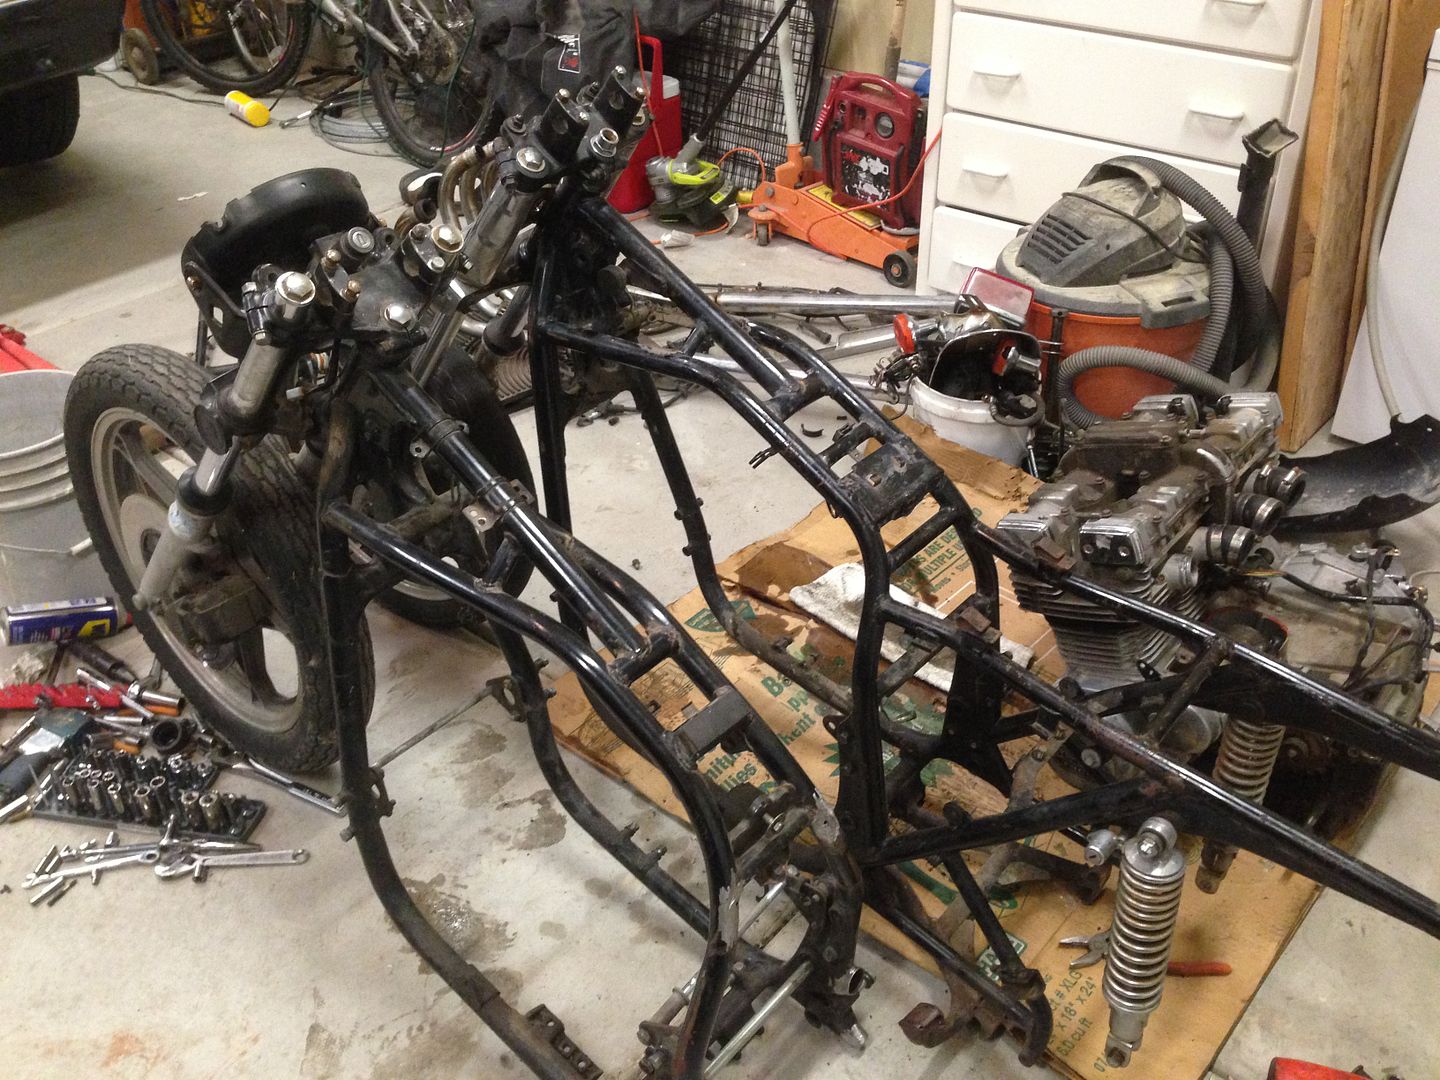
Stripped down my 80 750L to the frame. Going to get it blasted, cut the rear peg mounts and back of the frame off, weld a hoop on for a custom seat and get it all powder coated...plan is to make some sort of bobber out of her.
After about 3 hours of work last night, then 5 minutes in Photoshop to combine the images:

After about 3 hours of work last night, then 5 minutes in Photoshop to combine the images:
G
Guest
Guest
looks more like the end of the begining to me.Stripped down my 80 750L to the frame. Going to get it blasted, cut the rear peg mounts and back of the frame off, weld a hoop on for a custom seat and get it all powder coated...plan is to make some sort of bobber out of her.
After about 3 hours of work last night, then 5 minutes in Photoshop to combine the images:
looks more like the end of the begining to me.
Hello Fellow Utahn. :encouragement:
Yep, the end of the very beginning... Bought it for $200 on KSL, mostly for the parts. The engine out of my 78 is going to go in this frame, as the PO of the 78 project hacked the back of the 78 frame off and was going to stretch it and make a chopper out of it and lost interest. Here's the frames side by side: