• Required reading for all forum users!!!

    Welcome!
    Register to access the full functionality of the GSResources forum. Until you register and activate your account you will not have full forum access, nor will you be able to post or reply to messages.

    A note to new registrants...
    All new forum registrations must be activated via email before you have full access to the forum.

    A Special Note about Email accounts!
    DO NOT SIGN UP USING hotmail, outlook, gmx, sbcglobal, att, bellsouth or email.com. They delete our forum signup emails.

    A note to old forum members...
    I receive numerous requests from people who can no longer log in because their accounts were deleted. As mentioned in the forum FAQ, user accounts are deleted if you haven't logged in for the past 6 months. If you can't log in, then create a new forum account. If you don't get an error message, then check your email account for an activation message. If you get a message stating that the email address is already in use, then your account still exists so follow the instructions in the forum FAQ for resetting your password.

    Have you forgotten your password or have a new email address? Then read the forum FAQ for details on how to reset it.

    Any email requests for "can't log in anymore" problems or "lost my password" problems will be deleted. Read the forum FAQ and follow the instructions there - that's what we have one for...

  • Returning Visitors

    If you are a returning visitor who never received your confirmation email, then odds are your email provider is blockinig emails from our server. The only thing that can be done to get around this is you will have to try creating another forum account using an email address from another domain.

    If you are a returning visitor to the forum and can't log in using your old forum name and password but used to be able to then chances are your account is deleted. Purges of the databases are done regularly. You will have to create a new forum account and you should be all set.

what did you wrench on today??

The Only 4 cylinder Chrystler I'm Proficient in repairing is this type of motor...

394871_3670660704021_160341167_n.jpg

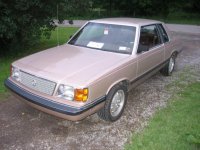
IN this type of car...


230785_3670660784023_1606301633_n.jpg

230769_3670660744022_577535151_n.jpg


I wish I had more pictures but I was very poor in 2003. All my money I had was dumped into that thing... Did manage to pull out a 12.8 1/4 mile time;).

But the 2.4 Neon/PT/Eclipse engine... I'm pretty sure it interference type. bet the valves are bent.


IMG_0474.jpg


DSC03319.JPG


13.1 on 18psi. hope to have it back on the road this year after a 6 year hiatus while i fixed up my house and made babies ;) bigger turbo, bigger injectors, i do my own chip burning, better intake, lsd in the trans, should be fun.

its not nearly as clean anymore either after sitting outside for a long time. oh well... makes waxing punks even sweeter.

2000 DOHC 2.4L Chrysler engine. Thanks guys! I explained to the owners husband that everything that I saw while looking for a timing belt/kit said that it was indeed an interference engine
and that it would most likely need a recon head as well. He said that what he researched stated that they did a design change after the 1998 engine so as to just clear the valves in the event
of a timing belt failure. I also explained to them that as the exhaust cam and crank were still turning while he was trying to re-start it, the intake cam was probably in a position that would
still cause harm to those valves. I said that AT BEST he had a 50/50% chance that the valves were not bent. He is willing to take that gamble anyway and wants it replaced. Cross fingers. :(

the 2.4l is valve to valve interference. you might be ok.

Brian
 

Attachments

  • IMG_0474.jpg
    IMG_0474.jpg
    92.9 KB · Views: 0
A little bit cleaner, back together part way and tried to fire it without adding the balancer, Alt., P/S, etc. It turns over better but the battery is weak. I will try a compression test on all cylinders
after the battery charges and after tomorrows 10+ hour road trip to help my daughter. Hoping to find out more Thursday.

 
Finally got around to the bearing in the a/c compressor clutch on the Volvo V70. Borrowed some home made pullers from another Forum and managed to do the job without disconnecting the hoses although did have to take move the p/s pump, remove the alternator to get enough room to dismount the compressor and rotate it 45 degrees up. And they said it was impossible :)
Repairing a/c in January:rolleyes:
 
Not today... but recently started tearing it down. Some aesthetic changes coming along with some maintenance.

2015-01-14.jpg
 
Two motor mounts were not attached and it is almost out of gasoline. Compression #'s were low but it does have over 165,000 miles showing.
Added a can of Berryman Total Fuel System cleaner to clean up the valves and injectors. It is running much better when at operating temp. and with the motor mounts attached.
Tomorrow it goes for a test flogging. ;)

Edit: The balancer was also off in that vid.
 
Time to retire this camera from video duty as it no longer focuses.
All wrapped up and back to use...

 
Two motor mounts were not attached and it is almost out of gasoline. Compression #'s were low but it does have over 165,000 miles showing.
Added a can of Berryman Total Fuel System cleaner to clean up the valves and injectors. It is running much better when at operating temp. and with the motor mounts attached.
Tomorrow it goes for a test flogging. ;)

Edit: The balancer was also off in that vid.

gotcha.

were the compression numbers even across the board?
 
Yes. low but not for this altitude. 100 here equals about 130 at Sea level.

reliant, PM sent.
 
Last edited:
Yesterday, both carbs stripped, cleaned and rebuilt, and now have the internal details of main jetting. Interestingly, the float level on one side was a couple of mm different from the other carb. I also found the Mikuni float level illustration that I could find related to an older one, so simply had to make an assumption about the spacing, reasoning the datum point wouldn't be totally, wildly different from what both carbs presented me with. They're now the same anyway, and I'll check the running plug colour. I see the main needles were set at a middling position, so there's leeway there if needed.
 
Wiring on the GS850 is going to be checked by the expert auto sparkie Monday, and it's too hot here in Perth to be working on bikes in sheds without aircon, so the Z900 Kwaka has been serviced ready for a club ride tomorrow up to the hills.
Oils topped up, chain lubed, horn earth fixed (was using my middle finger a lot)new breather tubes on the carbies, and a general clean & polish.
I'm in a vintage bike club here in Western Australia so there should be a varied convoy tomorrow starting from the clubroom for a trot up to the pubs in the hills.
If I'm in the mood tomorrow or Monday I'll tear the BSA magneto off and get it serviced as well.
 
Mikunis back on and roughly clankerated (slides clank down simultaneously) enough to start. The standby battery is mullered so the fire wouldn't light, but a fresh battery sorted that and all the kicking over with the dead one certainly brought a willingness to wake up.
Amusingly, it started fine with no choke, and the old coal-fired locomotive smell re-inforced my suspicion that it's simply far too rich - confirmed by the gust of black soot when the throttle is blipped.
However, when warmed up it settled down nicely to a mild tickover at 800rpm, both cylinders pulling their weight, if not quite evenly. Exhaust pipe IR readings reveal the LH cylinder is over-fuelled or the RH one under-fuelled - a difference of 200degC. I don't trust this IR thermometer to give anywhere near accurate readings in that range, as it's way over what it's supposed to do, but the difference is repeatable, so likely reliable as an indicator.
Tomorrow, more fiddling.

 
I did some much needed brake work, changed a few bulbs in the speedo/tach.
Now all i need to do is take it to a shop to get those fork seals replaced.
 
Working on redoing the dining room and hall ceilings...the plaster is solid, but paint just wont stay on, and checks over time.....after this wonderful fun is crown molding... I really dislike this work.....having a cold makes it funner still. I am thankful however that a friend lent us the hoist....it made the work suck far less.

View attachment 37939

I do have some parts for the GS on order- valve cover hold down bolt seals, so this week I can hopefully change them put the tank on and see how the carb work turned out.
 
The paint will stay on if the plaster is good. It is telling you something. Exactly what it is telling you is the question.
 
The paint will stay on if the plaster is good. It is telling you something. Exactly what it is telling you is the question.

Not sure really.... The entire house has been that way to some degree or another. When I tried to paint the other hall after we bought the house, the old paint that appeared solid was literally getting pulled off of the ceiling by the paint roller. I scraped every bit of old paint off and proceeded to paint. That was 4-5 years ago, and its been fine...My thought is that the original paint was junk.
 
Well tonight I managed to build myself a set of gauges for the EFE out of 2 bad sets. The set that came with the bike turns out were far more damaged then originally thought. The outer case was broken in several places, the inner plastic frame had all the mounts broken and what I thought was good glass was actually a piece of plexi silconed in place, oh well. A set that I managed to locate had a good case and bezel but the glass was cracked and because of that the gauge face was quite soiled and discoloured. So I managed to use the tach, speedo and gauge face from the old set, the plastic outer case and frame from the new set along with a piece of correct thickness non glare glass that my local glass shop was able to use to replicate a new glass face complete the trip meter hole. Viola, almost new gauges. Also ordered front and rear wheel bearing kits, steering stem bearing kits and fork seals. Started putting pieces back on the rear of the bike and now to start on the front.

Gauges-1_zps0b31ce42.jpg
[/URL]
 
Last edited:
Back
Top