• Required reading for all forum users!!!

    Welcome!
    Register to access the full functionality of the GSResources forum. Until you register and activate your account you will not have full forum access, nor will you be able to post or reply to messages.

    A note to new registrants...
    All new forum registrations must be activated via email before you have full access to the forum.

    A Special Note about Email accounts!
    DO NOT SIGN UP USING hotmail, outlook, gmx, sbcglobal, att, bellsouth or email.com. They delete our forum signup emails.

    A note to old forum members...
    I receive numerous requests from people who can no longer log in because their accounts were deleted. As mentioned in the forum FAQ, user accounts are deleted if you haven't logged in for the past 6 months. If you can't log in, then create a new forum account. If you don't get an error message, then check your email account for an activation message. If you get a message stating that the email address is already in use, then your account still exists so follow the instructions in the forum FAQ for resetting your password.

    Have you forgotten your password or have a new email address? Then read the forum FAQ for details on how to reset it.

    Any email requests for "can't log in anymore" problems or "lost my password" problems will be deleted. Read the forum FAQ and follow the instructions there - that's what we have one for...

  • Returning Visitors

    If you are a returning visitor who never received your confirmation email, then odds are your email provider is blockinig emails from our server. The only thing that can be done to get around this is you will have to try creating another forum account using an email address from another domain.

    If you are a returning visitor to the forum and can't log in using your old forum name and password but used to be able to then chances are your account is deleted. Purges of the databases are done regularly. You will have to create a new forum account and you should be all set.

My 1981 GS650G Thread

  • Thread starter Thread starter Macguyver
  • Start date Start date
Good to hear from you Mac! Congrats on the new job and yeah hopefully that'll only help you along once you get some time again.
 
Sorry Mac, had to cut my earlier post short.

Anyways, it's good to hear from you, I was getting a little concerned I hadn't seen a post from you for quite some time, didn't realise you'd started a new job, so congrats on that :)
 
Hey Don,

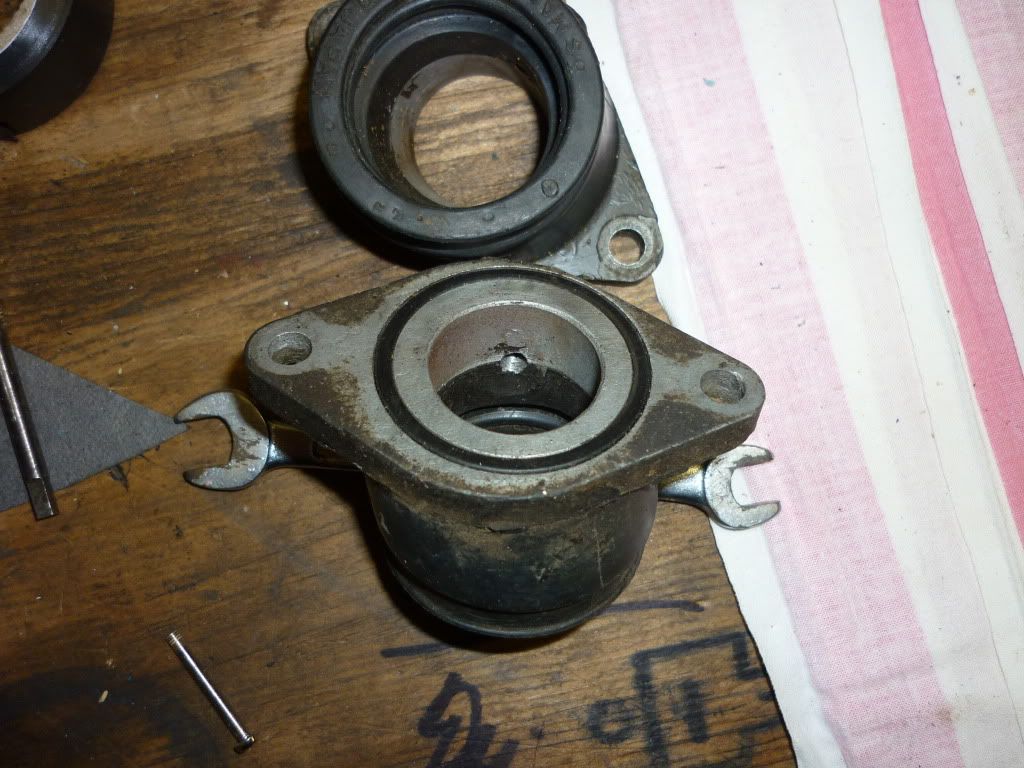
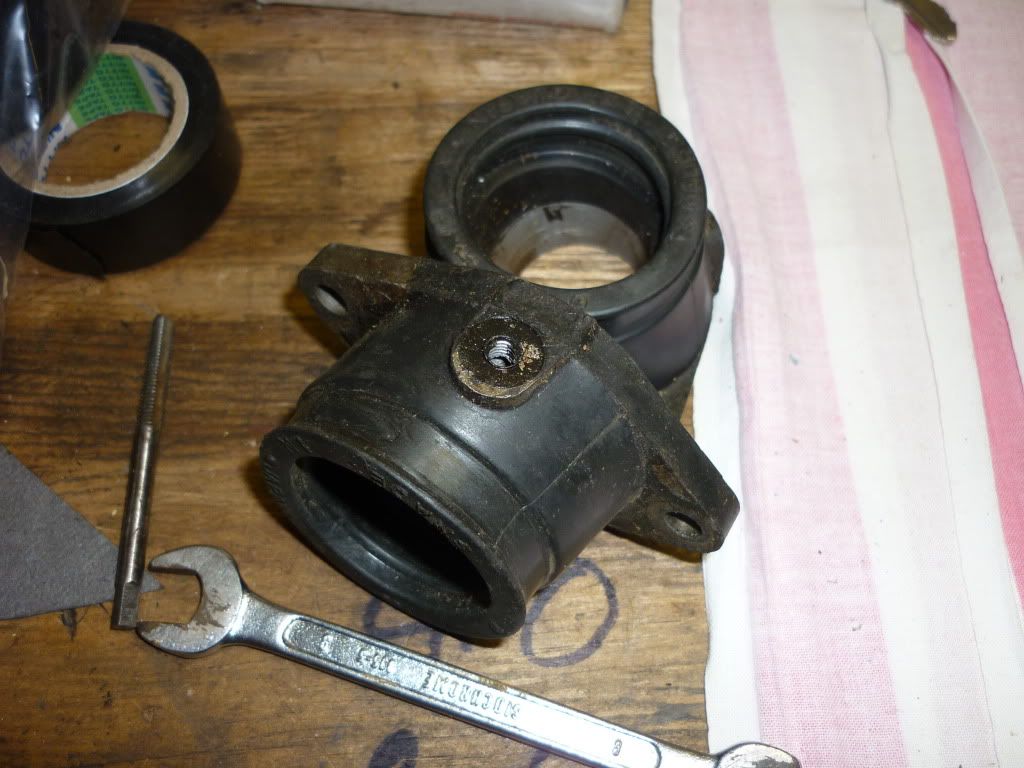
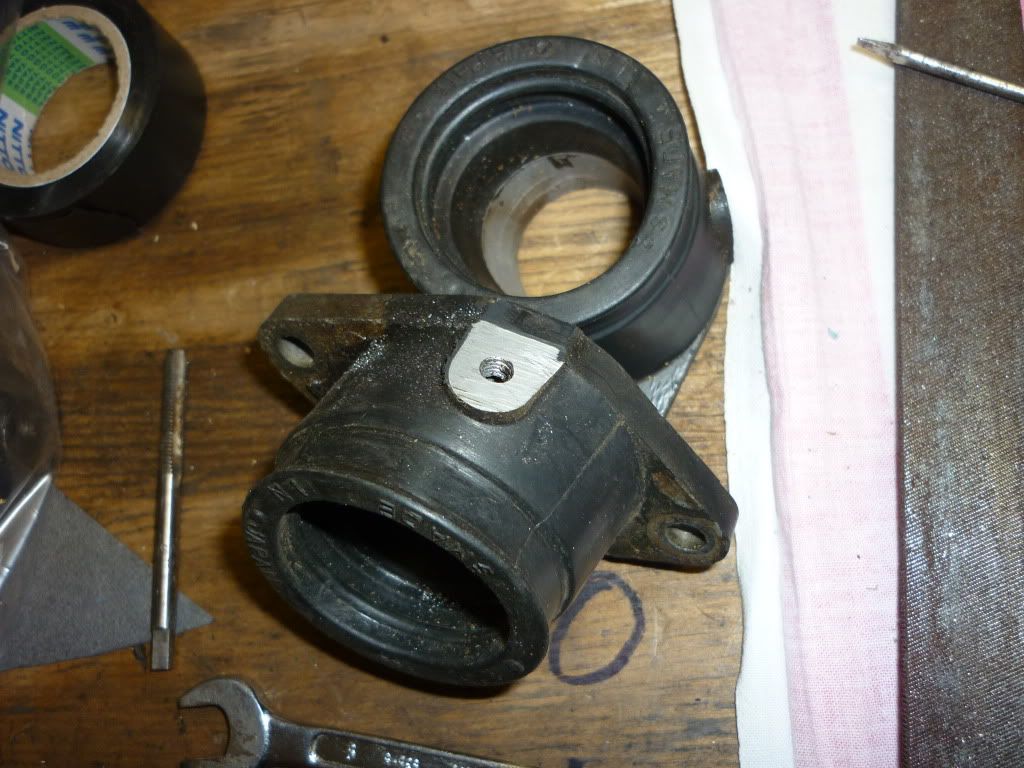
but I am unsure if the boots would be able to support the additional weight. I know I have seen pics of a destroyed boot before, but I can't remember if the ports are part of the casting, or if they are merely inserts in the rubber.

MAC I have a couple of sets of "old" 650 boots in the sged so I took a few pics for you.

P1000994.jpg


Above: Picture of boot from the inside, as can be seen the threaded 6mm hole is in the alloy part od the boot, not through the rubber section.


P1000995.jpg


Above: Picture of the boot from the outside.


P1000999.jpg


Above: In this picture I have filed away the rubber coating to show the threaded hole going directly into the aluminium part of the boot.

BTW MAC we are heading into our summer over here, we are halfway through spring now. Won't be long and we will have 30 degree Celcius days upon us. It's time to finish up our winter projects and start riding.

Your project is an excellent exhibition of craftsmanship and skill. I am especially impressed with the choke setup. A lot of GS riders would prefer that system than the longer cable to the steering head. I have converted my choke to the left switch gear, although my choke mechanism is slightly different to yours as I have later model carbs on my project. I will try and work out something similar to yours at a later date. In my opinion simpler is better.
 
Don, bit of a side note here... how did you get your choke on the left switch gear?

The 450 choke is directly on the carbs but I want it on the left 'bar, sorta the opposite to what Mac has done.
 
Don, bit of a side note here... how did you get your choke on the left switch gear?

The 450 choke is directly on the carbs but I want it on the left 'bar, sorta the opposite to what Mac has done.

PETE, not wanting to hijack MAC's thread here I have posted the info on your 450 Rebuild thread. Or will have done in 5 minutes or so.

Sorry MAC.
 
Last edited:
Cheers Don, and don't worry I'm sure Mac wouldn't object to a temporary side track here :)
 
Hey Guys,
Thanks for the replies and kind words, I am hoping after this initial rush to get up to speed on the new job, I can get back to my projects.

Thanks for the pics Don, that clears up the issue of what to do with the vacuum gauges. Now I need to do up 4 adapters to solid mount them off of the boots. That will definitely clean up the looks around the handlebars.

What the??? Thread -jacking on the GSR??? Nah, never happens. :D
Don't worry about it guys, I know I have been accused of it before...but never convicted. ;)

In so far as the choke relocation goes, I am waiting on a quote back from the fab shop down the street on custom CNC plasma cutting some parts out for me so I can manufacture some choke relocation kits. Plus, it gives me an excuse to get back into the blueing salts for doing black oxide coatings on parts.

I hope to have the supplies in this week to mix up the salts, and then I can do my own coating. :D When I can find the time...:(

Cheers guys,
 
yes we want updates, hope to see you riding the 650 this season and hopefully make it south to a rally or 2.
 
I'm baaack! Kind of...

I'm baaack! Kind of...

Hi guys, sorry for the super long delay since my last post. I was working my butt off to get things sorted in the new job. Apparently I was too good at it. I sewed up all the local customers possible, and made my self surplus to needs. :O(

So I am currently on the job hunt...again.

In my newly found spare time I have been working on a few things bike related. Namely an auxillary fuel tank, and a tank bag. Posts to come.

I thank everyone for checking in on me, and rest assured, the bike will be on the road this year. Unfortunately it will be a little delayed since the cash I had set aside for insurance had to go to other bills since my sudden unemployment. I remain hopeful and have started rebuilding my bike fund by doing side jobs. Slowly but surely I will be on two wheels this spring!

Next post, tank bag!
 
Tailored Tank Bag!

Tailored Tank Bag!

Since I have not found a tank bag which suits my specific needs, I decided to try my hand at making one.

Now, I have worked with similar materials before making paintball marker cases and laptop bags, and I know what has worked well for me in the past.

I used easily obtainable, low cost materials in this build. Unfortunately for me, my Singer wouldn't feed the thick upholstery thread I wanted to use to stitch everything together, so I had to stitch everything by hand. I'll be the first to say stitching a perfect line is tough by hand, so please forgive my uneven stitching.

Everything is stitched with four threads of heavy duty nylon upholsters' thread, so there is no worry about durability of the stiching. I think I would be hard pressed to rip the stiching between component parts. The most likely failure point would be the stiching of the various bags themselves.

To start off, I bought a set of Nylon ATV saddle bags, and a couple small nylon insulated cooler bags. These will make up the four compartments of the tank bag. Total cost was around $15.

tankbag01.jpg


The backbone of the tank bag was formed from the rear panel of an insulated nylon backpack, cut to size, and then joined with the side compartments. I used a couple nylon slings with broken clasps, and some wide elastic fabric for the end trim pieces which form the forward most, and rearmost ends of the "frame" of the tank bag.

tankbag02.jpg


I bent up some small metal tabs to be sandwiched between two layers of the nylon "frame" material to form the hooks which will lock the bag onto the tank. I then sealed them, and gave them a coat of black paint before stitching them into the material. The forward hooks are stitched to the elastic material since the only parts needed to lock the bag onto the tank are the rear hooks, and the front strap which goes around the steering stem.

tankbag03.jpg


Then came time to attach the top bags. One on each side, and conveniently enough, a ziploc storage bin base fit inside the bags perfectly. This will lend rigidity, and act as a second layer of waterproofing protection.

tankbag04.jpg


I stitched up a single pane map pocket with scraps from the backpack I used for the backbone piece. Here you can also see the two plastic storage bins I grabbed from the dollar store for a couple bucks. One fits inside the saddle pocket on each side of the tank like it were made for it.

tankbag05.jpg


The left side holds electrical tools and materials, the right one holds some small tools and some replacement parts. I went for a single pane map pocket because the map will only be used as a backup to the GPS.
Before everyone starts yelling at their computer about how I would have to take the bag off to fill the tank, here you go.

tankbag07.jpg


I used a "living hinge" of nylon webbing to join the right top compartment to the rear frame piece so it can be swung up and out of the way to gain access to the filler cap. The cap also acts as a lock to ensure the tank bag will not come off the bike unless the filler cap is off.

The right compartment is held down during normal use with velcro, one strip per side, triple stiched. I also added a small grab handle to the front of the compartment so it will be easy to peel the compartment from the velcro for refuelling.

I trimmed the cutout area with some more nylon webbing to clean up the area. The nylon webbing should tighten up a bit when all of the stitching is done, and the bag is washed for the first time.

tankbag08.jpg


With the filler cap removed, and the front strap released from around the steering stem, as well as the front hooks released, the rear hooks can be released by pulling the bag rearward on the tank. Then the bag can be easily carried using the handle I added between the two top compartments.

tankbag10.jpg


Here you can easily see the hooks engaged over the rim of the tank.

tankbag11.jpg


The hooks are definitely going to hold. The tank is about half full here, and the hooks didn't even budge when I lifted the tank bag up using the front strap.

tankbag12.jpg


I have a few details to finish on the bag, but the structure is complete. I need to build in the GPS pocket, run the wiring, and stitch on some draft tubes to cover the zippers to aid in waterproofing, but aside from that it is essentially ready to go.

Looking at the post preview I see just how grungy my tank looks. Man, I rue the day I sprayed that designer clear on there. Sure, it is practically chip proof, but man, does it ever hold onto dirt and grime! I need to get my bike to the car wash and pressure wash the heck out of it, and scrub it with a bristle brush to clean that stuff off.

Well, I hope my efforts at constructing a tank bag have been informative, or at least a good read. Next post...Aux Tank pt. 1!
 
Aux Tank pt.1

Aux Tank pt.1

Have you ever found yourself looking at an empty 5 Litre Heineken mini keg, trying to figure out what to do with it?

Sure, I could return it to the point of purchase for a small refund, or I could do something interesting with it.

I started out by removing the green top-ring by sliding a thin flat head screwdriver under the locking tabs on the outside of the rim to release them.

Once the top ring was off, it was a simply matter to break out the die grinder and cut out the top of the mini-keg to remove all of the bits and pieces inside the keg.

auxtank02.jpg


Next I layered some sandpaper over the keg and began contouring a watch casing to conform to the shape of the keg.

auxtank03.jpg


I then used a brass bristle wheel to clean off the coating on the inside and outside of the tank, and welded the casing to the keg.

auxtank04.jpg


Next step was to seal the inside around the weld with gas tank repair putty so I had lots of material to sand down later. Then I sealed around the outside with two part fiberglass which will be contoured later.

auxtank05.jpg


While the fiberglass was curing, I dug out the old petcock I had rebuilt, but couldn't get to work properly with vacuum, but works fine as an on/off. I made a template of the petcock and used it for cutting the hole in the keg, and making a plate for the inside of the keg.

auxtank06.jpg


There we go, add a couple drops of sealant during final assembly, and I am plumbed for on/off!

auxtank07.jpg


The next step in the process was to grab the donor tank and cut out the fill spout.

auxtank08.jpg


I then trimmed down the metal around the spout and welded it to the keg. Once the welds were ground smooth, I sealed the welds inside and out with some Marine JB Weld.

auxtank09.jpg


Next, I passed some primer over the prepped area.

auxtank10.jpg


The next step will be to weld on the mounting hardware, then get some tank sealant like Por-15, brass bristle brush the inside to remove the plastic lining, weld the end cover in place, and seal the tank. Once the tank is sealed, I can adhere the watch crystal back in place to finish off the fill level viewing hole.

That will have to wait until finances are freed up for side projects, so likely after I get my bike on the road.

Stay tuned for more to come!
 
Last edited:
WELCOME BACK BUDDY!!!! I missed checkin out this post man. I was kinda hopeing you were out riding so much you were too tired to post lol. I'll have to look at the pics when I get off work. I should post some pics of the tank bag I made from parts of an old flak vest.
 
:clap: Once again I love the ingenuity. I also missed these creative posts. I love the recycling of other materials. Its super cool. That aux tank is a great idea. I assume you are gonna make up some super trick mounting brackets and put it above the tail? Or do you have something much more clever in mind?

Welcome back!
 
Mac! It's great to see you back here and posting again, as you can see we all missed ya'! :D

Love that tank bag and aux fuel tank, they're great ideas, once again owning up to that screen name :clap:

Good luck in the job hunt and I hope you find something suitable soon that will give you both an income and time to keep working on the GS.
 
WELCOME BACK BUDDY!!!! I missed checkin out this post man. I was kinda hopeing you were out riding so much you were too tired to post lol. I'll have to look at the pics when I get off work. I should post some pics of the tank bag I made from parts of an old flak vest.

Tank bag from a flak vest! I love it! Pics would be great!

:clap: Once again I love the ingenuity. I also missed these creative posts. I love the recycling of other materials. Its super cool. That aux tank is a great idea. I assume you are gonna make up some super trick mounting brackets and put it above the tail? Or do you have something much more clever in mind?

Welcome back!

You're spot on, nifty mount to go over the tail. Hard part is going to be making sure it will pass the 30MPH pot hole test and not seperate and go bouncing down the road.

While I am at it, I may get off my duff and make it part of the original idea I had for a folding sissy bar setup. I have most of the materials I need, just a few parts to scavenge and I'll be able to get to work on it. Pics will be forthcoming as soon as I have some real progress to show.

wow, you really are Macguyver! Great work!

Thanks for the compliment Sir, I try.

Mac! It's great to see you back here and posting again, as you can see we all missed ya'! :D

Love that tank bag and aux fuel tank, they're great ideas, once again owning up to that screen name :clap:

Good luck in the job hunt and I hope you find something suitable soon that will give you both an income and time to keep working on the GS.

I missed you all as well! :D

I try to keep the spirit of Macgyver-ing (sp?) alive whenever I can.

I am thinking of maybe starting my own business since I am tired of working my butt off to make others wealthier. I shall see what the future brings. Good things I hope.

Will update with more when more is done.
 
Great work there Mac, good to see you back, showing us your handy work.

Good luck with the venture, I hope it takes off and is a great success for you. :clap:
 
One of my house mates had an empty Heineken keg can laying around the other day. I looked at it and immediately thought hmmmm extra gas tank....

If I ever convert my 850G into super-cross-country-touring rig I'll have to keep this in mind. Maybe make a clamp mount into the rear grab bar and the clamp bar attached to the frame pull. Would work nicely I think. Although maybe I'd use two of them to get a total capacity of almost 8 gallons on the bike. At reasonable driving conditions I should be good for at least 300-350 miles in between fill ups. :-k That sounds pretty good to me.

Maybe someday I'll steal your idea. :rolleyes:

Cheers!
 
Back
Top