• Required reading for all forum users!!!

    Welcome!
    Register to access the full functionality of the GSResources forum. Until you register and activate your account you will not have full forum access, nor will you be able to post or reply to messages.

    A note to new registrants...
    All new forum registrations must be activated via email before you have full access to the forum.

    A Special Note about Email accounts!
    DO NOT SIGN UP USING hotmail, outlook, gmx, sbcglobal, att, bellsouth or email.com. They delete our forum signup emails.

    A note to old forum members...
    I receive numerous requests from people who can no longer log in because their accounts were deleted. As mentioned in the forum FAQ, user accounts are deleted if you haven't logged in for the past 6 months. If you can't log in, then create a new forum account. If you don't get an error message, then check your email account for an activation message. If you get a message stating that the email address is already in use, then your account still exists so follow the instructions in the forum FAQ for resetting your password.

    Have you forgotten your password or have a new email address? Then read the forum FAQ for details on how to reset it.

    Any email requests for "can't log in anymore" problems or "lost my password" problems will be deleted. Read the forum FAQ and follow the instructions there - that's what we have one for...

  • Returning Visitors

    If you are a returning visitor who never received your confirmation email, then odds are your email provider is blockinig emails from our server. The only thing that can be done to get around this is you will have to try creating another forum account using an email address from another domain.

    If you are a returning visitor to the forum and can't log in using your old forum name and password but used to be able to then chances are your account is deleted. Purges of the databases are done regularly. You will have to create a new forum account and you should be all set.

New to me GS550 won't run without choke

  • Thread starter Thread starter Isoparmesan
  • Start date Start date
I

Isoparmesan

Guest
Hello everyone. I promise I used the search feature before posting this, couldn't find this specific issue. I've also read the common problems/top 10 mistakes posts.

I recently purchased a fairly well maintained, but not run for 3 years (stabilizer in the tank) 1977 GS550. It currently will start and idle with the choke on, but even slightly turning the choke off will cause it to die. With the choke on, I can slowly increase the throttle and the rpms will increase, but if I quickly increase the throttle it will die.

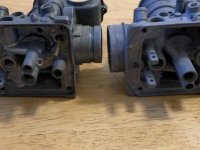
I know I need to clean the carbs. I have them off the bike, and am going to spend an evening with the ultrasonic cleaner at my motorcycle club.

When I saw the bike listed, it was listed as not running. It had been sitting for three years with stabilizer in the tank. I contacted the seller and he said he could get it running. When I first inspected the bike, it started right up, and ran without choke, but it spewed gas from one of the carbs. Seller said he could resolve that issue. He replaced the gaskets on the float bowls. When I checked it out again, he couldn't get it to start. I bought it anyway, and had it towed home.

I determined that two cylinders weren't firing due to bad spark plugs. I replaced the plugs and am now left in my current state, where it will run on full choke only.

I'm hoping just disassembling and cleaning the carbs will get it going, and from what I've read here I'm going to do the valves too. I'm also thinking that I should install an in-line fuel filter between the petcock and fuel rail.

It currently has velocity stacks on it and an aftermarket 4-2 exhaust, but has supposedly been rejetted to compensate.


Ok, enough back story. Here are my questions.


  • The service manual says NEVER TOUCH THOSE SCREWS ON THE BOTTOM OF THE CARBS. From my understanding, those are the fuel screws, and I'm aware that they are tuned specifically for each carb. I have gently screwed them all in and recorded how many turns it took, and then removed them and inspected them. They seem gunky and have sediment stuck on them. Is this likely part of my problem?


  • Related: Upon removing the fuel tank, and shaking it around a bit, I can hear sediment sloshing around in the tank. As far as I can tell, it's not rusted up on the inside aside from a bit of oxidation right below the gas cap. What's the best way to remove said sediment, and, since this particular gas tank is kind of hard to see inside, how can I tell if it's rusty?


  • If giving the carbs a good cleaning doesn't fix this, what else should I be looking at? Is there anything I need to be really careful about upon reassembling them?
 
You did the correct thing by recording the turns for each screw - if it runs after cleaning and doing the valves, great, but if it doesn't...well, you won't be able to go by the book, that's for sure. But you can worry about that when you get there.

Judging from the story, there's no point in debugging other stuff until you have the carbs rebuilt, aside from checking the valves, you must do this in any case.

I do recommend getting fresh O-Rings from rob (http://www.cycleorings.com/). Make sure the needle valves are closing properly and floats are not scraping the new gaskets (those things make them spew fuel).
 
You need to go through the Newbie Mistakes thread and rebuild those carbs. Basscliff's website has a nice VM carb rebuild tutorial (see roeme's signature for links).
 
The sediment is a big part of your issue.

You should empty the fuel tank and rinse it out with fresh gas. Inspect what comes out and post up pictures
Then, refill with fresh gas

Can you see metal inside the tank, or has it been lined?
 
The sediment is a big part of your issue.

You should empty the fuel tank and rinse it out with fresh gas. Inspect what comes out and post up pictures
Then, refill with fresh gas

Can you see metal inside the tank, or has it been lined?


It hasn't been lined as far as I can tell, but I don't think I know what a lined tank looks like. It looks like metal. Due to the shape of the tank, it's especially hard to see inside. All you can see under the gas cap is the bit that goes over the frame, which is kind of wide on this model. That spot has scuffs (presumably from fuel pumps) and has some oxidation where it's been scuffed.
 
If it had been lined you would probably notice, what they were using back in the day is quite affected by alcohol in the gas and turns quite nasty looking. A good flushing and a petcock screen inspection should be a good first step.
 
When you dismantle the carbs make a note of what jets (pilot/main) you have - maybe not standard spec. If you plan to keep the velocity stack or pods, re-jetting may be required.
 
I cleaned all the jets, and basically all the brass bits in an ultrasonic cleaner with vinegar for 20-30 min. I couldn?t dump the whole bank of carbs in (too big), and I was hesitant to separate them because I?ve heard the rubber/plastic fuel rail I have may not be reusable.

So, I went at spraying carb cleaner into all of the circuits and blasting them with compressed air while the ultrasonic cleaner was running. This worked fine for the most part with the exception of the pilot circuit on carb #2. I did finally get air to pass through though. If it?s still a problem, I know I?ll have to separate them, dunk them, and probably get a new fuel rail. There?s a guy on eBay who makes metal ones with o rings, but it?s around $50 for a set. Anyone know any other options for this, or a way to reuse the existing rail?

Next I?m going to drain the tank, try to check for rust, fresh gas, fuel filter, and then try to start it again.
 

Attachments

  • 1767D84A-2D0F-4FEE-963C-277C57ADF20B.jpg
    1767D84A-2D0F-4FEE-963C-277C57ADF20B.jpg
    19.2 KB · Views: 0
Ok, I was just watching a video of a guy reassembling the carbs, and realized I didn?t fully take the pilot jet out. It seems like it?s two pieces, but they aren?t attached like the main jet. Anyway, that is the piece I was trying to blast air/carb cleaner through. I hadn?t seen mention of it in the manual or anything. https://youtu.be/6FFWxdbd1GI the guy mentions it at 16 min.
 
You are wasting your time with carburetor cleaner. Aftermarket couplers and fuel T should be available if yours leak. You need to clean the carburetor bodies especially with the VM carburetors. Some of those passages are tiny.
 
Last edited:
I can actually only find the T-Joint on ebay. Does anyone know a place to get replacements? Has anyone reused the stock plastic ones with any success? Is there something I can seal them with? I really don't want to separate the carbs and then have a bad seal between them.

One option would be to separate just at the T-Joint, and only replace that. Then I could get 2 carbs at a time into the ultrasonic cleaner.
 
Do you have some calipers? Measure the ID of the hole in the carbs where the Tee plugs in, as well as the width of the Tee and diameter across the O-rings "bumps". I bought some beautiful brass Tees from ebay that the seller says were for VM26 carbs only the diameter across the O-rings is too small. I think these Tee's may be designed for the smaller VM22's.

Oh, and there is no way to clean the carbs without fully breaking them down and removing all the parts (fuel screw and pilot jets). Follow the rebuild tutorial and don't skip any steps. Replace all O-rings too.
 
These carbs are 42 years old and probably haven't been properly cleaned in all that time. Fully dismantle and dip for 24 hrs in Berryman's or similar - likely you will continue to have carb problems if you do not.
 
I do have some calipers. I?ll check later tonight. However, I?m less concerned about the T joint between carbs 2-3. Seems like I can find that in a few places online. I?m more concerned about the connector that goes between carbs 1-2 and 3-4.
 
I do have some calipers. I’ll check later tonight. However, I’m less concerned about the T joint between carbs 2-3. Seems like I can find that in a few places online. I’m more concerned about the connector that goes between carbs 1-2 and 3-4.

No need to worry about them too much, honestly. My O.G. '78/'79 VM22 rubber-T's and connectors are still sealing fine. I've taken them out more than once.

It's the crud which makes them spew fuel and either suffocate or starve your engine. You won't get that out without taking the carbs fully apart. Remember; vintage bike. No shortcuts nor rushing.

Have a look at my rebuild thread (blue one); I've never had carbs apart, lest rebuilt them, and I managed with the help of the forum. Like you, I hesitated taking apart the jets et cetera. At some point and after some additional reading, I took the plunge. Worked fine so far. Though, in stark contrast to your situation, I had a stock setup.
 
Ah, thanks for pointing me to your restore. Should be a good resource for me. I think mine is starting from a better overall place, which is good to see. Previous owner owned and maintained it for 17 years, but only stopped riding it three years ago. Definitely going to get some Berryman's, do a full disassemble/soak, maybe another ultrasonic pass. I also ordered new O-rings for the carbs and boots.

The goal here is to get the bike running well enough so my wife can use it. Looks like I've got my work cut out for me.
 
You do, but once you do it, there is a whole lot of life left in these bikes. The last major work I did on my bike was about eight years ago, running fine.
 
Ok. I’ve begun the process of chem dipping the carbs. I can only fit one carb and all it’s screws/jets/bowls into the can at once.

I've just removed the first one, rinsed it with water, and dried with a combination of a hair dryer and some canned air. Everything looks much cleaner, but the main carb body has developed a chalky oxidation. Is this normal? And if not have I damaged anything? Do I need to remove this somehow before rebuilding everything?

it was in the can for a little under 24h

I’ve attached a photo with the clean carb body on the right, and a yet-to-be-dipped carb on the left.
 

Attachments

  • F1A34F7C-F5F8-41DA-915C-90C6823A599E.jpg
    F1A34F7C-F5F8-41DA-915C-90C6823A599E.jpg
    17.7 KB · Views: 0
Last edited:
The oxidation will rub off with on my finger. I'm just wondering what the effects are of it coming off and flowing into the cylinder with the gas. The instructions for the chem dip mention treating low alloy metals with penetrating oil, but I also don't necessarily want that mixing with the gas.

I'm probably being paranoid.
 
Back
Top